Page 2496 of 3039

Symptom Possible Causes Action outside (but opens from the
inside) GO to Pinpoint Test A. Door(s) will not unlatch/open when
using inside door handle
Child lock(s) engaged
Interior door handle
condition/installation
Interior release cable disconnected
from interior door handle or door
latch
Check that the child locks are
disengaged
Check the interior door handle
condition and installation
Check the condition and security of
the interior release cable
Single Door Will Not Open From
The Inside (but opens from the
outside) GO to Pinpoint Test B. Door(s) will not lock/unlock from key
fob, key or internal lock switch
Wiring harness/connectors
Central junction box (CJB)
Door lock switch
Cable fault
Check for relevant stored DTCs
Once any DTC related faults have
been rectified continue with the
diagnostic steps below
No lock / unlock function from
key-fob GO to Pinpoint Test C. Door ajar or miss lock signal at
message centre when door(s) are
closed or alarm triggering
Wiring harness
Instrument cluster
Incorrect striker
alignment/adjustment
Ajar switch circuit short circuit to
ground
Ajar switch failure
Latch Mounted Door Ajar Switch
Test GO to Pinpoint Test D. DTC Index
For a list of Diagnostic Trouble Codes (DTCs) that could be logged on this vehicle, please refer to Section 100-00.
REFER to: Communications Network (418-00, Diagnosis and Testing) /
Locks, Latches and Entry Systems - DTC: With (501-14, Diagnosis and Testing).
Pinpoint Test
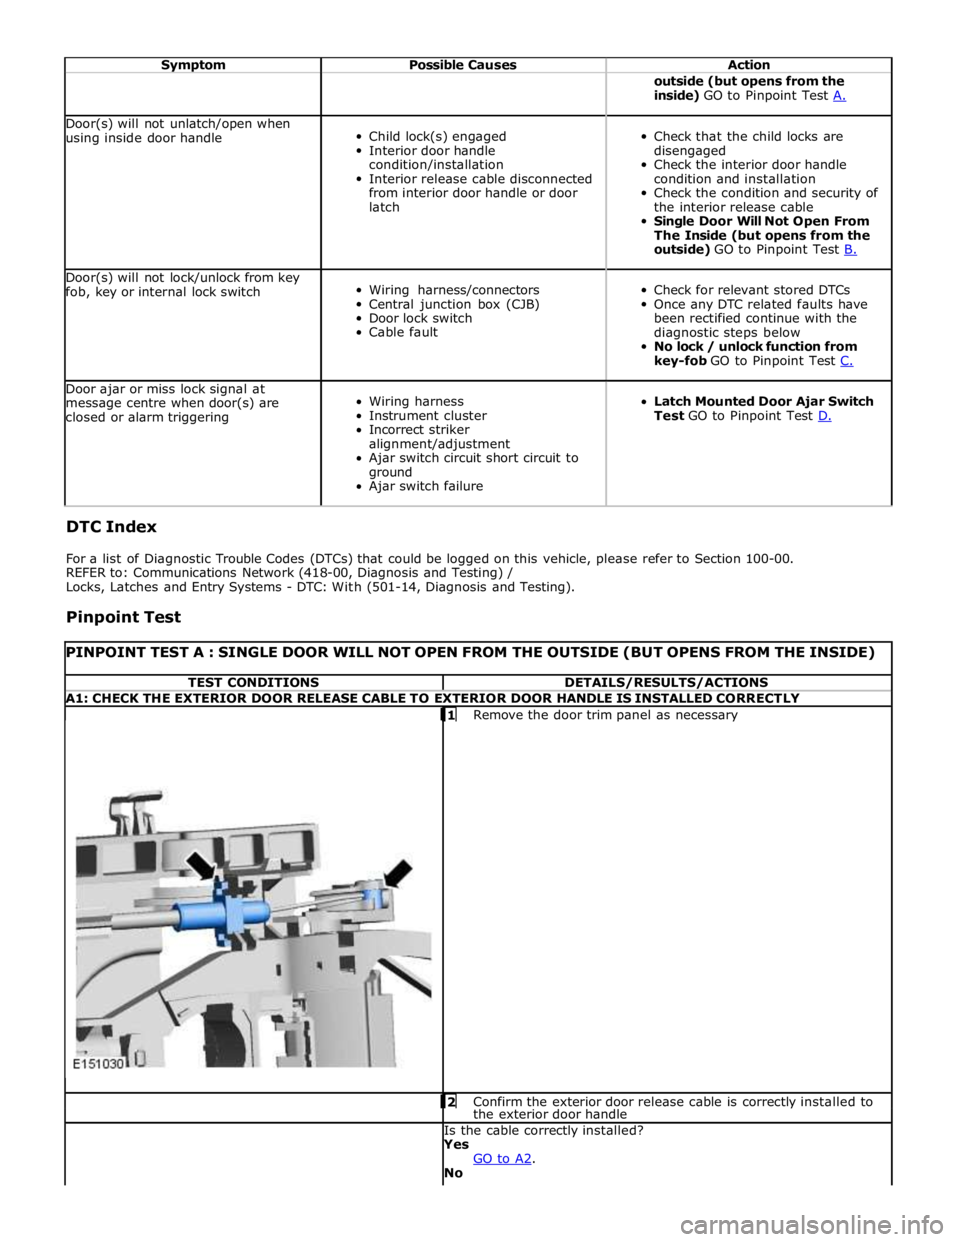
PINPOINT TEST A : SINGLE DOOR WILL NOT OPEN FROM THE OUTSIDE (BUT OPENS FROM THE INSIDE) TEST CONDITIONS DETAILS/RESULTS/ACTIONS A1: CHECK THE EXTERIOR DOOR RELEASE CABLE TO EXTERIOR DOOR HANDLE IS INSTALLED CORRECTLY
1 Remove the door trim panel as necessary 2 Confirm the exterior door release cable is correctly installed to the exterior door handle Is the cable correctly installed?
Yes
GO to A2. No
Page 2505 of 3039

Body wiring harness / connectors
Door wiring harness / connectors
Alarm control module
Central junction box (CJB)
Door Latch ajar switch
To investigate the functioning of the door ajar switch contained within the door latch, to prove or eliminate the door
latch mounted door ajar switch as the root cause, follow the process below. This will prevent the unnecessary replacement of
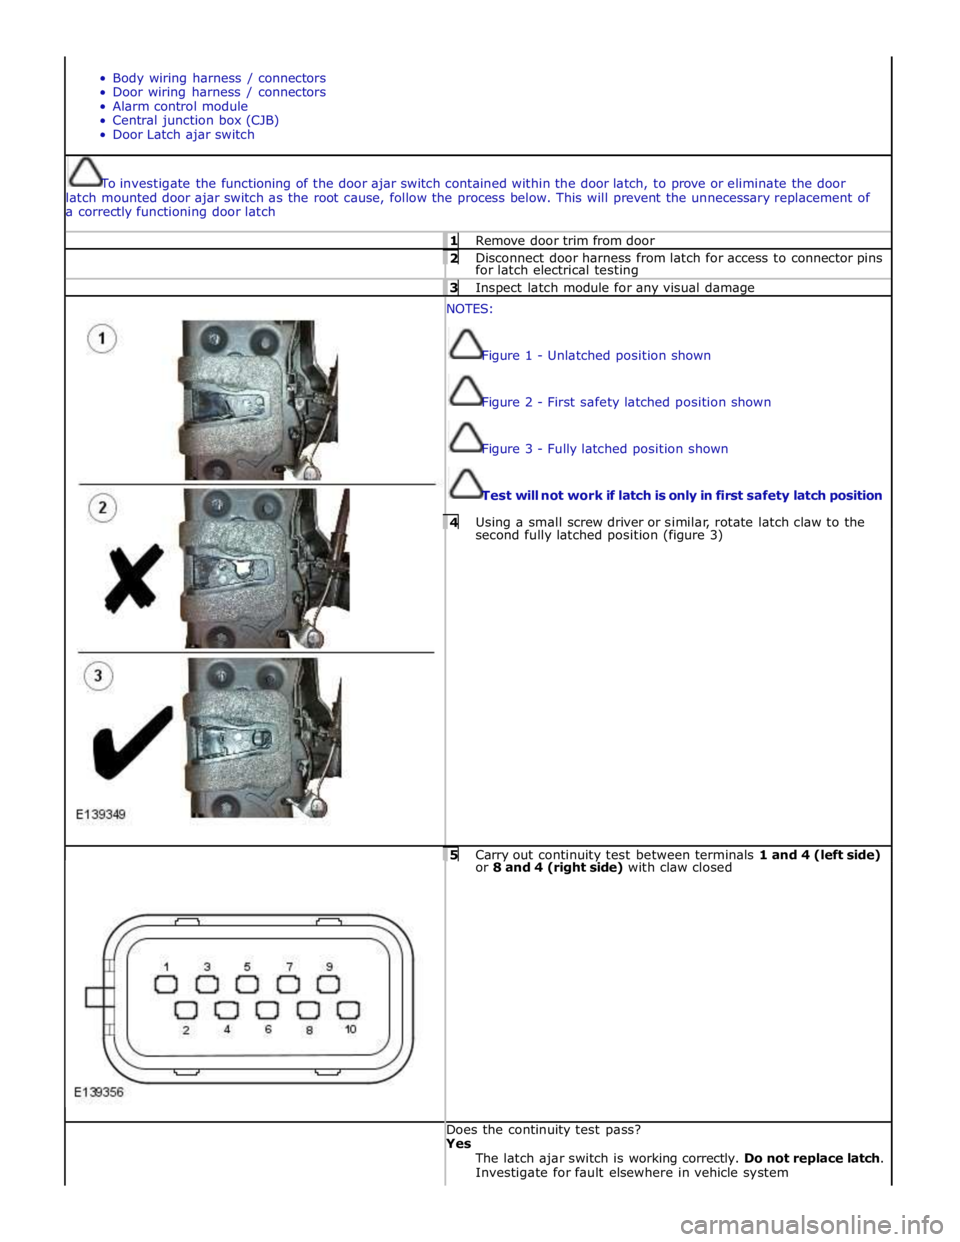
a correctly functioning door latch 1 Remove door trim from door 2 Disconnect door harness from latch for access to connector pins for latch electrical testing 3 Inspect latch module for any visual damage NOTES:
Figure 1 - Unlatched position shown
Figure 2 - First safety latched position shown
Figure 3 - Fully latched position shown
Test will not work if latch is only in first safety latch position 4 Using a small screw driver or similar, rotate latch claw to the second fully latched position (figure 3)
5 Carry out continuity test between terminals 1 and 4 (left side) or 8 and 4 (right side) with claw closed Does the continuity test pass? Yes
The latch ajar switch is working correctly. Do not replace latch.
Investigate for fault elsewhere in vehicle system
Page 2510 of 3039
3. CAUTION: Take extra care not to damage the wiring
harnesses.
NOTE: Secure the connection in the service position.
4.
Page 2511 of 3039
Installation
1. CAUTION: Make sure that the wiring harnesses are
correctly located.
To install, reverse the removal procedure.
Page 2515 of 3039
3. CAUTION: Take extra care not to damage the wiring
harnesses.
NOTE: Secure the connection in the service position.
4.
Page 2520 of 3039
11.
12.
13.
14. NOTE: Note the position of the wiring harness.
NOTE: Some variation in the illustrations may occur,
but the essential information is always correct.
Page 2530 of 3039
7. CAUTION: Note of the routing of the wiring harnesses.
8. NOTE: Do not disassemble further if the component is
removed for access only.
Page 2532 of 3039
Installation
12.
13.
CAUTION: Note of the routing of the wiring harnesses.
1. CAUTION: Make sure that the wiring harnesses are correctly
located.
To install, reverse the removal procedure.