Page 17 of 286

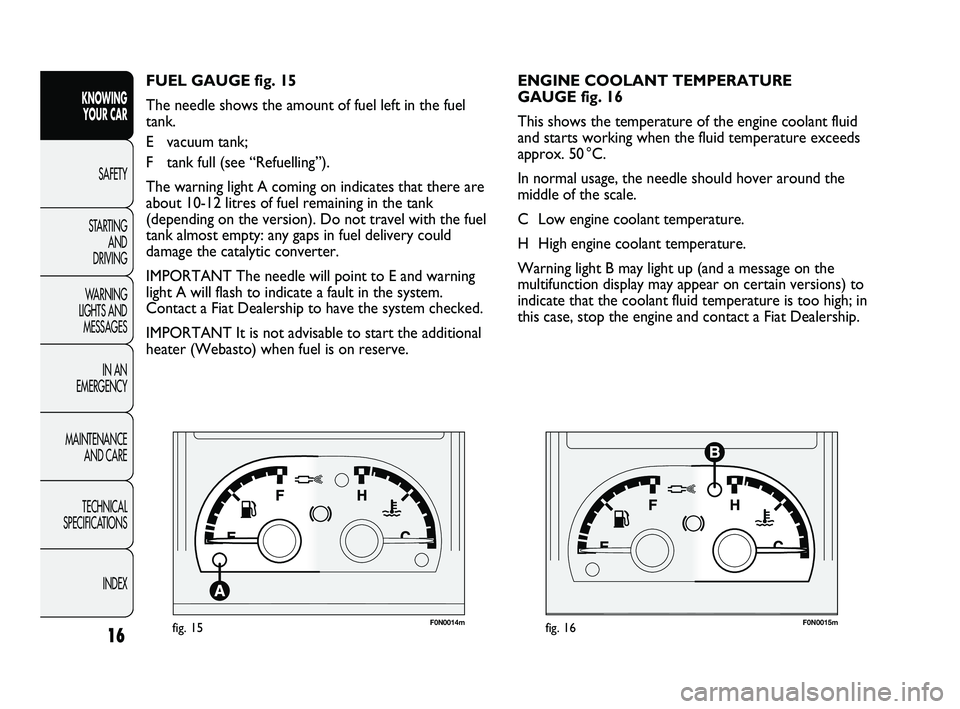
F0N0014mfig. 15F0N0015mfig. 16
ENGINE COOLANT TEMPERATURE
GAUGE fig. 16
This shows the temperature of the engine coolant fluid
and starts working when the fluid temperature exceeds
approx. 50 °C.
In normal usage, the needle should hover around the
middle of the scale.
C Low engine coolant temperature.
H High engine coolant temperature.
Warning light B may light up (and a message on the
multifunction display may appear on certain versions) to
indicate that the coolant fluid temperature is too high; in
this case, stop the engine and contact a Fiat Dealership. FUEL GAUGE fig. 15
The needle shows the amount of fuel left in the fuel
tank.
E vacuum tank;
F tank full (see “Refuelling”).
The warning light A coming on indicates that there are
about 10-12 litres of fuel remaining in the tank
(depending on the version). Do not travel with the fuel
tank almost empty: any gaps in fuel delivery could
damage the catalytic converter.
IMPORTANT The needle will point to E and warning
light A will flash to indicate a fault in the system.
Contact a Fiat Dealership to have the system checked.
IMPORTANT It is not advisable to start the additional
heater (Webasto) when fuel is on reserve.
16
KNOWING
YOUR CAR
SAFETY
STARTING
AND
DRIVING
WARNING
LIGHTS AND
MESSAGES
IN AN
EMERGENCY
MAINTENANCE
AND CARE
TECHNICAL
SPECIFICATIONS
INDEX
001-036 DUCATO LUM EN 7ed 6/21/10 2:08 PM Page 16
Page 18 of 286

17
KNOWING
YOUR CAR
SAFETY
STARTING
AND
DRIVING
WARNING
LIGHTS AND
MESSAGES
IN AN
EMERGENCY
MAINTENANCE
AND CARE
TECHNICAL
SPECIFICATIONS
INDEX
If the needle reaches the red area, stop
the engine immediately and contact
a Fiat Dealership.The failure of the fifth symbol to come on should not be
taken as a fault or the fact that there is not enough oil in
the sump.
IMPORTANT To find out the correct oil quantity,
always check using the dipstick (see paragraph
“Checking levels” in the section “Maintenance and
care”).
After a few seconds, the symbol display indicating the
amount of engine oil disappears and:
❒if the next service is due, the time to the next
service is displayed and the warning light õlights up
on the instrument panel. When the service date is
reached, the display shows some dashes;
❒then, if it is nearly time to change the engine oil, the
time to the next oil change is shown on the top row
of the display and the message “OIL” appears in the
lower part of the display. When the service date is
reached, the display shows five dashes.
Versions with multifunction display
When the ignition key is turned to MAR-ON the display
shows the oil level on the first row by turning five
symbols on/off. ENGINE OIL LEVEL GAUGE
(for versions/markets where provided)
The gauge provides a graphic indication of the level of
oil in the engine.
Versions with digital display
When the ignition key is turned to MAR-ON, the
quantity of oil in the engine is displayed by means of five
symbols.
F0N1017g
The symbols are gradually turned off to indicate
a reduction in the oil level.
If the oil level is lower than the minimum required value
and a top-up is required, the display shows 5 dashes
intermittently.
Four or five symbols light up to indicate a sufficient level
of oil in the sump.
F0N1018g
001-036 DUCATO LUM EN 7ed 6/21/10 2:08 PM Page 17
Page 19 of 286

F0N0016mfig. 17
DIGITAL DISPLAY
STANDARD SCREEN fig. 17
The standard screen shows the following information:
A Headlamp alignment position (only with dipped
headlamps on).
B Time (always displayed, even with the key extracted
and the front doors closed);
C Odometer (distance covered in kilometres or miles)
and TRIP data.
NOTE With key removed (when opening one of the
front doors) the display turns on and shows the time
and km or miles covered for a few seconds. The symbols are gradually turned off as the oil level
drops.
Four or five symbols light up to indicate a sufficient level
of oil in the sump. If the fifth symbol is not lit, this does
not indicate a fault or that insufficient oil is present in
the sump.
If the oil level is lower than the minimum required value,
the display shows a dedicated message indicating
minimum engine oil level and the need for a top-up.
IMPORTANT To find out the correct oil quantity,
always check using the dipstick (see paragraph
“Checking levels” in the section “Maintenance and
care”).
After a few seconds, the symbol display indicating the
amount of engine oil disappears and:
❒when the next scheduled servicing is near, the time
to the next service is displayed and the warning light
õlights up on the instrument panel. When the
service date is reached, the display shows
a dedicated message;
❒then, if it is nearly time to change the engine oil, the
time to the next oil change is shown on the top row
of the display. When the service interval has expired
a dedicated warning will be shown on the display.
18
KNOWING
YOUR CAR
SAFETY
STARTING
AND
DRIVING
WARNING
LIGHTS AND
MESSAGES
IN AN
EMERGENCY
MAINTENANCE
AND CARE
TECHNICAL
SPECIFICATIONS
INDEX
001-036 DUCATO LUM EN 7ed 6/21/10 2:08 PM Page 18
Page 20 of 286

19
KNOWING
YOUR CAR
SAFETY
STARTING
AND
DRIVING
WARNING
LIGHTS AND
MESSAGES
IN AN
EMERGENCY
MAINTENANCE
AND CARE
TECHNICAL
SPECIFICATIONS
INDEX
fig. 18
SETUP MENU fig. 19
The menu comprises a series of functions arranged in
a cycle which can be selected through buttons
▲and▼
to access the different select operations and settings
(setup) given in the following paragraphs.
The setup menu can be activated by briefly pressing
button
MODE.
By pressing buttons ▲and ▼you can scroll through the
setup menu options.
Handling modes differ with each other according to the
characteristic of the option selected.
Selecting a menu option
– briefly press button
MODEto select the menu option
that needs to be changed;
– press buttons ▲and ▼(by single presses) to select
the new setting;
– Briefly press button
MODEto store the new setting
and at the same time go back to the previously selected
menu option.
Selecting “Set Clock”
– briefly press button
MODEto select the first value to
change (hours);
– press buttons ▲and ▼(by single presses) to select
the new setting;
– briefly press button
MODEto store the new setting
and go to the next setup menu option (minutes);
– after setting the values with the same procedure, go
back to the previous menu item. CONTROL BUTTONS fig. 18
▲To scroll the displayed menu and the related options
upwards or to increase the value displayed.
MODE Press briefly to enter the menu and/or go to
the next screen or to confirm the required
menu option. Hold down to go back to the
standard screen.
▼To scroll the displayed menu and the related options
downwards or to decrease the value displayed.
NOTE Buttons
▲and▼activate different functions
according to the following situations:
Setup menu
– within the menu, they allow you to scroll up and
down through the options;
– during setting operations they allow an increase or
decrease.
001-036 DUCATO LUM EN 7ed 6/21/10 2:08 PM Page 19
Page 21 of 286
20
KNOWING
YOUR CAR
SAFETY
STARTING
AND
DRIVING
WARNING
LIGHTS AND
MESSAGES
IN AN
EMERGENCY
MAINTENANCE
AND CARE
TECHNICAL
SPECIFICATIONS
INDEX
From the standard screen, briefly press button MODE to start browsing. Press ▲or ▼to browse within the
menu.
NOTEOnly the short menu can be accessed while the vehicle is moving for reasons of safety (“SPEED” setting).
Stop the vehicle to access the full menu.
fig. 19
F0N1007g
Hold down the button MODE:
– to quit the setup menu if you are in the menu;
– to quit the displayed menu if you are setting an option;
– to save only the changes stored by the user (and
confirmed by pressing button MODE).The environment of the Set Up menu is timed; when
the menu is exited due to expiry of the time allowed,
only the changes already stored by the user (confirmed
beforehand by a brief press of the button) will be saved.
001-036 DUCATO LUM EN 7ed 6/21/10 2:08 PM Page 20
Page 22 of 286

21
KNOWING
YOUR CAR
SAFETY
STARTING
AND
DRIVING
WARNING
LIGHTS AND
MESSAGES
IN AN
EMERGENCY
MAINTENANCE
AND CARE
TECHNICAL
SPECIFICATIONS
INDEX
Setting the clock (Hour)
This function is used to set the clock.
To set the required unit proceed as follows:
– briefly press button MODE: the display shows the
“hours” flashing;
– press button ▲or ▼to adjust;
– briefly press button MODE: “minutes” start to flash
on the display;
– press button ▲or ▼to adjust;
– press the MODE button briefly to return to the menu
screen or press the button for longer to return to the
standard screen without memorising. Setting a speed limit (SPEEd)
With this function it is possible to set the vehicle speed
limit (km/h or mph); when this limit is exceeded the
driver is immediately alerted (see section “Warning
lights and messages”).
To set the desired speed limit, proceed as follows:
– briefly press button MODE, the display will show the
wording (SPEED) and the unit (km/h) or (mph)
previously set;
– press button▲or ▼to select activation (On) or
deactivation (
OFF) of the speed limit;
– if the function has been activated (On), press buttons
▲or ▼to select the required speed limit and then
press MODE to confirm.
NOTEThe speed may be set in the range from 30 to
200 km/h, or from 20 to 125 mph according to the
previously chosen unit (see “Setting the distance unit”)
described below. The setting will increase/decrease by
five units each time button ▲/▼is pressed. Hold down
button ▲/▼to increase/decrease the setting rapidly.
Complete the setting by briefly pressing the button
when you approach the required value.
– press the MODE button briefly to return to the menu
screen or press the button for longer to return to the
standard screen without memorising.
001-036 DUCATO LUM EN 7ed 6/21/10 2:08 PM Page 21
Page 23 of 286

Setting the distance unit (Unit)
With this function it is possible to set the unit.
To set the required unit proceed as follows:
– briefly press button MODE, the display will show the
wording (Unit) and the previously set unit (km) or (mi);
– press button ▲or ▼to select the required unit of
measurement.
– press the MODE button briefly to return to the menu
screen or press the button for longer to return to the
standard screen without memorising. Adjusting the buzzer volume (BUZZ)
This function enables the adjustment of the volume of
the buzzer accompanying any failure/warning indication.
To set the desired volume, proceed as
follows:
– briefly press button MODE, the display will show the
wording (bUZZ);
– press ▲or ▼to select the required volume
(adjustable over eight levels).
– press the MODE button briefly to return to the menu
screen or press the button for longer to return to the
standard screen without memorising.
22
KNOWING
YOUR CAR
SAFETY
STARTING
AND
DRIVING
WARNING
LIGHTS AND
MESSAGES
IN AN
EMERGENCY
MAINTENANCE
AND CARE
TECHNICAL
SPECIFICATIONS
INDEX
001-036 DUCATO LUM EN 7ed 6/21/10 2:08 PM Page 22
Page 24 of 286

23
KNOWING
YOUR CAR
SAFETY
STARTING
AND
DRIVING
WARNING
LIGHTS AND
MESSAGES
IN AN
EMERGENCY
MAINTENANCE
AND CARE
TECHNICAL
SPECIFICATIONS
INDEX
Front passenger’s airbag and side bag
activation/deactivation (BAG P) fig. 20
(for versions/markets, where provided)
This function is used to activate/deactivate the front
passenger’s airbag.
Proceed as follows:
❒press button MODE: the display shows messages
(BAG P OFF) (to deactivate) or the message
(BAG P On) (to activate). Press the buttons ▲or ▼
followed by button MODE again;
❒the confirmation request message will be displayed;
❒press buttons ▲or ▼to select either Yes (to
confirm activation/deactivation) or No (to abort);
❒briefly press button MODE : the display shows
a message confirming the selected value. Now,
go back to the menu screen or press the button for
a prolonged time to go back to the standard screen
without storing the settings.
MODE
MODE
MODE
▼ ▲
▼ ▲
▼ ▲
▼ ▲
F0N1001g
F0N1003gF0N1002g F0N1005g
F0N1006g F0N1002g
F0N1003g
fig. 20
001-036 DUCATO LUM EN 7ed 6/21/10 2:08 PM Page 23