2010 CHEVROLET EQUINOX fuses
[x] Cancel search: fusesPage 5 of 394
Introduction v
Notice:This means there is
something that could result in
property or vehicle damage. This
would not be covered by the
vehicle's warranty.
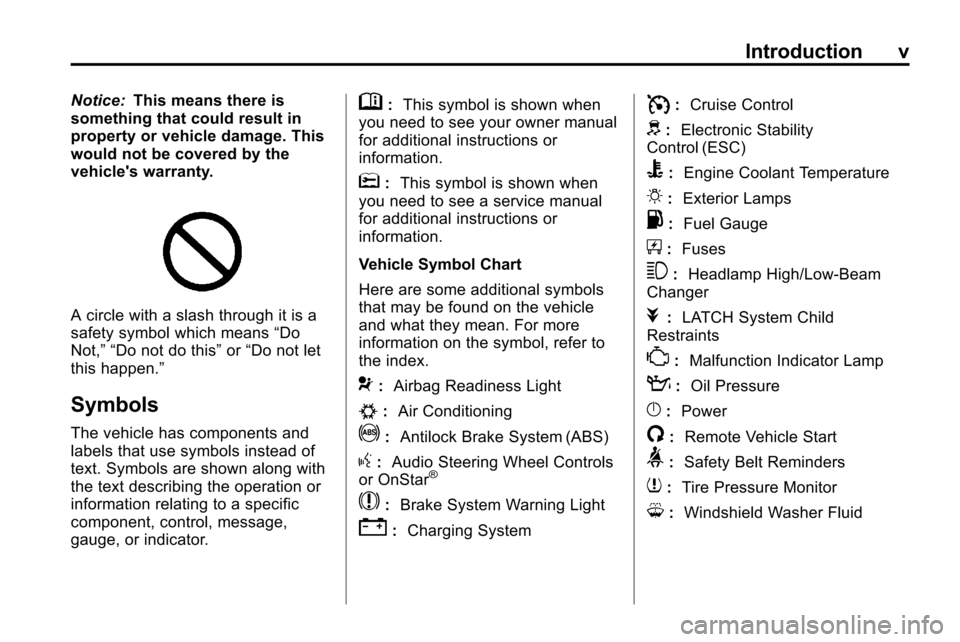
A circle with a slash through it is a
safety symbol which means “Do
Not,” “Do not do this” or“Do not let
this happen.”
Symbols
The vehicle has components and
labels that use symbols instead of
text. Symbols are shown along with
the text describing the operation or
information relating to a specific
component, control, message,
gauge, or indicator.
M: This symbol is shown when
you need to see your owner manual
for additional instructions or
information.
*: This symbol is shown when
you need to see a service manual
for additional instructions or
information.
Vehicle Symbol Chart
Here are some additional symbols
that may be found on the vehicle
and what they mean. For more
information on the symbol, refer to
the index.
9: Airbag Readiness Light
#:Air Conditioning
!:Antilock Brake System (ABS)
g:Audio Steering Wheel Controls
or OnStar®
$: Brake System Warning Light
":Charging System
I:Cruise Control
d:Electronic Stability
Control (ESC)
B: Engine Coolant Temperature
O:Exterior Lamps
.:Fuel Gauge
+:Fuses
3: Headlamp High/Low-Beam
Changer
j: LATCH System Child
Restraints
*: Malfunction Indicator Lamp
::Oil Pressure
}:Power
/:Remote Vehicle Start
>:Safety Belt Reminders
7:Tire Pressure Monitor
M:Windshield Washer Fluid
Page 96 of 394
4-10 Instruments and Controls
Clock (Without Date
Display)
The infotainment system controls,
located on the instrument panel, are
used to access the time and date
settings through the menu system.
SeeOperation
on page 6‑7for
information about how to use the
menu system.
Setting the Time
1. Turn the infotainment system ON.
2. Press the CONFIG button and select Time Settings, or press
the
Hbutton.
3. Select Set Time.
4. Turn the MENU/SEL knob to adjust the highlighted value.
5. Press the MENU/SEL knob to select the next value. 6. To save the time and return to
the Time Settings menu, press
the
0BACK button at any time
or press the SELECT button
after adjusting the minutes.
Setting the 12/24 Hour Format
1. Turn the infotainment system ON.
2. Press the CONFIG button and select Time Settings, or press
the
Hbutton.
3. Highlight 12/24 Hour Format.
4. Press the MENU/SEL knob to select the 12 hour or 24 hour
display format.
Power Outlets
The accessory power outlets can
be used to connect electrical
equipment, such as a cellular
phone.
There are four accessory power
outlets in the following locations,
below the CD slot, inside the center console storage, on the rear of the
center console storage, and in the
rear cargo compartment.
To use the outlets, remove the
cover. Close the outlet cover, when
not in use.
Notice:
If electrical devices are
left plugged into a power outlet,
the battery may drain causing the
vehicle not to start or damage to
the battery. This would not be
covered by the vehicle warranty.
Always unplug all electrical
devices when turning off the
vehicle.
Certain electrical accessories
may not be compatible with the
accessory power outlets and could
result in blown vehicle or adapter
fuses. If you experience a problem,
see your dealer for additional
information on the accessory power
outlet.
Page 129 of 394
Lighting 5-3
Turn and Lane-Change
Signals
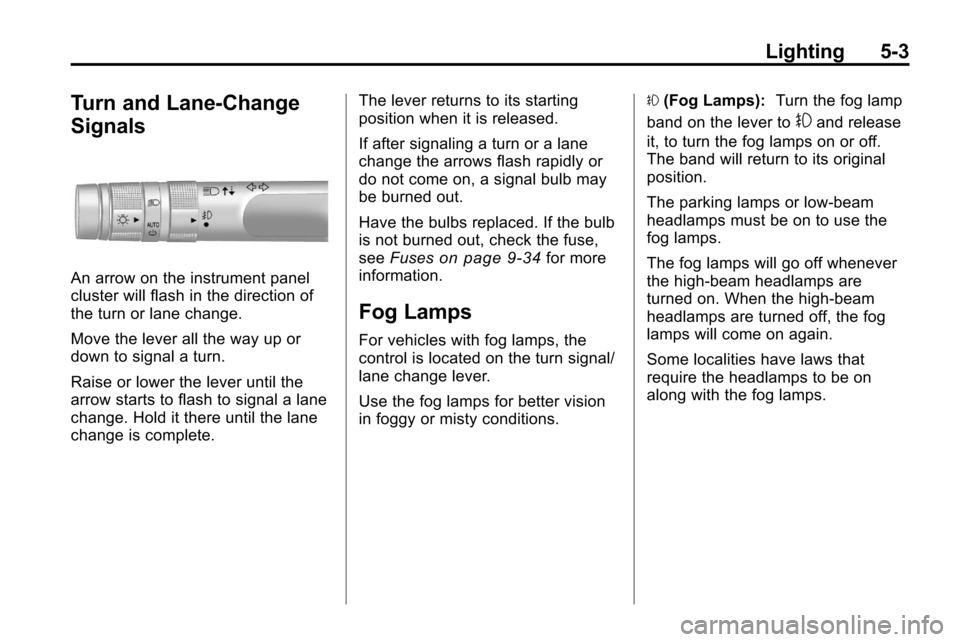
An arrow on the instrument panel
cluster will flash in the direction of
the turn or lane change.
Move the lever all the way up or
down to signal a turn.
Raise or lower the lever until the
arrow starts to flash to signal a lane
change. Hold it there until the lane
change is complete.The lever returns to its starting
position when it is released.
If after signaling a turn or a lane
change the arrows flash rapidly or
do not come on, a signal bulb may
be burned out.
Have the bulbs replaced. If the bulb
is not burned out, check the fuse,
see
Fuses
on page 9‑34for more
information.
Fog Lamps
For vehicles with fog lamps, the
control is located on the turn signal/
lane change lever.
Use the fog lamps for better vision
in foggy or misty conditions. #
(Fog Lamps): Turn the fog lamp
band on the lever to
#and release
it, to turn the fog lamps on or off.
The band will return to its original
position.
The parking lamps or low‐beam
headlamps must be on to use the
fog lamps.
The fog lamps will go off whenever
the high-beam headlamps are
turned on. When the high‐beam
headlamps are turned off, the fog
lamps will come on again.
Some localities have laws that
require the headlamps to be on
along with the fog lamps.
Page 269 of 394
Vehicle Care 9-1
Vehicle Care
General Information
General Information . . . . . . . . . . . 9-3
California Proposition65 Warning . . . . . . . . . . . . . . . . . . 9-3
California Perchlorate Materials Requirements . . . . . . . . . . . . . . . 9-3
Accessories and Modifications . . . . . . . . . . . . . . . . 9-4
Vehicle Checks
Doing Your OwnService Work . . . . . . . . . . . . . . . . 9-4
Hood . . . . . . . . . . . . . . . . . . . . . . . . . . 9-5
Engine Compartment Overview . . . . . . . . . . . . . . . . . . . . 9-6
Engine Cover . . . . . . . . . . . . . . . . . 9-9
Engine Oil . . . . . . . . . . . . . . . . . . . 9-10
Engine Oil Life System . . . . . . . 9-11
Automatic Transmission Fluid . . . . . . . . . . . . . . . . . . . . . . . 9-12 Engine Air Cleaner/Filter . . . . . 9-13
Cooling System . . . . . . . . . . . . . . 9-14
Engine Coolant . . . . . . . . . . . . . . 9-15
Engine Overheating . . . . . . . . . 9-18
Power Steering Fluid (2.4L
L4 Engine) . . . . . . . . . . . . . . . . . 9-20
Power Steering Fluid (3.0L V6 Engine) . . . . . . . . . . . . . . . . . 9-20
Washer Fluid . . . . . . . . . . . . . . . . 9-21
Brakes . . . . . . . . . . . . . . . . . . . . . . . 9-21
Brake Fluid . . . . . . . . . . . . . . . . . . 9-22
Battery . . . . . . . . . . . . . . . . . . . . . . . 9-24
All-Wheel Drive . . . . . . . . . . . . . . 9-24
Starter Switch Check . . . . . . . . 9-25
Automatic Transmission Shift Lock Control System
Check . . . . . . . . . . . . . . . . . . . . . . 9-25
Ignition Transmission Lock Check . . . . . . . . . . . . . . . . . . . . . . 9-25
Park Brake and P (Park) Mechanism Check . . . . . . . . . 9-26
Wiper Blade Replacement . . . 9-26
Headlamp Aiming
Headlamp Aiming . . . . . . . . . . . . 9-27
Bulb Replacement
Bulb Replacement . . . . . . . . . . . 9-30
Headlamps, Front Turn Signal, Sidemarker, and Parking
Lamps . . . . . . . . . . . . . . . . . . . . . . 9-30
Fog Lamps . . . . . . . . . . . . . . . . . . 9-31
Taillamps, Turn Signal, Sidemarker, Stoplamps,
and Back-Up Lamps . . . . . . . 9-32
License Plate Lamp . . . . . . . . . . 9-33
Replacement Bulbs . . . . . . . . . . 9-34
Electrical System
Fuses . . . . . . . . . . . . . . . . . . . . . . . . 9-34
Engine Compartment Fuse Block . . . . . . . . . . . . . . . . . . . . . . . 9-34
Instrument Panel Fuse Block . . . . . . . . . . . . . . . . . . . . . . . 9-37
Page 302 of 394
9-34 Vehicle Care
Replacement Bulbs
Exterior LampBulb
Number
Back-Up Lamp 921
Fog Lamp Front H11
Headlamp
High Beam HB3
Headlamp
Low Beam H11
License Plate Lamp W5WLL
Parking Lamp/Turn
Signal Front T20
Sidemarker Front
and Rear 194
Taillamp/Turn Signal
Lamp/Stop Lamp 3157K
For replacement bulbs not listed
here, contact your dealer.
Electrical System
Fuses
The wiring circuits in the vehicle are
protected from short circuits by
fuses. This greatly reduces the
chance of damage caused by
electrical problems.
Look at the silver-colored band
inside the fuse. If the band is broken
or melted, replace the fuse. Be sure
to replace a bad fuse with a new
one of the identical size and rating.
There are two fuse blocks in the
vehicle: one in the engine
compartment and one in the
instrument panel.
There is a fuse puller located in the
engine compartment fuse block.
See Engine Compartment Fuse
Block
on page 9‑34. It can be used
to easily remove fuses from the fuse
block.
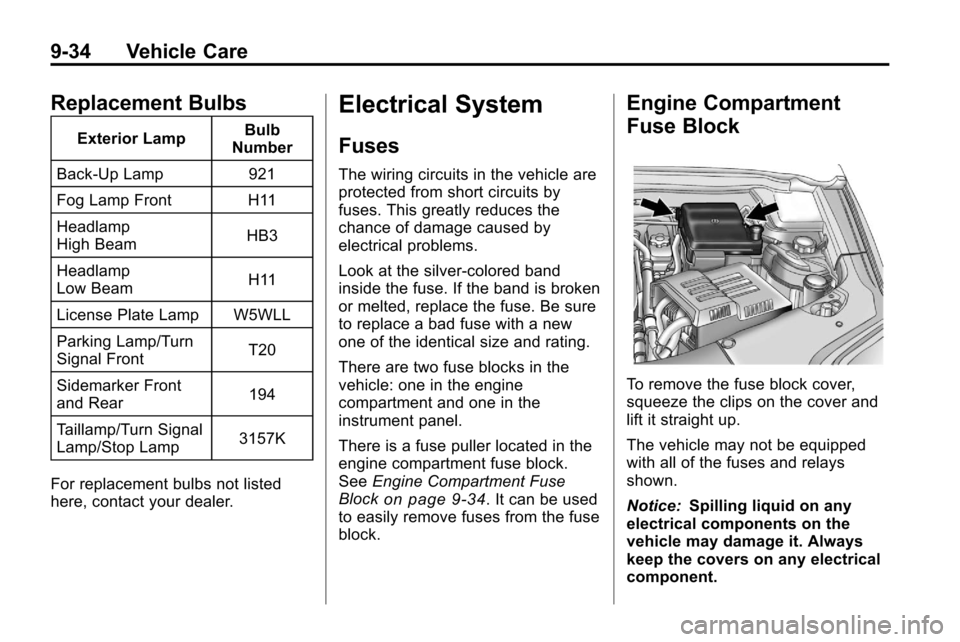
Engine Compartment
Fuse Block
To remove the fuse block cover,
squeeze the clips on the cover and
lift it straight up.
The vehicle may not be equipped
with all of the fuses and relays
shown.
Notice: Spilling liquid on any
electrical components on the
vehicle may damage it. Always
keep the covers on any electrical
component.
Page 303 of 394
Vehicle Care 9-35
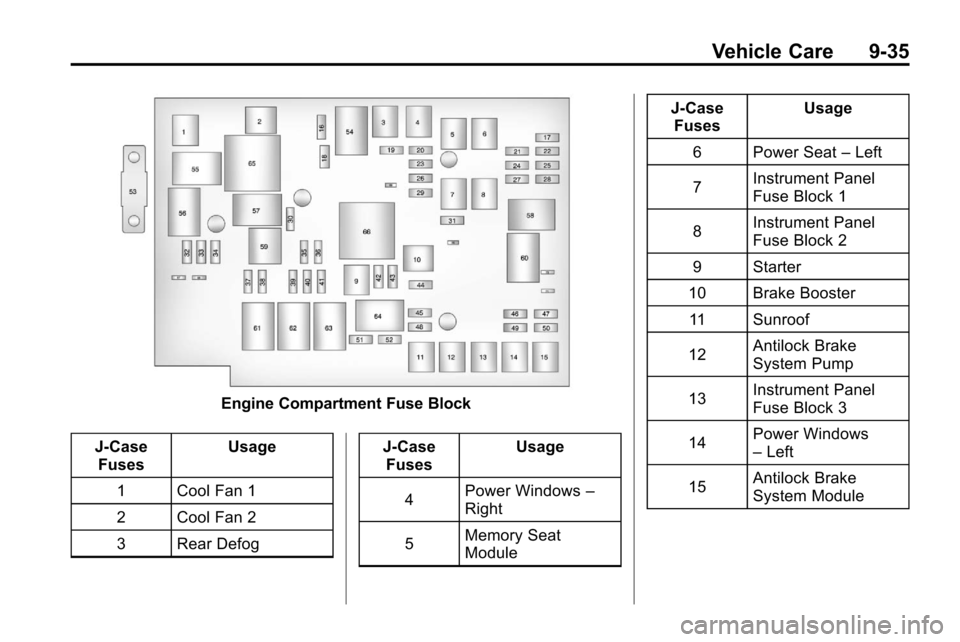
Engine Compartment Fuse Block
J-Case Fuses Usage
1 Cool Fan 1
2 Cool Fan 2
3 Rear Defog J-Case
Fuses Usage
4 Power Windows
–
Right
5 Memory Seat
Module J-Case
Fuses Usage
6 Power Seat –Left
7 Instrument Panel
Fuse Block 1
8 Instrument Panel
Fuse Block 2
9 Starter
10 Brake Booster 11 Sunroof
12 Antilock Brake
System Pump
13 Instrument Panel
Fuse Block 3
14 Power Windows
–
Left
15 Antilock Brake
System Module
Page 304 of 394
9-36 Vehicle Care
Mini Fuses Usage16 Transmission
Control Module
Battery
17 Trailer Parking Light
18 Engine Control
Module Battery
19 Heated Mirror
20 Trailer Left
21 Lift Gate Module
22 Power Lumbar
23 Trailer Right
24 Canister Vent
25 Memory Mirror
Module
26 Regulated Voltage
Control Battery
Sensor
27 Rear Accessory
Power Outlet Mini Fuses Usage
28 Wiper
29 Rear Wiper
30 Air Conditioning
Compressor
31 Rear Latch
32 Horn
33 Right High‐Beam
Headlamp
34 Left High‐Beam
Headlamp
35 Ignition Even Coil
36 Ignition Odd Coil
37 Windshield Washer
38 Front Fog Lamps
39 Post Catalytic
Converter Oxygen
Sensor
40 Engine Control
Module Mini Fuses Usage
41 Pre–Catalytic
Converter Oxygen
Sensor
42 Transmission
Control Module
43 Mirror
44 Chassis Control
Module Ignition
45 Spare
46 Rear Drive Module
47 Lift Gate Module
Logic
48 Instrument Panel
Fuse Block Ignition
49 Heated Seat –Front
50 Chassis Control
Module
51 Engine Control
Module
52 Rear Vision Camera
Page 305 of 394
Vehicle Care 9-37
Midi Fuse Usage53 Electric Power
Steering
Micro
Relays Usage
54 Rear Defogger
55 Cooling Fan Low
56 Head Lamp
High Beam
57 Cooling Fan Control
58 Wiper On/Off
Control
59 Air Conditioning
Compressor
60 Wiper Speed
61 Fog Lamp
62 Engine Control
63 Starter
64 Run/Crank Mini Relays Usage
65 Cooling Fan High
66 Brake Booster
Instrument Panel Fuse
Block
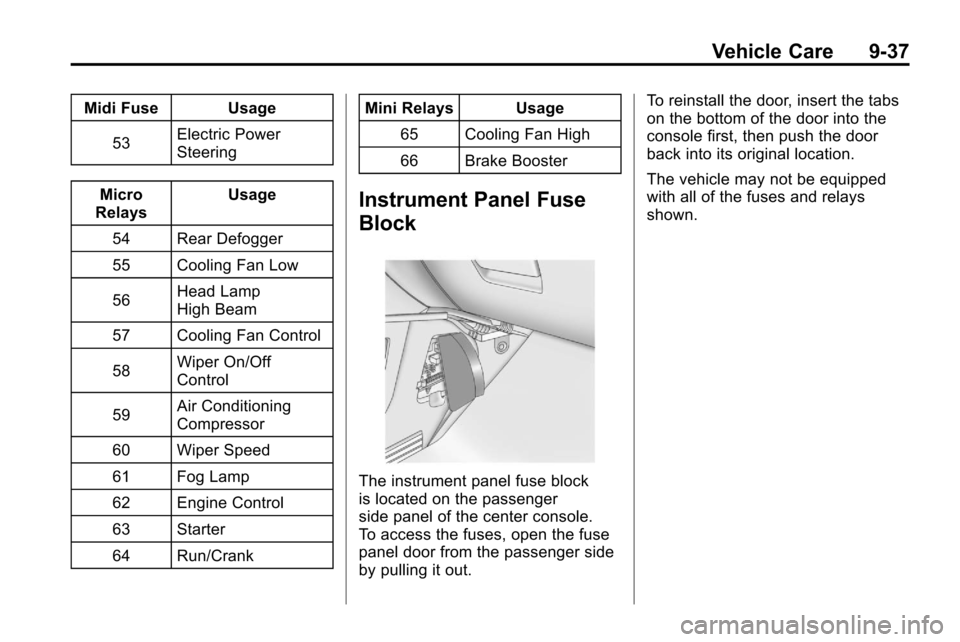
The instrument panel fuse block
is located on the passenger
side panel of the center console.
To access the fuses, open the fuse
panel door from the passenger side
by pulling it out. To reinstall the door, insert the tabs
on the bottom of the door into the
console first, then push the door
back into its original location.
The vehicle may not be equipped
with all of the fuses and relays
shown.