2010 CHEVROLET EQUINOX glove box
[x] Cancel search: glove boxPage 79 of 394

Seats and Restraints 2-53
6. If the child restraint has a toptether, follow the child restraint
manufacturer's instructions
regarding the use of the top
tether. See Lower Anchors and
Tethers for Children (LATCH
System)
on page 2‑45for more
information.
7. Push and pull the child restraint in different directions to be sure
it is secure.
To remove the child restraint,
unbuckle the vehicle safety belt and
let it return to the stowed position.
If the top tether is attached to a top
tether anchor, disconnect it.
Armrest Retaining Strap
{WARNING
A rear center armrest that is not
properly stowed and secured
could fall forward during a sudden
stop or collision. The armrest
could contact an infant secured in
a rear‐facing child restraint in the
center seat position. Fasten the
retaining strap onto the stowed
armrest before installing a
rear‐facing child restraint in
the rear center seat position.
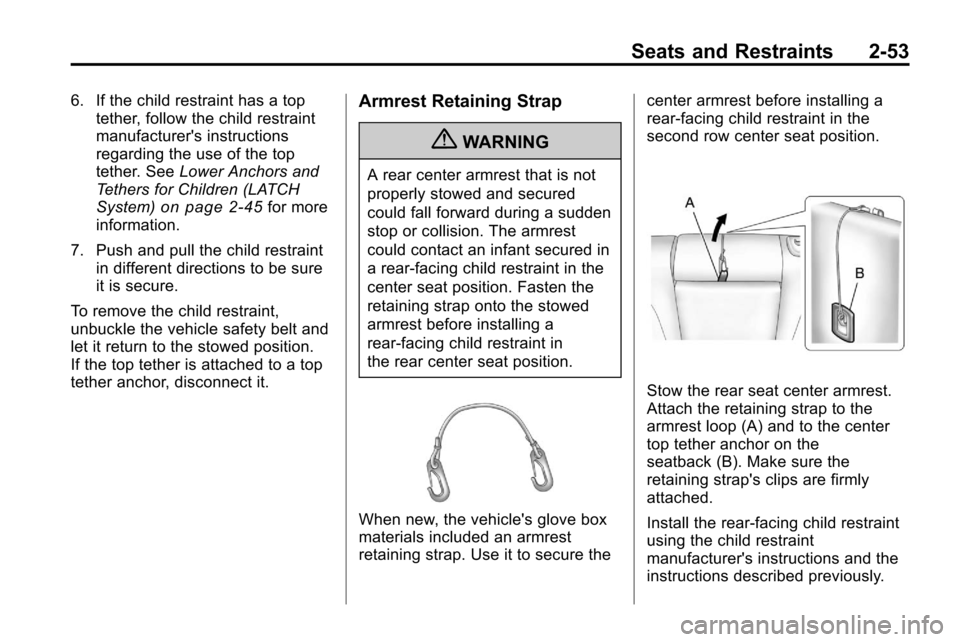
When new, the vehicle's glove box
materials included an armrest
retaining strap. Use it to secure the center armrest before installing a
rear‐facing child restraint in the
second row center seat position.
Stow the rear seat center armrest.
Attach the retaining strap to the
armrest loop (A) and to the center
top tether anchor on the
seatback (B). Make sure the
retaining strap's clips are firmly
attached.
Install the rear-facing child restraint
using the child restraint
manufacturer's instructions and the
instructions described previously.
Page 83 of 394

Storage 3-1
Storage
Storage Compartments
Instrument Panel Storage . . . . 3-1
Glove Box . . . . . . . . . . . . . . . . . . . . 3-1
Cupholders . . . . . . . . . . . . . . . . . . . 3-1
Center Console Storage . . . . . . 3-1
Additional Storage Features
Cargo Cover . . . . . . . . . . . . . . . . . . 3-1
Convenience Net . . . . . . . . . . . . . 3-1
Roof Rack System
Roof Rack System . . . . . . . . . . . . 3-2
Storage
Compartments
Instrument Panel Storage
There may be a storage
compartment on the instrument
panel. Pull the handle to open.
Glove Box
Open the glove box by lifting up on
the lever.
Cupholders
Two cupholders are in the center
console. Cupholders may be located
in the second row seat armrest. To
access, pull the armrest down.
Center Console Storage
For vehicles with center console
storage, use the lever on the front
to open.
Additional Storage
Features
Cargo Cover
For vehicles with a cargo cover, use
it to cover items in the rear of the
vehicle.
To remove the cover from the
vehicle, pull both ends toward each
other. To reinstall, place each end of
the cover in the holes behind the
rear seat.
Convenience Net
This vehicle may have a
convenience net located in the rear
of the vehicle. Attach it to the cargo
tie-downs for storing small loads.
Do not use the net to store heavy
loads.
Page 91 of 394

Instruments and Controls 4-5
A.Air Vents on page 7‑6.
B. Turn and Lane-Change Signals
on page 5‑3.Exterior Lamp
Controlson page 5‑1. Fog
Lampson page 5‑3(If
Equipped).
C. Instrument Cluster
on
page 4‑12.
D. Windshield Wiper/Washer
on
page 4‑7. Rear Window
Wiper/Washer on page 4‑8.
E. Power Door Locks
on
page 1‑7.
F. Instrument Panel Storage
on
page 3‑1.
G. Safety Locks on page 1‑7. H.
AM-FM Radio
on page 6‑11.
Navigation System (If
Equipped). See Navigation
System Manual.
I. Cruise Control
on page 8‑44.
J. Instrument Panel Illumination
Control
on page 5‑4.
K. Steering Wheel Adjustment
on
page 4‑6.
L. Horn on page 4‑7.
M. Steering Wheel Controls
on
page 4‑6.
N. Ignition Positions on page 8‑28.
O. Climate Control Systems
on
page 7‑1or Automatic Climate
Control System on page 7‑3. P. Shift Lever. See
Shifting Into
Park on page 8‑32.
Q. Fuel Economy Mode
on
page 8‑37(If Equipped).
R. StabiliTrak System
on
page 8‑43.
S. Cupholders on page 3‑1.
T. Power Outlets on page 4‑10.
U. CD Player on page 6‑19.
V. Driver Information Center Buttons. See Driver Information
Center (DIC) on page 4‑24.
W. Hazard Warning Flashers
on
page 5‑2.
X. Glove Box on page 3‑1.
Page 125 of 394

Instruments and Controls 4-39
OnStar®System
OnStar®uses several innovative
technologies and live advisors to
provide a wide range of safety,
security, navigation, diagnostics,
and calling services.
Automatic Crash Response
In a crash, built in sensors can
automatically alert an OnStar
advisor who is immediately
connected to the vehicle to see if
you need help.
How OnStar Service Works
Q: This blue button connects you
to a specially trained OnStar advisor
to verify your account information
and to answer questions.
]: Push this red emergency
button to get priority help from
specially trained OnStar emergency
advisors.
X: Push this button for hands‐free,
voice‐activated calling and to give
voice commands for turn‐by‐turn
navigation.
Crisis Assist, Stolen Vehicle
Assistance, Vehicle Diagnostics,
Remote Door Unlock, Roadside
Assistance, Turn‐by‐Turn Navigation
and Hands‐Free Calling are
available on most vehicles. Not all
OnStar services are available on all
vehicles. For more information see
the OnStar Owner's Guide or
visit www.onstar.com (U.S.) or
www.onstar.ca (Canada), contact
OnStar at 1-888-4-ONSTAR
(1‐888‐466‐7827) or TTY
1‐877‐248‐2080, or press
Qto
speak with an OnStar advisor
24 hours a day, 7 days a week. For a full description of OnStar
services and system limitations,
see the OnStar Owner's Guide in
the glove box.
OnStar service is subject to the
OnStar terms and conditions
included in the OnStar Subscriber
Information.
OnStar service cannot work unless
the vehicle is in a place where
OnStar has an agreement with a
wireless service provider for service
in that area. OnStar service also
cannot work unless the vehicle is in
a place where the wireless service
provider OnStar has hired for that
area has coverage, network
capacity and reception when the
service is needed, and technology
that is compatible with the OnStar
service. Not all services are
available everywhere, particularly in
remote or enclosed areas, or at all
times.
Page 203 of 394

Climate Controls 7-7
The passenger compartment air
filter can be accessed by removing
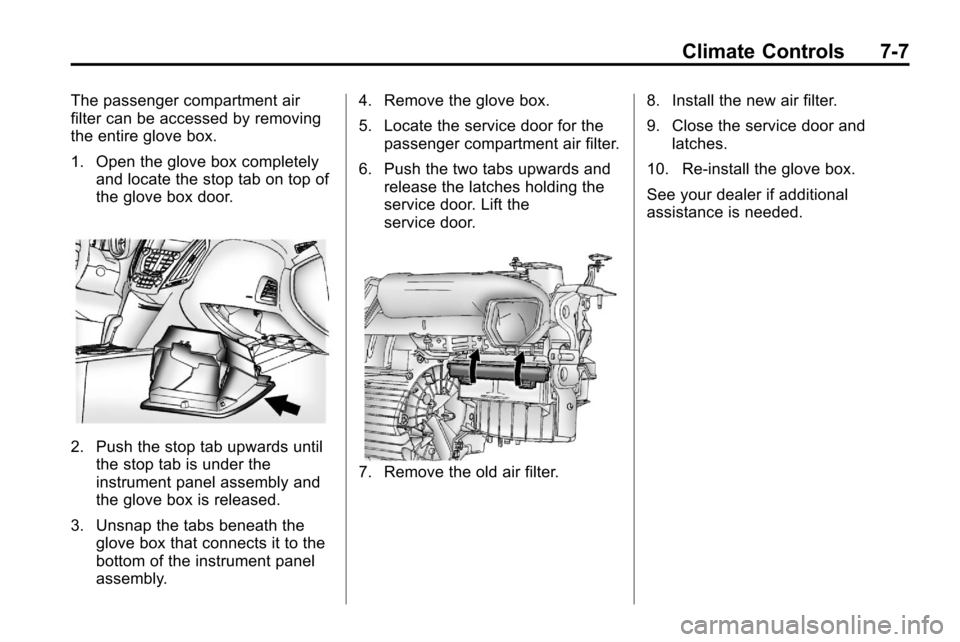
the entire glove box.
1. Open the glove box completelyand locate the stop tab on top of
the glove box door.
2. Push the stop tab upwards untilthe stop tab is under the
instrument panel assembly and
the glove box is released.
3. Unsnap the tabs beneath the glove box that connects it to the
bottom of the instrument panel
assembly. 4. Remove the glove box.
5. Locate the service door for the
passenger compartment air filter.
6. Push the two tabs upwards and release the latches holding the
service door. Lift the
service door.
7. Remove the old air filter. 8. Install the new air filter.
9. Close the service door and
latches.
10. Re‐install the glove box.
See your dealer if additional
assistance is needed.
Page 363 of 394

Technical Data 11-1
Technical Data
Vehicle Identification
Vehicle IdentificationNumber (VIN) . . . . . . . . . . . . . . 11-1
Service Parts Identification Label . . . . . . . . . . . . . . . . . . . . . . . 11-1
Vehicle Data
Capacities andSpecifications . . . . . . . . . . . . . . 11-2
Engine Drive Belt Routing . . . . 11-4
Vehicle Identification
Vehicle Identification
Number (VIN)
This legal identifier is in the front
corner of the instrument panel, on
the left side of the vehicle. It can be
seen through the windshield from
outside. The VIN also appears on
the Vehicle Certification and Service
Parts labels and certificates of title
and registration.
Engine Identification
The eighth character in the VIN is
the engine code. This code
identifies the vehicle's engine,
specifications, and replacement
parts. See “Engine Specifications”
under Capacities and Specifications
on page 11‑2for the vehicle's
engine code.
Service Parts
Identification Label
This label, on the inside of the glove
box, has the following information:
.Vehicle Identification
Number (VIN)
.Model designation
.Paint information
.Production options and special
equipment
Do not remove this label from the
vehicle.
Page 387 of 394

INDEX i-5
Fuel (cont.)Gasoline Specifications . . . . . . . 8-54
Gauge . . . . . . . . . . . . . . . . . . . . . . . . 4-13
Low Fuel Warning Light . . . . . . . 4-22
Recommended . . . . . . . . . . . . . . . 8-54
Requirements, California . . . . . 8-54
System Messages . . . . . . . . . . . . 4-30
Fuel Economy Mode . . . . . . . . . . . 8-37
Fuses . . . . . . . . . . . . . . . . . . . . . . . . . 9-34 Engine Compartment FuseBlock . . . . . . . . . . . . . . . . . . . . . . . . 9-34
Instrument Panel Fuse Block . . . . . . . . . . . . . . . . . . . . . . . . 9-37
G
GasolineSpecifications . . . . . . . . . . . . . . . . . 8-54
Gauges Engine CoolantTemperature . . . . . . . . . . . . . . . . 4-14
Fuel . . . . . . . . . . . . . . . . . . . . . . . . . . 4-13
Odometer . . . . . . . . . . . . . . . . . . . . . 4-13
Speedometer . . . . . . . . . . . . . . . . . 4-13
Tachometer . . . . . . . . . . . . . . . . . . . 4-13
Warning Lights and Indicators . . . . . . . . . . . . . . . . . . . 4-11 General Information
Service and Maintenance . . . . . 10-1
Towing . . . . . . . . . . . . . . . . . . . . . . . . 8-57
Vehicle Care . . . . . . . . . . . . . . . . . . . 9-3
Glove Box . . . . . . . . . . . . . . . . . . . . . . 3-1
GM Mobility Reimbursement Program . . . . . . . . . . . . . . . . . . . . . . 12-5
H
Hazard Warning Flashers . . . . . . . 5-2
Head Restraints . . . . . . . . . . . . . . . . 2-2
HeadlampsAiming . . . . . . . . . . . . . . . . . . . . . . . . 9-27
Bulb Replacement . . . . . . . . . . . . 9-30
Daytime Running
Lamps (DRL) . . . . . . . . . . . . . . . . . 5-2
Flash-to-Pass . . . . . . . . . . . . . . . . . . 5-2
Headlamps, Front Turn Signal, Sidemarker, and
Parking Lamps . . . . . . . . . . . . . . 9-30
High-Beam On Light . . . . . . . . . . 4-23
High/Low Beam Changer . . . . . . 5-1
Lamps On Reminder . . . . . . . . . 4-23
Heated Front Seats . . . . . . . . . . . . . 2-7
Heated Mirrors . . . . . . . . . . . . . . . . . 1-14 Heater
Engine Coolant . . . . . . . . . . . . . . . 8-31
High-Beam On Light . . . . . . . . . . . 4-23
Highway Hypnosis . . . . . . . . . . . . . 8-20
Hill and Mountain Roads . . . . . . . 8-20
Hill Start Assist (HSA) . . . . . . . . . 8-41
Hood . . . . . . . . . . . . . . . . . . . . . . . . . . . 9-5
Horn . . . . . . . . . . . . . . . . . . . . . . . . . . . . 4-7
How to Wear Safety Belts Properly . . . . . . . . . . . . . . . . . . . . . . 2-12
I
Ignition Positions . . . . . . . . . . . . . . 8-28
Ignition Transmission LockCheck . . . . . . . . . . . . . . . . . . . . . . . . 9-25
Immobilizer . . . . . . . . . . . . . . . . . . . . 1-13
Infants and Young Children, Restraints . . . . . . . . . . . . . . . . . . . . 2-39
Instrument Cluster . . . . . . . . . . . . . 4-12
Instrument Panel Storage Area . . . . . . . . . . . . . . . . . . 3-1
Instrument Panel Overview . . . . . 4-4
Introduction . . . . . . . . . . . . . . . . . . .iii, 6-1
Page 392 of 394

i-10 INDEX
ServiceAccessories and
Modifications . . . . . . . . . . . . . . . . . 9-4
Doing Your Own Work . . . . . . . . . 9-4
Engine Soon Light . . . . . . . . . . . . 4-16
Maintenance Records . . . . . . 10-10
Maintenance, General Information . . . . . . . . . . . . . . . . . . 10-1
Parts Identification Label . . . . . 11-1
Publications Ordering Information . . . . . . . . . . . . . . . . 12-12
Scheduling Appointments . . . . . 12-8
Vehicle Messages . . . . . . . . . . . . 4-32
Servicing the Airbag-Equipped Vehicle . . . . . 2-34
Shifting
Into Park . . . . . . . . . . . . . . . . . . . . . . 8-32
Out of Park . . . . . . . . . . . . . . . . . . . 8-33 Sidemarker
Bulb Replacement . . . . . . . . . . . . 9-32
Signals, Turn and Lane-Change . . . . . . . . . . . . . . . . . 5-3
Spare Tire Compact . . . . . . . . . . . . . . . . . . . . . . 9-68
Specifications and
Capacities . . . . . . . . . . . . . . . . . . . . 11-2
Speedometer . . . . . . . . . . . . . . . . . . 4-13
StabiliTrak System . . . . . . . . . . . . . 8-43
StabiliTrak
®OFF Light . . . . . . . . . 4-20
Start Assist, Hills . . . . . . . . . . . . . . 8-41
Start Vehicle, Remote . . . . . . . . . . 1-5
Starter Switch Check . . . . . . . . . . 9-25
Starting the Engine . . . . . . . . . . . . 8-30
Steering . . . . . . . . . . . . . . . . . . . . . . . . 8-5 Fluid, Power . . . . . . . . . . . . . . . . . . 9-20
Wheel Adjustment . . . . . . . . . . . . . 4-6
Wheel Controls . . . . . . . . . . . . . . . . 4-6 Stoplamps and Back-Up Lamps
Bulb Replacement . . . . . . . . . . . . 9-32
Storage Mass Media (MEM) . . . . . . . . . . . 6-25
Storage Areas Cargo Cover . . . . . . . . . . . . . . . . . . . 3-1
Center Console . . . . . . . . . . . . . . . . 3-1
Convenience Net . . . . . . . . . . . . . . 3-1
Glove Box . . . . . . . . . . . . . . . . . . . . . 3-1
Instrument Panel . . . . . . . . . . . . . . 3-1
Roof Rack System . . . . . . . . . . . . . 3-2
Stuck Vehicle . . . . . . . . . . . . . . . . . . 8-23
Sun Visors . . . . . . . . . . . . . . . . . . . . . 1-18
Sunroof . . . . . . . . . . . . . . . . . . . . . . . . 1-18
Symbols . . . . . . . . . . . . . . . . . . . . . . . . . . .v
System Roof Rack . . . . . . . . . . . . . . . . . . . . . 3-2
System Check Automatic TransmissionShiftlock Control . . . . . . . . . . . . 9-25