2010 CHEVROLET EQUINOX brake fluid
[x] Cancel search: brake fluidPage 2 of 394

2010 Chevrolet Equinox Owner ManualM
Driving and Operating. . . . . . . . 8-1
Driving Information . . . . . . . . . . . . . 8-2
Starting and Operating . . . . . . . 8-28
Engine Exhaust . . . . . . . . . . . . . . 8-34
Automatic Transmission . . . . . . 8-35
Drive Systems . . . . . . . . . . . . . . . . 8-38
Brakes . . . . . . . . . . . . . . . . . . . . . . . 8-38
Ride Control Systems . . . . . . . . 8-41
Cruise Control . . . . . . . . . . . . . . . . 8-44
Object Detection Systems . . . . 8-46
Fuel . . . . . . . . . . . . . . . . . . . . . . . . . . 8-53
Towing . . . . . . . . . . . . . . . . . . . . . . . 8-57
Conversions and Add-Ons . . . 8-64 Vehicle Care
. . . . . . . . . . . . . . . . . . 9-1
General Information . . . . . . . . . . . . 9-3
Vehicle Checks . . . . . . . . . . . . . . . . 9-4
Headlamp Aiming . . . . . . . . . . . . 9-27
Bulb Replacement . . . . . . . . . . . . 9-30
Electrical System . . . . . . . . . . . . . 9-34
Wheels and Tires . . . . . . . . . . . . . 9-40
Jump Starting . . . . . . . . . . . . . . . . 9-69
Towing . . . . . . . . . . . . . . . . . . . . . . . 9-72
Appearance Care . . . . . . . . . . . . . 9-75
Service and Maintenance . . . 10-1
General Information . . . . . . . . . . 10-1
Scheduled Maintenance . . . . . . 10-2
Recommended Fluids,
Lubricants, and Parts . . . . . . . 10-7
Maintenance Records . . . . . . . 10-10 Technical Data
. . . . . . . . . . . . . . . 11-1
Vehicle Identification . . . . . . . . . . 11-1
Vehicle Data . . . . . . . . . . . . . . . . . . 11-2
Customer Information . . . . . . . 12-1
Customer Information . . . . . . . . 12-1
Reporting Safety Defects . . . . 12-13
Vehicle Data Recording and
Privacy . . . . . . . . . . . . . . . . . . . . 12-14
Index . . . . . . . . . . . . . . . . . . . . . i-1
Page 5 of 394
Introduction v
Notice:This means there is
something that could result in
property or vehicle damage. This
would not be covered by the
vehicle's warranty.
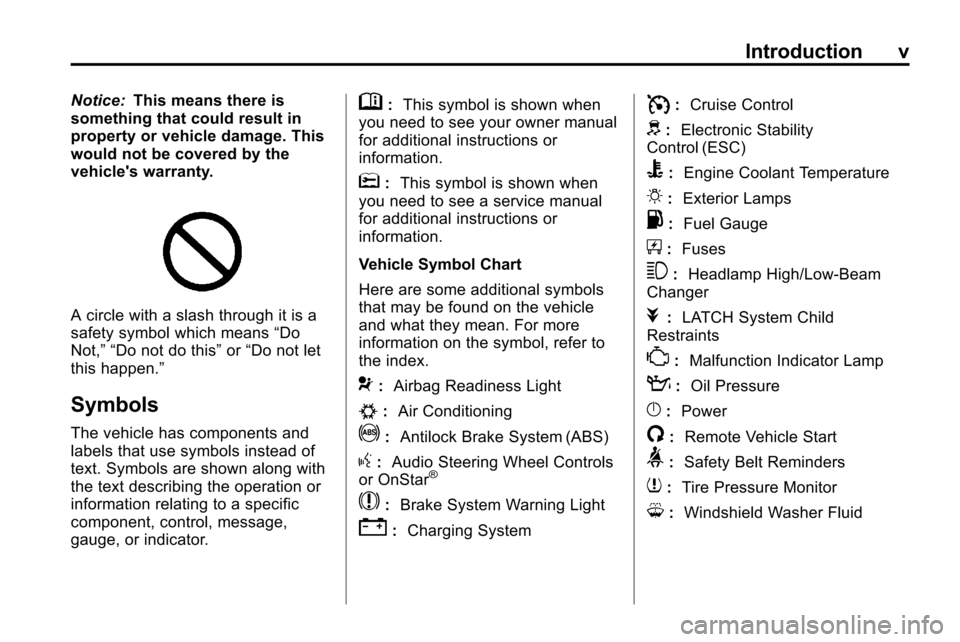
A circle with a slash through it is a
safety symbol which means “Do
Not,” “Do not do this” or“Do not let
this happen.”
Symbols
The vehicle has components and
labels that use symbols instead of
text. Symbols are shown along with
the text describing the operation or
information relating to a specific
component, control, message,
gauge, or indicator.
M: This symbol is shown when
you need to see your owner manual
for additional instructions or
information.
*: This symbol is shown when
you need to see a service manual
for additional instructions or
information.
Vehicle Symbol Chart
Here are some additional symbols
that may be found on the vehicle
and what they mean. For more
information on the symbol, refer to
the index.
9: Airbag Readiness Light
#:Air Conditioning
!:Antilock Brake System (ABS)
g:Audio Steering Wheel Controls
or OnStar®
$: Brake System Warning Light
":Charging System
I:Cruise Control
d:Electronic Stability
Control (ESC)
B: Engine Coolant Temperature
O:Exterior Lamps
.:Fuel Gauge
+:Fuses
3: Headlamp High/Low-Beam
Changer
j: LATCH System Child
Restraints
*: Malfunction Indicator Lamp
::Oil Pressure
}:Power
/:Remote Vehicle Start
>:Safety Belt Reminders
7:Tire Pressure Monitor
M:Windshield Washer Fluid
Page 114 of 394
4-28 Instruments and Controls
Battery Voltage and
Charging Messages
Battery Saver Active
This message displays when the
vehicle has detected that the battery
voltage is dropping beyond a
reasonable point. The battery saver
system starts reducing certain
features of the vehicle that you may
be able to notice. At the point that
features are disabled, this message
is displayed. It means that the
vehicle is trying to save the charge
in the battery. Turn off unnecessary
accessories to allow the battery to
recharge.
Low Battery
This message is displayed when the
battery voltage is low. SeeBattery
on page 9‑24for more information.
Service Battery Charging
System
This message is displayed when
there is a fault in the battery
charging system. Take the vehicle to
your dealer for service.
Brake System Messages
Brake Fluid Low
This message is displayed when the
brake fluid level is low, see Brake
Fluid on page 9‑22.
Release Parking Brake
This message is displayed as a
reminder that the parking brake is
on. Release it before you attempt to
drive.
Compass Messages
CAL
This message is displayed when the
compass needs to be calibrated.
See Compass on page 4‑8.
– – –
Three dashes will be displayed if the
compass needs service. See your
dealer for service.
Cruise Control Messages
Apply Brake Before Cruise
If this message displays when
attempting to activate cruise control,
apply the brake and then try again.
Cruise Set to XXX
This message will display when the
cruise control is set and it will show
the speed it was set to. See Cruise
Control
on page 8‑44for more
information.
Page 224 of 394
8-20 Driving and Operating
Other Rainy Weather Tips
Besides slowing down, other wet
weather driving tips include:
.Allow extra following distance.
.Pass with caution.
.Keep windshield wiping
equipment in good shape.
.Keep the windshield washer fluid
reservoir filled.
.Have good tires with proper
tread depth. SeeTireson
page 9‑40.
.Turn off cruise control.
Highway Hypnosis
Always be alert and pay attention to
your surroundings while driving.
If you become tired or sleepy, find a
safe place to park your vehicle
and rest.
Other driving tips include:
.Keep the vehicle well ventilated.
.Keep interior temperature cool.
.Keep your eyes moving —scan
the road ahead and to the sides.
.Check the rearview mirror and
vehicle instruments often.
Hill and Mountain Roads
Driving on steep hills or through
mountains is different than driving
on flat or rolling terrain. Tips for
driving in these conditions include:
.Keep the vehicle serviced and in
good shape.
.Check all fluid levels and brakes,
tires, cooling system, and
transmission.
.Going down steep or long hills,
shift to a lower gear.
{WARNING
If you do not shift down, the
brakes could get so hot that they
would not work well. You would
then have poor braking or even
none going down a hill. You could
crash. Shift down to let the engine
assist the brakes on a steep
downhill slope.
Page 265 of 394
Driving and Operating 8-61
3. When the wheel chocks are inplace, release the brake pedal
until the chocks absorb the load.
4. Reapply the brake pedal. Then apply the parking brake and shift
into P (Park).
5. Release the brake pedal.
Leaving After Parking on a Hill
1. Apply and hold the brake pedal.
2. Start the engine.
3. Shift into a gear.
4. Release the parking brake.
5. Let up on the brake pedal.
6. Drive slowly until the trailer is clear of the chocks.
7. Stop and have someone pick up and store the chocks.
Maintenance When Trailer
Towing
The vehicle needs service more
often when pulling a trailer. See this
manual's Maintenance Schedule or
Index for more information. Things
that are especially important in
trailer operation are automatic
transmission fluid, engine oil, axle
lubricant, belts, cooling system and
brake system. Inspect these before
and during the trip.
Check periodically to see that all
hitch nuts and bolts are tight.
Engine Cooling When Trailer
Towing
The cooling system may temporarily
overheat during severe operating
conditions. See Engine Overheating
on page 9‑18.
Trailer Towing
Before pulling a trailer, there are
three important considerations that
have to do with weight:
.The weight of the trailer
.The weight of the trailer tongue
.The total weight on the vehicle's
tires
Weight of the Trailer
How heavy can a trailer safely be?
Speed, altitude, road grades,
outside temperature, special
equipment, and the amount of
tongue weight the vehicle can carry
must be considered. See “Weight of
the Trailer Tongue” later in this
section for more information.
Maximum trailer weight is calculated
assuming only the driver is in the
tow vehicle and it has all the
required trailering equipment.
The weight of additional optional
equipment, passengers and cargo in
the tow vehicle must be subtracted
from the maximum trailer weight.
Page 269 of 394
Vehicle Care 9-1
Vehicle Care
General Information
General Information . . . . . . . . . . . 9-3
California Proposition65 Warning . . . . . . . . . . . . . . . . . . 9-3
California Perchlorate Materials Requirements . . . . . . . . . . . . . . . 9-3
Accessories and Modifications . . . . . . . . . . . . . . . . 9-4
Vehicle Checks
Doing Your OwnService Work . . . . . . . . . . . . . . . . 9-4
Hood . . . . . . . . . . . . . . . . . . . . . . . . . . 9-5
Engine Compartment Overview . . . . . . . . . . . . . . . . . . . . 9-6
Engine Cover . . . . . . . . . . . . . . . . . 9-9
Engine Oil . . . . . . . . . . . . . . . . . . . 9-10
Engine Oil Life System . . . . . . . 9-11
Automatic Transmission Fluid . . . . . . . . . . . . . . . . . . . . . . . 9-12 Engine Air Cleaner/Filter . . . . . 9-13
Cooling System . . . . . . . . . . . . . . 9-14
Engine Coolant . . . . . . . . . . . . . . 9-15
Engine Overheating . . . . . . . . . 9-18
Power Steering Fluid (2.4L
L4 Engine) . . . . . . . . . . . . . . . . . 9-20
Power Steering Fluid (3.0L V6 Engine) . . . . . . . . . . . . . . . . . 9-20
Washer Fluid . . . . . . . . . . . . . . . . 9-21
Brakes . . . . . . . . . . . . . . . . . . . . . . . 9-21
Brake Fluid . . . . . . . . . . . . . . . . . . 9-22
Battery . . . . . . . . . . . . . . . . . . . . . . . 9-24
All-Wheel Drive . . . . . . . . . . . . . . 9-24
Starter Switch Check . . . . . . . . 9-25
Automatic Transmission Shift Lock Control System
Check . . . . . . . . . . . . . . . . . . . . . . 9-25
Ignition Transmission Lock Check . . . . . . . . . . . . . . . . . . . . . . 9-25
Park Brake and P (Park) Mechanism Check . . . . . . . . . 9-26
Wiper Blade Replacement . . . 9-26
Headlamp Aiming
Headlamp Aiming . . . . . . . . . . . . 9-27
Bulb Replacement
Bulb Replacement . . . . . . . . . . . 9-30
Headlamps, Front Turn Signal, Sidemarker, and Parking
Lamps . . . . . . . . . . . . . . . . . . . . . . 9-30
Fog Lamps . . . . . . . . . . . . . . . . . . 9-31
Taillamps, Turn Signal, Sidemarker, Stoplamps,
and Back-Up Lamps . . . . . . . 9-32
License Plate Lamp . . . . . . . . . . 9-33
Replacement Bulbs . . . . . . . . . . 9-34
Electrical System
Fuses . . . . . . . . . . . . . . . . . . . . . . . . 9-34
Engine Compartment Fuse Block . . . . . . . . . . . . . . . . . . . . . . . 9-34
Instrument Panel Fuse Block . . . . . . . . . . . . . . . . . . . . . . . 9-37
Page 275 of 394

Vehicle Care 9-7
A.Engine Air Cleaner/Filteron
page 9‑13.
B. Engine Cover on page 9‑9.
C. Engine Oil Dipstick (out of view). See Engine Oil
on
page 9‑10.
D. Engine Oil Fill Cap. See Engine
Oil on page 9‑10. E. Brake Fluid Reservoir. See
Brakes on page 9‑21.
F. Engine Compartment Fuse
Block on page 9‑34.
G. Remote Positive (+) Terminal. See Jump Startingon
page 9‑69.
H. Remote Negative (−) Terminal. See Jump Starting
on
page 9‑69. I.
Battery on page 9‑24.
J. Engine Coolant Surge Tank and Pressure Cap. See Engine
Coolant on page 9‑15.
K. Windshield Washer Fluid Reservoir. See Washer Fluid
on
page 9‑21.
Page 277 of 394
Vehicle Care 9-9
A.Engine Air Cleaner/Filteron
page 9‑13.
B. Power Steering Fluid (2.4L L4
Engine)
on page 9‑20or
Power Steering Fluid (3.0L
V6 Engine) on page 9‑20.
C. Engine Oil Fill Cap. See Engine
Oil on page 9‑10.
D. Engine Cover on page 9‑9.
E. Engine Oil Dipstick (out of view). See Engine Oil
on
page 9‑10.
F. Brake Fluid Reservoir. See Brakes on page 9‑21. G.
Engine Compartment Fuse
Block on page 9‑34.
H. Remote Positive (+) Terminal. See Jump Starting
on
page 9‑69.
I. Remote Negative (−) Terminal. See Jump Starting
on
page 9‑69.
J. Battery on page 9‑24.
K. Engine Coolant Surge Tank and Pressure Cap. See Engine
Coolant on page 9‑15.
L. Windshield Washer Fluid Reservoir. See Washer Fluid
on
page 9‑21.
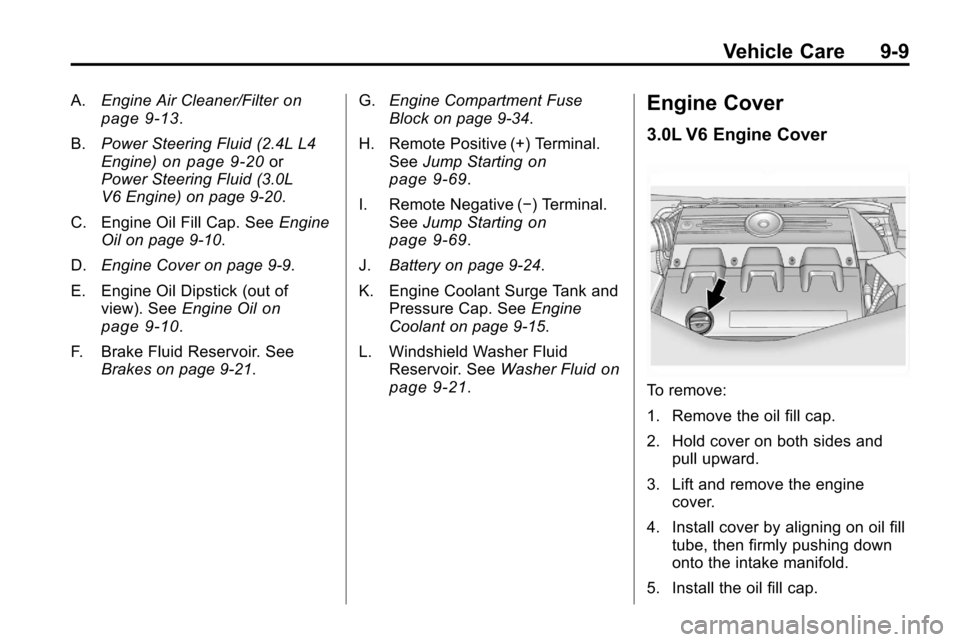
Engine Cover
3.0L V6 Engine Cover
To remove:
1. Remove the oil fill cap.
2. Hold cover on both sides and pull upward.
3. Lift and remove the engine cover.
4. Install cover by aligning on oil fill tube, then firmly pushing down
onto the intake manifold.
5. Install the oil fill cap.