2010 CHEVROLET EQUINOX seat adjustment
[x] Cancel search: seat adjustmentPage 27 of 394
Seats and Restraints 2-1
Seats and
Restraints
Head Restraints
Head Restraints . . . . . . . . . . . . . . . 2-2
Front Seats
Seat Adjustment . . . . . . . . . . . . . . 2-3
Power Seat Adjustment . . . . . . . 2-3
Lumbar Adjustment . . . . . . . . . . . 2-5
Reclining Seatbacks . . . . . . . . . . 2-5
Heated Front Seats . . . . . . . . . . . 2-7
Rear Seats
Rear Seats . . . . . . . . . . . . . . . . . . . . 2-8
Safety Belts
Safety Belts . . . . . . . . . . . . . . . . . . . 2-9
How to Wear Safety BeltsProperly . . . . . . . . . . . . . . . . . . . . 2-12
Lap-Shoulder Belt . . . . . . . . . . . 2-17
Safety Belt Use During Pregnancy . . . . . . . . . . . . . . . . . . 2-21 Safety Belt Extender . . . . . . . . . 2-21
Safety System Check . . . . . . . . 2-21
Safety Belt Care . . . . . . . . . . . . . 2-22
Replacing Safety Belt System
Parts After a Crash . . . . . . . . . 2-22
Airbag System
Airbag System . . . . . . . . . . . . . . . 2-22
Where Are the Airbags? . . . . . 2-25
When Should an Airbag
Inflate? . . . . . . . . . . . . . . . . . . . . . 2-26
What Makes an Airbag Inflate? . . . . . . . . . . . . . . . . . . . . . 2-28
How Does an Airbag Restrain? . . . . . . . . . . . . . . . . . . . 2-28
What Will You See After an Airbag Inflates? . . . . . . . . . . . . 2-28
Passenger Sensing System . . . . . . . . . . . . . . . . . . . . . 2-30
Servicing the Airbag-Equipped Vehicle . . . . . . . . . . . . . . . . . . . . . 2-34
Adding Equipment to the Airbag-Equipped Vehicle . . . 2-35 Airbag System Check . . . . . . . . 2-36
Replacing Airbag System
Parts After a Crash . . . . . . . . . 2-36
Child Restraints
Older Children . . . . . . . . . . . . . . . 2-37
Infants and YoungChildren . . . . . . . . . . . . . . . . . . . . 2-39
Child Restraint Systems . . . . . 2-41
Where to Put the Restraint . . . . . . . . . . . . . . . . . . . 2-43
Lower Anchors and Tethers for Children (LATCH
System) . . . . . . . . . . . . . . . . . . . . 2-45
Replacing LATCH System Parts After a Crash . . . . . . . . . 2-51
Securing Child Restraints
(Rear Seat ) . . . . . . . . . . . . . . . . 2-51
Securing Child Restraints (Front Passenger Seat) . . . . 2-54
Page 29 of 394
Seats and Restraints 2-3
Front Seats
Seat Adjustment
{WARNING
You can lose control of the
vehicle if you try to adjust a
manual driver's seat while the
vehicle is moving. The sudden
movement could startle and
confuse you, or make you push a(Continued)
WARNING (Continued)
pedal when you do not want to.
Adjust the driver's seat only when
the vehicle is not moving.
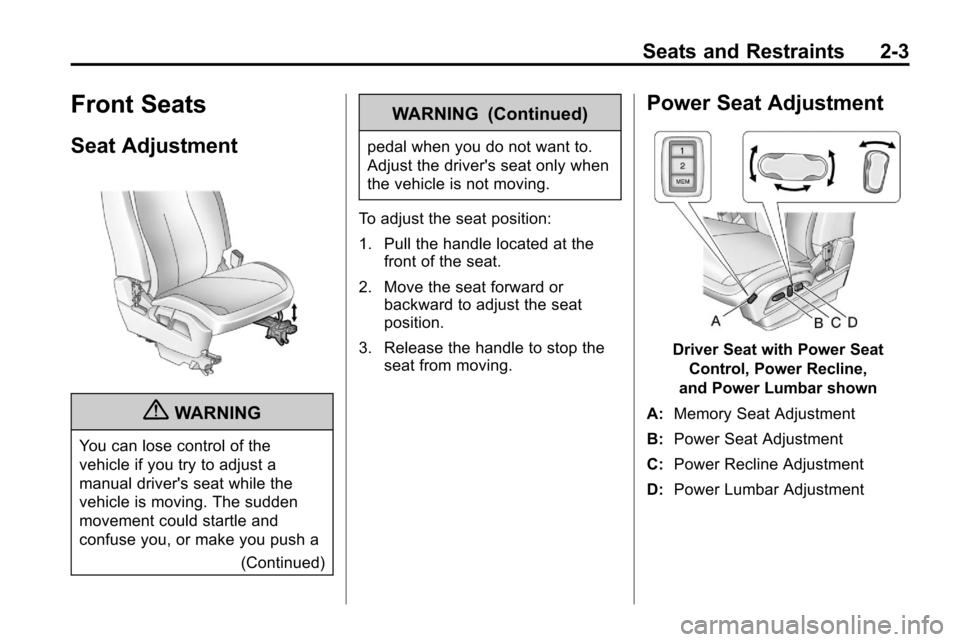
To adjust the seat position:
1. Pull the handle located at the front of the seat.
2. Move the seat forward or backward to adjust the seat
position.
3. Release the handle to stop the seat from moving.
Power Seat Adjustment
Driver Seat with Power Seat
Control, Power Recline,
and Power Lumbar shown
A: Memory Seat Adjustment
B: Power Seat Adjustment
C: Power Recline Adjustment
D: Power Lumbar Adjustment
Page 30 of 394
2-4 Seats and Restraints
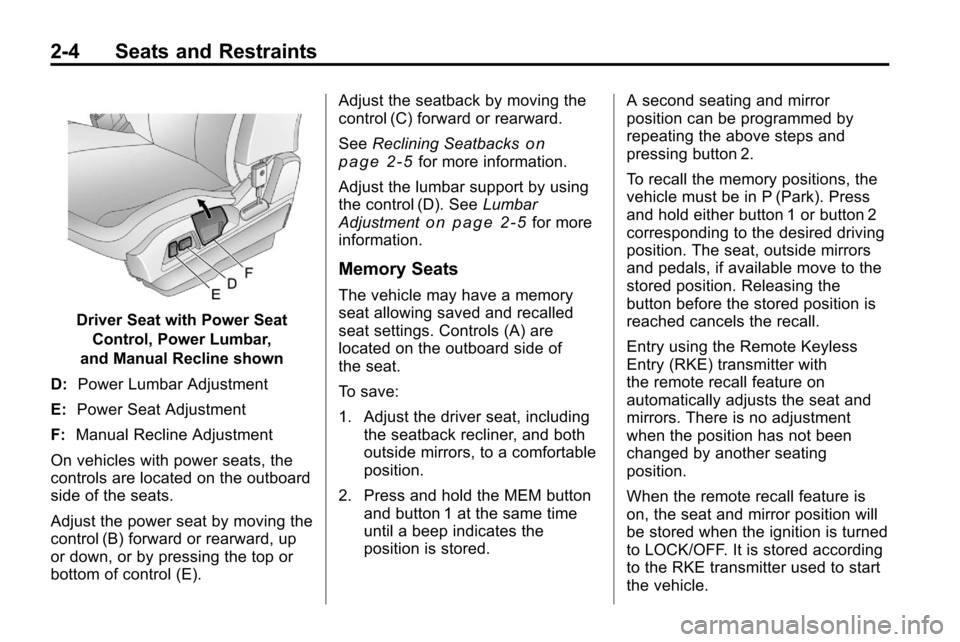
Driver Seat with Power SeatControl, Power Lumbar,
and Manual Recline shown
D: Power Lumbar Adjustment
E: Power Seat Adjustment
F: Manual Recline Adjustment
On vehicles with power seats, the
controls are located on the outboard
side of the seats.
Adjust the power seat by moving the
control (B) forward or rearward, up
or down, or by pressing the top or
bottom of control (E). Adjust the seatback by moving the
control (C) forward or rearward.
See
Reclining Seatbacks
on
page 2‑5for more information.
Adjust the lumbar support by using
the control (D). See Lumbar
Adjustment
on page 2‑5for more
information.
Memory Seats
The vehicle may have a memory
seat allowing saved and recalled
seat settings. Controls (A) are
located on the outboard side of
the seat.
To save:
1. Adjust the driver seat, including the seatback recliner, and both
outside mirrors, to a comfortable
position.
2. Press and hold the MEM button and button 1 at the same time
until a beep indicates the
position is stored. A second seating and mirror
position can be programmed by
repeating the above steps and
pressing button 2.
To recall the memory positions, the
vehicle must be in P (Park). Press
and hold either button 1 or button 2
corresponding to the desired driving
position. The seat, outside mirrors
and pedals, if available move to the
stored position. Releasing the
button before the stored position is
reached cancels the recall.
Entry using the Remote Keyless
Entry (RKE) transmitter with
the remote recall feature on
automatically adjusts the seat and
mirrors. There is no adjustment
when the position has not been
changed by another seating
position.
When the remote recall feature is
on, the seat and mirror position will
be stored when the ignition is turned
to LOCK/OFF. It is stored according
to the RKE transmitter used to start
the vehicle.
Page 31 of 394
Seats and Restraints 2-5
To stop recall movement of the RKE
remote recall feature, press one of
the power seat controls, memory
buttons, or power mirror buttons.
Memory Seat recall may stop if
the seat is blocked. Remove the
obstruction and then press the
memory button again. If the memory
function does not work properly, see
your dealer for service.
Easy Exit Seat
If the easy exit seat feature is on in
the Driver Information Center (DIC),
automatic adjustment occurs when
the ignition is turned to LOCK/OFF
and the driver door is opened. The
driver seat moves back.
SeeVehicle Personalization
on
page 4‑34for more information.
Lumbar Adjustment
Power Lumbar
Seats with power lumbar have
controls located on the outboard
side of the seat. See Power Seat
Adjustment
on page 2‑3for more
information.
Adjust lumbar support by using the
rocker switch (D) on the outboard
side of the driver seat.
Release the switch when the
seatback reaches the desired level
of lumbar support.
Reclining Seatbacks
Manual Reclining Seatbacks
{WARNING
You can lose control of the
vehicle if you try to adjust a
manual driver's seat while the
vehicle is moving. The sudden
(Continued)
WARNING (Continued)
movement could startle and
confuse you, or make you push a
pedal when you do not want to.
Adjust the driver's seat only when
the vehicle is not moving.
{WARNING
If either seatback is not locked, it
could move forward in a sudden
stop or crash. That could cause
injury to the person sitting there.
Always push and pull on the
seatbacks to be sure they are
locked.
Vehicles with manual reclining
seatbacks have a lever on the
outboard side of the seat. Lift the
lever and move the seatback to the
desired position, then release the
lever. The seatback should not
move when pushed or pulled.
Page 32 of 394
2-6 Seats and Restraints
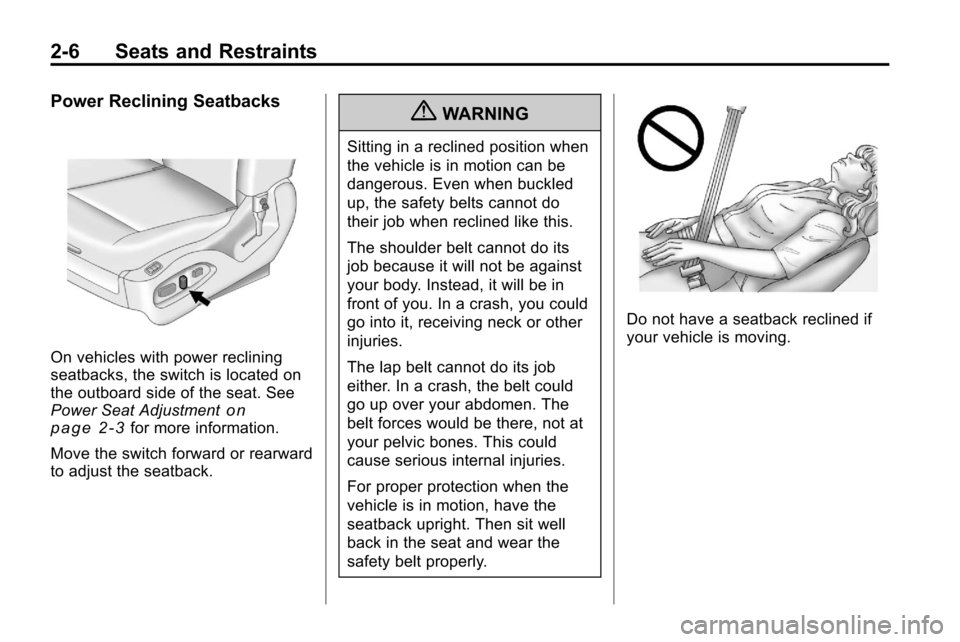
Power Reclining Seatbacks
On vehicles with power reclining
seatbacks, the switch is located on
the outboard side of the seat. See
Power Seat Adjustment
on
page 2‑3for more information.
Move the switch forward or rearward
to adjust the seatback.
{WARNING
Sitting in a reclined position when
the vehicle is in motion can be
dangerous. Even when buckled
up, the safety belts cannot do
their job when reclined like this.
The shoulder belt cannot do its
job because it will not be against
your body. Instead, it will be in
front of you. In a crash, you could
go into it, receiving neck or other
injuries.
The lap belt cannot do its job
either. In a crash, the belt could
go up over your abdomen. The
belt forces would be there, not at
your pelvic bones. This could
cause serious internal injuries.
For proper protection when the
vehicle is in motion, have the
seatback upright. Then sit well
back in the seat and wear the
safety belt properly.
Do not have a seatback reclined if
your vehicle is moving.
Page 43 of 394
Seats and Restraints 2-17
Lap-Shoulder Belt
All seating positions in the vehicle
have a lap-shoulder belt.
The following instructions explain
how to wear a lap-shoulder belt
properly.
1. Adjust the seat, if the seat isadjustable, so you can sit up
straight. To see how, see “Seats”
in the Index.
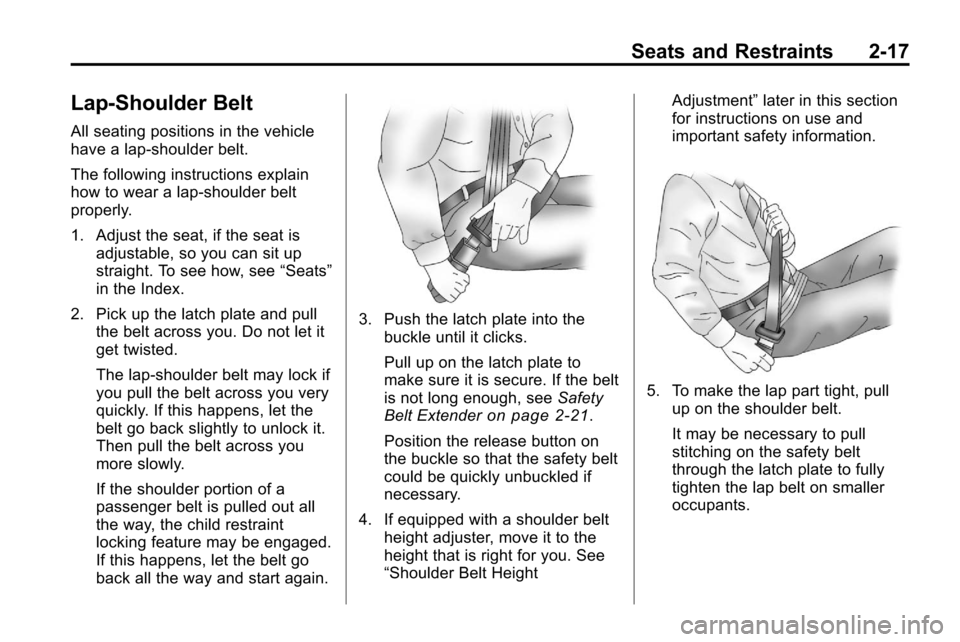
2. Pick up the latch plate and pull the belt across you. Do not let it
get twisted.
The lap-shoulder belt may lock if
you pull the belt across you very
quickly. If this happens, let the
belt go back slightly to unlock it.
Then pull the belt across you
more slowly.
If the shoulder portion of a
passenger belt is pulled out all
the way, the child restraint
locking feature may be engaged.
If this happens, let the belt go
back all the way and start again.
3. Push the latch plate into the
buckle until it clicks.
Pull up on the latch plate to
make sure it is secure. If the belt
is not long enough, see Safety
Belt Extender
on page 2‑21.
Position the release button on
the buckle so that the safety belt
could be quickly unbuckled if
necessary.
4. If equipped with a shoulder belt height adjuster, move it to the
height that is right for you. See
“Shoulder Belt Height Adjustment”
later in this section
for instructions on use and
important safety information.
5. To make the lap part tight, pull
up on the shoulder belt.
It may be necessary to pull
stitching on the safety belt
through the latch plate to fully
tighten the lap belt on smaller
occupants.
Page 44 of 394
2-18 Seats and Restraints
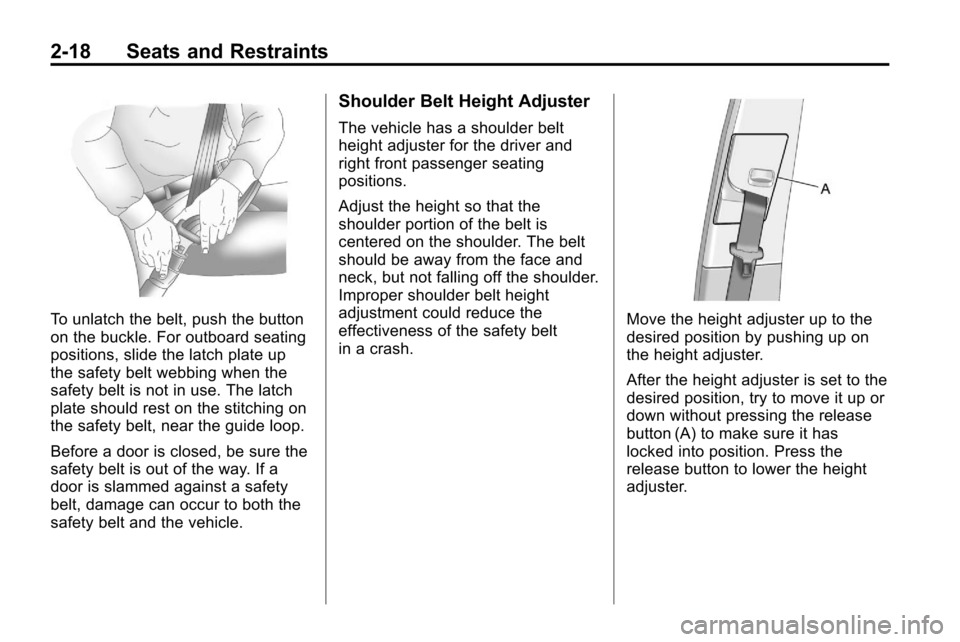
To unlatch the belt, push the button
on the buckle. For outboard seating
positions, slide the latch plate up
the safety belt webbing when the
safety belt is not in use. The latch
plate should rest on the stitching on
the safety belt, near the guide loop.
Before a door is closed, be sure the
safety belt is out of the way. If a
door is slammed against a safety
belt, damage can occur to both the
safety belt and the vehicle.
Shoulder Belt Height Adjuster
The vehicle has a shoulder belt
height adjuster for the driver and
right front passenger seating
positions.
Adjust the height so that the
shoulder portion of the belt is
centered on the shoulder. The belt
should be away from the face and
neck, but not falling off the shoulder.
Improper shoulder belt height
adjustment could reduce the
effectiveness of the safety belt
in a crash.
Move the height adjuster up to the
desired position by pushing up on
the height adjuster.
After the height adjuster is set to the
desired position, try to move it up or
down without pressing the release
button (A) to make sure it has
locked into position. Press the
release button to lower the height
adjuster.
Page 131 of 394

Infotainment System 6-1
Infotainment
System
Introduction
Introduction . . . . . . . . . . . . . . . . . . . 6-1
Theft-Deterrent Feature . . . . . . . 6-2
Overview (Radio with CD) . . . . . 6-3
Overview (Radio withCD/DVD/MEM) . . . . . . . . . . . . . 6-5
Operation . . . . . . . . . . . . . . . . . . . . . 6-7
Radio
AM-FM Radio . . . . . . . . . . . . . . . . 6-11
Satellite Radio . . . . . . . . . . . . . . . 6-14
Radio Reception . . . . . . . . . . . . . 6-18
Multi-Band Antenna . . . . . . . . . . 6-18
Audio Players
CD Player . . . . . . . . . . . . . . . . . . . 6-19
CD/DVD Player . . . . . . . . . . . . . . 6-21
Mass Storage Media (MEM) . . . . . . . . . . . . . . . 6-25
Auxiliary Devices (Radio
with CD) . . . . . . . . . . . . . . . . . . . . 6-28
Auxiliary Devices (Radio with CD/DVD/MEM) . . . . . . . 6-31
Rear Seat Infotainment
Rear Seat Entertainment(RSE) System . . . . . . . . . . . . . . 6-33
Phone
Bluetooth (Overview) . . . . . . . . 6-42
Bluetooth (InfotainmentControls) . . . . . . . . . . . . . . . . . . . 6-43
Bluetooth (Voice Recognition) . . . . . . . . . . . . . . . 6-46
Bluetooth (Navigation) . . . . . . . 6-58
Introduction
Read the following pages to
become familiar with the audio
system's features.
{WARNING
Taking your eyes off the road for
extended periods could cause a
crash resulting in injury or death
to you or others. Do not give
extended attention to
entertainment tasks while driving.
This system provides access to
many audio and non audio listings.
To minimize taking your eyes off the
road while driving, do the following
while the vehicle is parked:
.Become familiar with the
operation and controls of the
audio system.
.Set up the tone, speaker
adjustments, and preset radio
stations.