2010 CHEVROLET CORVETTE automatic transmission
[x] Cancel search: automatic transmissionPage 160 of 472
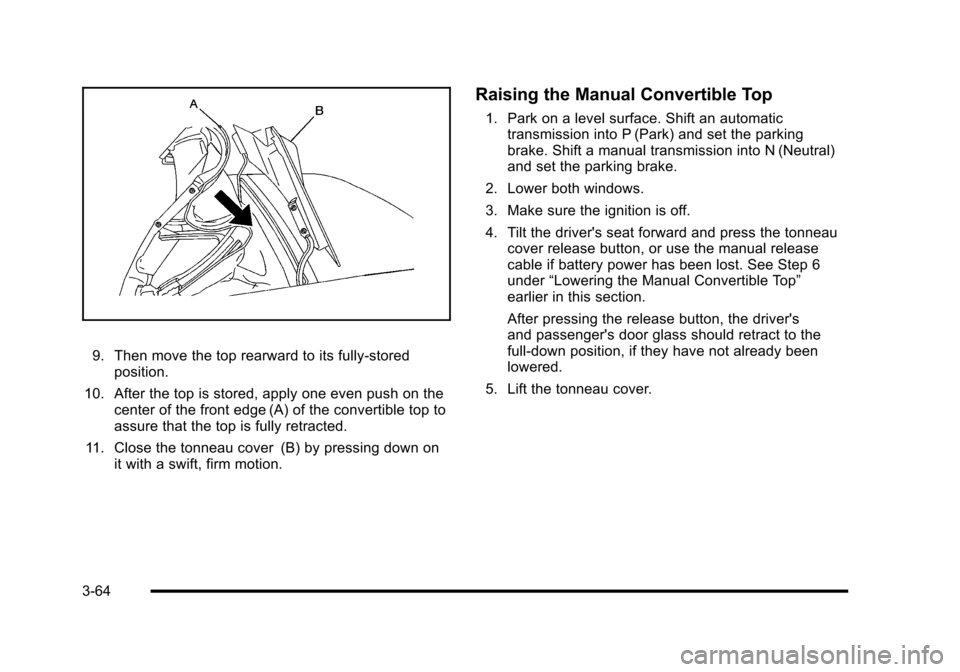
9. Then move the top rearward to its fully-stored position.
10. After the top is stored, apply one even push on the center of the front edge (A) of the convertible top to
assure that the top is fully retracted.
11. Close the tonneau cover (B) by pressing down on it with a swift, firm motion.
Raising the Manual Convertible Top
1. Park on a level surface. Shift an automatictransmission into P (Park) and set the parking
brake. Shift a manual transmission into N (Neutral)
and set the parking brake.
2. Lower both windows.
3. Make sure the ignition is off.
4. Tilt the driver's seat forward and press the tonneau cover release button, or use the manual release
cable if battery power has been lost. See Step 6
under “Lowering the Manual Convertible Top”
earlier in this section.
After pressing the release button, the driver's
and passenger's door glass should retract to the
full-down position, if they have not already been
lowered.
5. Lift the tonneau cover.
3-64
Page 163 of 472
Notice:Lowering the top if it is damp, wet, or dirty
can cause stains, mildew, and damage to the inside
of your vehicle. Dry off the top before lowering it.
Notice: If you lower the top on your vehicle in cold
weather (0°F/-18°C or lower), you may damage top
components. Do not lower the top in cold weather.
Notice: If you raise or lower the convertible top
while the vehicle is in motion, you could damage
the top or the top mechanism. The repairs would
not be covered by your warranty. Always put an
automatic transmission in (P) Park or a manual
transmission in (N) Neutral before raising or
lowering the convertible top.
Lowering the Power Convertible Top
1. Park on a level surface. Start the engine. Shift an automatic transmission into P (Park) and set the
parking brake. Shift a manual transmission into
N (Neutral), and set the parking brake.
2. Make sure the trunk is closed and the rear trunk partition in the rear storage area is in the fastened
upright position, and that no objects are forward of
the divider. See “Rear Trunk Partition” underRear
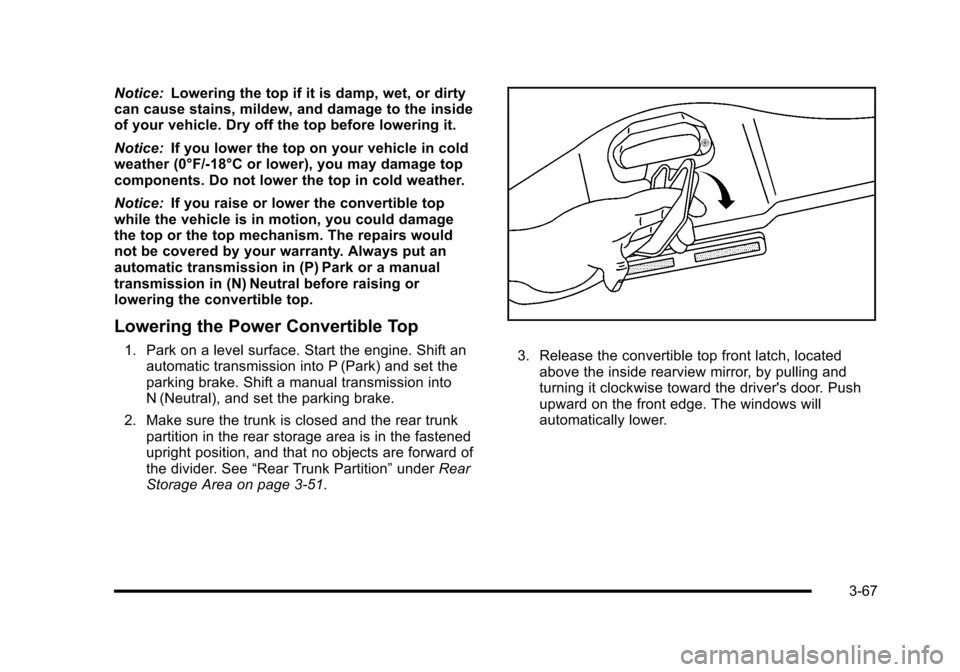
Storage Area on page 3‑51. 3. Release the convertible top front latch, located above the inside rearview mirror, by pulling and
turning it clockwise toward the driver's door. Push
upward on the front edge. The windows will
automatically lower.
3-67
Page 164 of 472
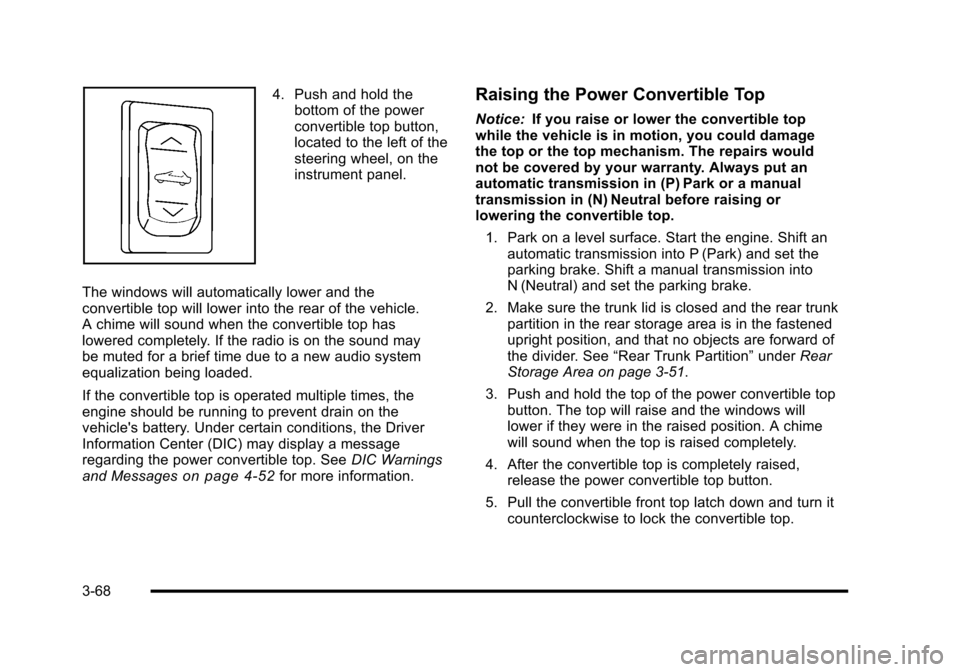
4. Push and hold the bottom of the power
convertible top button,
located to the left of the
steering wheel, on the
instrument panel.
The windows will automatically lower and the
convertible top will lower into the rear of the vehicle.
A chime will sound when the convertible top has
lowered completely. If the radio is on the sound may
be muted for a brief time due to a new audio system
equalization being loaded.
If the convertible top is operated multiple times, the
engine should be running to prevent drain on the
vehicle's battery. Under certain conditions, the Driver
Information Center (DIC) may display a message
regarding the power convertible top. See DIC Warnings
and Messages
on page 4‑52for more information.
Raising the Power Convertible Top
Notice: If you raise or lower the convertible top
while the vehicle is in motion, you could damage
the top or the top mechanism. The repairs would
not be covered by your warranty. Always put an
automatic transmission in (P) Park or a manual
transmission in (N) Neutral before raising or
lowering the convertible top.
1. Park on a level surface. Start the engine. Shift an automatic transmission into P (Park) and set the
parking brake. Shift a manual transmission into
N (Neutral) and set the parking brake.
2. Make sure the trunk lid is closed and the rear trunk partition in the rear storage area is in the fastened
upright position, and that no objects are forward of
the divider. See “Rear Trunk Partition” underRear
Storage Area on page 3‑51.
3. Push and hold the top of the power convertible top button. The top will raise and the windows will
lower if they were in the raised position. A chime
will sound when the top is raised completely.
4. After the convertible top is completely raised, release the power convertible top button.
5. Pull the convertible front top latch down and turn it counterclockwise to lock the convertible top.
3-68
Page 169 of 472

Section 4 Instrument Panel
Instrument Panel Overview. . . . . . . . . . . . . . . . . . . . . . . . 4-3
Hazard Warning Flashers . . . . . . . . . . . . . . . . . . . . . . . 4-3
Horn . . . . . . . . . . . . . . . . . . . . . . . . . . . . . . . . . . . . . . . . . . . . 4-3
Tilt Wheel . . . . . . . . . . . . . . . . . . . . . . . . . . . . . . . . . . . . . . . 4-3
Turn Signal/Multifunction Lever . . . . . . . . . . . . . . . . . . 4-4
Turn and Lane-Change Signals (Auto Signal) . . . 4-5
Headlamp High/Low-Beam Changer . . . . . . . . . . . . 4-5
Flash-to-Pass . . . . . . . . . . . . . . . . . . . . . . . . . . . . . . . . . . . 4-5
Windshield Wipers . . . . . . . . . . . . . . . . . . . . . . . . . . . . . . 4-6
Windshield Washer . . . . . . . . . . . . . . . . . . . . . . . . . . . . . 4-6
Cruise Control . . . . . . . . . . . . . . . . . . . . . . . . . . . . . . . . . . 4-7
Exterior Lamps . . . . . . . . . . . . . . . . . . . . . . . . . . . . . . . . . 4-11
Wiper Activated Headlamps . . . . . . . . . . . . . . . . . . . 4-12
Headlamps on Reminder . . . . . . . . . . . . . . . . . . . . . . 4-12
Daytime Running Lamps (DRL) . . . . . . . . . . . . . . . . 4-12
Fog Lamps . . . . . . . . . . . . . . . . . . . . . . . . . . . . . . . . . . . . 4-13
Twilight Sentinel
®. . . . . . . . . . . . . . . . . . . . . . . . . . . . . . 4-14
Exterior Lighting Battery Saver . . . . . . . . . . . . . . . . . 4-15
Instrument Panel Brightness . . . . . . . . . . . . . . . . . . . 4-15
Courtesy Lamps . . . . . . . . . . . . . . . . . . . . . . . . . . . . . . . 4-15
Entry/Exit Lighting . . . . . . . . . . . . . . . . . . . . . . . . . . . . . 4-15
Reading Lamps . . . . . . . . . . . . . . . . . . . . . . . . . . . . . . . . 4-15
Battery Run-Down Protection . . . . . . . . . . . . . . . . . . 4-16
Head-Up Display (HUD) . . . . . . . . . . . . . . . . . . . . . . . 4-16
Accessory Power Outlet(s) . . . . . . . . . . . . . . . . . . . . . 4-20
Ashtray(s) and Cigarette Lighter . . . . . . . . . . . . . . . 4-21 Climate Controls
. . . . . . . . . . . . . . . . . . . . . . . . . . . . . . . . . . 4-22
Dual Automatic Climate Control System . . . . . . . 4-22
Outlet Adjustment . . . . . . . . . . . . . . . . . . . . . . . . . . . . . . 4-27
Passenger Compartment Air Filter . . . . . . . . . . . . . 4-28
Warning Lights, Gauges, and Indicators . . . . . . . . 4-29
Instrument Panel Cluster . . . . . . . . . . . . . . . . . . . . . . . 4-30
Speedometer and Odometer . . . . . . . . . . . . . . . . . . . 4-32
Tachometer . . . . . . . . . . . . . . . . . . . . . . . . . . . . . . . . . . . . 4-32
Safety Belt Reminders . . . . . . . . . . . . . . . . . . . . . . . . . 4-32
Airbag Readiness Light . . . . . . . . . . . . . . . . . . . . . . . . 4-33
Passenger Airbag Status Indicator . . . . . . . . . . . . . 4-34
Voltmeter Gauge . . . . . . . . . . . . . . . . . . . . . . . . . . . . . . . 4-35
One-to-Four Shift Light (Manual Transmission) . . . . . . . . . . . . . . . . . . . . . . . . . . . . . . . 4-36
Brake System Warning Light . . . . . . . . . . . . . . . . . . . 4-36
Antilock Brake System (ABS) Warning Light . . . . . . . . . . . . . . . . . . . . . . . . . . . . . . . 4-37
Traction Control System (TCS) Warning Light . . . . . . . . . . . . . . . . . . . . . . . . . . . . . . . . 4-38
Active Handling System Light . . . . . . . . . . . . . . . . . . 4-39
Engine Coolant Temperature Gauge . . . . . . . . . . . 4-40
Tire Pressure Light . . . . . . . . . . . . . . . . . . . . . . . . . . . . 4-40
Malfunction Indicator Lamp . . . . . . . . . . . . . . . . . . . . 4-41
Engine Oil Pressure Gauge . . . . . . . . . . . . . . . . . . . . 4-44
Security Light . . . . . . . . . . . . . . . . . . . . . . . . . . . . . . . . . . 4-45
4-1
Page 178 of 472
Using Cruise Control on Hills
How well the cruise control works on hills depends upon
the vehicle's speed, load, and the steepness of the hills.
When going up steep hills, you might want to step on
the accelerator pedal to maintain the vehicle's speed.
When going downhill, you might have to brake or shift
to a lower gear to keep the vehicle's speed down. When
the brakes are applied the cruise control turns off.
Cruise Control in Sport and Manual Paddle
Shift Gear Selection
When the vehicle is in S (Sport) and the manual paddle
shift controls are not being used, cruise control
operates in the same manner as D (Drive).
When the vehicle is in S (Sport) and the manual paddle
shift controls are being used, cruise control operates as
follows:
.If cruise control is active and a gear is selected
with the manual paddle shift controls, the vehicle
speed is maintained in the driver selected gear
and will not automatically up-shift or down-shift
the transmission while the driver ’s gear selection
is active.
.If driving in hilly terrain, cruise control may not be
able to maintain vehicle speed if an up-shift or
down-shift is not selected by the driver. While
driving on hilly terrain and cruise control is active
with a manual paddle shift gear selection, the
driver must select the proper gear for the terrain or
select D (Drive) on the gear range selector for full
automatic transmission operation.
Ending Cruise Control
To end a cruise control session, step lightly on the
brake pedal. If the vehicle has a manual transmission,
lightly tapping the clutch will also end a cruise control
session.
Move the cruise control switch to
9to turn the system
completely off.
When cruise control is disengaged, the CRUISE
DISENGAGED message displays on the Driver
Information Center (DIC). See DIC Warnings and
Messages on page 4‑52.
Erasing Speed Memory
The cruise control set speed memory is erased when
the cruise control or the ignition is turned off.
4-10
Page 184 of 472

Battery Run-Down Protection
This vehicle has a feature to help prevent the battery
from being drained in case any of the following lamps
are left on; the underhood lamp, if your vehicle has
this feature, vanity mirror lamps, cargo lamps, reading
lamps, console or glove box lamps. If any of these
lamps are left on, they will automatically time-out after
about 10 minutes. To reset it, all of the above lamps
must be turned off or the ignition key on.
Head-Up Display (HUD)
{WARNING:
If the HUD image is too bright, or too high in your
field of view, it may take you more time to see
things you need to see when it is dark outside.
Be sure to keep the HUD image dim and placed
low in your field of view.
For vehicles with the Head-Up Display (HUD), you can
see some of the driver information that appears on the
instrument panel cluster. The information may be displayed in English or metric
units and appears as an image focused out toward the
front of the vehicle. The HUD consists of the following
information:
.Speedometer
.Turn Signal Indicators
.High-Beam Indicator Symbol
.Tachometer
.Manual Paddle Shift Gear Indicator (If Equipped)
These displays on the HUD are for use when
using the manual paddle shift controls to shift
the transmission. See
“Manual Paddle Shift”in
Automatic Transmission Operation on page 3‑26.
.Shift Light
This light is used for performance driving to
indicate that the vehicle's best performance level
has been reached to shift the transmission into the
next higher gear. An arrow pointing up will light up
on the display just prior to reaching the engine fuel
cut-off mode. This cut-off is about 6,500 RPM for
the LS3 engine, 6,600 RPM for the LS9 & ZR1
engines and 7,000 RPM for the LS7 engine.
.Check Gauges Warning
.Engine Coolant Temperature Gauge
4-16
Page 185 of 472
.Transmission Fluid Temperature Gauge,
(Automatic Transmission Vehicles Only)
.Engine Oil Temperature Gauge
.Engine Oil Pressure Gauge
.G-Force Gauge
.Boost Gauge (If Equipped)
.Audio Functions, Street Mode Only
.Navigation, Only with Navigation Radio,
Turn-by-Turn Guidance
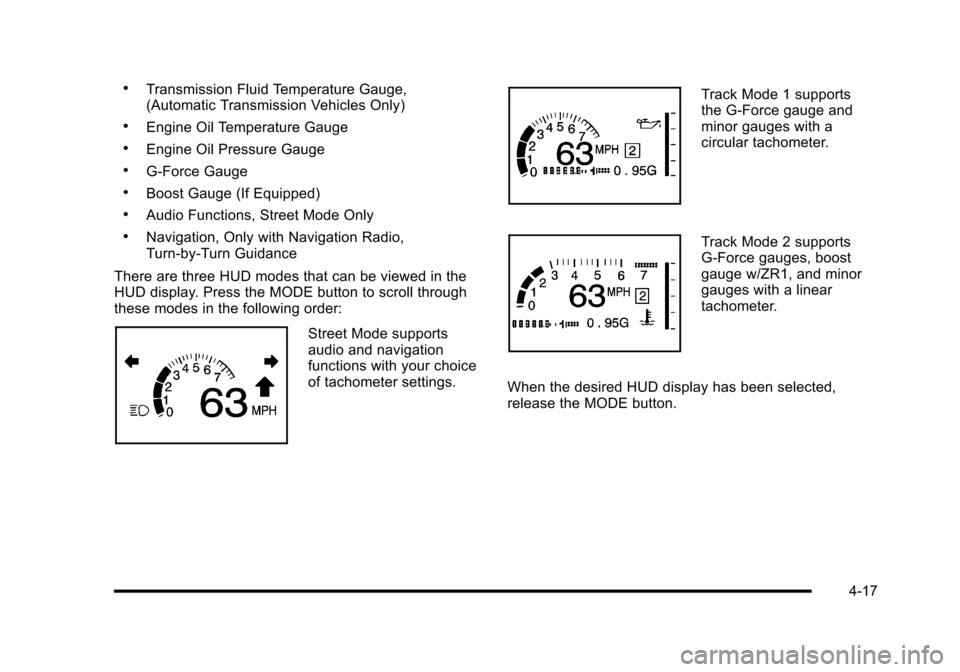
There are three HUD modes that can be viewed in the
HUD display. Press the MODE button to scroll through
these modes in the following order:
Street Mode supports
audio and navigation
functions with your choice
of tachometer settings.
Track Mode 1 supports
the G-Force gauge and
minor gauges with a
circular tachometer.
Track Mode 2 supports
G-Force gauges, boost
gauge w/ZR1, and minor
gauges with a linear
tachometer.
When the desired HUD display has been selected,
release the MODE button.
4-17
Page 198 of 472
Instrument Panel Cluster
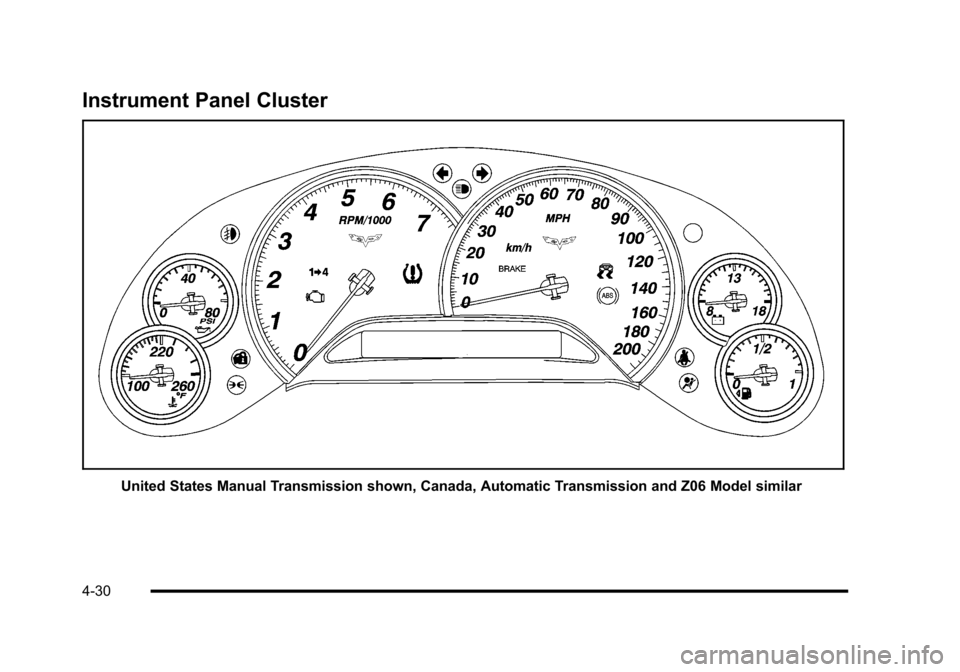
United States Manual Transmission shown, Canada, Automatic Transmission and Z06 Model similar
4-30