2010 CHEVROLET CORVETTE automatic transmission
[x] Cancel search: automatic transmissionPage 9 of 472

A.Outlet Adjustment on page 4‑27.
B. Head-Up Display (HUD)
on page 4‑16(If Equipped).
C. Turn Signal/Multifunction Lever
on page 4‑4.
Cruise Controlon page 4‑7. Fog Lampson
page 4‑13. Exterior Lamps on page 4‑11.
D. Manual Shift Paddles (If Equipped). See Automatic
Transmission Operation on page 3‑26.
E. Driver Information Center (DIC) on page 4‑47.
F. Instrument Panel Cluster on page 4‑30.
G. Windshield Wipers
on page 4‑6and Windshield
Washer on page 4‑6.
H. DIC Operation and Displays on page 4‑47.
I. Hazard Warning Flashers on page 4‑3.
J. Audio System(s) on page 4‑80.
K. Dual Automatic Climate Control System
on
page 4‑22.
L. Fuel Door Release Button. See Filling the
Tank
on page 6‑9. Hatch/Trunk Release Button.
See “Hatch/Trunk Lid Release” underHatchon
page 3‑14.
M. Instrument Panel Brightness on page 4‑15.
N. Power Folding Top Switch (If Equipped). See Convertible Top (Manual)
on page 3‑59orConvertible Top (Power) on page 3‑66. O.
Bluetooth
®on page 4‑96(If Equipped).
Audio Steering Wheel Controlson page 4‑107(If Equipped).
P. Tilt Wheel on page 4‑3.
Q. Horn on page 4‑3.
R. Telescopic Wheel Button (If Equipped). See Tilt Wheel on page 4‑3.
S. Ignition Positions on page 3‑23.
T. Heated Seats
on page 2‑4(If Equipped).
U. Shift Lever (Automatic Shown). See Automatic
Transmission Operation
on page 3‑26or Manual
Transmission Operation on page 3‑32.
V. Active Handling System on page 5‑8.
W. Accessory Power Outlet(s) on page 4‑20.
X. Selective Ride Control on page 5‑14.
Y. Cupholders on page 3‑50.
Z. Ashtray(s) and Cigarette Lighter on page 4‑21.
AA. Parking Brake on page 3‑34.
AB. Glove Box on page 3‑50.
AC. Instrument Panel Fuse Block on page 6‑101.
1-3
Page 21 of 472

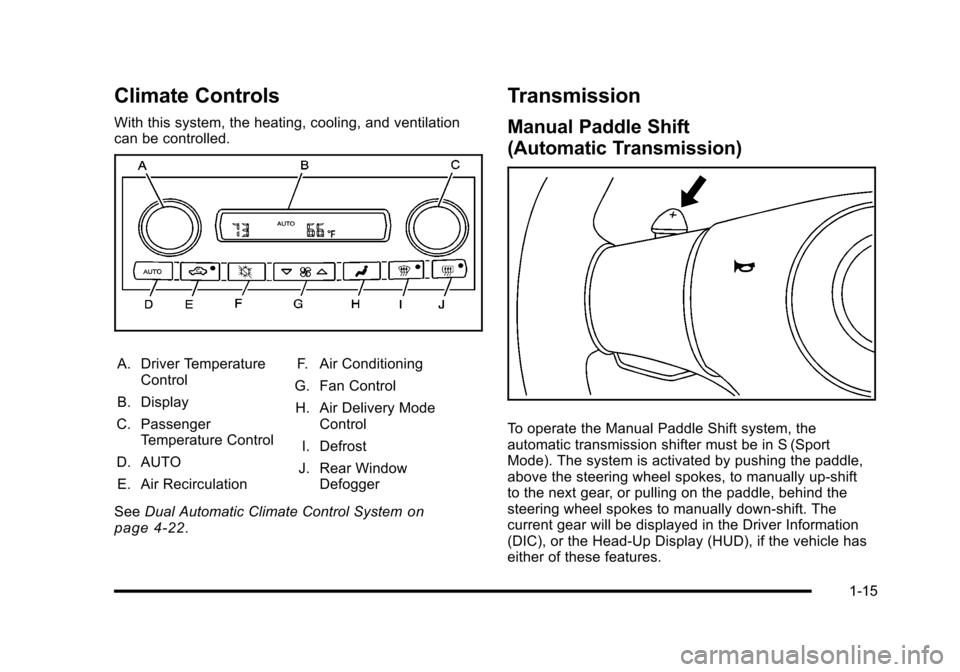
Climate Controls
With this system, the heating, cooling, and ventilation
can be controlled.
A. Driver Temperature Control
B. Display
C. Passenger Temperature Control
D. AUTO E. Air Recirculation F. Air Conditioning
G. Fan Control H. Air Delivery Mode Control
I. Defrost
J. Rear Window Defogger
See Dual Automatic Climate Control System
on
page 4‑22.
Transmission
Manual Paddle Shift
(Automatic Transmission)
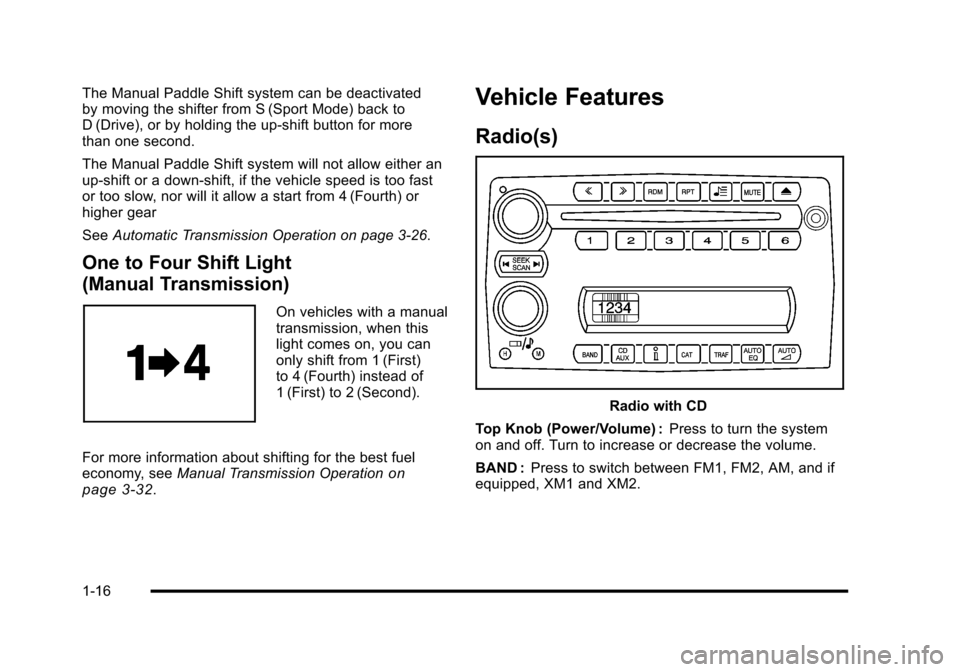
To operate the Manual Paddle Shift system, the
automatic transmission shifter must be in S (Sport
Mode). The system is activated by pushing the paddle,
above the steering wheel spokes, to manually up-shift
to the next gear, or pulling on the paddle, behind the
steering wheel spokes to manually down-shift. The
current gear will be displayed in the Driver Information
(DIC), or the Head-Up Display (HUD), if the vehicle has
either of these features.
1-15
Page 22 of 472

The Manual Paddle Shift system can be deactivated
by moving the shifter from S (Sport Mode) back to
D (Drive), or by holding the up‐shift button for more
than one second.
The Manual Paddle Shift system will not allow either an
up-shift or a down-shift, if the vehicle speed is too fast
or too slow, nor will it allow a start from 4 (Fourth) or
higher gear
See Automatic Transmission Operation on page 3‑26.
One to Four Shift Light
(Manual Transmission)
On vehicles with a manual
transmission, when this
light comes on, you can
only shift from 1 (First)
to 4 (Fourth) instead of
1 (First) to 2 (Second).
For more information about shifting for the best fuel
economy, see Manual Transmission Operation
on
page 3‑32.
Vehicle Features
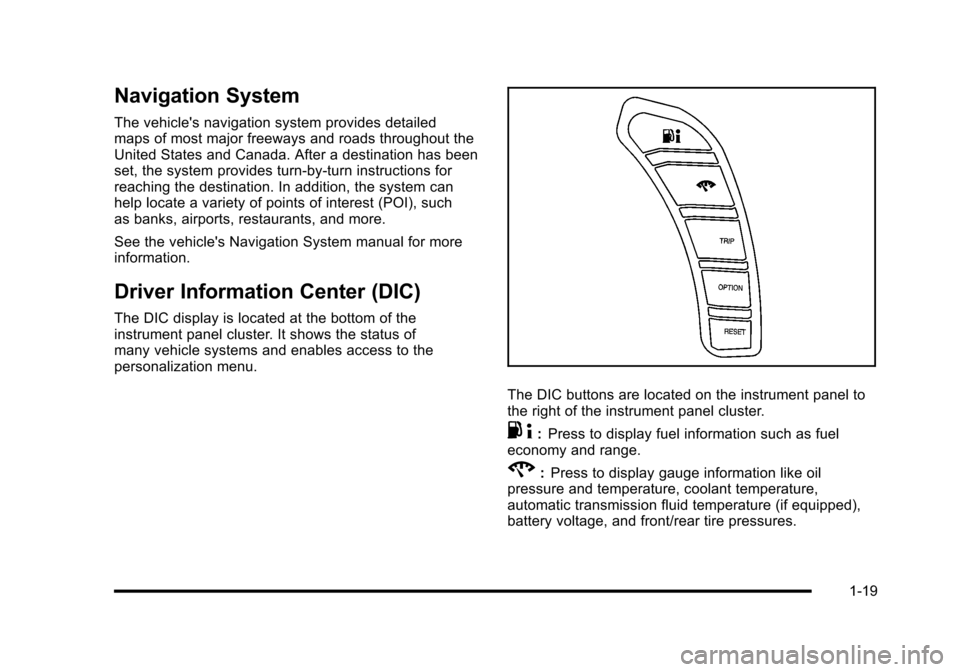
Radio(s)
Radio with CD
Top Knob (Power/Volume) : Press to turn the system
on and off. Turn to increase or decrease the volume.
BAND : Press to switch between FM1, FM2, AM, and if
equipped, XM1 and XM2.
1-16
Page 25 of 472

Navigation System
The vehicle's navigation system provides detailed
maps of most major freeways and roads throughout the
United States and Canada. After a destination has been
set, the system provides turn-by-turn instructions for
reaching the destination. In addition, the system can
help locate a variety of points of interest (POI), such
as banks, airports, restaurants, and more.
See the vehicle's Navigation System manual for more
information.
Driver Information Center (DIC)
The DIC display is located at the bottom of the
instrument panel cluster. It shows the status of
many vehicle systems and enables access to the
personalization menu.
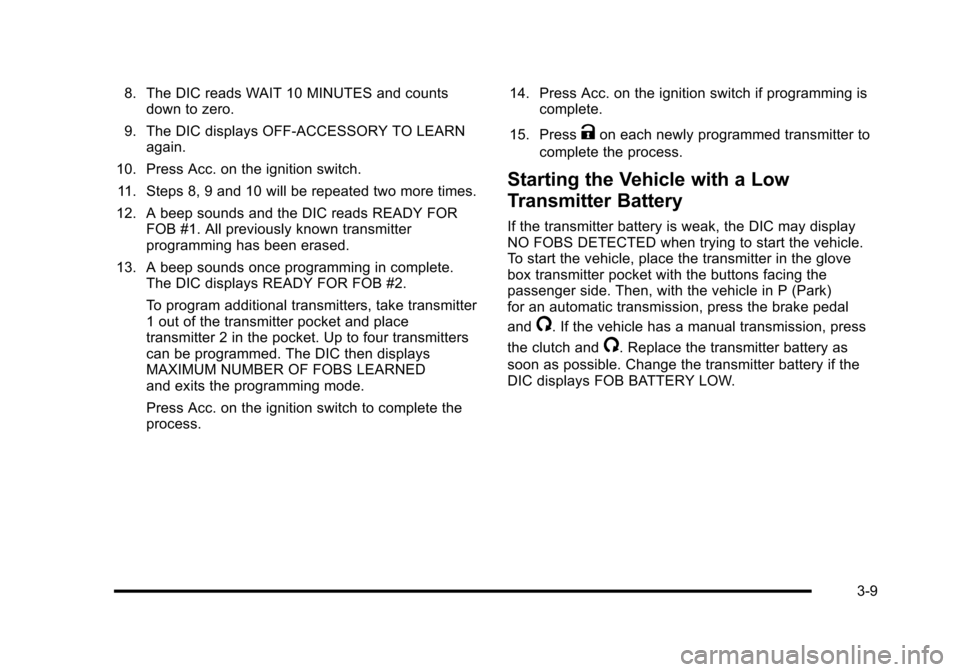
The DIC buttons are located on the instrument panel to
the right of the instrument panel cluster.
. 4:Press to display fuel information such as fuel
economy and range.
2: Press to display gauge information like oil
pressure and temperature, coolant temperature,
automatic transmission fluid temperature (if equipped),
battery voltage, and front/rear tire pressures.
1-19
Page 39 of 472

To recall a memory position:
.On vehicles with an automatic transmission, press
and release the desired button.
If the vehicle is in P (Park), a single beep sounds
and the memory position is recalled after a brief
delay.
If the vehicle is not in P (Park), three beeps sound
and the memory position is not recalled.
.On vehicles with a manual transmission, when the
vehicle is on, the parking brake needs to be set to
recall the memory position. Press and release the
desired button.
A single beep sounds and the memory position is
recalled after a brief delay.
If the vehicle is on and the parking brake is not set,
three beeps sound and the memory position is not
recalled.
For vehicles with the Auto Memory Recall, see “Auto
Memory Recall” underDIC Vehicle Personalization
on
page 4‑71for more information.
To stop recall movement of the memory feature, press
one of the power seat controls, power mirror or memory
buttons, or the telescopic steering column switch.
Easy Exit Seat
B (Easy Exit Seat) : This button is used to program
and recall the desired driver's seat exit position.
To program an exit position:
1. Recall the desired driving position by pressing button 1.
2. Adjust the seat and the telescopic steering column position to a comfortable exit position.
3. Press and hold the exit button until two beeps sound to let you know that the exit position is
now programmed.
A second exit position can be programmed by repeating
the above steps and pressing button 2.
To recall an exit position:
.On vehicles with an automatic transmission, the
vehicle needs to be in P (Park).
.On vehicles with a manual transmission, the
parking brake must be set.
B: Press to recall an exit position.
One beep will sound and the exit position for the
currently identified driver will be recalled.
For vehicles with the Auto Exit Recall, see “Auto Exit
Recall” underDIC Vehicle Personalization
on
page 4‑71for more information.
2-5
Page 97 of 472

Section 3 Features and Controls
Keys. . . . . . . . . . . . . . . . . . . . . . . . . . . . . . . . . . . . . . . . . . . . . . . . 3-3
Keyless Access System . . . . . . . . . . . . . . . . . . . . . . . . . 3-5
Keyless Access System Operation . . . . . . . . . . . . . . 3-5
Doors and Locks . . . . . . . . . . . . . . . . . . . . . . . . . . . . . . . . . 3-10
Door Locks . . . . . . . . . . . . . . . . . . . . . . . . . . . . . . . . . . . . 3-10
Power Door Locks . . . . . . . . . . . . . . . . . . . . . . . . . . . . . 3-12
Automatic Door Lock . . . . . . . . . . . . . . . . . . . . . . . . . . 3-13
Programmable Automatic Door Unlock . . . . . . . . 3-13
Lockout Protection . . . . . . . . . . . . . . . . . . . . . . . . . . . . . 3-13
Hatch . . . . . . . . . . . . . . . . . . . . . . . . . . . . . . . . . . . . . . . . . . 3-14
Windows . . . . . . . . . . . . . . . . . . . . . . . . . . . . . . . . . . . . . . . . . . 3-16
Power Windows . . . . . . . . . . . . . . . . . . . . . . . . . . . . . . . 3-17
Sun Visors . . . . . . . . . . . . . . . . . . . . . . . . . . . . . . . . . . . . . 3-18
Theft-Deterrent Systems . . . . . . . . . . . . . . . . . . . . . . . . . 3-19
Theft-Deterrent System . . . . . . . . . . . . . . . . . . . . . . . . 3-19
Immobilizer . . . . . . . . . . . . . . . . . . . . . . . . . . . . . . . . . . . . 3-20
Immobilizer Operation . . . . . . . . . . . . . . . . . . . . . . . . . 3-20 Starting and Operating Your Vehicle
. . . . . . . . . . . . 3-21
New Vehicle Break-In . . . . . . . . . . . . . . . . . . . . . . . . . . 3-21
Front Air Dam . . . . . . . . . . . . . . . . . . . . . . . . . . . . . . . . . . 3-22
Ignition Positions . . . . . . . . . . . . . . . . . . . . . . . . . . . . . . 3-23
Retained Accessory Power (RAP) . . . . . . . . . . . . . 3-24
Starting the Engine . . . . . . . . . . . . . . . . . . . . . . . . . . . . 3-24
Automatic Transmission Operation . . . . . . . . . . . . . 3-26
Manual Transmission Operation . . . . . . . . . . . . . . . 3-32
Parking Brake . . . . . . . . . . . . . . . . . . . . . . . . . . . . . . . . . 3-34
Shifting Into Park (Automatic Transmission) . . . 3-35
Shifting Out of Park . . . . . . . . . . . . . . . . . . . . . . . . . . . . 3-36
Parking the Vehicle (Manual Transmission) . . . . 3-36
Parking Over Things That Burn . . . . . . . . . . . . . . . . 3-37
Engine Exhaust . . . . . . . . . . . . . . . . . . . . . . . . . . . . . . . . 3-37
Running the Vehicle While Parked . . . . . . . . . . . . . 3-38
Mirrors . . . . . . . . . . . . . . . . . . . . . . . . . . . . . . . . . . . . . . . . . . . . 3-39
Automatic Dimming Rearview Mirror . . . . . . . . . . . 3-39
Compass . . . . . . . . . . . . . . . . . . . . . . . . . . . . . . . . . . . . . . 3-39
Outside Power Mirrors . . . . . . . . . . . . . . . . . . . . . . . . . 3-41
Outside Automatic Dimming Mirror . . . . . . . . . . . . . 3-41
Outside Convex Mirror . . . . . . . . . . . . . . . . . . . . . . . . . 3-42
Outside Heated Mirrors . . . . . . . . . . . . . . . . . . . . . . . . 3-42
3-1
Page 102 of 472

Keyless Trunk Opening
Press the hatch/trunk release button located on the rear
of the hatch/trunk lid above the license plate to open the
trunk if the keyless access transmitter is within range.
See Hatch
on page 3‑14for additional information.
There are other conditions that can affect the
performance of the transmitter. See Keyless Access
System
on page 3‑5Keyless Access System.
This vehicle comes with
two transmitters.
Q(Lock): Press once to lock the doors. WhenQis
pressed twice, the lights flash and the horn sounds to
confirm locking.
K(Unlock): Press once to unlock only the driver door.
Press
Ktwice within five seconds to unlock both doors.
The interior lamps may come on.
Pressing
Kalso recalls the memory settings.
See Memory Seat, Mirrors and Steering Wheel
on
page 2‑4for more information.
}(Hatch/Trunk): Press and hold for about
one second to unlock the hatch/trunk. If the engine
is running, the shift lever must be in P (Park) for an
automatic transmission. For a manual transmission,
the shift lever must be in NEUTRAL with the parking
brake set.
L(Panic): Press to sound the horn. Press any other
button on the keyless access transmitter to stop it.
The vehicle comes with two transmitters. Each
transmitter will have a number on top of it, “1”or“2”.
These numbers correspond to the driver of the vehicle.
For example, the memory seat position for driver 1 will
be recalled when using the transmitter labeled “1”,
if enabled through the DIC. See Memory Seat, Mirrors
and Steering Wheel
on page 2‑4and DIC Vehicle
Personalizationon page 4‑71for more information.
3-6
Page 105 of 472

8. The DIC reads WAIT 10 MINUTES and counts down to zero.
9. The DIC displays OFF-ACCESSORY TO LEARN again.
10. Press Acc. on the ignition switch. 11. Steps 8, 9 and 10 will be repeated two more times.
12. A beep sounds and the DIC reads READY FOR FOB #1. All previously known transmitter
programming has been erased.
13. A beep sounds once programming in complete. The DIC displays READY FOR FOB #2.
To program additional transmitters, take transmitter
1 out of the transmitter pocket and place
transmitter 2 in the pocket. Up to four transmitters
can be programmed. The DIC then displays
MAXIMUM NUMBER OF FOBS LEARNED
and exits the programming mode.
Press Acc. on the ignition switch to complete the
process. 14. Press Acc. on the ignition switch if programming is
complete.
15. Press
Kon each newly programmed transmitter to
complete the process.
Starting the Vehicle with a Low
Transmitter Battery
If the transmitter battery is weak, the DIC may display
NO FOBS DETECTED when trying to start the vehicle.
To start the vehicle, place the transmitter in the glove
box transmitter pocket with the buttons facing the
passenger side. Then, with the vehicle in P (Park)
for an automatic transmission, press the brake pedal
and
/. If the vehicle has a manual transmission, press
the clutch and
/. Replace the transmitter battery as
soon as possible. Change the transmitter battery if the
DIC displays FOB BATTERY LOW.
3-9