2010 CHEVROLET CORVETTE transmission oil
[x] Cancel search: transmission oilPage 7 of 472

Section 1 In Brief
Instrument Panel. . . . . . . . . . . . . . . . . . . . . . . . . . . . . . . . . . . 1-2
Initial Drive Information . . . . . . . . . . . . . . . . . . . . . . . . . . . 1-4
Remote Keyless Entry (RKE) System . . . . . . . . . . . 1-4
Door Locks . . . . . . . . . . . . . . . . . . . . . . . . . . . . . . . . . . . . . 1-5
Trunk Release . . . . . . . . . . . . . . . . . . . . . . . . . . . . . . . . . . 1-6
Windows . . . . . . . . . . . . . . . . . . . . . . . . . . . . . . . . . . . . . . . . 1-6
Seat Adjustment . . . . . . . . . . . . . . . . . . . . . . . . . . . . . . . . 1-7
Safety Belt . . . . . . . . . . . . . . . . . . . . . . . . . . . . . . . . . . . . . . 1-9
Sensing System for Passenger Airbag . . . . . . . . . 1-10
Mirror Adjustment . . . . . . . . . . . . . . . . . . . . . . . . . . . . . . 1-11
Steering Wheel Adjustment . . . . . . . . . . . . . . . . . . . . 1-12
Interior Lighting . . . . . . . . . . . . . . . . . . . . . . . . . . . . . . . . 1-13
Exterior Lighting . . . . . . . . . . . . . . . . . . . . . . . . . . . . . . . 1-13
Windshield Wiper/Washer . . . . . . . . . . . . . . . . . . . . . . 1-14
Climate Controls . . . . . . . . . . . . . . . . . . . . . . . . . . . . . . . 1-15
Transmission . . . . . . . . . . . . . . . . . . . . . . . . . . . . . . . . . . 1-15
Vehicle Features . . . . . . . . . . . . . . . . . . . . . . . . . . . . . . . . . . 1-16
Radio(s) . . . . . . . . . . . . . . . . . . . . . . . . . . . . . . . . . . . . . . . 1-16
Satellite Radio . . . . . . . . . . . . . . . . . . . . . . . . . . . . . . . . . 1-17 Portable Audio Devices . . . . . . . . . . . . . . . . . . . . . . . . 1-18
Steering Wheel Controls . . . . . . . . . . . . . . . . . . . . . . . 1-18
Bluetooth
®. . . . . . . . . . . . . . . . . . . . . . . . . . . . . . . . . . . . . 1-18
Navigation System . . . . . . . . . . . . . . . . . . . . . . . . . . . . . 1-19
Driver Information Center (DIC) . . . . . . . . . . . . . . . . 1-19
Cruise Control . . . . . . . . . . . . . . . . . . . . . . . . . . . . . . . . . 1-20
Power Outlets . . . . . . . . . . . . . . . . . . . . . . . . . . . . . . . . . 1-21
Roof Panel . . . . . . . . . . . . . . . . . . . . . . . . . . . . . . . . . . . . 1-21
Convertible . . . . . . . . . . . . . . . . . . . . . . . . . . . . . . . . . . . . 1-21
Performance and Maintenance . . . . . . . . . . . . . . . . . . 1-21
Traction Control System (TCS) . . . . . . . . . . . . . . . . 1-21
Towing . . . . . . . . . . . . . . . . . . . . . . . . . . . . . . . . . . . . . . . . . 1-22
Tire Pressure Monitor . . . . . . . . . . . . . . . . . . . . . . . . . . 1-22
Z06, Z16, and ZR1 Features . . . . . . . . . . . . . . . . . . . 1-23
Engine Oil Life System . . . . . . . . . . . . . . . . . . . . . . . . 1-24
Driving for Better Fuel Economy . . . . . . . . . . . . . . . 1-24
Battery . . . . . . . . . . . . . . . . . . . . . . . . . . . . . . . . . . . . . . . . . 1-24
Roadside Assistance Program . . . . . . . . . . . . . . . . . 1-25
OnStar
®. . . . . . . . . . . . . . . . . . . . . . . . . . . . . . . . . . . . . . . 1-25
1-1
Page 25 of 472
Navigation System
The vehicle's navigation system provides detailed
maps of most major freeways and roads throughout the
United States and Canada. After a destination has been
set, the system provides turn-by-turn instructions for
reaching the destination. In addition, the system can
help locate a variety of points of interest (POI), such
as banks, airports, restaurants, and more.
See the vehicle's Navigation System manual for more
information.
Driver Information Center (DIC)
The DIC display is located at the bottom of the
instrument panel cluster. It shows the status of
many vehicle systems and enables access to the
personalization menu.
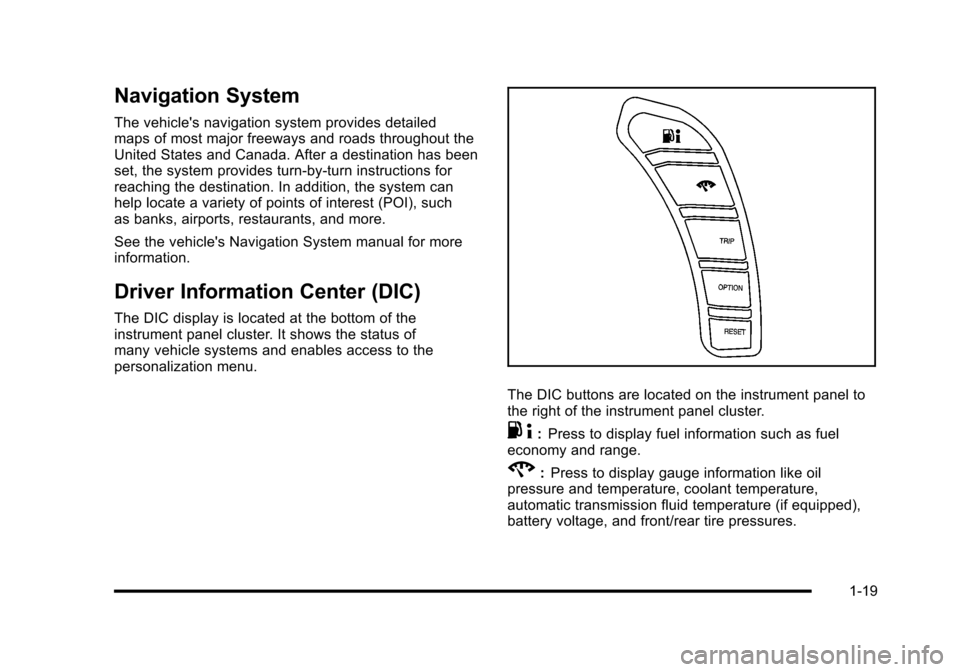
The DIC buttons are located on the instrument panel to
the right of the instrument panel cluster.
. 4:Press to display fuel information such as fuel
economy and range.
2: Press to display gauge information like oil
pressure and temperature, coolant temperature,
automatic transmission fluid temperature (if equipped),
battery voltage, and front/rear tire pressures.
1-19
Page 118 of 472
For the first 500 miles/805 km:
.Avoid full throttle starts and abrupt stops.
.Do not exceed 4,000 engine rpm.
.Avoid driving at any one constant speed, fast or
slow, including the use of cruise control.
.Avoid downshifting to brake or slow the vehicle
when the engine speed will exceed 4000 RPM.
.Do not let the engine labor. Never lug the
engine in high gear at low speeds. With a manual
transmission, shift to the next lower gear. This rule
applies at all times, not just during the break-in
period.
For the first 1,500 miles/2414 km:
.Do not participate in track events, sport driving
schools, or similar activities during the first
1,500 miles/2414 km.
.Check engine oil with every refueling and add if
necessary. Oil and fuel consumption may be higher
than normal during the first 1,500 miles/2414 km.
Front Air Dam
The vehicle is equipped with a front air dam which has
minimal ground clearance.
Vehicles with the ZR-1 package also come with a
splitter made from carbon fiber.
{WARNING:
The splitter in the ZR‐1 is made from carbon fiber.
When damaged, the exposed edges can be very
sharp. A person could be injured by these sharp
edges. Use caution when washing the vehicle,
coming in contact with, or removing damaged
carbon fiber parts. See your dealer/retailer for
replacement.
Under normal operation, these components will
occasionally contact some road surfaces (speed
bumps, driveway ramps, etc.). This can be heard inside
the vehicle as a scraping noise. This is normal and
does not indicate a problem.
Use care when approaching bumps or objects on road
surfaces and avoid them when possible.
3-22
Page 121 of 472
3. Do not race the engine immediately after starting it. Operate the engine and transmission gently until
the oil warms up and lubricates all moving parts.
4. If the engine does not start and no DIC message is displayed, wait 15 seconds before trying again to
let the cranking motor cool down.
If the engine does not start after 5-10 seconds,
especially in very cold weather (below −18°C
or 0°F), it could be flooded with too much gasoline.
Try pushing the accelerator pedal all the way
to the floor while cranking for up to 15 seconds
maximum. Wait at least 15 seconds between
each try, to allow the cranking motor to cool down.
When the engine starts, let go of the accelerator.
If the vehicle starts briefly but then stops again,
repeat these steps. This clears the extra gasoline
from the engine.
Notice: Cranking the engine for long periods of
time, by pressing the START button immediately
after cranking has ended, can overheat and damage
the cranking motor, and drain the battery. Wait at
least 15 seconds between each try, to allow the
cranking motor to cool down. The vehicle has a Computer-Controlled Cranking
System. This feature assists in starting the engine and
protects components. Once cranking has been initiated,
the engine continues cranking for a few seconds or
until the vehicle starts. If the engine does not start,
cranking automatically stops after 15 seconds to
prevent cranking motor damage. To prevent gear
damage, this system also prevents cranking if the
engine is already running.
Notice:
The engine is designed to work with the
electronics in the vehicle. If electrical parts or
accessories are added, you could change the
way the engine operates. Before adding electrical
equipment, check with your dealer/retailer. If you
do not, the engine might not perform properly. Any
resulting damage would not be covered by the
vehicle warranty.
3-25
Page 169 of 472

Section 4 Instrument Panel
Instrument Panel Overview. . . . . . . . . . . . . . . . . . . . . . . . 4-3
Hazard Warning Flashers . . . . . . . . . . . . . . . . . . . . . . . 4-3
Horn . . . . . . . . . . . . . . . . . . . . . . . . . . . . . . . . . . . . . . . . . . . . 4-3
Tilt Wheel . . . . . . . . . . . . . . . . . . . . . . . . . . . . . . . . . . . . . . . 4-3
Turn Signal/Multifunction Lever . . . . . . . . . . . . . . . . . . 4-4
Turn and Lane-Change Signals (Auto Signal) . . . 4-5
Headlamp High/Low-Beam Changer . . . . . . . . . . . . 4-5
Flash-to-Pass . . . . . . . . . . . . . . . . . . . . . . . . . . . . . . . . . . . 4-5
Windshield Wipers . . . . . . . . . . . . . . . . . . . . . . . . . . . . . . 4-6
Windshield Washer . . . . . . . . . . . . . . . . . . . . . . . . . . . . . 4-6
Cruise Control . . . . . . . . . . . . . . . . . . . . . . . . . . . . . . . . . . 4-7
Exterior Lamps . . . . . . . . . . . . . . . . . . . . . . . . . . . . . . . . . 4-11
Wiper Activated Headlamps . . . . . . . . . . . . . . . . . . . 4-12
Headlamps on Reminder . . . . . . . . . . . . . . . . . . . . . . 4-12
Daytime Running Lamps (DRL) . . . . . . . . . . . . . . . . 4-12
Fog Lamps . . . . . . . . . . . . . . . . . . . . . . . . . . . . . . . . . . . . 4-13
Twilight Sentinel
®. . . . . . . . . . . . . . . . . . . . . . . . . . . . . . 4-14
Exterior Lighting Battery Saver . . . . . . . . . . . . . . . . . 4-15
Instrument Panel Brightness . . . . . . . . . . . . . . . . . . . 4-15
Courtesy Lamps . . . . . . . . . . . . . . . . . . . . . . . . . . . . . . . 4-15
Entry/Exit Lighting . . . . . . . . . . . . . . . . . . . . . . . . . . . . . 4-15
Reading Lamps . . . . . . . . . . . . . . . . . . . . . . . . . . . . . . . . 4-15
Battery Run-Down Protection . . . . . . . . . . . . . . . . . . 4-16
Head-Up Display (HUD) . . . . . . . . . . . . . . . . . . . . . . . 4-16
Accessory Power Outlet(s) . . . . . . . . . . . . . . . . . . . . . 4-20
Ashtray(s) and Cigarette Lighter . . . . . . . . . . . . . . . 4-21 Climate Controls
. . . . . . . . . . . . . . . . . . . . . . . . . . . . . . . . . . 4-22
Dual Automatic Climate Control System . . . . . . . 4-22
Outlet Adjustment . . . . . . . . . . . . . . . . . . . . . . . . . . . . . . 4-27
Passenger Compartment Air Filter . . . . . . . . . . . . . 4-28
Warning Lights, Gauges, and Indicators . . . . . . . . 4-29
Instrument Panel Cluster . . . . . . . . . . . . . . . . . . . . . . . 4-30
Speedometer and Odometer . . . . . . . . . . . . . . . . . . . 4-32
Tachometer . . . . . . . . . . . . . . . . . . . . . . . . . . . . . . . . . . . . 4-32
Safety Belt Reminders . . . . . . . . . . . . . . . . . . . . . . . . . 4-32
Airbag Readiness Light . . . . . . . . . . . . . . . . . . . . . . . . 4-33
Passenger Airbag Status Indicator . . . . . . . . . . . . . 4-34
Voltmeter Gauge . . . . . . . . . . . . . . . . . . . . . . . . . . . . . . . 4-35
One-to-Four Shift Light (Manual Transmission) . . . . . . . . . . . . . . . . . . . . . . . . . . . . . . . 4-36
Brake System Warning Light . . . . . . . . . . . . . . . . . . . 4-36
Antilock Brake System (ABS) Warning Light . . . . . . . . . . . . . . . . . . . . . . . . . . . . . . . 4-37
Traction Control System (TCS) Warning Light . . . . . . . . . . . . . . . . . . . . . . . . . . . . . . . . 4-38
Active Handling System Light . . . . . . . . . . . . . . . . . . 4-39
Engine Coolant Temperature Gauge . . . . . . . . . . . 4-40
Tire Pressure Light . . . . . . . . . . . . . . . . . . . . . . . . . . . . 4-40
Malfunction Indicator Lamp . . . . . . . . . . . . . . . . . . . . 4-41
Engine Oil Pressure Gauge . . . . . . . . . . . . . . . . . . . . 4-44
Security Light . . . . . . . . . . . . . . . . . . . . . . . . . . . . . . . . . . 4-45
4-1
Page 185 of 472
.Transmission Fluid Temperature Gauge,
(Automatic Transmission Vehicles Only)
.Engine Oil Temperature Gauge
.Engine Oil Pressure Gauge
.G-Force Gauge
.Boost Gauge (If Equipped)
.Audio Functions, Street Mode Only
.Navigation, Only with Navigation Radio,
Turn-by-Turn Guidance
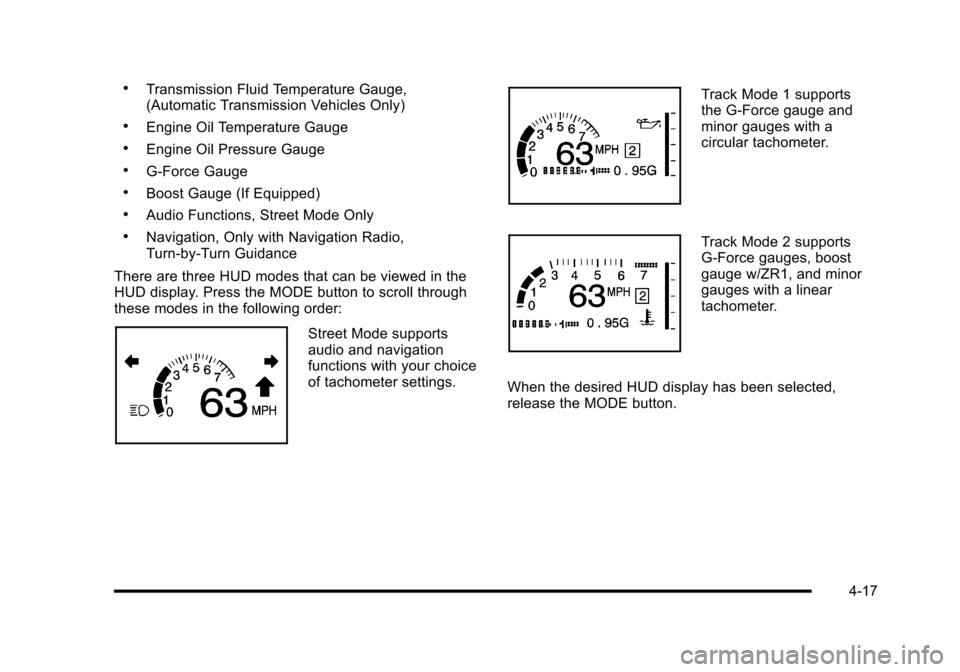
There are three HUD modes that can be viewed in the
HUD display. Press the MODE button to scroll through
these modes in the following order:
Street Mode supports
audio and navigation
functions with your choice
of tachometer settings.
Track Mode 1 supports
the G-Force gauge and
minor gauges with a
circular tachometer.
Track Mode 2 supports
G-Force gauges, boost
gauge w/ZR1, and minor
gauges with a linear
tachometer.
When the desired HUD display has been selected,
release the MODE button.
4-17
Page 186 of 472
Within each mode, the display, can be further
customized by pressing the PAGE button. Pressing this
button in each mode will turn off and on the following:
.Street Mode —No tachometer, circular
tachometer, and linear tachometer.
.Track Modes 1 and 2 —No minor gauge, coolant
temperature, transmission oil temperature, engine
oil temperature, engine oil pressure, and boost
gauge.
While in Track Mode 1 or 2, the maximum G value
achieved during the current ignition cycle can be
displayed by pressing and holding the PAGE
button. The maximum G display will be shown
until the PAGE button is released. The maximum
G value display will be identical to the normal
G value display, except the maximum G gauge
digits (X.XX G) and corresponding G gauge bar
will overwrite the current G value.
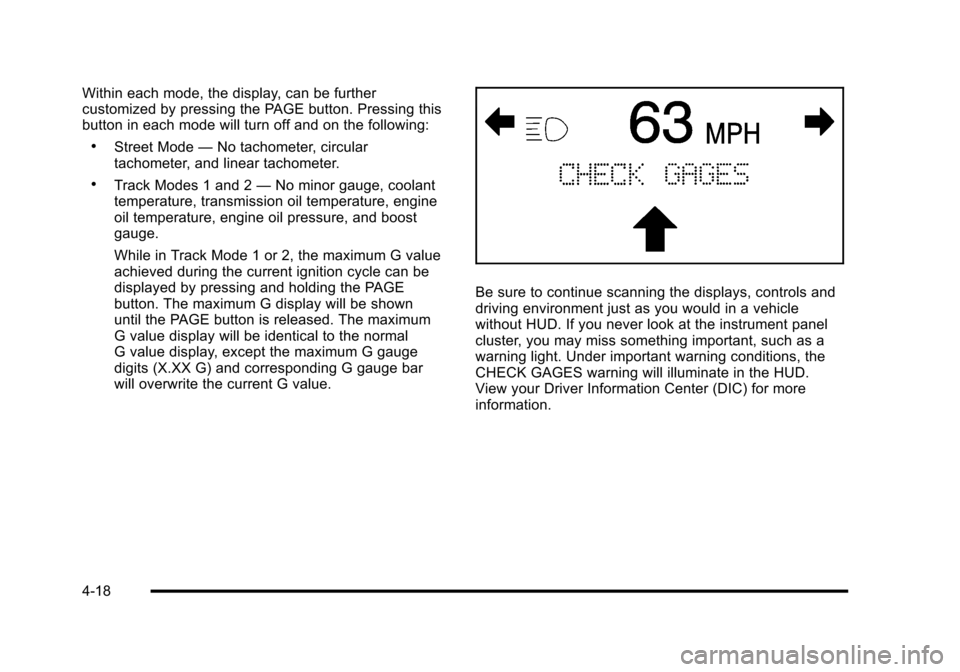
Be sure to continue scanning the displays, controls and
driving environment just as you would in a vehicle
without HUD. If you never look at the instrument panel
cluster, you may miss something important, such as a
warning light. Under important warning conditions, the
CHECK GAGES warning will illuminate in the HUD.
View your Driver Information Center (DIC) for more
information.
4-18
Page 216 of 472
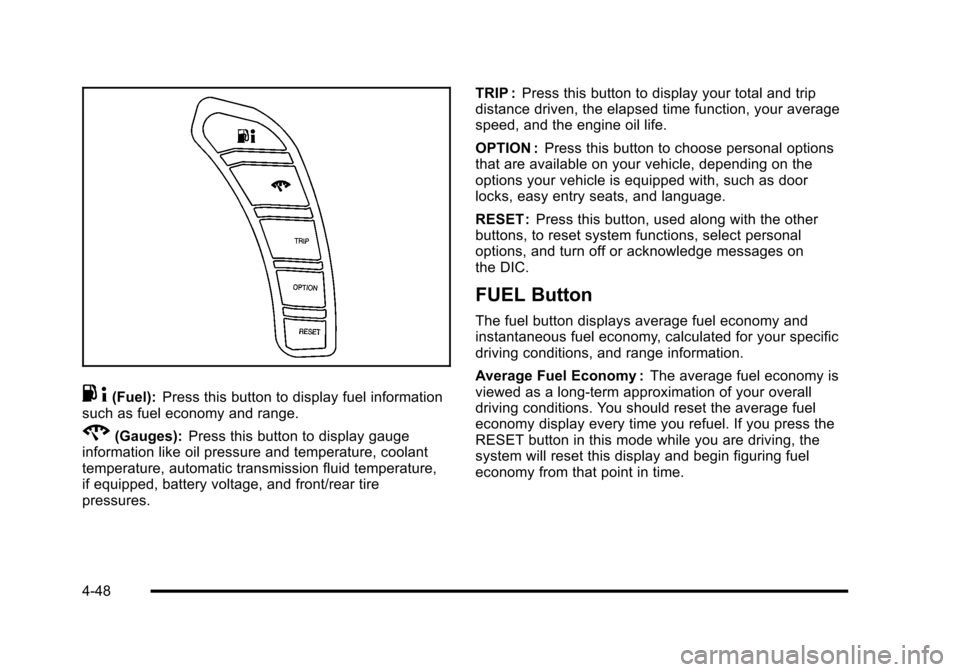
.4(Fuel): Press this button to display fuel information
such as fuel economy and range.
2(Gauges): Press this button to display gauge
information like oil pressure and temperature, coolant
temperature, automatic transmission fluid temperature,
if equipped, battery voltage, and front/rear tire
pressures. TRIP :
Press this button to display your total and trip
distance driven, the elapsed time function, your average
speed, and the engine oil life.
OPTION : Press this button to choose personal options
that are available on your vehicle, depending on the
options your vehicle is equipped with, such as door
locks, easy entry seats, and language.
RESET : Press this button, used along with the other
buttons, to reset system functions, select personal
options, and turn off or acknowledge messages on
the DIC.
FUEL Button
The fuel button displays average fuel economy and
instantaneous fuel economy, calculated for your specific
driving conditions, and range information.
Average Fuel Economy : The average fuel economy is
viewed as a long-term approximation of your overall
driving conditions. You should reset the average fuel
economy display every time you refuel. If you press the
RESET button in this mode while you are driving, the
system will reset this display and begin figuring fuel
economy from that point in time.
4-48