Page 57 of 108
Features and functions
50
To close the front storage compartment, push
down on the center of the hood until it latches
securely.
EJU35161Glove compartment
The glove compartment is located in front of
the seat.
To open the glove compartment, turn the
glove compartment knob, and then lift up the
lid.To close the glove compartment, lower the lid,
and then turn the glove compartment knob to
lock the lid in place.
EJU31760Seat storage compartment
The seat storage compartment is located un-
der the rear seat.
To open the seat storage compartment, re-
move the rear seat. (See page 25 for rear seat
removal and installation procedures.)
1Glove compartment knob
1Glove compartment
1
1
Glove compartment:
Capacity:
5.9 L (1.6 US gal, 1.3 Imp.gal)
Load limit:
1.0 kg (2 lb)
1Seat storage compartment
Seat storage compartment:
Capacity:
15.0 L (4.0 US gal, 3.3 Imp.gal)
Load limit:
9.0 kg (20 lb)
UF1W71E0.book Page 50 Tuesday, June 24, 2008 11:46 AM
Page 58 of 108
Features and functions
51
EJU35171Beverage holder
The beverage holder is located on the star-
board (right) side of the watercraft.
Do not place beverages in the beverage hold-
er when operating the watercraft.
EJU35184Watertight compartment
The watertight compartment is located on the
port (left) side of the watercraft.
To open the watertight compartment, turn the
cap counterclockwise.
To close the watertight compartment, turn the
cap clockwise until it stops.
1Beverage holder
1Watertight compartment cap
2Watertight compartment
Watertight compartment:
Capacity:
2.7 L (0.7 US gal, 0.6 Imp. gal)
Load limit:
1.0 kg (2.2 lb)
1
1
2
UF1W71E0.book Page 51 Tuesday, June 24, 2008 11:46 AM
Page 59 of 108

Operation
52
EJU31821
Fuel and oil EJU37222Fuel
WARNING
EWJ00282
�Gasoline and gasoline vapors are ex-
tremely flammable. To avoid fires and
explosions and to reduce the risk of in-
jury when refueling, follow these in-
structions.
�Gasoline is poisonous and can cause in-
jury or death. Handle gasoline with care.
Never siphon gasoline by mouth. If you
should swallow some gasoline, inhale a
lot of gasoline vapor, or get some gaso-
line in your eyes, see your doctor imme-
diately. If gasoline spills on your skin,
wash with soap and water. If gasoline
spills on your clothing, change your
clothes.
NOTICE
ECJ00321
�Do not use leaded gasoline. Leaded gas-
oline can seriously damage the engine.
�Avoid getting water and contaminants in
the fuel tank. Contaminated fuel can
cause poor performance and engine
damage. Use only fresh gasoline that
has been stored in clean containers.
Gasohol
There are two types of gasohol: gasohol con-
taining ethanol and that containing methanol.
Gasohol containing ethanol can be used if
ethanol content does not exceed 10% and thefuel meets the minimum octane ratings. E-85
is a fuel blend containing 85% ethanol and
therefore must not be used in this watercraft.
All ethanol blends containing more than 10%
ethanol can cause fuel system damage or en-
gine performance problems.
Yamaha does not recommend gasohol con-
taining methanol because it can cause fuel
system damage and engine performance
problems.
To fill the fuel tank:
(1) Before refueling, turn off the engine. Do
not stand or sit on the watercraft. Never
refuel while smoking, or while in the vicin-
ity of sparks, open flames, or other sourc-
es of ignition.
(2) Place the watercraft in a well-ventilated
area and in a horizontal position.
(3) Remove the seats, and then check the
fuel level. (See page 25 for seat removal
and installation procedures.)
(4) Open the hood. (See page 26 for hood
opening and closing procedures.)
(5) Remove the fuel tank filler cap, and then
slowly add fuel to the fuel tank. Stop filling
when the fuel level reaches approximate-
ly 50 mm (2 in) from the top of the fuel
tank. Do not overfill the fuel tank. Be-
cause fuel expands when it heats up,
heat from the engine or the sun can
cause fuel to spill out of the fuel tank. Do
not leave the watercraft with a full tank in
direct sunlight. Recommended fuel:
Regular unleaded gasoline with a mini-
mum octane rating of
86
(Pump octane number) = (R + M)/2
90 (Research octane number)
UF1W71E0.book Page 52 Tuesday, June 24, 2008 11:46 AM
Page 60 of 108
Operation
53
(6) Wipe up any spilled fuel immediately.
(7) Install the fuel tank filler cap, and then
close the hood. Make sure that the fuel
tank filler cap and the hood are securely
closed before operating the watercraft.
(8) Install the seats. Make sure that the seats
are securely installed before operating
the watercraft.
EJU31891Engine oil
NOTICE
ECJ00281
Use only 4-stroke engine oil. Usage of 2-
stroke engine oil could result in severe en-
gine damage.
Make sure that the engine oil is at the speci-
fied level. Add oil as necessary. (See page 56
for engine oil level checking procedures.) Use
a combination of the recommended SAE and
API engine oil classifications shown in the
chart below. Fuel tank capacity:
70 L (18.5 US gal, 15.4 Imp.gal)
1Approximately 50 mm (2 in) from top of the
fuel tank
1
UF1W71E0.book Page 53 Tuesday, June 24, 2008 11:46 AM
Page 61 of 108

Operation
54
EJU31980
Pre-operation checks EJU31991Pre-operation check list
Before operating this watercraft, perform the checks in the following check list.
WARNING
EWJ00411
Failure to inspect or maintain the watercraft properly increases the possibility of an ac-
cident or damage to the watercraft. Do not operate the watercraft if you find any prob-
lem. If a problem cannot be corrected by the procedures provided in this manual, have
the watercraft inspected by a Yamaha dealer.
ITEM ROUTINE PAGE
BEFORE LAUNCH OR OPERATION
Engine compartmentRemove the seats to ventilate the engine compart-
ment. Check for fuel vapors and loose electrical con-
nections.56
BilgeCheck for water and fuel and drain if necessary. 58
Stern drain plugsCheck for proper installation. 58
Throttle leverCheck that the throttle lever springs back smoothly. 59
Steering systemCheck for proper operation.
Check that the handlebars are locked in place.60
Shift lever and reverse gateCheck for proper operation. 60
QSTSCheck for proper operation. 61
Fuel and oilCheck the fuel and oil levels and replenish if neces-
sary.
Check the hoses and tanks for leakage.56, 56
Water separatorCheck for water and drain if necessary. 57
BatteryCheck the electrolyte level and battery condition. 58
HoodCheck that the hood is securely closed. 26
Front and rear seatsCheck that the seats are securely installed. 25
Hull and deckCheck the hull and deck for cracks and other dam-
age.56
Jet intakeCheck for debris and remove if necessary. 62
Fire extinguisherCheck the condition and replace if necessary. 59
Engine shut-off cord (lan-
yard)Check the condition and replace if frayed or broken. 62
SwitchesCheck the start switch, engine stop switch, and en-
gine shut-off switch for proper operation.62
AFTER LAUNCH
Cooling water pilot outletCheck that water is discharged while the engine is
running and the watercraft is in the water.63
Multifunction information
centerCheck for warning indications and proper operation. 63
UF1W71E0.book Page 54 Tuesday, June 24, 2008 11:46 AM
Page 62 of 108
Operation
55
TIP:
Pre-operation checks should be made each time the watercraft is used. These checks can be
completed in a short time. It is worth the time spent to ensure safety and reliability.
UF1W71E0.book Page 55 Tuesday, June 24, 2008 11:46 AM
Page 63 of 108

Operation
56
EJU32280Pre-operation check points EJU32331Engine compartment
WARNING
EWJ00460
Failure to ventilate the engine compart-
ment could result in a fire or explosion. Do
not start the engine if there is a fuel leak or
a loose electrical connection.
Ventilate the engine compartment before
each use.
To ventilate the engine compartment, remove
the seats. (See page 25 for seat removal and
installation procedures.) Leave the engine
compartment open for a few minutes to allow
any fuel vapors to escape.
While the engine compartment is open, check
for loose electrical connections.
EJU32350Hull and deck
Check the hull and deck for cracks and other
damage. If any damage is found, have a
Yamaha dealer repair the watercraft.
EJU36871Fuel level
Make sure that there is sufficient fuel in the
fuel tank before each use.
Also, check the fuel system for leakage,
cracks, and malfunctions. (See page 83 for
check points and correct procedures.)
(1) Open the hood and remove the fuel tank
filler cap to release any pressure thatmight have built up in the fuel tank. (See
page 26 for hood opening and closing
procedures.)
(2) Remove the seats. (See page 25 for seat
removal and installation procedures.)
(3) Check the fuel level in the fuel tank and
replenish if necessary. (See page 52 for
filling procedures.)
(4) Install the fuel tank filler cap, and then
close the hood and install the seats.
EJU36882Engine oil level
Check the engine oil level before each use.
WARNING
EWJ00340
Engine oil is extremely hot immediately af-
ter the engine is turned off. Coming in con-
tact with or getting any engine oil on your
clothes could result in burns.
NOTICE
ECJ01001
Make sure that debris and water do not en-
ter the oil filler hole. Debris and water in
the engine oil can cause serious engine
damage.
To check the engine oil level:
(1) Place the watercraft in a precisely level
position on land with the engine stopped.
TIP:
If the engine was running, allow the engine oil
to settle by waiting 5 minutes or more before
checking the oil level.
(2) Remove the seats. (See page 25 for seat
removal and installation procedures.)
(3) Remove the dipstick, wipe it clean, and
then insert it back into the dipstick tube
completely. Remove the dipstick again
and check that the engine oil level is be-
UF1W71E0.book Page 56 Tuesday, June 24, 2008 11:46 AM
Page 64 of 108
 If the engine oil level is below the mini-
mum level mark, perform steps 5–7 to
add enough oil so that the oil level is be-
tween the mini")
Operation
57
tween the minimum and maximum level
marks.
(4) If the engine oil level is below the mini-
mum level mark, perform steps 5–7 to
add enough oil so that the oil level is be-
tween the minimum and maximum level
marks on the dipstick. If the engine oil lev-
el is significantly above the maximum lev-
el mark, have a Yamaha dealer service
the watercraft.(5) Remove the engine oil filler cap.
(6) Pour engine oil into the filler hole. Wait
approximately 5 minutes until the engine
oil settles.
TIP:
The difference between the minimum and
maximum level marks on the dipstick is equal
to approximately 1 liter of engine oil.
(7) Repeat steps 3–6 until the engine oil is at
the proper level.
(8) Install the engine oil filler cap, and then
install the seats.
EJU32420Water separator
Check the water separator for water. The wa-
ter separator retains any water that may have
entered through the fuel tank breather hose if
the watercraft was capsized. Normally, the
water separator is empty.
1Dipstick
1Maximum level mark
2Minimum level mark
1
12
1Engine oil filler cap
1Water separator
2Drain screw
1
1
2
UF1W71E0.book Page 57 Tuesday, June 24, 2008 11:46 AM
 1
1 2
2 3
3 4
4 5
5 6
6 7
7 8
8 9
9 10
10 11
11 12
12 13
13 14
14 15
15 16
16 17
17 18
18 19
19 20
20 21
21 22
22 23
23 24
24 25
25 26
26 27
27 28
28 29
29 30
30 31
31 32
32 33
33 34
34 35
35 36
36 37
37 38
38 39
39 40
40 41
41 42
42 43
43 44
44 45
45 46
46 47
47 48
48 49
49 50
50 51
51 52
52 53
53 54
54 55
55 56
56 57
57 58
58 59
59 60
60 61
61 62
62 63
63 64
64 65
65 66
66 67
67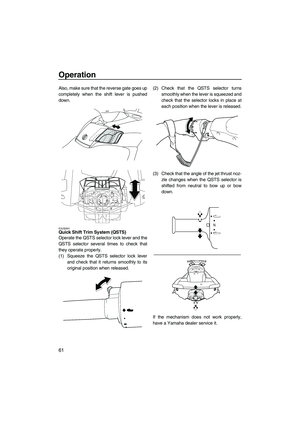 68
68 69
69 70
70 71
71 72
72 73
73 74
74 75
75 76
76 77
77 78
78 79
79 80
80 81
81 82
82 83
83 84
84 85
85 86
86 87
87 88
88 89
89 90
90 91
91 92
92 93
93 94
94 95
95 96
96 97
97 98
98 99
99 100
100 101
101 102
102 103
103 104
104 105
105 106
106 107
107
 side of the watercraft.
Do not place beverages in the beverage hold-
er when operating the")
 Wipe up any spilled fuel immediately.
(7) Install the fuel tank filler cap, and then
close the hood. Make sure that the fuel
tank filler cap and the hood are securely
closed before op")
