Page 946 of 2453
RS-13
Rear Shock Absorber
REAR SUSPENSION
F: DISPOSAL
CAUTION:
•Before handling the shock absorber, be sure
to wear goggles to protect eyes from gas, oil
and cutting powder.
•Do not disassemble the shock absorber or
place it into a fire.
•Drill a hole into shock absorbers in case of
discarding shock absorbers filled with gas.
1) Place the shock absorber on a level surface with
the piston rod fully expanded.
2) Make a hole into the specified position 30 mm
(1.18 in) deep using a drill with 2 — 3 mm (0.08 —
0.12 in) diameter.
(1) 40 mm (1.57 in)
RS-00135
(1)
Page 947 of 2453

RS-14
Front Lateral Link
REAR SUSPENSION
7. Front Lateral Link
A: REMOVAL
1) Lift-up the vehicle, and then remove the rear
wheels.
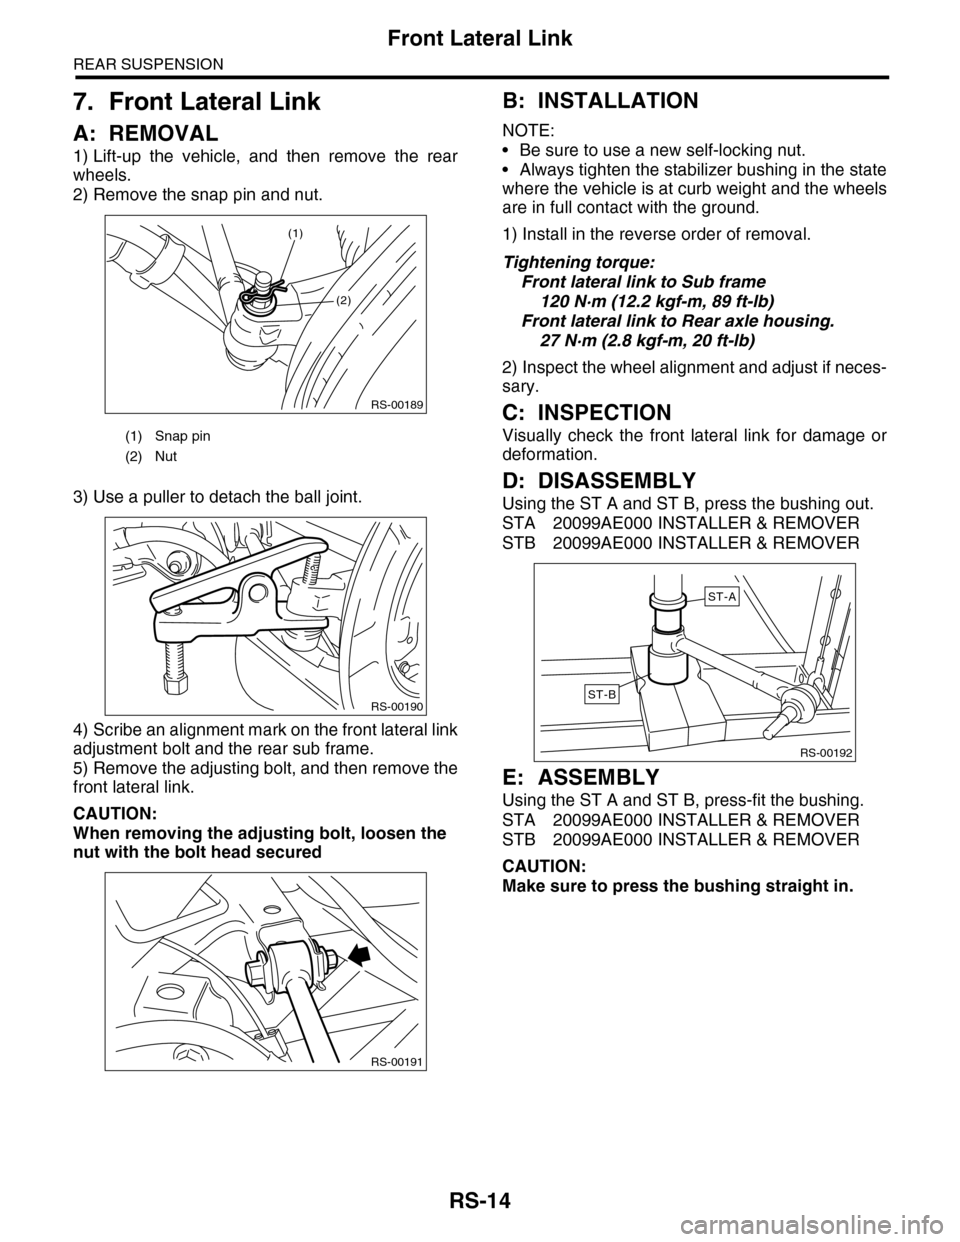
2) Remove the snap pin and nut.
3) Use a puller to detach the ball joint.
4) Scribe an alignment mark on the front lateral link
adjustment bolt and the rear sub frame.
5) Remove the adjusting bolt, and then remove the
front lateral link.
CAUTION:
When removing the adjusting bolt, loosen the
nut with the bolt head secured
B: INSTALLATION
NOTE:
•Be sure to use a new self-locking nut.
•Always tighten the stabilizer bushing in the state
where the vehicle is at curb weight and the wheels
are in full contact with the ground.
1) Install in the reverse order of removal.
Tightening torque:
Front lateral link to Sub frame
120 N·m (12.2 kgf-m, 89 ft-lb)
Front lateral link to Rear axle housing.
27 N·m (2.8 kgf-m, 20 ft-lb)
2) Inspect the wheel alignment and adjust if neces-
sary.
C: INSPECTION
Visually check the front lateral link for damage or
deformation.
D: DISASSEMBLY
Using the ST A and ST B, press the bushing out.
STA 20099AE000 INSTALLER & REMOVER
STB 20099AE000 INSTALLER & REMOVER
E: ASSEMBLY
Using the ST A and ST B, press-fit the bushing.
STA 20099AE000 INSTALLER & REMOVER
STB 20099AE000 INSTALLER & REMOVER
CAUTION:
Make sure to press the bushing straight in.
(1) Snap pin
(2) Nut
RS-00189
(2)
(1)
RS-00190
RS-00191
RS-00192
ST-A
ST-B
Page 948 of 2453
RS-15
Rear Lateral Link
REAR SUSPENSION
8. Rear Lateral Link
A: REMOVAL
1) Lift-up the vehicle, and then remove the rear
wheels.
2) Remove the nut and detach the stabilizer link.
3) Remove the bolts on the bottom side of the
shock absorber.
4) Remove the bolt to remove the rear lateral link.
B: INSTALLATION
NOTE:
•Be sure to use a new self-locking nut.
•Always tighten the stabilizer bushing in the state
where the vehicle is at curb weight and the wheels
are in full contact with the ground.
1) Install in the reverse order of removal.
Tightening torque:
Rear lateral link
120 N·m (12.2 kgf-m, 89 ft-lb)
Shock absorber
120 N·m (12.2 kgf-m, 89 ft-lb)
Stabilizer link
60 N·m (6.1 kgf-m, 44 ft-lb)
2) Inspect the wheel alignment and adjust if neces-
sary.
C: INSPECTION
Visually check the rear lateral link for damage and
deformation.
RS-00193
Page 949 of 2453

RS-16
Rear Sub Frame
REAR SUSPENSION
9. Rear Sub Frame
A: REMOVAL
1) Separate the front exhaust pipe and rear ex-
haust pipe.
2) Remove the rear exhaust pipe and muffler.
3) Remove the propeller shaft.
4) Remove the spare tire hoist.
REMOVAL, Spare Tire Hoist.>
5) Remove the rear parking brake cable from the
parking brake assembly.
AL, Parking Brake Assembly (Rear Disc Brake).>
6) Detach the brake hose, and remove the rear
brake caliper from the vehicle.
7) Disconnect the ABS wheel speed sensor con-
nector.
8) Remove the bolts on the bottom side of the
shock absorber.
9) Support the sub frame using a jack.
10) Remove the front sub frame.
11) Remove the rear sub frame support.
12) Remove the rear sub frame.
B: INSTALLATION
NOTE:
•Be sure to use a new self-locking nut.
•Always tighten the stabilizer bushing in the state
where the vehicle is at curb weight and the wheels
are in full contact with the ground.
1) Install in the reverse order of removal.
Tightening torque:
Refer to “COMPONENT” of “General Descrip-
tion” for the tightening torque.
COMPONENT, General Description.>
2) Bleed air from brake system.
3) Inspect the wheel alignment and adjust if neces-
sary.
C: INSPECTION
Check the removed parts for wear, damage and
crack, and repair or replace them if faulty.
RS-00194
RS-00195
RS-00196
RS-00197
RS-00198
Page 950 of 2453

RS-17
General Diagnostic Table
REAR SUSPENSION
10.General Diagnostic Table
A: INSPECTION
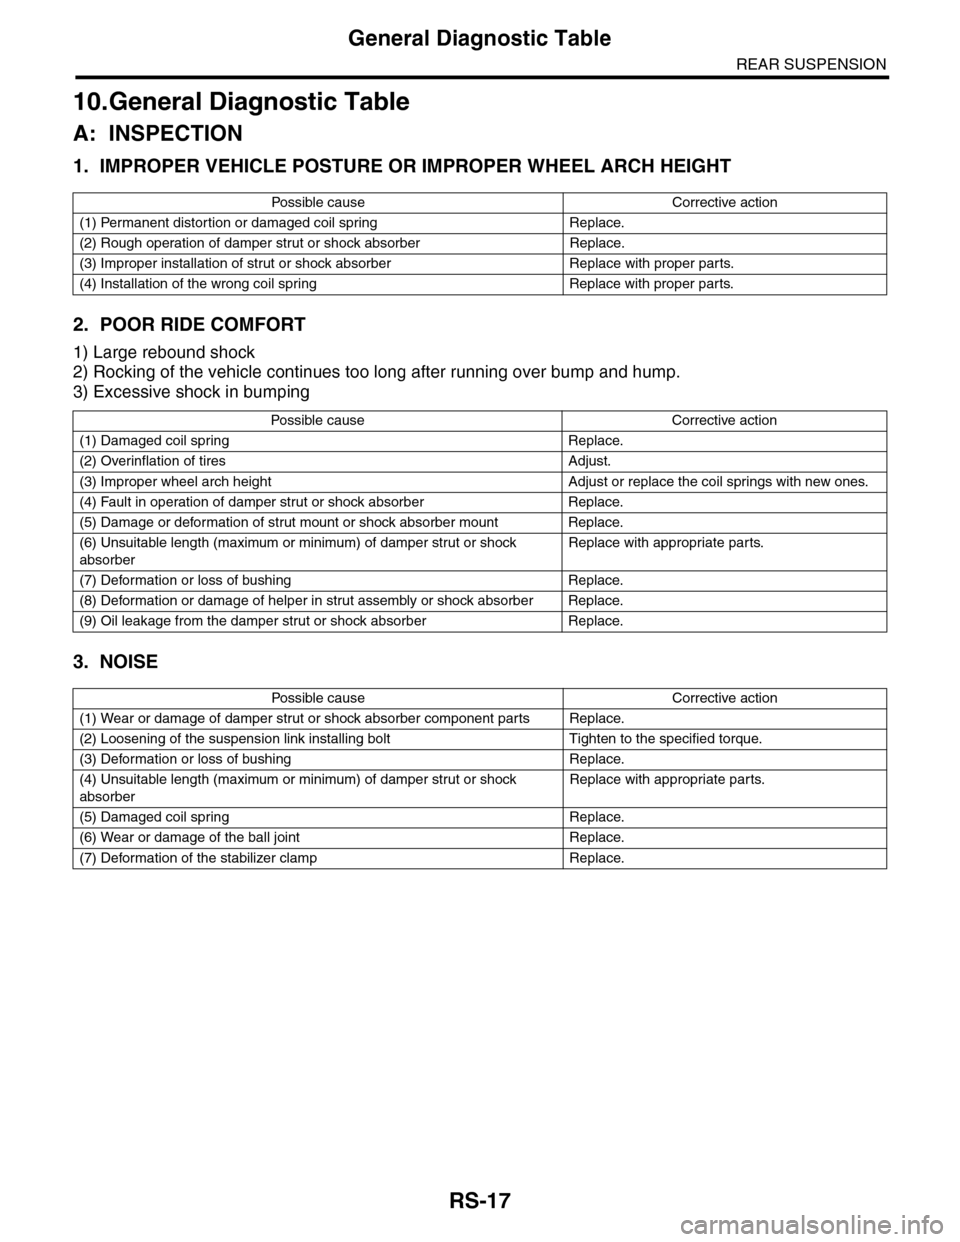
1. IMPROPER VEHICLE POSTURE OR IMPROPER WHEEL ARCH HEIGHT
2. POOR RIDE COMFORT
1) Large rebound shock
2) Rocking of the vehicle continues too long after running over bump and hump.
3) Excessive shock in bumping
3. NOISE
Po ss ibl e c a us e C o r r e ct ive ac ti o n
(1) Permanent distortion or damaged coil spring Replace.
(2) Rough operation of damper strut or shock absorber Replace.
(3) Improper installation of strut or shock absorber Replace with proper parts.
(4) Installation of the wrong coil spring Replace with proper parts.
Po ss ibl e ca us e C or r e ct i ve a ct io n
(1) Damaged coil spring Replace.
(2) Overinflation of tires Adjust.
(3) Improper wheel arch height Adjust or replace the coil springs with new ones.
(4) Fault in operation of damper strut or shock absorber Replace.
(5) Damage or deformation of strut mount or shock absorber mount Replace.
(6) Unsuitable length (maximum or minimum) of damper strut or shock
absorber
Replace with appropriate parts.
(7) Deformation or loss of bushing Replace.
(8) Deformation or damage of helper in strut assembly or shock absorber Replace.
(9) Oil leakage from the damper strut or shock absorber Replace.
Po ss ibl e c a us e C o r r e ct ive ac ti o n
(1) Wear or damage of damper strut or shock absorber component parts Replace.
(2) Loosening of the suspension link installing bolt Tighten to the specified torque.
(3) Deformation or loss of bushing Replace.
(4) Unsuitable length (maximum or minimum) of damper strut or shock
absorber
Replace with appropriate parts.
(5) Damaged coil spring Replace.
(6) Wear or damage of the ball joint Replace.
(7) Deformation of the stabilizer clamp Replace.
Page 951 of 2453
RS-18
General Diagnostic Table
REAR SUSPENSION
Page 1000 of 2453
VDC(diag)-8
Check List for Interview
VEHICLE DYNAMICS CONTROL (VDC) (DIAGNOSTICS)
Condition a) Brakes Deceleration: G
continuous / intermittent
b) Accelerator Acceleration: G
continuous / intermittent
c) Vehicle speed km/h MPH
Advancing
Accelerating
Reducing speed
Low speed
Turning
Others:
d) Tire inflation pressure Front RH tire: kPa
Fr o n t L H t ir e : kPa
Rear RH tire: kPa
Rear LH tire: kPa
e) Degree of wear Front RH tire:
Fr o n t L H t ir e :
Rear RH tire:
Rear LH tire:
f) Steering wheel Sharp turning
Gentle turning
Straight forward motion
Gentle return
Sharp return
g) Tire/Wheel size Specified size
Except specification ( )
h) Tire variation Summer tire
Studless tire (Brand: )
i) Tire chains are fitted: Yes / No
j) T-type tire is used: Yes / No
k) Condition of suspension alignment:
l) Loading state:
m) Repair parts are used: Yes / No
• Contents:
n) Others:
Page 1079 of 2453

VDC(diag)-87
General Diagnostic Table
VEHICLE DYNAMICS CONTROL (VDC) (DIAGNOSTICS)
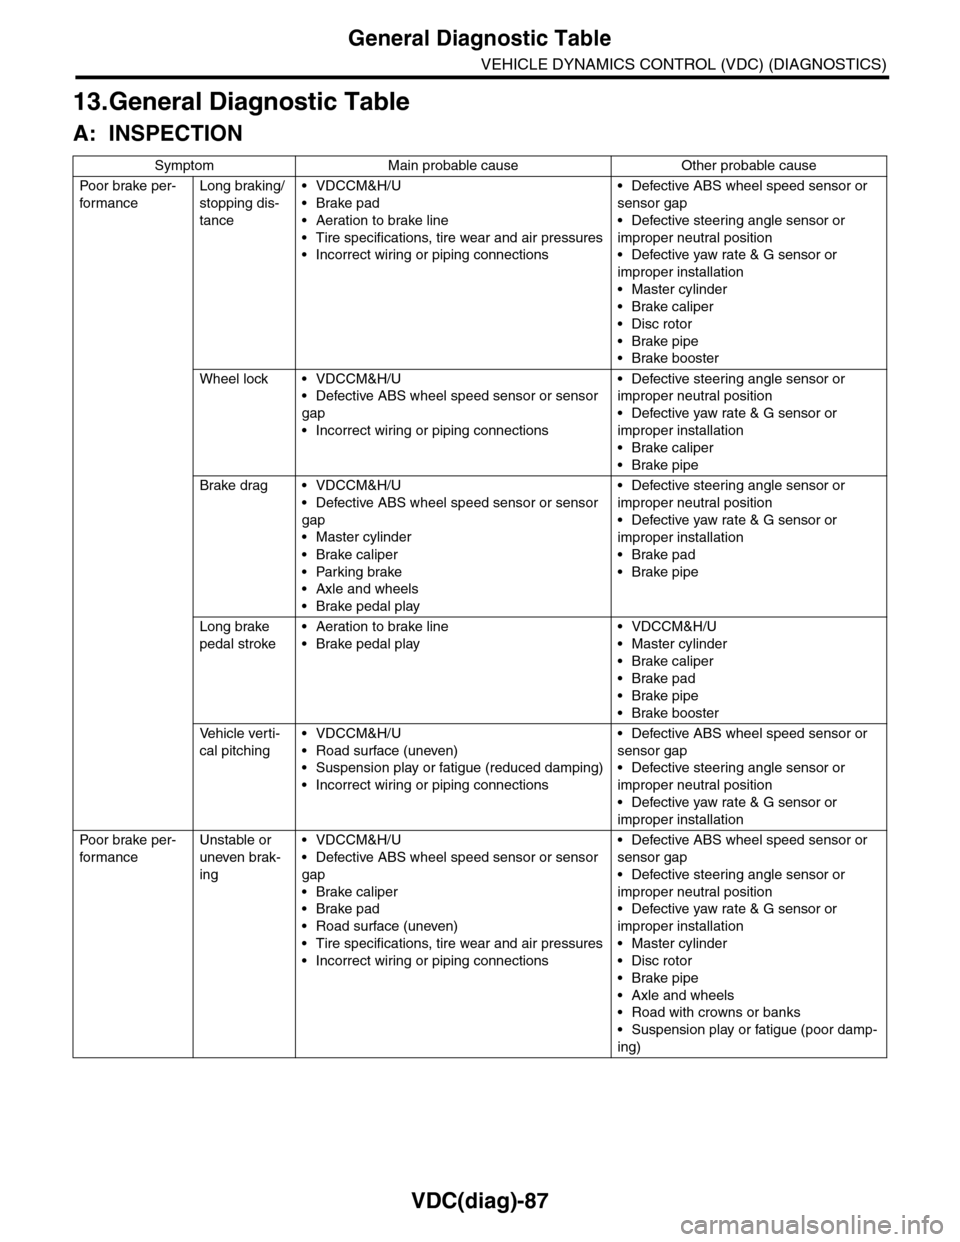
13.General Diagnostic Table
A: INSPECTION
Symptom Main probable cause Other probable cause
Po or b rake pe r -
for mance
Long braking/
stopping dis-
tance
•VDCCM&H/U
•Brake pad
•Aeration to brake line
•Tire specifications, tire wear and air pressures
•Incorrect wiring or piping connections
•Defective ABS wheel speed sensor or
sensor gap
•Defective steering angle sensor or
improper neutral position
•Defective yaw rate & G sensor or
improper installation
•Master cylinder
•Brake caliper
•Disc rotor
•Brake pipe
•Brake booster
Wheel lock • VDCCM&H/U
•Defective ABS wheel speed sensor or sensor
gap
•Incorrect wiring or piping connections
•Defective steering angle sensor or
improper neutral position
•Defective yaw rate & G sensor or
improper installation
•Brake caliper
•Brake pipe
Brake drag • VDCCM&H/U
•Defective ABS wheel speed sensor or sensor
gap
•Master cylinder
•Brake caliper
•Parking brake
•Axle and wheels
•Brake pedal play
•Defective steering angle sensor or
improper neutral position
•Defective yaw rate & G sensor or
improper installation
•Brake pad
•Brake pipe
Long brake
pedal stroke
•Aeration to brake line
•Brake pedal play
•VDCCM&H/U
•Master cylinder
•Brake caliper
•Brake pad
•Brake pipe
•Brake booster
Ve h i c l e v e r t i -
cal pitching
•VDCCM&H/U
•Road surface (uneven)
•Suspension play or fatigue (reduced damping)
•Incorrect wiring or piping connections
•Defective ABS wheel speed sensor or
sensor gap
•Defective steering angle sensor or
improper neutral position
•Defective yaw rate & G sensor or
improper installation
Po or b rake pe r -
for mance
Unstable or
uneven brak-
ing
•VDCCM&H/U
•Defective ABS wheel speed sensor or sensor
gap
•Brake caliper
•Brake pad
•Road surface (uneven)
•Tire specifications, tire wear and air pressures
•Incorrect wiring or piping connections
•Defective ABS wheel speed sensor or
sensor gap
•Defective steering angle sensor or
improper neutral position
•Defective yaw rate & G sensor or
improper installation
•Master cylinder
•Disc rotor
•Brake pipe
•Axle and wheels
•Road with crowns or banks
•Suspension play or fatigue (poor damp-
ing)