2009 SUBARU TRIBECA Harness
[x] Cancel search: HarnessPage 1444 of 2453
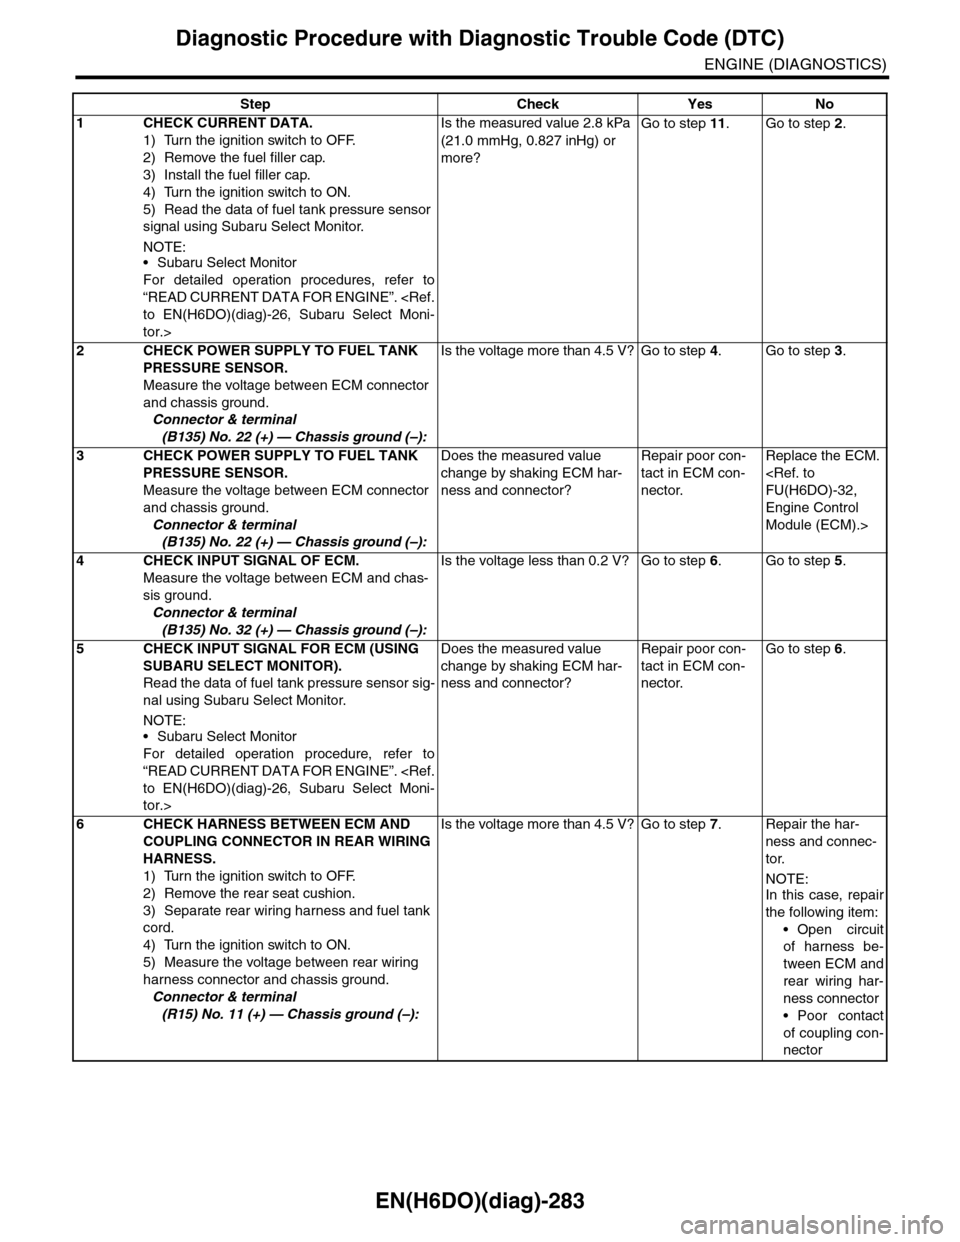
EN(H6DO)(diag)-283
Diagnostic Procedure with Diagnostic Trouble Code (DTC)
ENGINE (DIAGNOSTICS)
Step Check Yes No
1CHECK CURRENT DATA.
1) Turn the ignition switch to OFF.
2) Remove the fuel filler cap.
3) Install the fuel filler cap.
4) Turn the ignition switch to ON.
5) Read the data of fuel tank pressure sensor
signal using Subaru Select Monitor.
NOTE:•Subaru Select Monitor
For detailed operation procedures, refer to
“READ CURRENT DATA FOR ENGINE”.
tor.>
Is the measured value 2.8 kPa
(21.0 mmHg, 0.827 inHg) or
more?
Go to step 11.Go to step 2.
2CHECK POWER SUPPLY TO FUEL TANK
PRESSURE SENSOR.
Measure the voltage between ECM connector
and chassis ground.
Connector & terminal
(B135) No. 22 (+) — Chassis ground (–):
Is the voltage more than 4.5 V? Go to step 4.Go to step 3.
3CHECK POWER SUPPLY TO FUEL TANK
PRESSURE SENSOR.
Measure the voltage between ECM connector
and chassis ground.
Connector & terminal
(B135) No. 22 (+) — Chassis ground (–):
Does the measured value
change by shaking ECM har-
ness and connector?
Repair poor con-
tact in ECM con-
nector.
Replace the ECM.
Engine Control
Module (ECM).>
4CHECK INPUT SIGNAL OF ECM.
Measure the voltage between ECM and chas-
sis ground.
Connector & terminal
(B135) No. 32 (+) — Chassis ground (–):
Is the voltage less than 0.2 V? Go to step 6.Go to step 5.
5CHECK INPUT SIGNAL FOR ECM (USING
SUBARU SELECT MONITOR).
Read the data of fuel tank pressure sensor sig-
nal using Subaru Select Monitor.
NOTE:
•Subaru Select Monitor
For detailed operation procedure, refer to
“READ CURRENT DATA FOR ENGINE”.
tor.>
Does the measured value
change by shaking ECM har-
ness and connector?
Repair poor con-
tact in ECM con-
nector.
Go to step 6.
6CHECK HARNESS BETWEEN ECM AND
COUPLING CONNECTOR IN REAR WIRING
HARNESS.
1) Turn the ignition switch to OFF.
2) Remove the rear seat cushion.
3) Separate rear wiring harness and fuel tank
cord.
4) Turn the ignition switch to ON.
5) Measure the voltage between rear wiring
harness connector and chassis ground.
Connector & terminal
(R15) No. 11 (+) — Chassis ground (–):
Is the voltage more than 4.5 V? Go to step 7.Repair the har-
ness and connec-
tor.
NOTE:In this case, repair
the following item:
•Open circuit
of harness be-
tween ECM and
rear wiring har-
ness connector
•Poor contact
of coupling con-
nector
Page 1445 of 2453
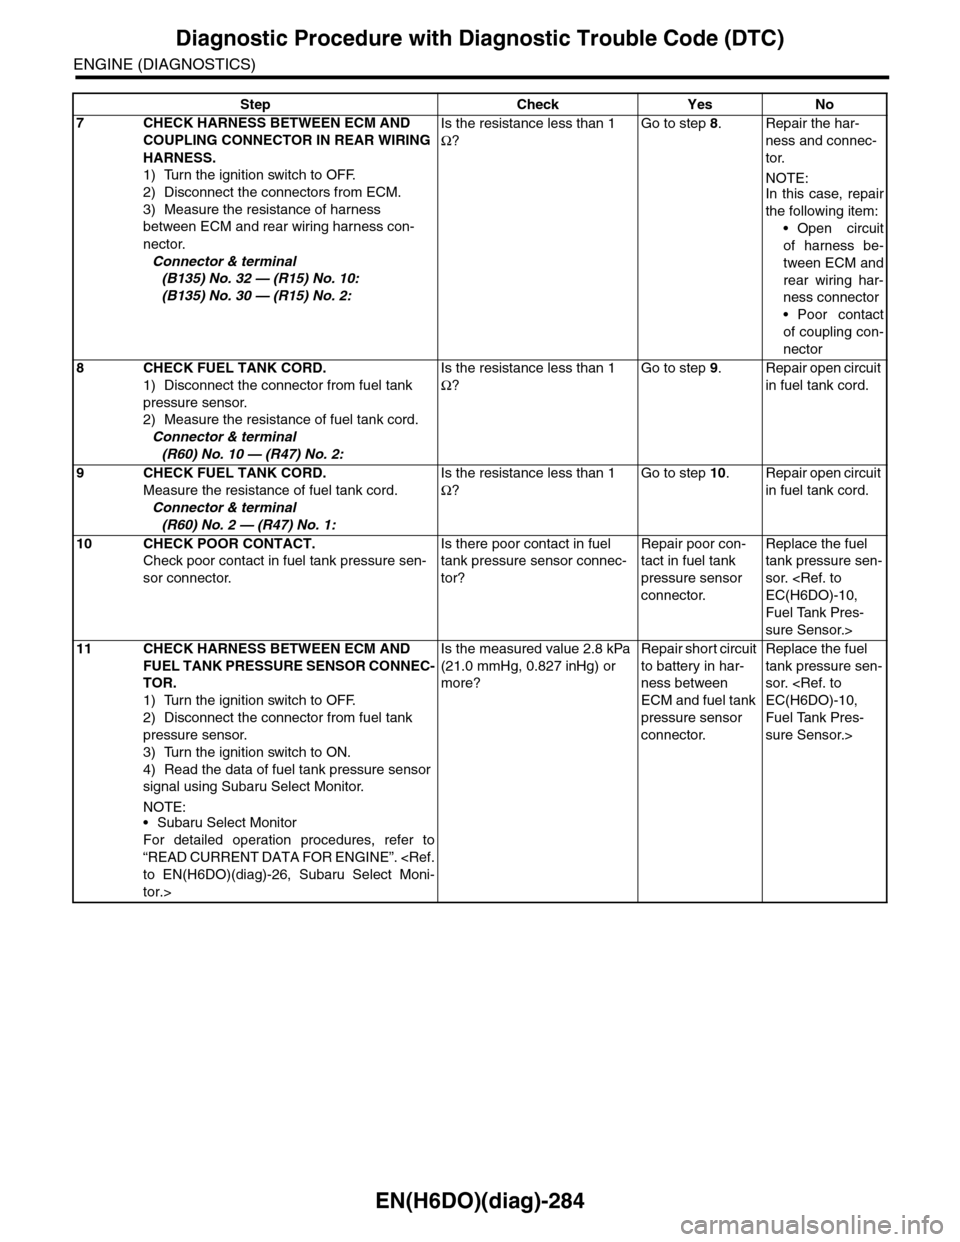
EN(H6DO)(diag)-284
Diagnostic Procedure with Diagnostic Trouble Code (DTC)
ENGINE (DIAGNOSTICS)
7CHECK HARNESS BETWEEN ECM AND
COUPLING CONNECTOR IN REAR WIRING
HARNESS.
1) Turn the ignition switch to OFF.
2) Disconnect the connectors from ECM.
3) Measure the resistance of harness
between ECM and rear wiring harness con-
nector.
Connector & terminal
(B135) No. 32 — (R15) No. 10:
(B135) No. 30 — (R15) No. 2:
Is the resistance less than 1
Ω?
Go to step 8.Repair the har-
ness and connec-
tor.
NOTE:In this case, repair
the following item:
•Open circuit
of harness be-
tween ECM and
rear wiring har-
ness connector
•Poor contact
of coupling con-
nector
8CHECK FUEL TANK CORD.
1) Disconnect the connector from fuel tank
pressure sensor.
2) Measure the resistance of fuel tank cord.
Connector & terminal
(R60) No. 10 — (R47) No. 2:
Is the resistance less than 1
Ω?
Go to step 9.Repair open circuit
in fuel tank cord.
9CHECK FUEL TANK CORD.
Measure the resistance of fuel tank cord.
Connector & terminal
(R60) No. 2 — (R47) No. 1:
Is the resistance less than 1
Ω?
Go to step 10.Repair open circuit
in fuel tank cord.
10 CHECK POOR CONTACT.
Check poor contact in fuel tank pressure sen-
sor connector.
Is there poor contact in fuel
tank pressure sensor connec-
tor?
Repair poor con-
tact in fuel tank
pressure sensor
connector.
Replace the fuel
tank pressure sen-
sor.
Fuel Tank Pres-
sure Sensor.>
11 CHECK HARNESS BETWEEN ECM AND
FUEL TANK PRESSURE SENSOR CONNEC-
TOR.
1) Turn the ignition switch to OFF.
2) Disconnect the connector from fuel tank
pressure sensor.
3) Turn the ignition switch to ON.
4) Read the data of fuel tank pressure sensor
signal using Subaru Select Monitor.
NOTE:•Subaru Select Monitor
For detailed operation procedures, refer to
“READ CURRENT DATA FOR ENGINE”.
tor.>
Is the measured value 2.8 kPa
(21.0 mmHg, 0.827 inHg) or
more?
Repair short circuit
to battery in har-
ness between
ECM and fuel tank
pressure sensor
connector.
Replace the fuel
tank pressure sen-
sor.
Fuel Tank Pres-
sure Sensor.>
Step Check Yes No
Page 1451 of 2453
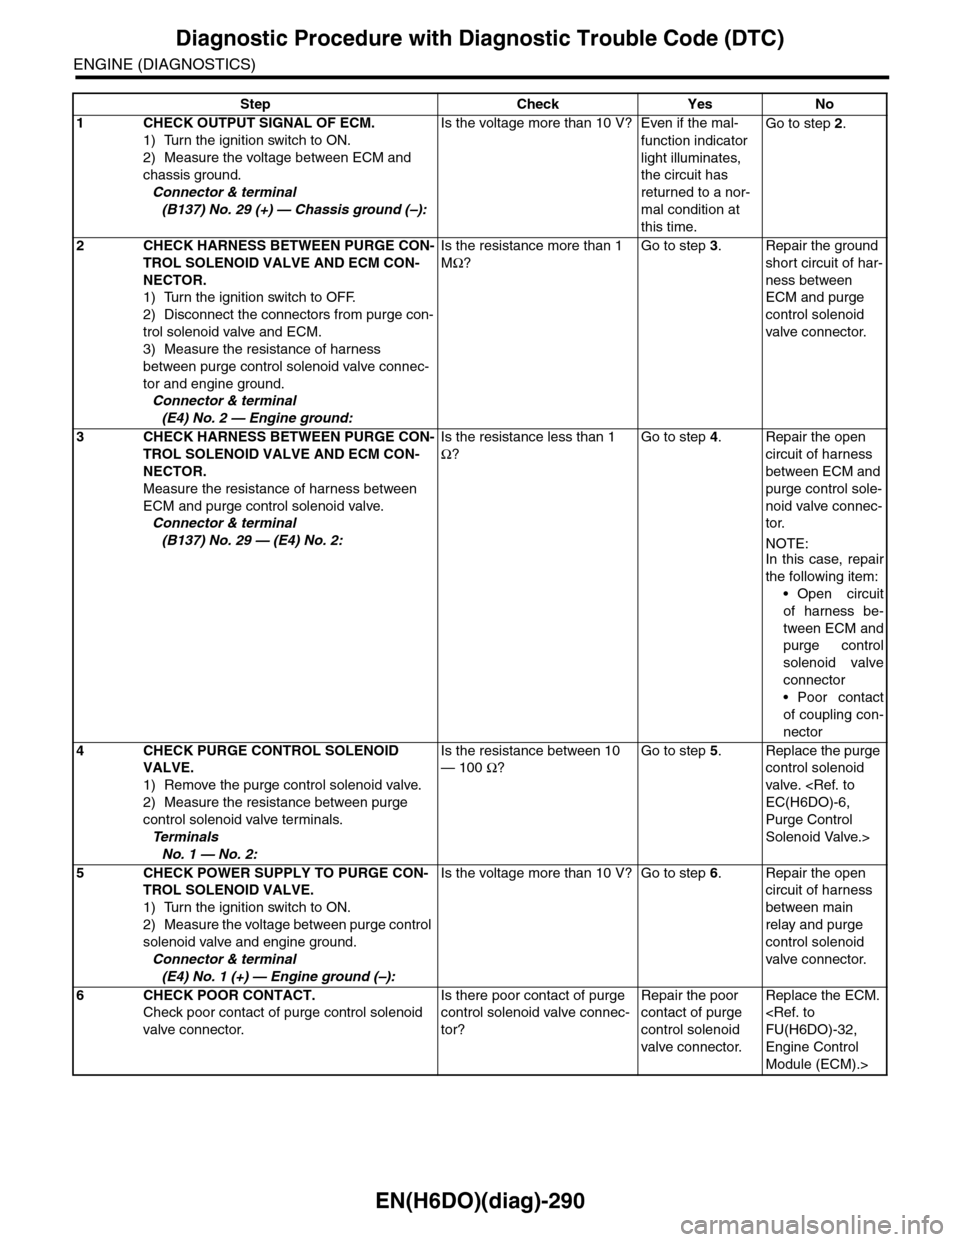
EN(H6DO)(diag)-290
Diagnostic Procedure with Diagnostic Trouble Code (DTC)
ENGINE (DIAGNOSTICS)
Step Check Yes No
1CHECK OUTPUT SIGNAL OF ECM.
1) Turn the ignition switch to ON.
2) Measure the voltage between ECM and
chassis ground.
Connector & terminal
(B137) No. 29 (+) — Chassis ground (–):
Is the voltage more than 10 V? Even if the mal-
function indicator
light illuminates,
the circuit has
returned to a nor-
mal condition at
this time.
Go to step 2.
2CHECK HARNESS BETWEEN PURGE CON-
TROL SOLENOID VALVE AND ECM CON-
NECTOR.
1) Turn the ignition switch to OFF.
2) Disconnect the connectors from purge con-
trol solenoid valve and ECM.
3) Measure the resistance of harness
between purge control solenoid valve connec-
tor and engine ground.
Connector & terminal
(E4) No. 2 — Engine ground:
Is the resistance more than 1
MΩ?
Go to step 3.Repair the ground
short circuit of har-
ness between
ECM and purge
control solenoid
valve connector.
3CHECK HARNESS BETWEEN PURGE CON-
TROL SOLENOID VALVE AND ECM CON-
NECTOR.
Measure the resistance of harness between
ECM and purge control solenoid valve.
Connector & terminal
(B137) No. 29 — (E4) No. 2:
Is the resistance less than 1
Ω?
Go to step 4.Repair the open
circuit of harness
between ECM and
purge control sole-
noid valve connec-
tor.
NOTE:In this case, repair
the following item:
•Open circuit
of harness be-
tween ECM and
purge control
solenoid valve
connector
•Poor contact
of coupling con-
nector
4CHECK PURGE CONTROL SOLENOID
VALVE.
1) Remove the purge control solenoid valve.
2) Measure the resistance between purge
control solenoid valve terminals.
Te r m i n a l s
No. 1 — No. 2:
Is the resistance between 10
— 100 Ω?
Go to step 5.Replace the purge
control solenoid
valve.
Purge Control
Solenoid Valve.>
5CHECK POWER SUPPLY TO PURGE CON-
TROL SOLENOID VALVE.
1) Turn the ignition switch to ON.
2) Measure the voltage between purge control
solenoid valve and engine ground.
Connector & terminal
(E4) No. 1 (+) — Engine ground (–):
Is the voltage more than 10 V? Go to step 6.Repair the open
circuit of harness
between main
relay and purge
control solenoid
valve connector.
6CHECK POOR CONTACT.
Check poor contact of purge control solenoid
valve connector.
Is there poor contact of purge
control solenoid valve connec-
tor?
Repair the poor
contact of purge
control solenoid
valve connector.
Replace the ECM.
Engine Control
Module (ECM).>
Page 1453 of 2453
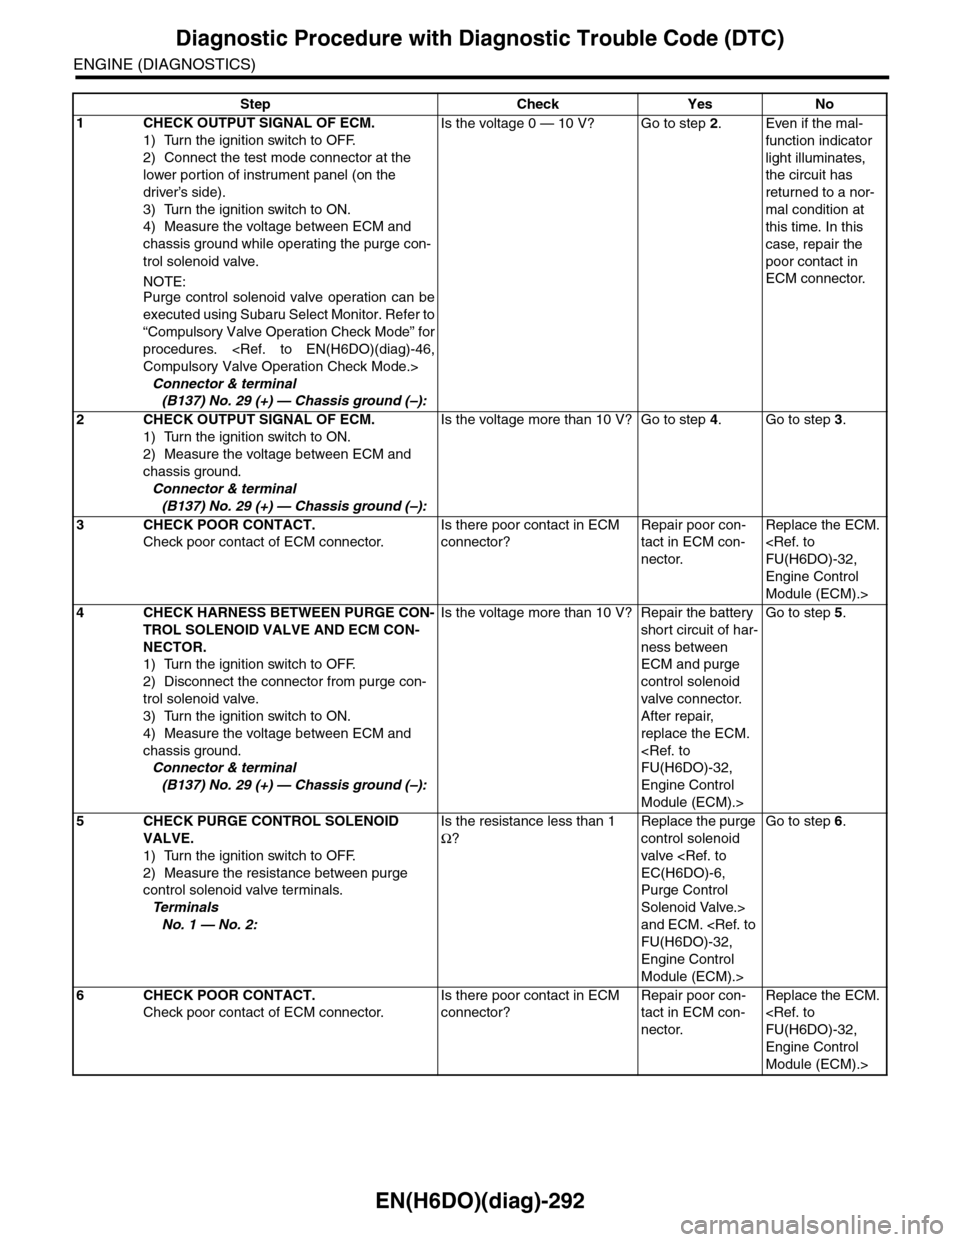
EN(H6DO)(diag)-292
Diagnostic Procedure with Diagnostic Trouble Code (DTC)
ENGINE (DIAGNOSTICS)
Step Check Yes No
1CHECK OUTPUT SIGNAL OF ECM.
1) Turn the ignition switch to OFF.
2) Connect the test mode connector at the
lower portion of instrument panel (on the
driver’s side).
3) Turn the ignition switch to ON.
4) Measure the voltage between ECM and
chassis ground while operating the purge con-
trol solenoid valve.
NOTE:Purge control solenoid valve operation can be
executed using Subaru Select Monitor. Refer to
“Compulsory Valve Operation Check Mode” for
procedures.
Connector & terminal
(B137) No. 29 (+) — Chassis ground (–):
Is the voltage 0 — 10 V? Go to step 2.Even if the mal-
function indicator
light illuminates,
the circuit has
returned to a nor-
mal condition at
this time. In this
case, repair the
poor contact in
ECM connector.
2CHECK OUTPUT SIGNAL OF ECM.
1) Turn the ignition switch to ON.
2) Measure the voltage between ECM and
chassis ground.
Connector & terminal
(B137) No. 29 (+) — Chassis ground (–):
Is the voltage more than 10 V? Go to step 4.Go to step 3.
3CHECK POOR CONTACT.
Check poor contact of ECM connector.
Is there poor contact in ECM
connector?
Repair poor con-
tact in ECM con-
nector.
Replace the ECM.
Engine Control
Module (ECM).>
4CHECK HARNESS BETWEEN PURGE CON-
TROL SOLENOID VALVE AND ECM CON-
NECTOR.
1) Turn the ignition switch to OFF.
2) Disconnect the connector from purge con-
trol solenoid valve.
3) Turn the ignition switch to ON.
4) Measure the voltage between ECM and
chassis ground.
Connector & terminal
(B137) No. 29 (+) — Chassis ground (–):
Is the voltage more than 10 V? Repair the battery
short circuit of har-
ness between
ECM and purge
control solenoid
valve connector.
After repair,
replace the ECM.
Engine Control
Module (ECM).>
Go to step 5.
5CHECK PURGE CONTROL SOLENOID
VALVE.
1) Turn the ignition switch to OFF.
2) Measure the resistance between purge
control solenoid valve terminals.
Te r m i n a l s
No. 1 — No. 2:
Is the resistance less than 1
Ω?
Replace the purge
control solenoid
valve
Purge Control
Solenoid Valve.>
and ECM.
Engine Control
Module (ECM).>
Go to step 6.
6CHECK POOR CONTACT.
Check poor contact of ECM connector.
Is there poor contact in ECM
connector?
Repair poor con-
tact in ECM con-
nector.
Replace the ECM.
Engine Control
Module (ECM).>
Page 1464 of 2453
EN(H6DO)(diag)-303
Diagnostic Procedure with Diagnostic Trouble Code (DTC)
ENGINE (DIAGNOSTICS)
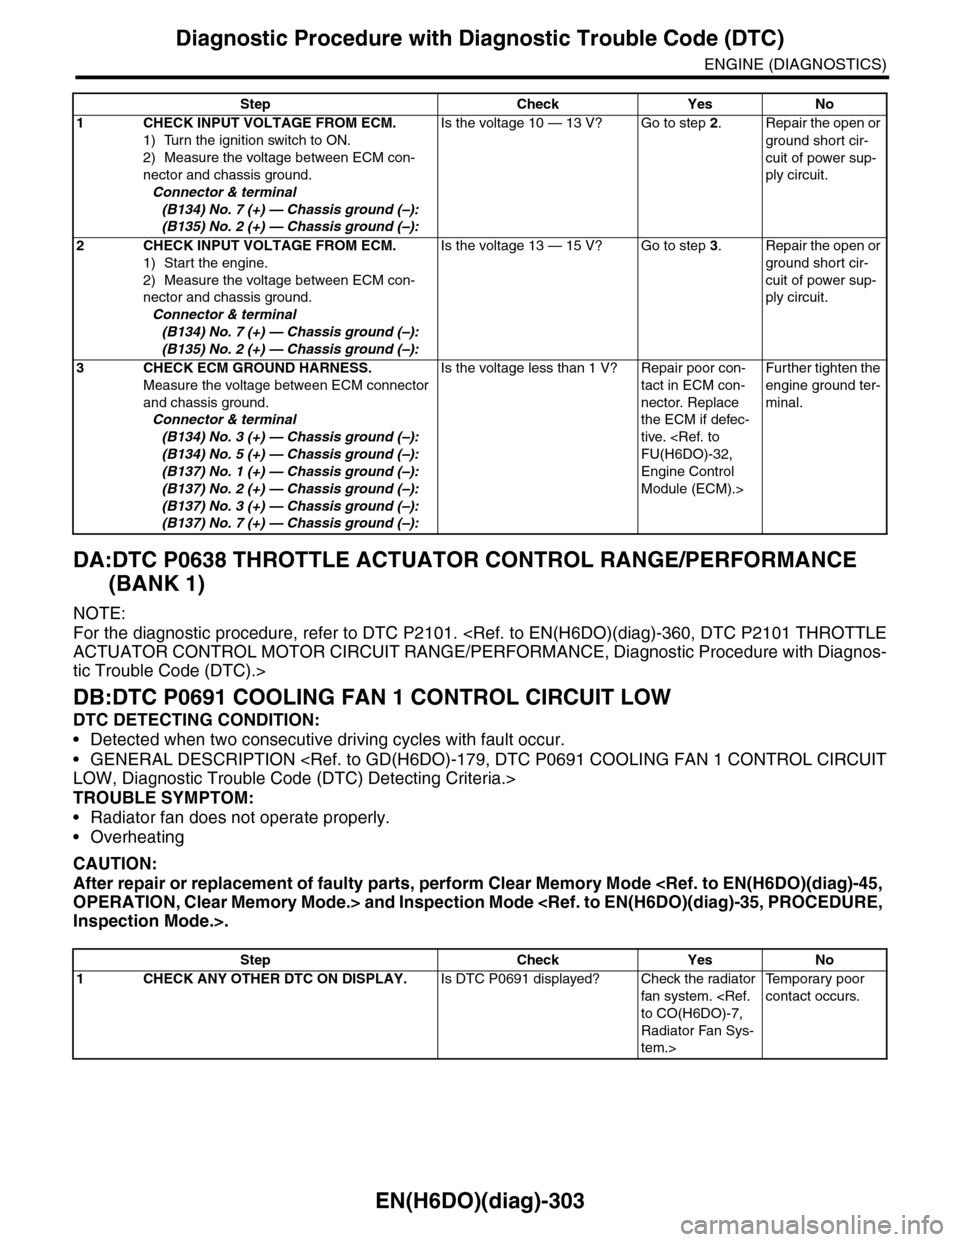
DA:DTC P0638 THROTTLE ACTUATOR CONTROL RANGE/PERFORMANCE
(BANK 1)
NOTE:
For the diagnostic procedure, refer to DTC P2101.
tic Trouble Code (DTC).>
DB:DTC P0691 COOLING FAN 1 CONTROL CIRCUIT LOW
DTC DETECTING CONDITION:
•Detected when two consecutive driving cycles with fault occur.
•GENERAL DESCRIPTION
TROUBLE SYMPTOM:
•Radiator fan does not operate properly.
•Overheating
CAUTION:
After repair or replacement of faulty parts, perform Clear Memory Mode
Step Check Yes No
1CHECK INPUT VOLTAGE FROM ECM.
1) Turn the ignition switch to ON.
2) Measure the voltage between ECM con-
nector and chassis ground.
Connector & terminal
(B134) No. 7 (+) — Chassis ground (–):
(B135) No. 2 (+) — Chassis ground (–):
Is the voltage 10 — 13 V? Go to step 2.Repair the open or
ground short cir-
cuit of power sup-
ply circuit.
2CHECK INPUT VOLTAGE FROM ECM.
1) Start the engine.
2) Measure the voltage between ECM con-
nector and chassis ground.
Connector & terminal
(B134) No. 7 (+) — Chassis ground (–):
(B135) No. 2 (+) — Chassis ground (–):
Is the voltage 13 — 15 V? Go to step 3.Repair the open or
ground short cir-
cuit of power sup-
ply circuit.
3CHECK ECM GROUND HARNESS.
Measure the voltage between ECM connector
and chassis ground.
Connector & terminal
(B134) No. 3 (+) — Chassis ground (–):
(B134) No. 5 (+) — Chassis ground (–):
(B137) No. 1 (+) — Chassis ground (–):
(B137) No. 2 (+) — Chassis ground (–):
(B137) No. 3 (+) — Chassis ground (–):
(B137) No. 7 (+) — Chassis ground (–):
Is the voltage less than 1 V? Repair poor con-
tact in ECM con-
nector. Replace
the ECM if defec-
tive.
Engine Control
Module (ECM).>
Fur ther tighten the
engine ground ter-
minal.
Step Check Yes No
1CHECK ANY OTHER DTC ON DISPLAY.Is DTC P0691 displayed? Check the radiator
fan system.
Radiator Fan Sys-
tem.>
Te m p o r a r y p o o r
contact occurs.
Page 1480 of 2453
EN(H6DO)(diag)-319
Diagnostic Procedure with Diagnostic Trouble Code (DTC)
ENGINE (DIAGNOSTICS)
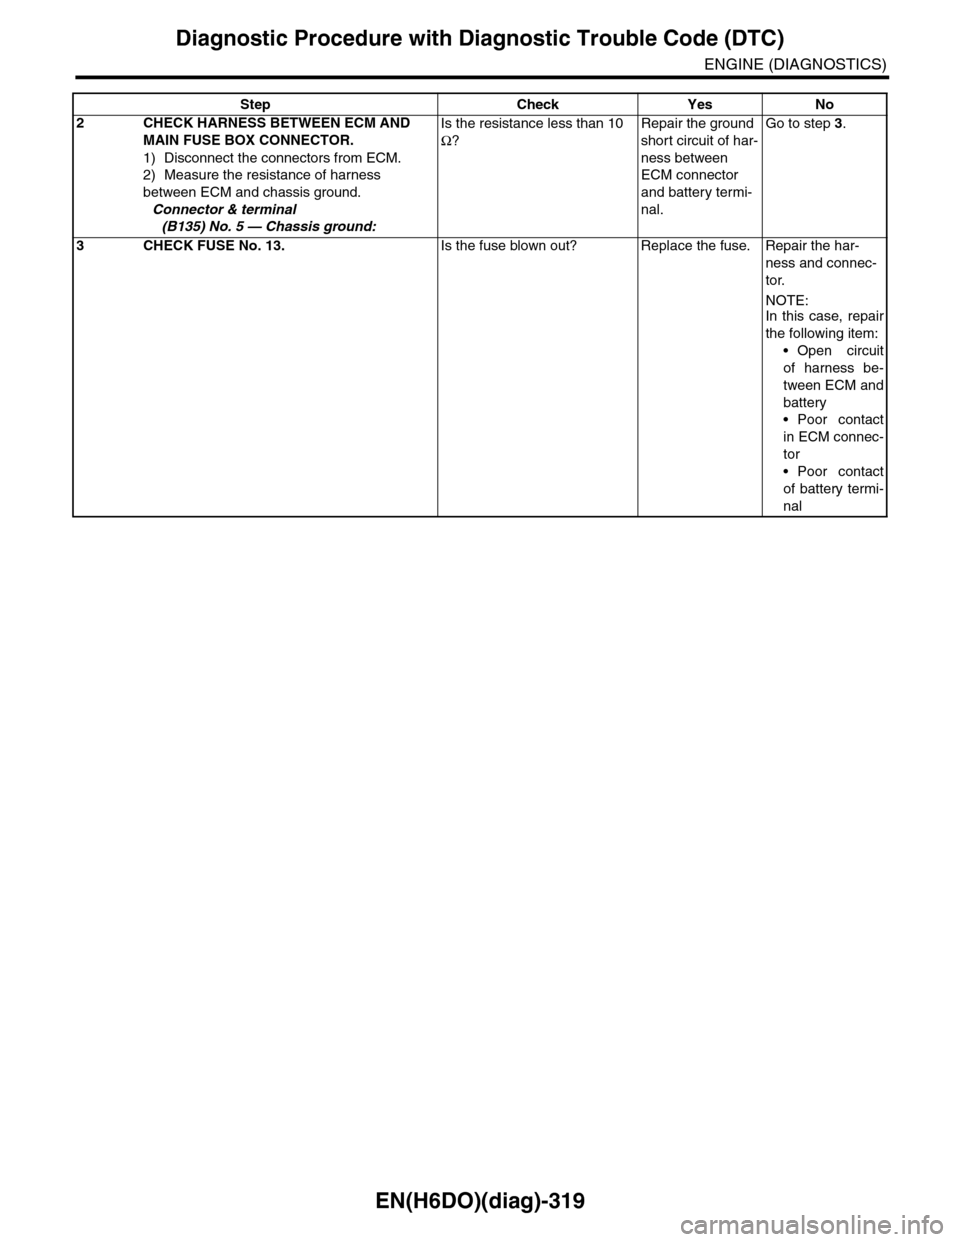
2CHECK HARNESS BETWEEN ECM AND
MAIN FUSE BOX CONNECTOR.
1) Disconnect the connectors from ECM.
2) Measure the resistance of harness
between ECM and chassis ground.
Connector & terminal
(B135) No. 5 — Chassis ground:
Is the resistance less than 10
Ω?
Repair the ground
short circuit of har-
ness between
ECM connector
and battery termi-
nal.
Go to step 3.
3CHECK FUSE No. 13.Is the fuse blown out? Replace the fuse. Repair the har-
ness and connec-
tor.
NOTE:In this case, repair
the following item:
•Open circuit
of harness be-
tween ECM and
battery
•Poor contact
in ECM connec-
tor
•Poor contact
of battery termi-
nal
Step Check Yes No
Page 1482 of 2453
EN(H6DO)(diag)-321
Diagnostic Procedure with Diagnostic Trouble Code (DTC)
ENGINE (DIAGNOSTICS)
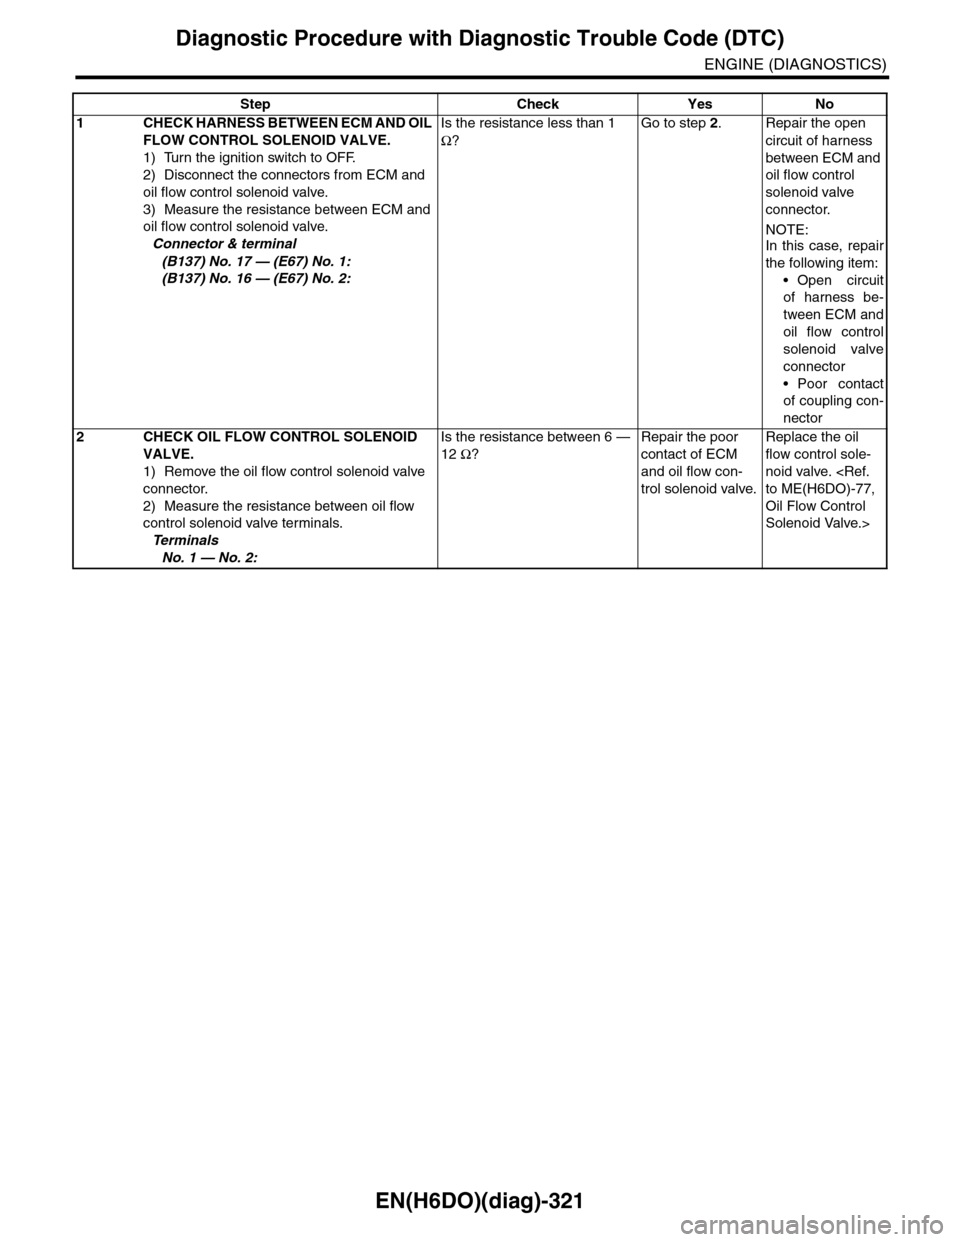
Step Check Yes No
1CHECK HARNESS BETWEEN ECM AND OIL
FLOW CONTROL SOLENOID VALVE.
1) Turn the ignition switch to OFF.
2) Disconnect the connectors from ECM and
oil flow control solenoid valve.
3) Measure the resistance between ECM and
oil flow control solenoid valve.
Connector & terminal
(B137) No. 17 — (E67) No. 1:
(B137) No. 16 — (E67) No. 2:
Is the resistance less than 1
Ω?
Go to step 2.Repair the open
circuit of harness
between ECM and
oil flow control
solenoid valve
connector.
NOTE:In this case, repair
the following item:
•Open circuit
of harness be-
tween ECM and
oil flow control
solenoid valve
connector
•Poor contact
of coupling con-
nector
2CHECK OIL FLOW CONTROL SOLENOID
VALVE.
1) Remove the oil flow control solenoid valve
connector.
2) Measure the resistance between oil flow
control solenoid valve terminals.
Te r m i n a l s
No. 1 — No. 2:
Is the resistance between 6 —
12 Ω?
Repair the poor
contact of ECM
and oil flow con-
trol solenoid valve.
Replace the oil
flow control sole-
noid valve.
Oil Flow Control
Solenoid Valve.>
Page 1484 of 2453
EN(H6DO)(diag)-323
Diagnostic Procedure with Diagnostic Trouble Code (DTC)
ENGINE (DIAGNOSTICS)
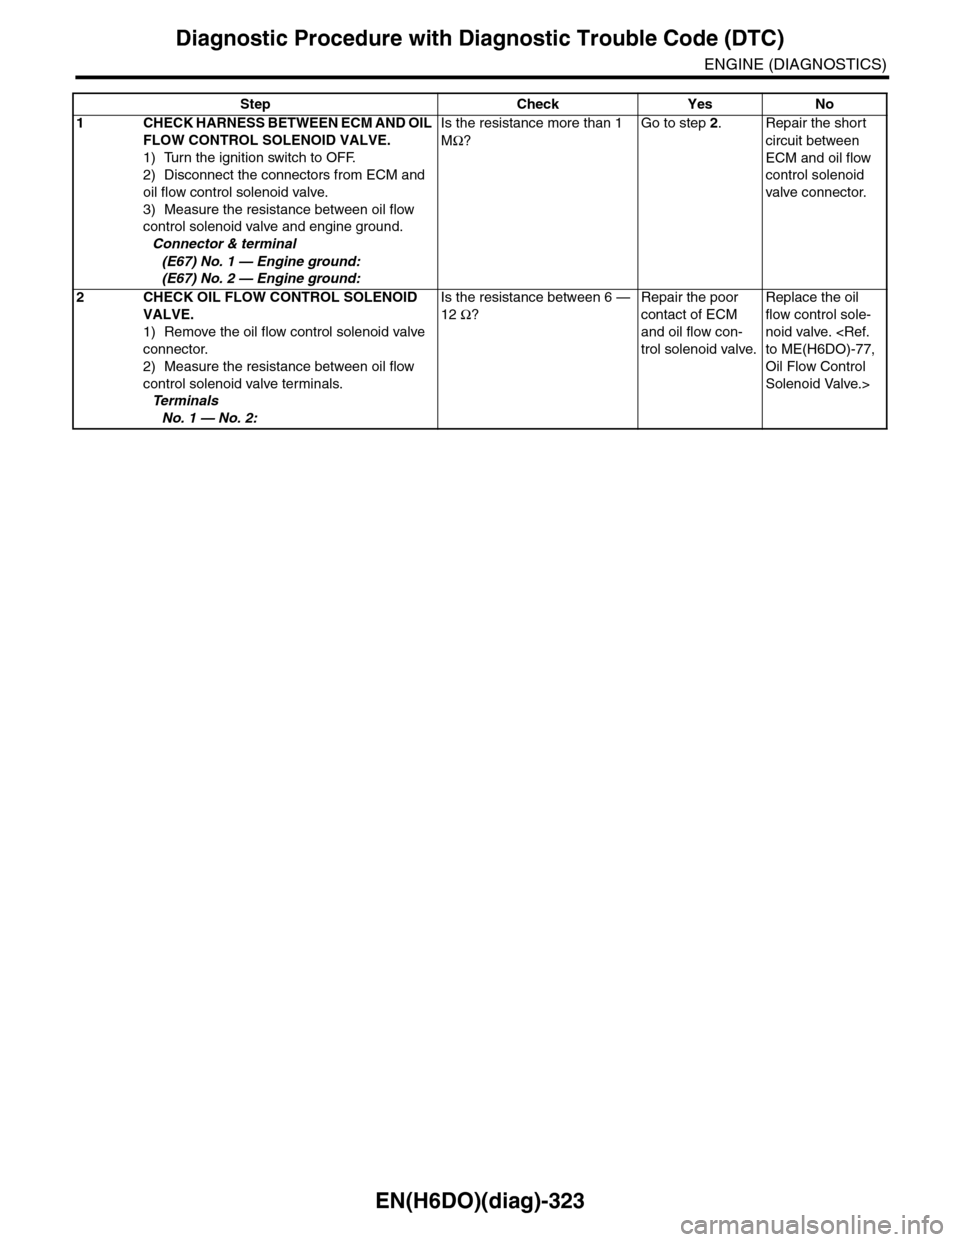
Step Check Yes No
1CHECK HARNESS BETWEEN ECM AND OIL
FLOW CONTROL SOLENOID VALVE.
1) Turn the ignition switch to OFF.
2) Disconnect the connectors from ECM and
oil flow control solenoid valve.
3) Measure the resistance between oil flow
control solenoid valve and engine ground.
Connector & terminal
(E67) No. 1 — Engine ground:
(E67) No. 2 — Engine ground:
Is the resistance more than 1
MΩ?
Go to step 2.Repair the short
circuit between
ECM and oil flow
control solenoid
valve connector.
2CHECK OIL FLOW CONTROL SOLENOID
VALVE.
1) Remove the oil flow control solenoid valve
connector.
2) Measure the resistance between oil flow
control solenoid valve terminals.
Te r m i n a l s
No. 1 — No. 2:
Is the resistance between 6 —
12 Ω?
Repair the poor
contact of ECM
and oil flow con-
trol solenoid valve.
Replace the oil
flow control sole-
noid valve.
Oil Flow Control
Solenoid Valve.>