Page 1388 of 2453
EN(H6DO)(diag)-227
Diagnostic Procedure with Diagnostic Trouble Code (DTC)
ENGINE (DIAGNOSTICS)
BH:DTC P0196 ENGINE OIL TEMPERATURE SENSOR CIRCUIT RANGE/PER-
FORMANCE
DTC DETECTING CONDITION:
•Detected when two consecutive driving cycles with fault occur.
•GENERAL DESCRIPTION
CIRCUIT RANGE/PERFORMANCE, Diagnostic Trouble Code (DTC) Detecting Criteria.>
TROUBLE SYMPTOM:
•Hard to start
•Erroneous idling
•Poor driving performance
CAUTION:
After repair or replacement of faulty parts, perform Clear Memory Mode
OPERATION, Clear Memory Mode.> and Inspection Mode
Inspection Mode.>.
WIRING DIAGRAM:
EN-03662
E75
E2
B21
B134 ECM
1
19
29
E1
B20
2
3
23
E75
12
B20
1234567891011 121314 15 16
B21
123412131415567816171819910 1120212223 24 25 2627 28 29 3031 32 33
3534 37363938 41404342 4445 47464948 51505352 54
OILTEMPERATURESENSOR
B134
85610 11 12 13 14 157213416
3019 20 2228 29
91718252123 24323126 2733 34
Page 1401 of 2453
EN(H6DO)(diag)-240
Diagnostic Procedure with Diagnostic Trouble Code (DTC)
ENGINE (DIAGNOSTICS)
BM:DTC P0230 FUEL PUMP PRIMARY CIRCUIT
DTC DETECTING CONDITION:
•Detected when two consecutive driving cycles with fault occur.
•GENERAL DESCRIPTION
agnostic Trouble Code (DTC) Detecting Criteria.>
CAUTION:
After repair or replacement of faulty parts, perform Clear Memory Mode
OPERATION, Clear Memory Mode.> and Inspection Mode
Inspection Mode.>.
WIRING DIAGRAM:
EN-03653
EE
M
10
76
56
NO.11
B362
R122
B135B:
B136C:
R58
7
B33C12
21
985
FUEL PUMPCONTROL UNIT
FUELPUMPECM
BATTERY
FUEL PUMPRELAY
B362
5678
3412
R1
B98218
23B98
R1
R15
R60712
R58
2
546
13
B135B:
567821943102422 23 2511 12 13 14 1526 2728
16 17 18 1920 2129 30 31 32 33 34 35
R122
34125891067
B98
123456 78910 1112 13 16 1714 15 18 19 2021222324
R60
12
10115634897131412
B136
16101112131415252430
9871718192028212223293231
123456
2726333435
C:
Page 1405 of 2453
EN(H6DO)(diag)-244
Diagnostic Procedure with Diagnostic Trouble Code (DTC)
ENGINE (DIAGNOSTICS)
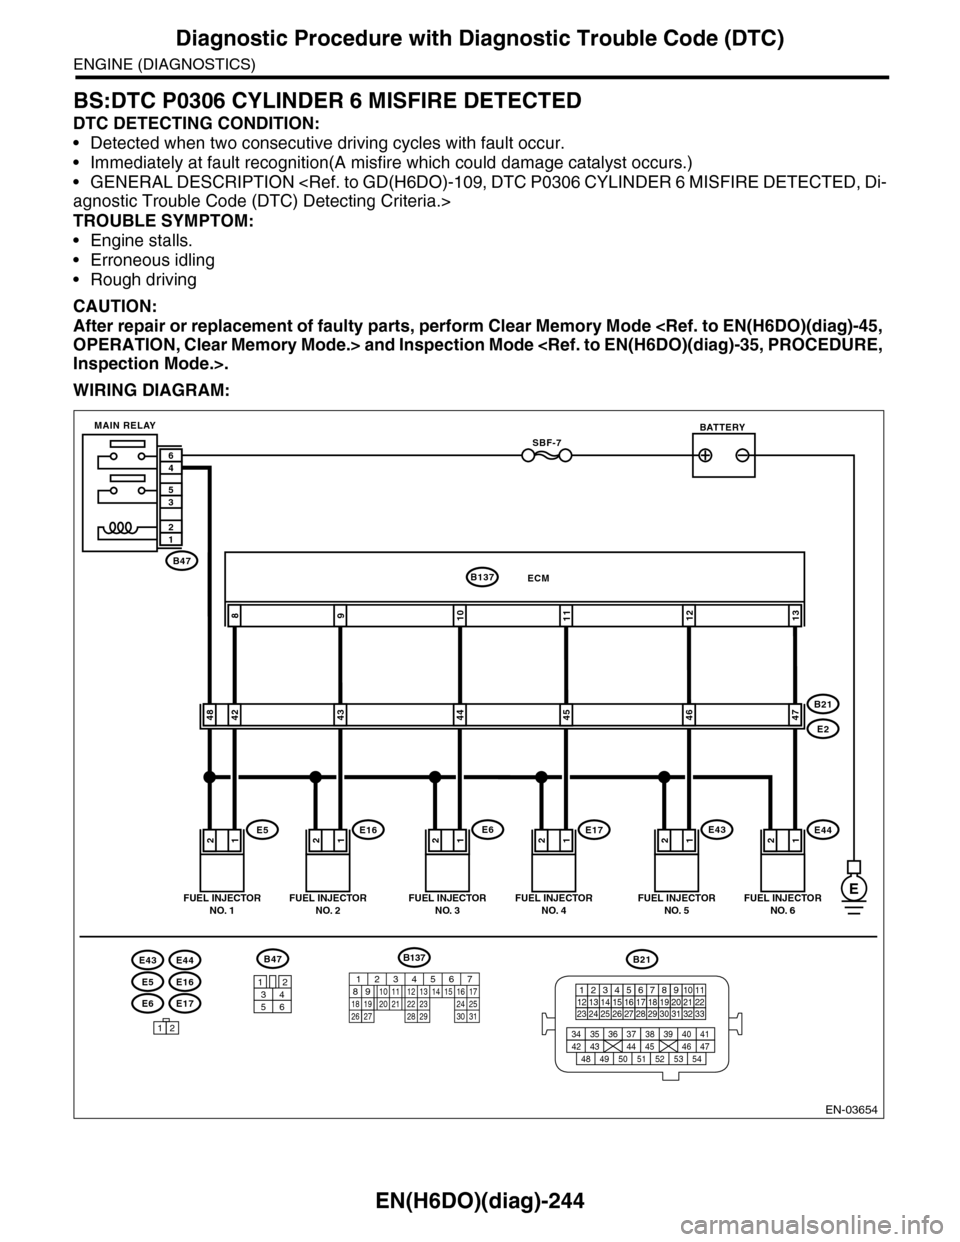
BS:DTC P0306 CYLINDER 6 MISFIRE DETECTED
DTC DETECTING CONDITION:
•Detected when two consecutive driving cycles with fault occur.
•Immediately at fault recognition(A misfire which could damage catalyst occurs.)
•GENERAL DESCRIPTION
agnostic Trouble Code (DTC) Detecting Criteria.>
TROUBLE SYMPTOM:
•Engine stalls.
•Erroneous idling
•Rough driving
CAUTION:
After repair or replacement of faulty parts, perform Clear Memory Mode
OPERATION, Clear Memory Mode.> and Inspection Mode
Inspection Mode.>.
WIRING DIAGRAM:
EN-03654
E6E17
E5E16
E43E44
12121212
109811
4248434445
ECMB137
E5E16E6E17
B21
E2
FUEL INJECTORNO. 1FUEL INJECTORNO. 2FUEL INJECTORNO. 3FUEL INJECTORNO. 4
BATTERY
1212
1213
4647
E43E44
FUEL INJECTORNO. 5FUEL INJECTORNO. 6
SBF-7
B47
MAIN RELAY
12
35
46
B47
3412
56
12
B21
123412131415567816171819910 1120212223 24 25 2627 28 29 3031 32 33
3534 37363938 41404342 4445 47464948 51505352 54
E
B137
85610 11 12 13 14 157213416
3019 20 2228 29
91718 2521 23 243126 27
Page 1413 of 2453
EN(H6DO)(diag)-252
Diagnostic Procedure with Diagnostic Trouble Code (DTC)
ENGINE (DIAGNOSTICS)
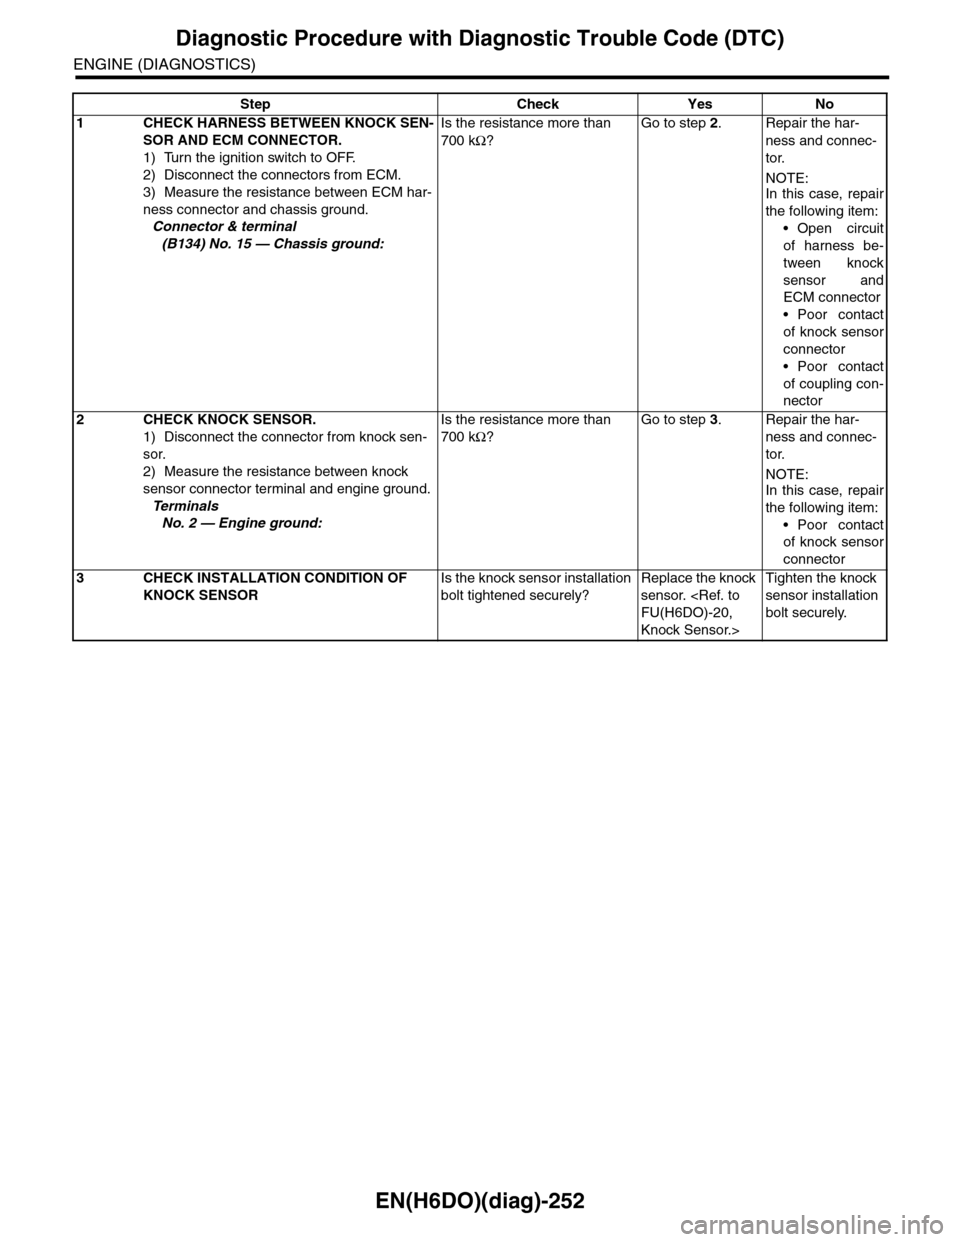
Step Check Yes No
1CHECK HARNESS BETWEEN KNOCK SEN-
SOR AND ECM CONNECTOR.
1) Turn the ignition switch to OFF.
2) Disconnect the connectors from ECM.
3) Measure the resistance between ECM har-
ness connector and chassis ground.
Connector & terminal
(B134) No. 15 — Chassis ground:
Is the resistance more than
700 kΩ?
Go to step 2.Repair the har-
ness and connec-
tor.
NOTE:In this case, repair
the following item:
•Open circuit
of harness be-
tween knock
sensor and
ECM connector
•Poor contact
of knock sensor
connector
•Poor contact
of coupling con-
nector
2CHECK KNOCK SENSOR.
1) Disconnect the connector from knock sen-
sor.
2) Measure the resistance between knock
sensor connector terminal and engine ground.
Te r m i n a l s
No. 2 — Engine ground:
Is the resistance more than
700 kΩ?
Go to step 3.Repair the har-
ness and connec-
tor.
NOTE:In this case, repair
the following item:
•Poor contact
of knock sensor
connector
3CHECK INSTALLATION CONDITION OF
KNOCK SENSOR
Is the knock sensor installation
bolt tightened securely?
Replace the knock
sensor.
FU(H6DO)-20,
Knock Sensor.>
Tighten the knock
sensor installation
bolt securely.
Page 1417 of 2453
EN(H6DO)(diag)-256
Diagnostic Procedure with Diagnostic Trouble Code (DTC)
ENGINE (DIAGNOSTICS)
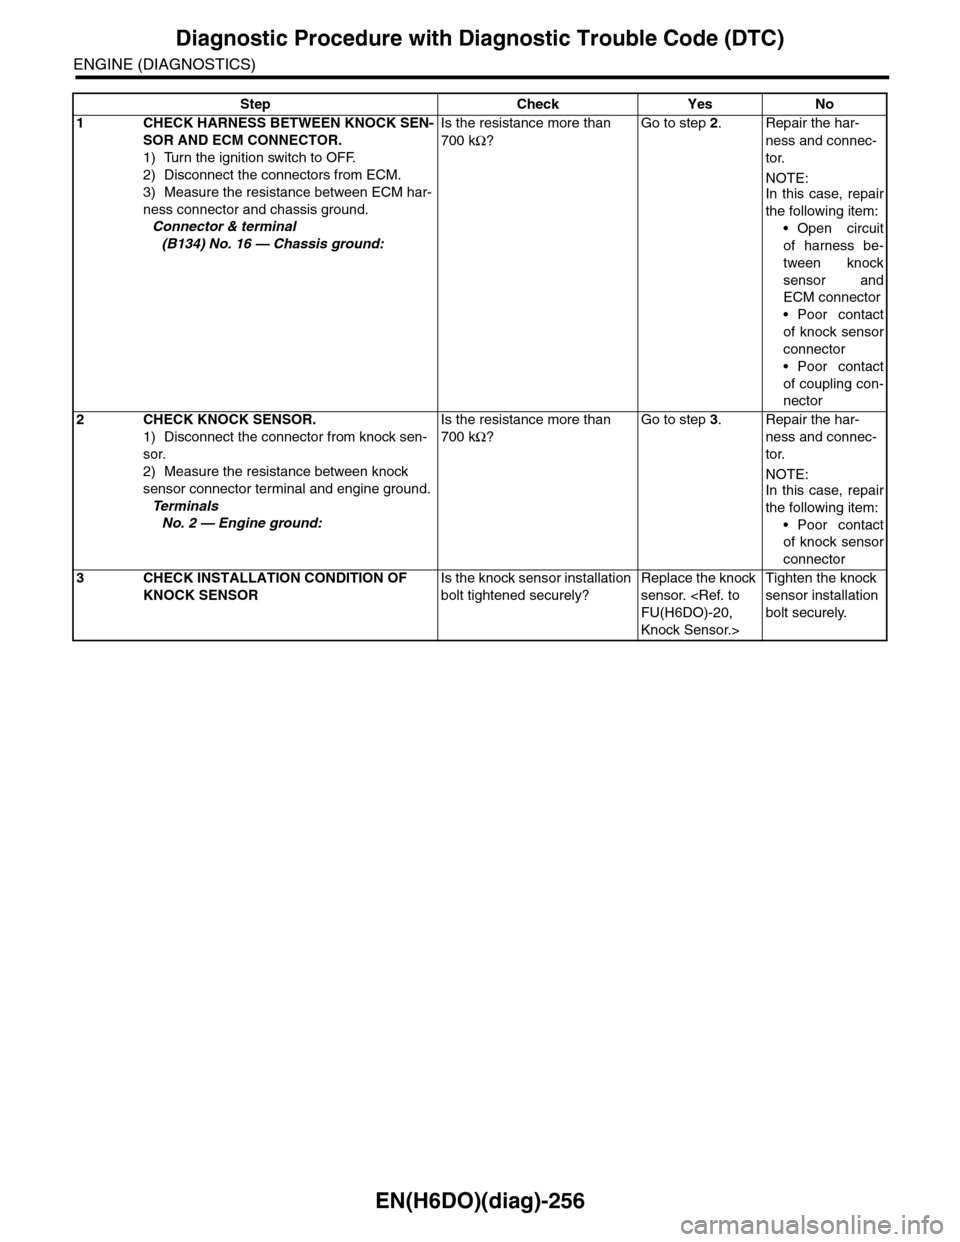
Step Check Yes No
1CHECK HARNESS BETWEEN KNOCK SEN-
SOR AND ECM CONNECTOR.
1) Turn the ignition switch to OFF.
2) Disconnect the connectors from ECM.
3) Measure the resistance between ECM har-
ness connector and chassis ground.
Connector & terminal
(B134) No. 16 — Chassis ground:
Is the resistance more than
700 kΩ?
Go to step 2.Repair the har-
ness and connec-
tor.
NOTE:In this case, repair
the following item:
•Open circuit
of harness be-
tween knock
sensor and
ECM connector
•Poor contact
of knock sensor
connector
•Poor contact
of coupling con-
nector
2CHECK KNOCK SENSOR.
1) Disconnect the connector from knock sen-
sor.
2) Measure the resistance between knock
sensor connector terminal and engine ground.
Te r m i n a l s
No. 2 — Engine ground:
Is the resistance more than
700 kΩ?
Go to step 3.Repair the har-
ness and connec-
tor.
NOTE:In this case, repair
the following item:
•Poor contact
of knock sensor
connector
3CHECK INSTALLATION CONDITION OF
KNOCK SENSOR
Is the knock sensor installation
bolt tightened securely?
Replace the knock
sensor.
FU(H6DO)-20,
Knock Sensor.>
Tighten the knock
sensor installation
bolt securely.
Page 1421 of 2453
EN(H6DO)(diag)-260
Diagnostic Procedure with Diagnostic Trouble Code (DTC)
ENGINE (DIAGNOSTICS)
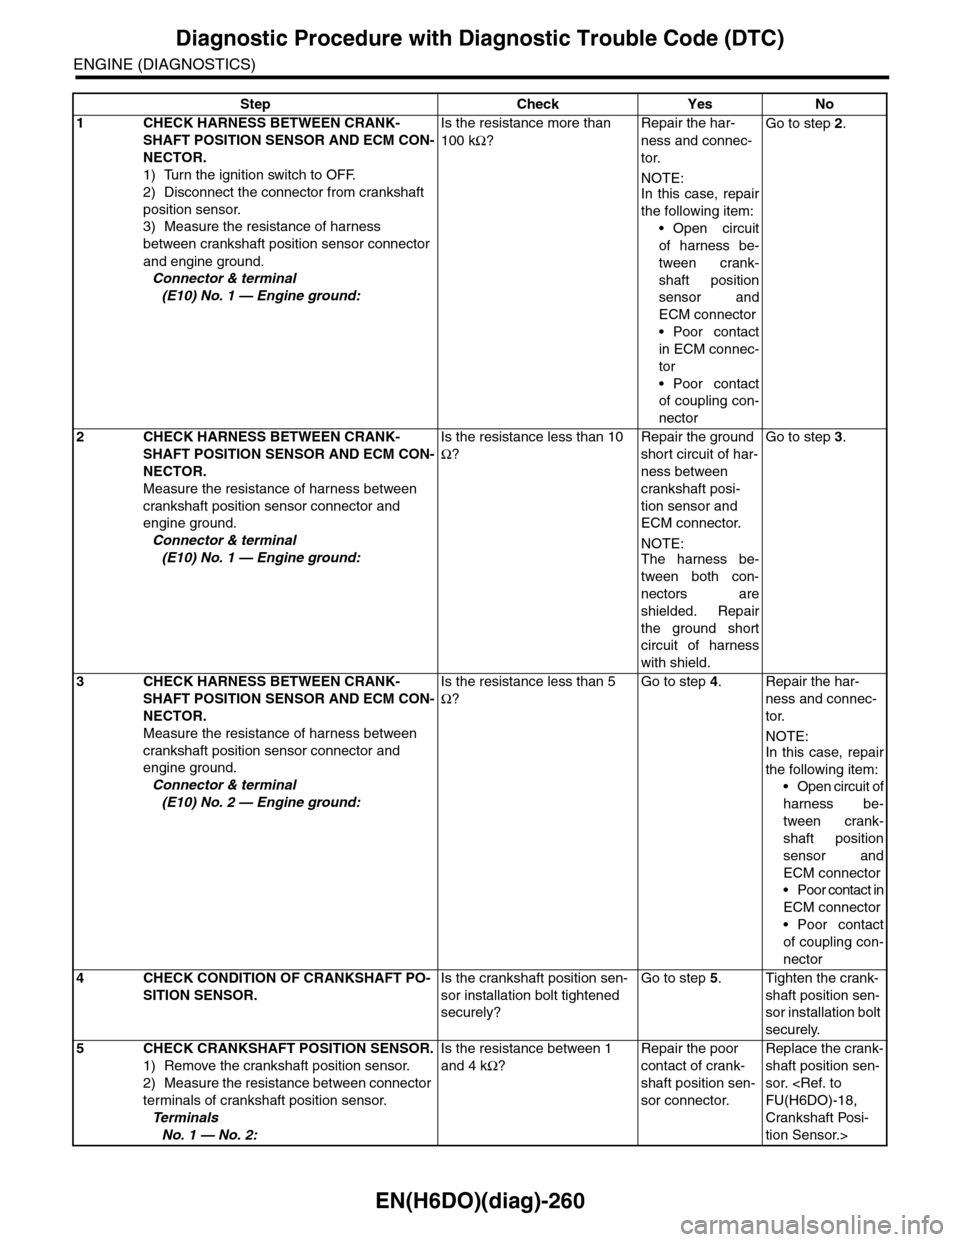
Step Check Yes No
1CHECK HARNESS BETWEEN CRANK-
SHAFT POSITION SENSOR AND ECM CON-
NECTOR.
1) Turn the ignition switch to OFF.
2) Disconnect the connector from crankshaft
position sensor.
3) Measure the resistance of harness
between crankshaft position sensor connector
and engine ground.
Connector & terminal
(E10) No. 1 — Engine ground:
Is the resistance more than
100 kΩ?
Repair the har-
ness and connec-
tor.
NOTE:In this case, repair
the following item:
•Open circuit
of harness be-
tween crank-
shaft position
sensor and
ECM connector
•Poor contact
in ECM connec-
tor
•Poor contact
of coupling con-
nector
Go to step 2.
2CHECK HARNESS BETWEEN CRANK-
SHAFT POSITION SENSOR AND ECM CON-
NECTOR.
Measure the resistance of harness between
crankshaft position sensor connector and
engine ground.
Connector & terminal
(E10) No. 1 — Engine ground:
Is the resistance less than 10
Ω?
Repair the ground
short circuit of har-
ness between
crankshaft posi-
tion sensor and
ECM connector.
NOTE:The harness be-
tween both con-
nectors are
shielded. Repair
the ground short
circuit of harness
with shield.
Go to step 3.
3CHECK HARNESS BETWEEN CRANK-
SHAFT POSITION SENSOR AND ECM CON-
NECTOR.
Measure the resistance of harness between
crankshaft position sensor connector and
engine ground.
Connector & terminal
(E10) No. 2 — Engine ground:
Is the resistance less than 5
Ω?
Go to step 4.Repair the har-
ness and connec-
tor.
NOTE:In this case, repair
the following item:
•Open circuit of
harness be-
tween crank-
shaft position
sensor and
ECM connector
•Poor contact in
ECM connector
•Poor contact
of coupling con-
nector
4CHECK CONDITION OF CRANKSHAFT PO-
SITION SENSOR.
Is the crankshaft position sen-
sor installation bolt tightened
securely?
Go to step 5.Tighten the crank-
shaft position sen-
sor installation bolt
securely.
5CHECK CRANKSHAFT POSITION SENSOR.
1) Remove the crankshaft position sensor.
2) Measure the resistance between connector
terminals of crankshaft position sensor.
Te r m i n a l s
No. 1 — No. 2:
Is the resistance between 1
and 4 kΩ?
Repair the poor
contact of crank-
shaft position sen-
sor connector.
Replace the crank-
shaft position sen-
sor.
FU(H6DO)-18,
Crankshaft Posi-
tion Sensor.>
Page 1422 of 2453
EN(H6DO)(diag)-261
Diagnostic Procedure with Diagnostic Trouble Code (DTC)
ENGINE (DIAGNOSTICS)
BY:DTC P0336 CRANKSHAFT POSITION SENSOR “A” CIRCUIT RANGE/PER-
FORMANCE
DTC DETECTING CONDITION:
•Detected when two consecutive driving cycles with fault occur.
•GENERAL DESCRIPTION
“A” CIRCUIT RANGE/PERFORMANCE, Diagnostic Trouble Code (DTC) Detecting Criteria.>
TROUBLE SYMPTOM:
•Engine stalls.
•Failure of engine to start
CAUTION:
After repair or replacement of faulty parts, perform Clear Memory Mode
OPERATION, Clear Memory Mode.> and Inspection Mode
Inspection Mode.>.
WIRING DIAGRAM:
EN-03664
12
87
1424
B20
E1
E10
E10
12
B134 ECM
CRANKSHAFTPOSITIONSENSOR
13
E
B20
1234567891011 121314 15 16
B134
85610 11 12 13 14 157213416
3019 20 2228 29
91718252123 24323126 2733 34
Page 1423 of 2453
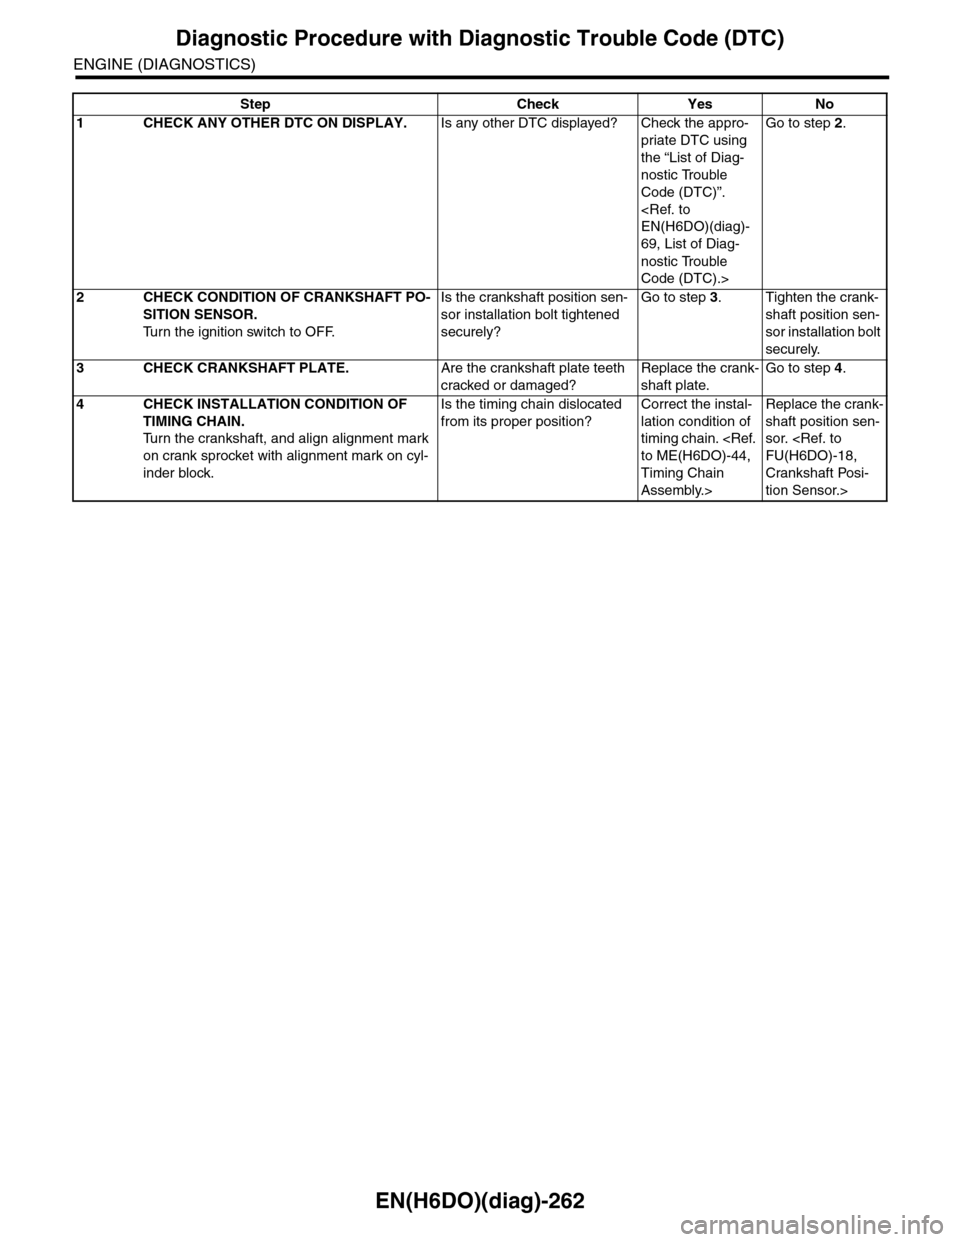
EN(H6DO)(diag)-262
Diagnostic Procedure with Diagnostic Trouble Code (DTC)
ENGINE (DIAGNOSTICS)
Step Check Yes No
1CHECK ANY OTHER DTC ON DISPLAY.Is any other DTC displayed? Check the appro-
priate DTC using
the “List of Diag-
nostic Trouble
Code (DTC)”.
EN(H6DO)(diag)-
69, List of Diag-
nostic Trouble
Code (DTC).>
Go to step 2.
2CHECK CONDITION OF CRANKSHAFT PO-
SITION SENSOR.
Tu r n t h e i g n i t i o n s w i t c h t o O F F.
Is the crankshaft position sen-
sor installation bolt tightened
securely?
Go to step 3.Tighten the crank-
shaft position sen-
sor installation bolt
securely.
3CHECK CRANKSHAFT PLATE.Are the crankshaft plate teeth
cracked or damaged?
Replace the crank-
shaft plate.
Go to step 4.
4CHECK INSTALLATION CONDITION OF
TIMING CHAIN.
Tu r n t h e c r a n k s h a f t , a n d a l i g n a l i g n m e n t m a r k
on crank sprocket with alignment mark on cyl-
inder block.
Is the timing chain dislocated
from its proper position?
Correct the instal-
lation condition of
timing chain.
to ME(H6DO)-44,
Timing Chain
Assembly.>
Replace the crank-
shaft position sen-
sor.
FU(H6DO)-18,
Crankshaft Posi-
tion Sensor.>