2009 SUBARU TRIBECA check oil
[x] Cancel search: check oilPage 340 of 2453

AC-14
General Description
HVAC SYSTEM (HEATER, VENTILATOR AND A/C)
C: CAUTION
1. HFC-134A A/C SYSTEM
•The cooling system components for the HFC-
134a system such as the refrigerant and compres-
sor oil are different from the conventional CFC-12
system components and they are incompatible with
each other.
•Vehicles with the HFC-134a system can be iden-
tified by the label (A) attached to the vehicle.
Before maintenance, check which A/C system is in-
stalled to the vehicle.
2. COMPRESSOR OIL
•HFC-134a compressor oil has no compatibility
with that of CFC-12 system.
•Use only Denso Oil 8, the manufacturer-autho-
rized compressor oil for the HFC-134a system.
•Do not mix multiple compressor oils.
If CFC-12 compressor oil is used in the HFC-134a
A/C system, the compressor may become stuck
due to poor lubrication, or the refrigerant may leak
due to swelling of rubber parts.
On the other hand, if HFC-134a compressor oil is
used in a CFC-12 A/C system, the durability of the
A/C system will be lowered.
•HFC-134a compressor oil is very hygroscopic.
When replacing or installing/removing A/C parts,
immediately isolate the oil from atmosphere using a
plug or tape. In order to avoid moisture, store the oil
in a container with its cap tightly closed.
3. REFRIGERANT
•CFC-12 refrigerant cannot be used in a HFC-
134a A/C system. HFC-134a refrigerant, also can-
not be used in a CFC-12 A/C system.
•If an incorrect or no refrigerant is used, it will re-
sult in poor lubrication and the compressor itself
may be damaged.
4. HANDLING OF REFRIGERANT
•The refrigerant boils at approx. –30°C (22°F).
When handling it, be sure to wear protective gog-
gles and protective gloves. Direct contact of the re-
frigerant with skin may cause frostbite.
If the refrigerant gets into your eye, avoid rubbing
your eyes with your hands. Wash your eye with
plenty of water, and receive medical treatment from
an eye doctor.
•Do not heat a service can. If a service can is di-
rectly heated, or put into boiling water, the inside
pressure will become extremely high. This may
cause the can to explode. If a service can must be
warmed up, use warm water of 40°C (104°F) or less.
•Do not drop or subject a service can to impacts.
(Observe the precautions and operation procedure
described on the refrigerant can.)
•When the engine is running, do not open the
high-pressure valve of the manifold gauge. High-
pressure gas can back-flow resulting in an explo-
sion of the can.
•Provide good ventilation and do not work in a
closed area.
•In order to prevent global warming, avoid releas-
ing HFC-134a into the atmosphere. Using a refrig-
erant recovery system, discharge and recycle the
gas.
AC-01380
(A) Goggles
(B) Gloves
(C) Avoid open flame
(D) No direct heat on container
(E) Do not discharge
(F) Loosen
(A)(B)
(C) (D)
(E)
(F)
AC-00007
Page 341 of 2453

AC-15
General Description
HVAC SYSTEM (HEATER, VENTILATOR AND A/C)
5. O-RING CONNECTIONS
•Always use a new O-ring.
•In order to keep the O-rings free of lint which can
cause a refrigerant gas leak, perform operations
without gloves and cloth.
•Apply compressor oil to O-rings to avoid sticking,
before installation.
•Use a torque wrench to tighten the O-ring fittings.
Over-tightening will cause damage to the O-ring
and cause tube end distortion.
•If the work is interrupted before completing pipe
connections, recap the tubes, components and fit-
tings with a plug or tape to prevent foreign matter
from entering.
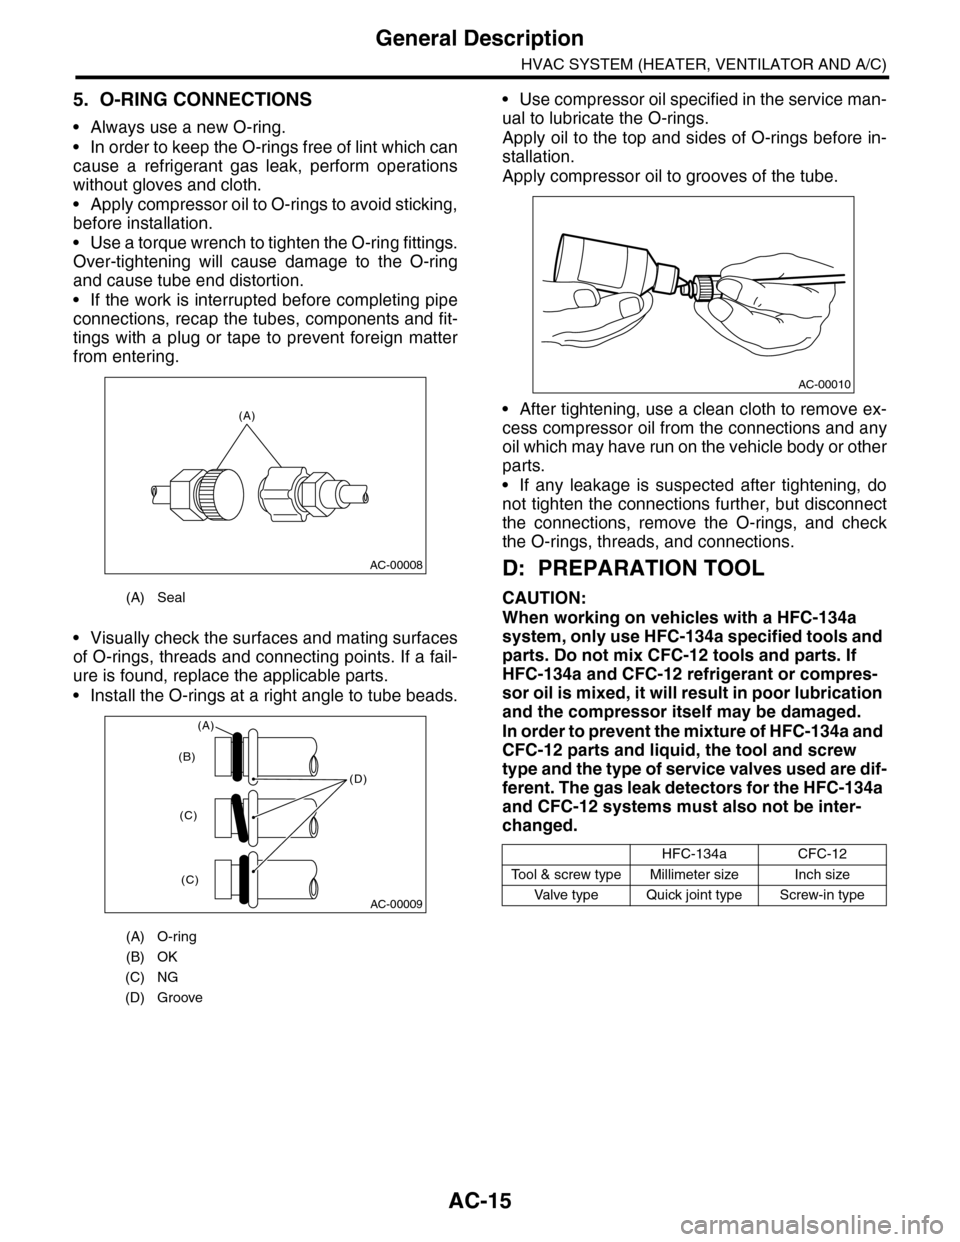
•Visually check the surfaces and mating surfaces
of O-rings, threads and connecting points. If a fail-
ure is found, replace the applicable parts.
•Install the O-rings at a right angle to tube beads.
•Use compressor oil specified in the service man-
ual to lubricate the O-rings.
Apply oil to the top and sides of O-rings before in-
stallation.
Apply compressor oil to grooves of the tube.
•After tightening, use a clean cloth to remove ex-
cess compressor oil from the connections and any
oil which may have run on the vehicle body or other
parts.
•If any leakage is suspected after tightening, do
not tighten the connections further, but disconnect
the connections, remove the O-rings, and check
the O-rings, threads, and connections.
D: PREPARATION TOOL
CAUTION:
When working on vehicles with a HFC-134a
system, only use HFC-134a specified tools and
parts. Do not mix CFC-12 tools and parts. If
HFC-134a and CFC-12 refrigerant or compres-
sor oil is mixed, it will result in poor lubrication
and the compressor itself may be damaged.
In order to prevent the mixture of HFC-134a and
CFC-12 parts and liquid, the tool and screw
type and the type of service valves used are dif-
ferent. The gas leak detectors for the HFC-134a
and CFC-12 systems must also not be inter-
changed.
(A) Seal
(A) O-ring
(B) OK
(C) NG
(D) Groove
(A)
AC-00008
AC-00009
(D)
(B)
(C)
(C)
(A)
HFC-134aCFC-12
To o l & s c r e w t y p e M i l l i m e t e r s i z e I n c h s i z e
Va l ve t y p e Q u i ck j o i n t t y p e S c r ew - i n t y p e
AC-00010
Page 350 of 2453

AC-24
Refrigerant Leak Check
HVAC SYSTEM (HEATER, VENTILATOR AND A/C)
5. Refrigerant Leak Check
A: INSPECTION
1) At engine speed below 1500rpm, operate the A/
C system for approx. 10 minutes, and confirm that
the high-side pressure shows at least 690 kPa
(7.03 kg/cm2, 100 psi). Then stop the engine to
start the leak test.
2) Starting from the connection between high-pres-
sure pipe and evaporator, check the system for
leaks along the high-pressure side through the
compressor. The following items must be checked
thoroughly.
3) Check the joint and seam between pressure
switch (dual switch) and high-pressure pipe.
4) Check the connections between condenser and
pipes, and welded joints on the condenser.
The leak tester may detect the oil on the condenser
fins as a leak.
5) Check the joint between compressor and hoses.
6) Check the machined area of the compressor and
other joints on the compressor.
7) Check the compressor shaft seal at the area
near the center of compressor clutch pulley.
Some shaft seals show a slight amount of leakage,
about 3 g (0.1 oz) per year. This is not a problem.
8) Starting from the connection between low-pres-
sure pipe and evaporator, check the system for
leakage along the low-pressure side through the
compressor. The following items must be checked
thoroughly.
•Connection between 2 parts
•Connection between pipe and plate
•Connection between pipes
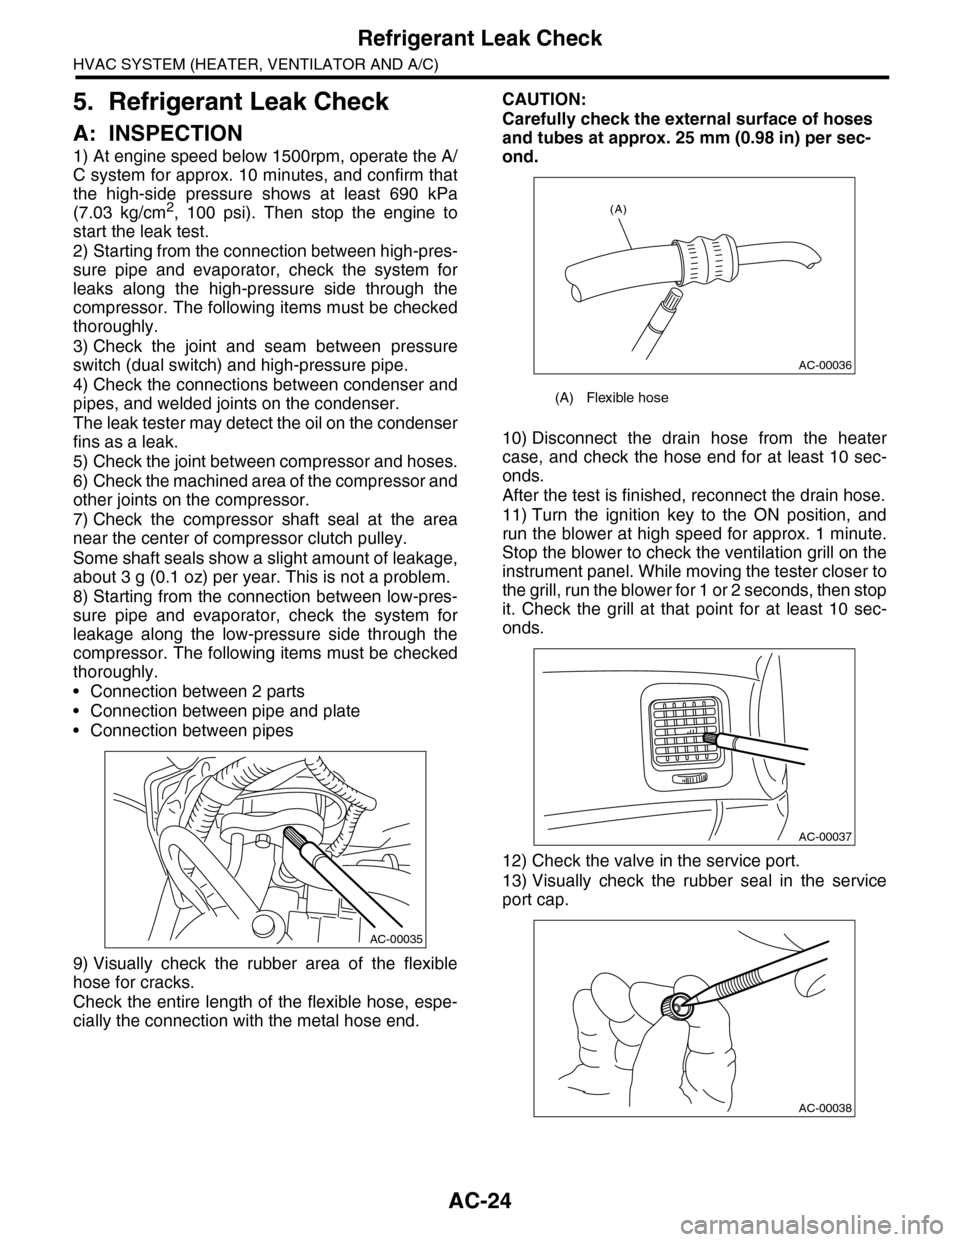
9) Visually check the rubber area of the flexible
hose for cracks.
Check the entire length of the flexible hose, espe-
cially the connection with the metal hose end.
CAUTION:
Carefully check the external surface of hoses
and tubes at approx. 25 mm (0.98 in) per sec-
ond.
10) Disconnect the drain hose from the heater
case, and check the hose end for at least 10 sec-
onds.
After the test is finished, reconnect the drain hose.
11) Turn the ignition key to the ON position, and
run the blower at high speed for approx. 1 minute.
Stop the blower to check the ventilation grill on the
instrument panel. While moving the tester closer to
the grill, run the blower for 1 or 2 seconds, then stop
it. Check the grill at that point for at least 10 sec-
onds.
12) Check the valve in the service port.
13) Visually check the rubber seal in the service
port cap.
AC-00035
(A) Flexible hose
AC-00036
(A)
AC-00037
AC-00038
Page 359 of 2453

AC-33
Compressor
HVAC SYSTEM (HEATER, VENTILATOR AND A/C)
14.Compressor
A: INSPECTION
1. MAGNETIC CLUTCH CLEARANCE
Check the clearance of the entire circumference
around the drive plate and pulley.
Standard:
0.45±0.15 mm (0.0177±0.0059 in)
2. MAGNETIC CLUTCH OPERATION
1) Disconnect the compressor connector.
2) Connect the positive (+) lead from the battery to
the compressor connector terminal, and the nega-
tive (–) lead to the compressor body.
3) Check the magnet clutch engagement.
If there is a problem, replace the compressor.
B: REMOVAL
1) Perform the compressor oil return operation.
2) Turn the A/C switch to OFF and stop the engine.
3) Using the refrigerant recovery system, dis-
charge refrigerant.
4) Disconnect the ground cable from battery.
5) Remove the V-belts.
6) Remove the generator.
7) Remove the bolt and remove the low-pressure
hose and high-pressure hose.
8) Disconnect the compressor harness from the
body harness.
9) Remove the bolts and remove the compressor
bracket.
10) Remove the bolts, then remove the bracket
from the compressor.
C: INSTALLATION
1) Install in the reverse order of removal.
2) Replace the O-rings on low-/high-pressure hos-
es with new parts, then apply compressor oil.
3) After replacing the compressor, adjust the
amount of compressor oil.
4) Charge refrigerant.
Tightening torque:
Refer to “COMPONENT” of “General Descrip-
tion”.
AC-01287
AC-01381
AC-01289
AC-01290
Page 360 of 2453

AC-34
Condenser
HVAC SYSTEM (HEATER, VENTILATOR AND A/C)
15.Condenser
A: REMOVAL
1) Using the refrigerant recovery system, dis-
charge refrigerant.
2) Disconnect the ground cable from battery.
3) Remove the bumper upper cover.
4) Disconnect the pressure hose and pipe from the
condenser.
5) Remove the 4 bolts, lift the condenser and pull
out from the space between the radiator and
bumper.
CAUTION:
•Be careful not to damage the condenser fins.
If a damaged fin is found, repair it using a thin
screwdriver.
•If the condenser is replaced, add an appropri-
ate amount of compressor oil to the compres-
sor.
B: INSTALLATION
1) Install in the reverse order of removal.
CAUTION:
Replace the O-rings on hoses or pipes with new
parts, and then apply compressor oil.
2) Charge refrigerant.
Tightening torque:
Refer to “COMPONENT” of “General Descrip-
tion”.
tion.>
C: INSPECTION
1) Check to see that the condenser fins are not
clogged with debris or insects. Blow with com-
pressed air or flush fins with water as needed.
2) Inspect for oil leakage from the condenser. If a
failure is found, replace the condenser with a new
one.
AC-01292
AC-01291
AC-01293
Page 458 of 2453

LAN(diag)-2
Basic Diagnostic Procedure
LAN SYSTEM (DIAGNOSTICS)
1. Basic Diagnostic Procedure
A: PROCEDURE
1. WITH SUBARU SELECT MONITOR
CAUTION:
•Subaru Select Monitor is required for reading DTC, performing diagnosis and reading current data.
•Remove foreign matter (dust, water, oil, etc.) from the body integrated unit connector during re-
moval and installation.
•For model with immobilizer, registration of immobilizer may be needed after the replacement of
controller etc. For detailed procedure, refer to the REGISTRATION MANUAL FOR IMMOBILIZER.
NOTE:
•To check harness for broken wires or short circuits, shake trouble spot or connector.
•Check List for Interview.
Step Check Yes No
1CHECK PRE-INSPECTION.
1) Ask the customer when and how the trou-
ble occurred using interview check list.
2) Check the display of communication error
display. (Combination meter, odo/trip meter)
Is the communication error dis-
played?
Go to step 3.Go to step 2.
2BASIC INSPECTION
Check the components which might affect
body control.
Is the component that might
influence the body control
problem normal?
Go to step 3.Repair or replace
each component.
3CHECK INDICATION OF DTC.
1) Read DTC of all systems.
CODE (DTC), OPERATION, Subaru Select
Monitor.>
NOTE:•The LAN system is for the overall vehicle, so
read the DTC of all systems.
•If the communication function of the Subaru
Select Monitor cannot be executed normally,
check the communication circuit.
TIALIZING IMPOSSIBLE, Diagnostic Proce-
dure with Diagnostic Trouble Code (DTC).>
2) Record all DTC.
Is a DTC other than CAN com-
munication displayed in the
output code?
ECU: P0600 TCU: P1718 VDC
CU: C0047 or C0057, etc.
Refer to the DTC
related table.
FUNCTION
CHECK, DTC
TA B L E , L i s t o f
Diagnostic Trou-
ble Code (DTC).>
Go to step 5.
Go to step 4.
4PERFORM GENERAL DIAGNOSTICS.
Inspect using “General Diagnostics Table”.
Is result of inspection OK? LAN system is nor-
mal.
Go to step 5.
5PERFORM DIAGNOSIS.
1) Correct the cause of trouble.
2) Perform the clear memory mode.
OPERATION, Subaru Select Monitor.>
3) Read the DTC.
OPERATION, Subaru Select Monitor.>
Is DTC displayed? Repeat step 5 until
DTC is not shown.
Finish the diagno-
sis.
Page 546 of 2453

LI-13
Headlight Bulb
LIGHTING SYSTEM
11.Headlight Bulb
A: REMOVAL
1. HIGH BEAM AND LOW BEAM
CAUTION:
•Because the halogen bulb operates at a high
temperature, dirt and oil on the bulb surface re-
duces the bulb's service life. Hold the flange
portion when replacing the bulb. Never touch
the glass portion.
•Do not leave the headlight without a bulb for
a long time. Dust, moisture, etc. entering the
headlight may affect its performance.
1) Disconnect the ground cable from battery.
2) Remove the air intake duct. (When removing the
headlight bulb RH)
3) Remove the battery. (When removing the head-
light bulb LH)
4) Disconnect the harness connector.
5) Remove the bulb assembly (A) then remove the
high beam. To remove the low beam, remove the
back cover (B), and then go to the next step.
6) Remove the light bulb retaining spring (A) to re-
move bulb.
B: INSTALLATION
Install in the reverse order of removal.
C: INSPECTION
1) Visually check the bulb for blow out.
2) Check the bulb specification.
3) If NG, replace the bulb with a new one.
IN-02134
LI-00506(B)
(A)
LI-00507
(A)
Page 602 of 2453

SB-5
General Description
SEAT BELT SYSTEM
B: CAUTION
•Before starting the work, turn the ignition switch
to OFF, disconnect the battery ground cable and
wait for 20 seconds or more.
•The pretensioner system has a backup power
source. The pretensioner might deploy if you do not
wait for 20 seconds or more before starting work.
•Do not drop or apply any impact to the preten-
sioner.
•If oil, grease or water gets on the pretensioner,
wipe it off immediately with a dry cloth.
•Do not expose the pretensioner to high tempera-
ture or flame.
•Do not allow current to flow through or voltage to
reach the pretensioner. Do not use a circuit tester
to check resistance of the pretensioner.
•Do not disassemble or attempt to repair the pre-
tensioner. If it is dented, cracked or deformed, re-
place it with a new one.
•Do not use the airbag or pretensioner parts from
other vehicles. Always replace parts with new
parts.
•When handling a seat belt with deployed preten-
sioner, wear gloves and goggles. Wash your hands
afterwards.
•Do not reuse a seat belt with deployed preten-
sioner.
•If material from the airbag enters the eyes or con-
tacts skin during deployment, wash it away with
clean water, and then consult a doctor.
C: PREPARATION TOOL
1. GENERAL TOOL
TOOL NAME REMARKS
TO RX® T50Used for removing and installing the inner seat belt assembly.