Page 1218 of 2453
EN(H6DO)(diag)-57
Diagnostics for Engine Starting Failure
ENGINE (DIAGNOSTICS)
16.Diagnostics for Engine Starting Failure
A: PROCEDURE
1. Check for fuel amount.
↓
2. Inspection of starter motor circuit.
Fai l ur e. >
↓
3. Inspection of ECM power supply and ground line.
LINE OF ENGINE CONTROL MODULE (ECM), Diagnostics for Engine Starting Failure.>
↓
4. Inspection of ignition control system.
Starting Failure.>
↓
5. Inspection of fuel pump circuit
↓
6. Inspection of fuel injector circuit
ure.>
Page 1219 of 2453
EN(H6DO)(diag)-58
Diagnostics for Engine Starting Failure
ENGINE (DIAGNOSTICS)
B: STARTER MOTOR CIRCUIT
CAUTION:
After repair or replacement of faulty parts, perform Clear Memory Mode
OPERATION, Clear Memory Mode.> and Inspection Mode
Inspection Mode.>.
WIRING DIAGRAM:
EN-03735
3220
NO.21
B225
MAIN SBFSBF-6
E
1513
1614
ECM
B136
B72
B14
M
23
B72B225
101112
131415 16
17181920
21222324
25262728
293031 32
333435 36 39 40
3738
129
34
56
78
134562
BATTERY
IGNITIONSWITCH
STARTERRELAYSTARTER MOTOR
B136
16101112131415252430
9871718192028212223293231
123456
2726333435
Page 1220 of 2453

EN(H6DO)(diag)-59
Diagnostics for Engine Starting Failure
ENGINE (DIAGNOSTICS)
Step Check Yes No
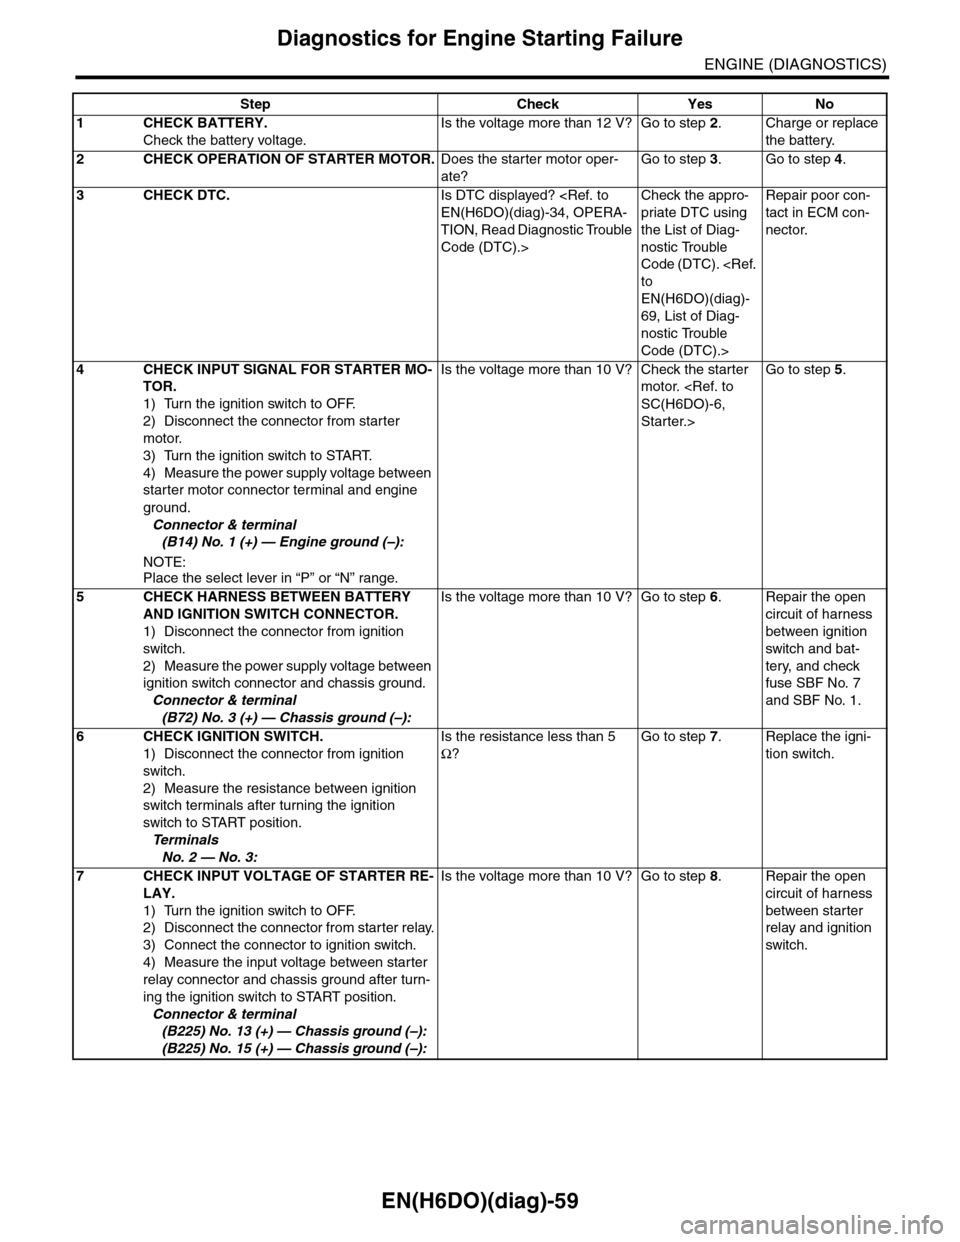
1CHECK BATTERY.
Check the battery voltage.
Is the voltage more than 12 V? Go to step 2.Charge or replace
the battery.
2CHECK OPERATION OF STARTER MOTOR.Does the starter motor oper-
ate?
Go to step 3.Go to step 4.
3CHECK DTC.Is DTC displayed?
EN(H6DO)(diag)-34, OPERA-
TION, Read Diagnostic Trouble
Code (DTC).>
Check the appro-
priate DTC using
the List of Diag-
nostic Trouble
Code (DTC).
to
EN(H6DO)(diag)-
69, List of Diag-
nostic Trouble
Code (DTC).>
Repair poor con-
tact in ECM con-
nector.
4CHECK INPUT SIGNAL FOR STARTER MO-
TOR.
1) Turn the ignition switch to OFF.
2) Disconnect the connector from starter
motor.
3) Turn the ignition switch to START.
4) Measure the power supply voltage between
starter motor connector terminal and engine
ground.
Connector & terminal
(B14) No. 1 (+) — Engine ground (–):
NOTE:Place the select lever in “P” or “N” range.
Is the voltage more than 10 V? Check the starter
motor.
SC(H6DO)-6,
Starter.>
Go to step 5.
5CHECK HARNESS BETWEEN BATTERY
AND IGNITION SWITCH CONNECTOR.
1) Disconnect the connector from ignition
switch.
2) Measure the power supply voltage between
ignition switch connector and chassis ground.
Connector & terminal
(B72) No. 3 (+) — Chassis ground (–):
Is the voltage more than 10 V? Go to step 6.Repair the open
circuit of harness
between ignition
switch and bat-
tery, and check
fuse SBF No. 7
and SBF No. 1.
6CHECK IGNITION SWITCH.
1) Disconnect the connector from ignition
switch.
2) Measure the resistance between ignition
switch terminals after turning the ignition
switch to START position.
Te r m i n a l s
No. 2 — No. 3:
Is the resistance less than 5
Ω?
Go to step 7.Replace the igni-
tion switch.
7CHECK INPUT VOLTAGE OF STARTER RE-
LAY.
1) Turn the ignition switch to OFF.
2) Disconnect the connector from starter relay.
3) Connect the connector to ignition switch.
4) Measure the input voltage between starter
relay connector and chassis ground after turn-
ing the ignition switch to START position.
Connector & terminal
(B225) No. 13 (+) — Chassis ground (–):
(B225) No. 15 (+) — Chassis ground (–):
Is the voltage more than 10 V? Go to step 8.Repair the open
circuit of harness
between starter
relay and ignition
switch.
Page 1221 of 2453
EN(H6DO)(diag)-60
Diagnostics for Engine Starting Failure
ENGINE (DIAGNOSTICS)
8CHECK STARTER RELAY.
1) Connect the battery to starter relay termi-
nals No. 15 and No. 16.
2) Measure the resistance between starter
relay terminals.
Te r m i n a l s
No. 13 — No. 14:
Is the resistance less than 1
Ω?
Go to step 9.Replace the
starter relay.
9CHECK INPUT VOLTAGE FROM ECM.
1) Turn the ignition switch to OFF.
2) Connect the connector to starter relay.
3) Disconnect the connectors from ECM.
4) Measure the voltage between ECM and
chassis ground.
Connector & terminal
(B136) No. 32 (+) — Chassis ground (–):
(B136) No. 20 (+) — Chassis ground (–):
Is the voltage more than 10 V? Replace the ECM.
FU(H6DO)-32,
Engine Control
Module (ECM).>
Repair the open or
ground short cir-
cuit of harness
between ECM and
starter relay.
Step Check Yes No
Page 1222 of 2453

EN(H6DO)(diag)-61
Diagnostics for Engine Starting Failure
ENGINE (DIAGNOSTICS)
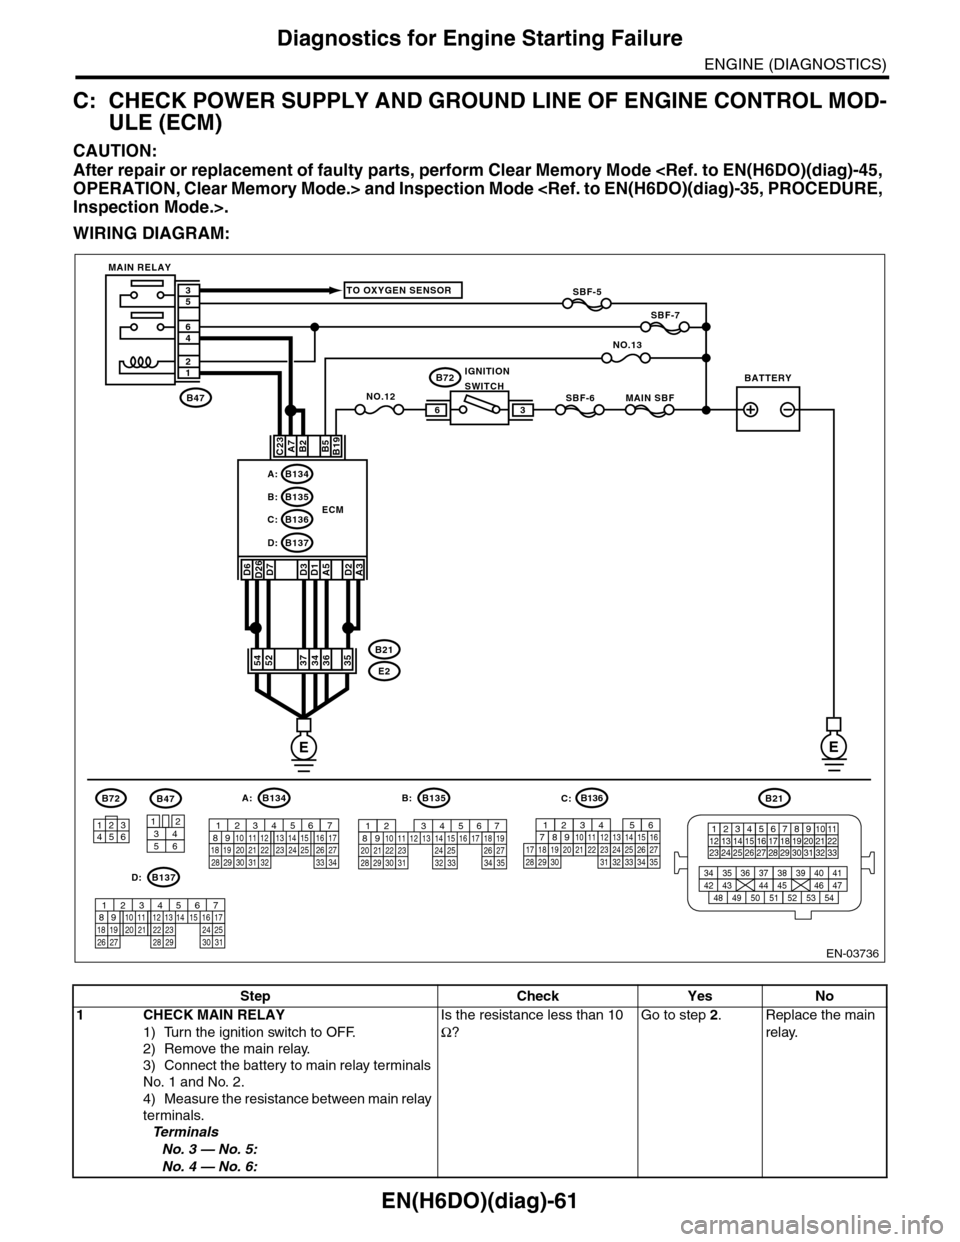
C: CHECK POWER SUPPLY AND GROUND LINE OF ENGINE CONTROL MOD-
ULE (ECM)
CAUTION:
After repair or replacement of faulty parts, perform Clear Memory Mode
OPERATION, Clear Memory Mode.> and Inspection Mode
Inspection Mode.>.
WIRING DIAGRAM:
EN-03736
SBF-6MAIN SBF
SBF-7
B72
B2A7C23
D7D3D1A5
B5B19
NO.12B47
E2
B21
12
46
53
ECM
EE
36
B134A:
D:B137
B135B:
B136C:
A3
52373634
3412
56
B47
TO OXYGEN SENSOR
NO.13
D2
35
B21
123412131415567816171819910 1120212223 24 25 2627 28 29 3031 32 33
3534 37363938 41404342 4445 47464948 51505352 54
B72
134562
B134
56 7821943102422 23 2511 12 13 14 1526 2728
16 1718 19 20 2133 34293230 31
A:B135
567821943102422 23 2511 12 13 14 1526 2728
16 17 18 1920 2129 30 31 32 33 34 35
B:
B137
5678219431022 2311 12 13 14 1524 2526
16 1718 19 20 2127 28 29 30 31
D:
SBF-5
D6D26
54
MAIN RELAY
BATTERYIGNITIONSWITCH
B136
16101112131415252430
9871718192028212223293231
123456
2726333435
C:
Step Check Yes No
1CHECK MAIN RELAY
1) Turn the ignition switch to OFF.
2) Remove the main relay.
3) Connect the battery to main relay terminals
No. 1 and No. 2.
4) Measure the resistance between main relay
terminals.
Te r m i n a l s
No. 3 — No. 5:
No. 4 — No. 6:
Is the resistance less than 10
Ω?
Go to step 2.Replace the main
relay.
Page 1223 of 2453

EN(H6DO)(diag)-62
Diagnostics for Engine Starting Failure
ENGINE (DIAGNOSTICS)
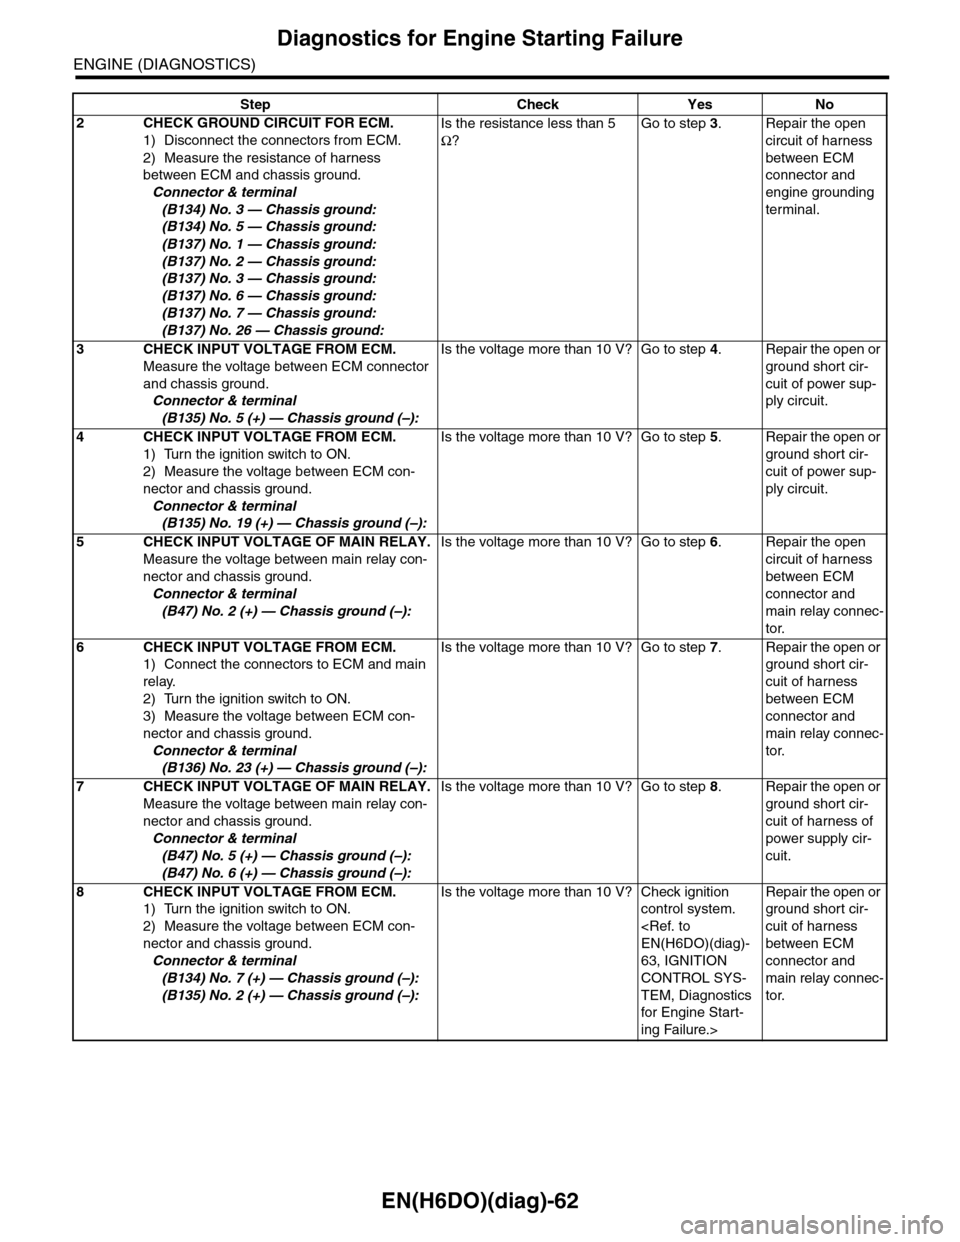
2CHECK GROUND CIRCUIT FOR ECM.
1) Disconnect the connectors from ECM.
2) Measure the resistance of harness
between ECM and chassis ground.
Connector & terminal
(B134) No. 3 — Chassis ground:
(B134) No. 5 — Chassis ground:
(B137) No. 1 — Chassis ground:
(B137) No. 2 — Chassis ground:
(B137) No. 3 — Chassis ground:
(B137) No. 6 — Chassis ground:
(B137) No. 7 — Chassis ground:
(B137) No. 26 — Chassis ground:
Is the resistance less than 5
Ω?
Go to step 3.Repair the open
circuit of harness
between ECM
connector and
engine grounding
terminal.
3CHECK INPUT VOLTAGE FROM ECM.
Measure the voltage between ECM connector
and chassis ground.
Connector & terminal
(B135) No. 5 (+) — Chassis ground (–):
Is the voltage more than 10 V? Go to step 4.Repair the open or
ground short cir-
cuit of power sup-
ply circuit.
4CHECK INPUT VOLTAGE FROM ECM.
1) Turn the ignition switch to ON.
2) Measure the voltage between ECM con-
nector and chassis ground.
Connector & terminal
(B135) No. 19 (+) — Chassis ground (–):
Is the voltage more than 10 V? Go to step 5.Repair the open or
ground short cir-
cuit of power sup-
ply circuit.
5CHECK INPUT VOLTAGE OF MAIN RELAY.
Measure the voltage between main relay con-
nector and chassis ground.
Connector & terminal
(B47) No. 2 (+) — Chassis ground (–):
Is the voltage more than 10 V? Go to step 6.Repair the open
circuit of harness
between ECM
connector and
main relay connec-
tor.
6CHECK INPUT VOLTAGE FROM ECM.
1) Connect the connectors to ECM and main
relay.
2) Turn the ignition switch to ON.
3) Measure the voltage between ECM con-
nector and chassis ground.
Connector & terminal
(B136) No. 23 (+) — Chassis ground (–):
Is the voltage more than 10 V? Go to step 7.Repair the open or
ground short cir-
cuit of harness
between ECM
connector and
main relay connec-
tor.
7CHECK INPUT VOLTAGE OF MAIN RELAY.
Measure the voltage between main relay con-
nector and chassis ground.
Connector & terminal
(B47) No. 5 (+) — Chassis ground (–):
(B47) No. 6 (+) — Chassis ground (–):
Is the voltage more than 10 V? Go to step 8.Repair the open or
ground short cir-
cuit of harness of
power supply cir-
cuit.
8CHECK INPUT VOLTAGE FROM ECM.
1) Turn the ignition switch to ON.
2) Measure the voltage between ECM con-
nector and chassis ground.
Connector & terminal
(B134) No. 7 (+) — Chassis ground (–):
(B135) No. 2 (+) — Chassis ground (–):
Is the voltage more than 10 V? Check ignition
control system.
EN(H6DO)(diag)-
63, IGNITION
CONTROL SYS-
TEM, Diagnostics
for Engine Star t-
ing Failure.>
Repair the open or
ground short cir-
cuit of harness
between ECM
connector and
main relay connec-
tor.
Step Check Yes No
Page 1224 of 2453
EN(H6DO)(diag)-63
Diagnostics for Engine Starting Failure
ENGINE (DIAGNOSTICS)
D: IGNITION CONTROL SYSTEM
CAUTION:
After repair or replacement of faulty parts, perform Clear Memory Mode
OPERATION, Clear Memory Mode.> and Inspection Mode
Inspection Mode.>.
WIRING DIAGRAM:
EN-03652
E34
E45
E31
E32
E46E33
123
ECMB137
231918212220
SBF-746
B327
E46
E2
B21
E32
1814131617
32312E3432E4532
1549
111E31312E33312
12
B225
B21
123412131415567816171819910 1120212223 24 25 2627 28 29 3031 32 33
3534 37363938 41404342 4445 47464948 51505352 54
91012
34
56
78
11 121415 16
131819 20
172223 24
21
3839 40
373435 36
333031 32
292627 28
25
B225B327
3412
56
EE
OXYGEN SENSORRELAY
IGNITION COILNO. 1
RELAY HOLDER
IGNITION COIL NO. 2IGNITION COILNO. 3IGNITION COILNO. 4IGNITION COILNO. 5IGNITION COILNO. 6
B137
85610 11 12 13 14 157213416
3019 20 2228 29
91718 2521 23 243126 27
Page 1226 of 2453

EN(H6DO)(diag)-65
Diagnostics for Engine Starting Failure
ENGINE (DIAGNOSTICS)
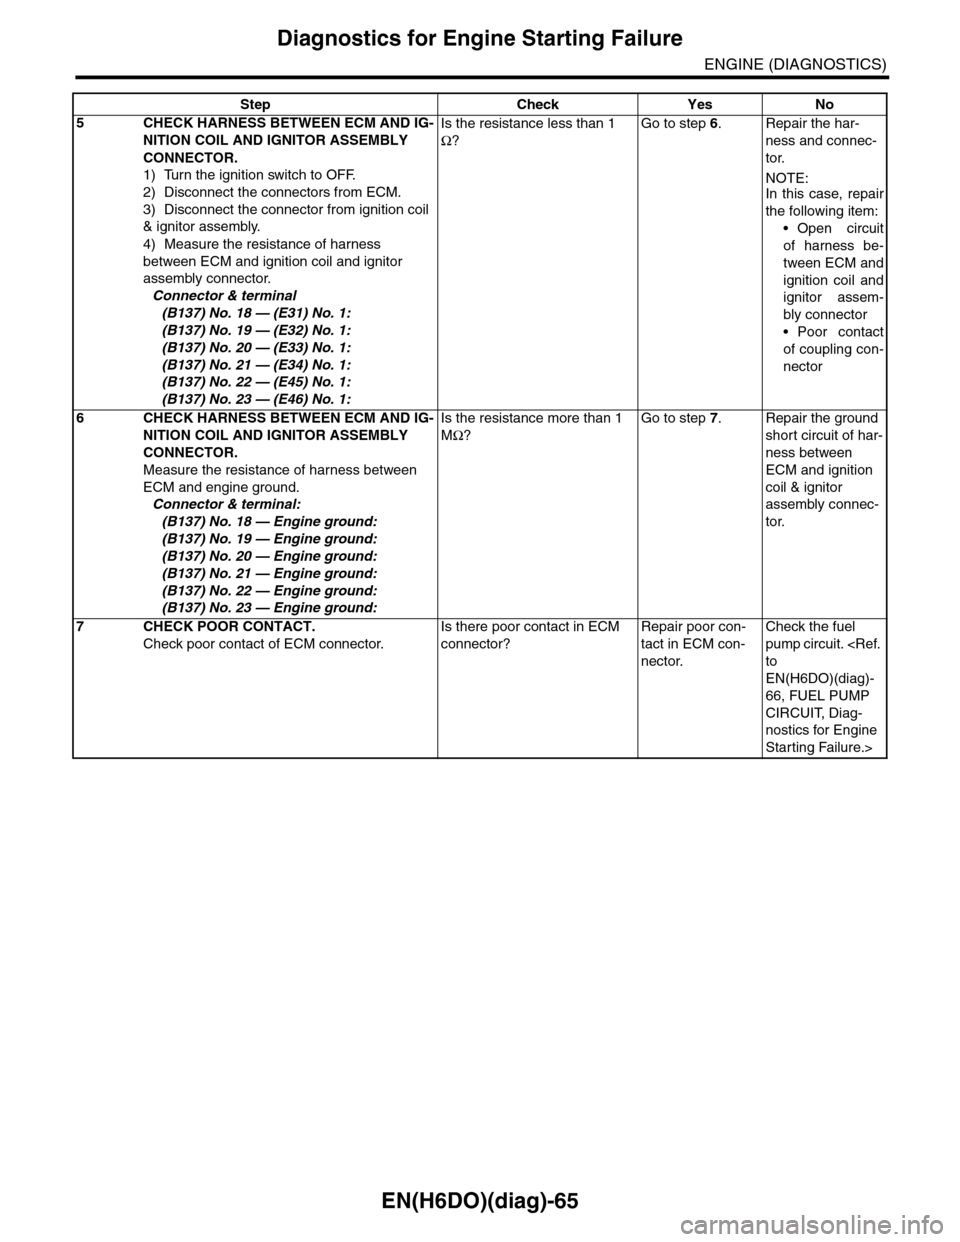
5CHECK HARNESS BETWEEN ECM AND IG-
NITION COIL AND IGNITOR ASSEMBLY
CONNECTOR.
1) Turn the ignition switch to OFF.
2) Disconnect the connectors from ECM.
3) Disconnect the connector from ignition coil
& ignitor assembly.
4) Measure the resistance of harness
between ECM and ignition coil and ignitor
assembly connector.
Connector & terminal
(B137) No. 18 — (E31) No. 1:
(B137) No. 19 — (E32) No. 1:
(B137) No. 20 — (E33) No. 1:
(B137) No. 21 — (E34) No. 1:
(B137) No. 22 — (E45) No. 1:
(B137) No. 23 — (E46) No. 1:
Is the resistance less than 1
Ω?
Go to step 6.Repair the har-
ness and connec-
tor.
NOTE:In this case, repair
the following item:
•Open circuit
of harness be-
tween ECM and
ignition coil and
ignitor assem-
bly connector
•Poor contact
of coupling con-
nector
6CHECK HARNESS BETWEEN ECM AND IG-
NITION COIL AND IGNITOR ASSEMBLY
CONNECTOR.
Measure the resistance of harness between
ECM and engine ground.
Connector & terminal:
(B137) No. 18 — Engine ground:
(B137) No. 19 — Engine ground:
(B137) No. 20 — Engine ground:
(B137) No. 21 — Engine ground:
(B137) No. 22 — Engine ground:
(B137) No. 23 — Engine ground:
Is the resistance more than 1
MΩ?
Go to step 7.Repair the ground
short circuit of har-
ness between
ECM and ignition
coil & ignitor
assembly connec-
tor.
7CHECK POOR CONTACT.
Check poor contact of ECM connector.
Is there poor contact in ECM
connector?
Repair poor con-
tact in ECM con-
nector.
Check the fuel
pump circuit.
to
EN(H6DO)(diag)-
66, FUEL PUMP
CIRCUIT, Diag-
nostics for Engine
Starting Failure.>
Step Check Yes No