2009 SKODA YETI park assist
[x] Cancel search: park assistPage 56 of 271

Lights and Visibility
55
Using the system
Safety
Driving Tips
General Maintenance
Breakdown assistance
Technical Data
Rain lights If you switch on the windscreen wipe in th
e operation rain sensor* for longer than 10
seconds or in the operation permanent wipe (position 2 or 3)
⇒page 63 switching on
for longer than 15 seconds, the side lights
and low beam are switched on automati-
cally. The light switches off if the windscreen wipe is in operation rain sensor* for more than 4 minutes or is not switched
on in the operation permanent wipe.
WARNING
The automatic light control only operat
es as a support. Th
e driver is not
released from his responsibility to inspect the light and if necessary to switch on the light depending on the light conditions. The light sensor cannot detect for example rain or snow. For these conditions we recommend to switch on the low beam
!
Note
•
Do not affix any stickers in front of the light sensor, so that you do not impair its
function or put it out of operation.•
The same principles as for using the automa
tic light control also
apply to the light
which is switched on manually
⇒page 53.
Cornering lights*The cornering lights are used to illuminate
the curves by means of the cone of light
swiveling together with the front headlight with Xenon lights*. This function is active when the speed of the car increases to more than 10km/h. The swiveling function of the headlights ca
n be switched off / on via the menu point
Assistant
in the main menu of the Information display*
⇒page 24.
WARNING
If the cornering ligh
ts are defective, the headlights are automatically lowered to
the emergency position, which prevents a
possible dazzling of oncoming traffic.
Thus the illuminated length of the road is shortened. Drive carefully and have the car inspected immediatel
y by a specialist garage.
Coming Home FunctionThe function makes it possible to switch on the lights in the darkness for a short time after leaving the vehicle.Switching on Coming Home Function– The light switch is in the position automatic driving lamp control
and the low
beam illuminates.
– Switch off the ignition. – After opening the driver's door, the function Coming Home is switched on.– Close all the doors and the boot lid and lo
ck the vehicle. After a short time, switch
all lights off.
Depending on equipment fitted the function Coming Home switches on the following lights:•
Parking lights,
•
Low beam,
•
Entry lighting in the exterior mirrors,
•
Licence plate light.
Coming Home Function The lights go out 10 seconds after cl
osing all the doors and the boot lid.
If a door or the boot lid re
mains open, the lights go out
60 seconds after switching off
the ignition. The function Coming Home is controlled with the light sensor in the mount of the inte- rior rear mirror. If the light intensity is higher than the set value of the light sensor, the Coming Home Function is not switched on after switching off the ignition.
Note
•
If the Coming Home Function is switched
on constantly, the battery will be heavily
discharged particularly in short-haul traffic.•
The switching on of the described lights
should only be undertaken in accordance
with the legal requirements.
sgg.6.book Page 55 Thursday, September 24, 2009 2:32 PM
Page 58 of 271

Lights and Visibility
57
Using the system
Safety
Driving Tips
General Maintenance
Breakdown assistance
Technical Data
Switching on the fog lights– First of all turn the light switch into position
or ⇒page 56, fig. 46
.
– Pull the light switch into position . The rear fog light warning light
⇒page 29 lights up in the instrument cluster when
the fog light is switched off.Fog lights with the function “Corner”* The fog lights with the function “Corner” improve the illumination of areas close to the vehicle when turning, parking etc.The fog lights with the function “Corner” ar
e regulated according to the steering angle
or after switching on the turn signal light
8) in the following circumstances:
•
the vehicle is stationary and the engine
is running or it moves with a speed of
maximum 40 km/h;•
the daylight driving lights are not switched on;
•
the low beam is switched on or th
e light switch is
in the position
and the
intensity of the ambient light causes the low beam to be switched on;•
the fog lights are not switched on;
•
no reverse gear is engaged.Note
If you engage the reverse gear during the
active function “Corne
r”, both fog lights
illuminate.Rear fog light
Switching on the rear fog light– First of all turn the light switch into position
or ⇒page 56, fig. 46
.
– Pull the switch into position .
The rear fog light warning light
⇒page 29 lights up in the instrument cluster when
the fog light is switched off. Only the rear fog light of the trailer lights
up automatically when you are towing a trailer
using a factory-fitted towing device
which is fitted with the rear fog light.
The rear fog light is located in the rear light array on the driver's side.
Caution
The rear fog light should only be switched on
if visibility is partic
ularly poor (conform
with any varying legal provisions) to avoi
d dazzling vehicles behind your vehicle.
Instrument lighting*
You can adjust the brightness of the instrument lighting.Instrument lighting– Switch on the light. – Turn the control dial
⇒fig. 47
to the desired intensity of the instrument lighting.
For the information display*
⇒page 24 the intensity of the lighting is automatically
set. It is only possible to adjust the instrume
nt lighting with the co
ntrol dial if the light
intensity drops below the set value of the light sensor.
8)If both switch on versions are conflicting, for ex
ample if the steering wheel is turned to the left
and the right turn signal light is switched on, the turn signal light has the higher priority.
A1
A2
Fig. 47 Dash panel:
Instrument lighting
sgg.6.book Page 57 Thursday, September 24, 2009 2:32 PM
Page 60 of 271
Lights and Visibility
59
Using the system
Safety
Driving Tips
General Maintenance
Breakdown assistance
Technical Data
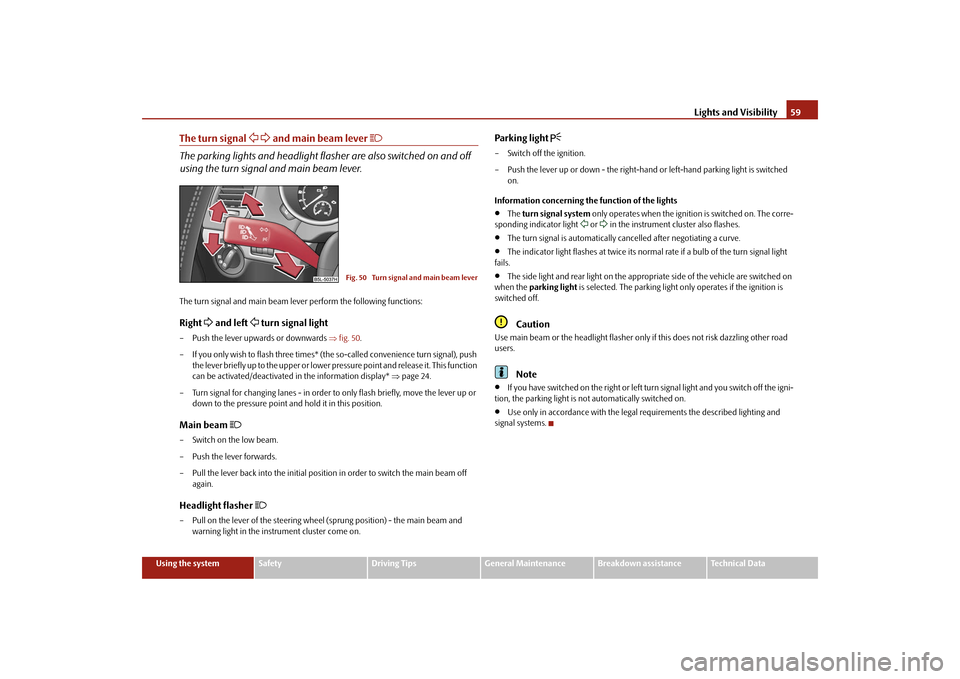
The turn signal
and main beam lever
The parking lights and headlight flas
her are also switched on and off
using the turn signal and main beam lever.The turn signal and main beam le
ver perform the following functions:
Right
and left
turn signal light
– Push the lever upwards or downwards
⇒fig. 50
.
– If you only wish to flash three times* (the
so-called convenience turn signal), push
the lever briefly up to the upper or lower pr
essure point and release it. This function
can be activated/deactivated in the information display*
⇒page 24.
– Turn signal for changing lanes - in order to
only flash briefly, move the lever up or
down to the pressure point and hold it in this position.
Main beam
– Switch on the low beam. – Push the lever forwards.– Pull the lever back into the initial positi
on in order to switch the main beam off
again.
Headlight flasher
– Pull on the lever of the steering whee
l (sprung position) -
the main beam and
warning light in the instrument cluster come on.
Parking light
– Switch off the ignition. – Push the lever up or down - the right-hand
or left-hand parking light is switched
on.
Information concerning the function of the lights•
The
turn signal system
only operates when the ignition is switched on. The corre-
sponding indicator light
or in the instrument cluster also flashes.
•
The turn signal is automatically cancelled after negotiating a curve.
•
The indicator light flashes at twice its normal
rate if a bulb of the turn signal light
fails.•
The side light and rear light on the appropriate side of the vehicle are switched on
when the
parking light
is selected. The parking light only operates if the ignition is
switched off.
Caution
Use main beam or the headlight flasher only
if this does not risk dazzling other road
users.
Note
•
If you have switched on the right or left turn signal light and you switch off the igni-
tion, the parking light is not automatically switched on.•
Use only in accordance with the legal
requirements the described lighting and
signal systems.
Fig. 50 Turn signal and main beam lever
sgg.6.book Page 59 Thursday, September 24, 2009 2:32 PM
Page 66 of 271

Lights and Visibility
65
Using the system
Safety
Driving Tips
General Maintenance
Breakdown assistance
Technical Data
Alternative park position of the rear window wiperEach time after switching off the engine for
the second time, the wi
per blade of the rear
window wiper is tilted when the park position
is activated. Thus, the life of the wiper
blade is prolonged.Activating– Switch on the ignition - position
⇒page 109.
– Push the operating level in the position
⇒page 63, fig. 57
five times in succes-
sion within 5 seconds.
– Switch off the ignition. After switching on
the ignition again, the alternative park
position of the rear window wiper is activated.
– For deactivating the alternative park position of the rear window wiper, proceed in
the same way.
Headlight cleaning system*The headlights are being cleaned after the windscreen has been sprayed for the first time and fifth time, the low beam or main beam are switched on and the windscreen wiper lever was held in the position
⇒page 63, fig. 57
for about 1 second.
The headlight washer nozzles are moved forward out of the bumper by the water pres- sure for cleaning the headlights. You should remove stubborn dirt (such as in
sect residues) from the headlight lenses at
regular intervals, for example when refuelling
. Please refer to the following guidelines
⇒ page 196, “The headlight lenses”. You should remove any snow from the fixtur
es of the washer nozzles and clear ice in
winter with a de-icing spray in order to
ensure proper operation of the cleaning
system.
Replacing wiper blades for the windscreen wipersOne cannot fold out the wiper arms in the re
st position from the windscreen. Before
replacing the wiper arms you must pu
t them into the service position.
Service position for changing wiper blades– Close the bonnet. – Switch the ignition on and then again off. – Then press the windscreen wiper lever in the position
⇒page 63, fig. 57
within
10 seconds - the wiper arms move into the service position.
Taking off the wiper blade– Fold windscreen wiper arm away from the windscreen. – Press the locking button, in order to unlock the wiper blade and pull off in the
direction of arrow
⇒fig. 58
.
Attaching a wiper blade– Push the wiper blade until it locks up to the stop. – Check whether the wiper blade is correctly attached. – Fold the windscreen wiper ar
m back onto the windscreen.
The wiper arms move back into the rest posi
tion - after switching on the ignition and
after changing the position of the window
wiper lever or when driving at a speed
greater than 6°km/h.
A2
A6
A5
Fig. 58 Wiper blade for the windscreen wiper
A4
sgg.6.book Page 65 Thursday, September 24, 2009 2:32 PM
Page 68 of 271

Lights and Visibility
67
Using the system
Safety
Driving Tips
General Maintenance
Breakdown assistance
Technical Data
Switching off the automatic dimming– Press again the button - the warning light goes out . If the automatic dimming is switched on, the mirror dims
automatically
depending on
the light striking the mirror from the rear.
The mirror has no lever on the bottom edge
of the mirror. When the interior lights are sw
itched on or the reverse gear is engaged,
the mirror always moves back
into the basic position.
Note
•
Do not affix any stickers in front of the light sensor, so that you do not impair the
automatic dimming function or put it out of operation.•
If you switch off the automatic dimming inte
rior rear-view mirror, also the exterior
mirror dimming is switched off.Exterior mirror You can adjust the exterior mirrors electrically.The exterior mirror he
ater* only operates when the en
gine is running and up to an
outside temperature of +20°C.Heating of the external mirror*– Turn the rotary knob to position
⇒fig. 61
.
Adjusting left and right exterior mirrors simultaneously– Turn the rotary knob to position
. The movement of the mirror surface is identical
to the movement of the rotary knob.
Adjusting the right-hand exterior mirror– Turn the rotary knob to position
. The movement of the mirror surface is identical
to the movement of the rotary knob.
Switching off operating control– Turn the rotary knob to position
.
Tilting surface of front pa
ssenger exterior mirror*
When the rotary knob is in position
⇒fig. 61
and the reverse gear is engaged, the
surface of the mirror tilts down slightly. This provides an aid in seeing the kerb of the pavement when parking the car. The mirror returns into its initial position, after the rotary knob is moved out of the position
and put into another position or if the speed is more than 15 km/h.
Memory for exterior mirrors* On vehicles fitted with a memory for the driver seat, the relevant setting of the exterior mirror is also stored
automatically when the se
at position is stored
⇒page 70.
WARNING
•
Convex (curved outward) or spherical (differently curved) exterior mirrors
increase the vision field. They do, however, make objects appear smaller in the mirror. These mirrors are only of limited
use, therefore, for estimating distances
to the following vehicles.•
Use whenever possible the interior rear
mirror, for estimating the distances
to the following vehicles.
Note
•
Do not touch the surfaces of the exterior
mirrors if the exterior
mirror heater is
switched on.
AB
AA
Fig. 61 Inner part of door: Rotary knob
sgg.6.book Page 67 Thursday, September 24, 2009 2:32 PM
Page 106 of 271

Heating and air conditioning system
105
Using the system
Safety
Driving Tips
General Maintenance
Breakdown assistance
Technical Data
tion and also cause the windows to mist up. The risk of having an accident increases. Switch recirculated air mode off as soon as the windows begin misting up.
Note
If the windscreen mists up, press the button
⇒page 103, fig. 110
. After the
windscreen has been demisted, press the button .•
The automatic air distribution control operates only if the outside temperature is
higher than approx. 2°C.Controlling blower There are a total of seven blower stages available.The Climatronic system controls the blower st
ages automatically in line with the inte-
rior temperature. You can also
, howev er, a dapt the bl ower stage s ma nua lly to sui t y our
particular needs. – Press again the button on the left side (reduce blower speed) or on the right
side (increase blower speed).
If you switch off the blower, the Climatronic is switched off. The set blower speed is displayed above the button when the respective number of warning lights come on.
WARNING
•
“Stale air” may result in fatigue in the driver and occupants, reduce atten-
tion levels and also cause the windows to mist up. The risk of having an accident increases.•
Do not switch the Climatronic system off for longer than necessary.
•
Switch the Climatronic system on as soon as the windows mist up.
Defrosting windscreenDefrosting windscreen - switching on– Press the button
⇒page 103, fig. 110
.
Defrosting windscreen - switching off– Once again press the button or the button . The temperature control is controlled automatically. More air flows out of the air outlet vents
1 and
2.
Auxiliary heating (auxiliary heating and ventilation)*Description and important information The auxiliary heating (auxiliary he
ating and ventilation) heats or
supplies the interior of the vehicl
e with fresh air independent of the
engine.Auxiliary heating (auxiliary heating) The auxiliary heating (auxiliary heating) functions in connection with the Climatic or Climatronic. It can be used when stationary, when engi
ne is switched off for preheating of the
vehicle as well as while driving (only during the heating phase of the engine). The auxiliary heating (auxiliary heating) wa
rms up the coolant during the combustion
of fuel from the vehicle tank. The coolant warms up the air, which (if the blower speed is not set to zero) flows into the occupant compartment. Auxiliary ventilation The auxiliary ventilation enables fresh air to flow into the vehicle interior by switching off the engine, whereby the interior temperature is effectively decreased (e.g. with the vehicle parked in the sun).
WARNING (continued)
A1AUTO
AUTO
sgg.6.book Page 105 Thursday, September 24, 2009 2:32 PM
Page 114 of 271

Starting-off and Driving
113
Using the system
Safety
Driving Tips
General Maintenance
Breakdown assistance
Technical Data
Releasing the handbrake– Pull the handbrake lever up slightly and
at the same time
press in the locking
button
⇒fig. 116
.
– Hold the button pressed and push the handbrake lever down fully
⇒
.
The handbrake warning light
lights up when the handbrak
e is applied, provided the
ignition is on. A warning signal sounds and the following text
appears in the display* if you have inad-
vertently driven off with the handbrake applied:
Handbrake on
The handbrake warning is acti
vated if you drive at a speed of more than 6 km/h for
more than 3 seconds.
WARNING
•
Please note that the handbrake must be fully released. A handbrake which
is only partially released can result in the rear brakes overheating which will have a negative effect on the operation of
the brake system - risk of accident! In
addition this can result in premature wear of the rear brake pads.•
Never leave children unattended in the vehicle. The children might, for
example, release the handbrake or take
the vehicle out of gear. The vehicle
might then move off - risk of accident!
Caution
After the car has come to a stop, always firs
t of all apply the handbrake firmly before
then additionally engaging a gear (manual gearbox) or moving the selector lever into position
P (automatic gearbox).
Rear parking aid*The parking aid provides a warning
of obstacles behind the vehicle.
The audible parking aid determines the di
stance between the rear bumper and an
obstacle located behind the ve
hicle with the aid of ultras
ound sensors. The tones of
the parking aid can be adapted in th
e menu of the information display*
⇒page 27.
The sensors are integrated in the rear bumper. Range of sensors The clearance warning begins at a distance
of about 160 cm from the obstacle (area
⇒ fig. 117
). The interval between the warning signals becomes shorter as the clear-
ance is reduced. A continuous tone sounds from
a distance of approx. 30
cm (area ) - danger area.
You should not reverse any further after this signal sounds!
If the vehicle is
equipped with a factory-fitted
towing device*, the border of the danger area starts,
continuous tone, 5 cm furt
her behind the vehicle. Th
e vehicle can be extended
through an installed deta
chable towing device.
On vehicles equipped with a factory-fitted
radio* or navigation system*, the distance
to the obstruction is shown graphically in the display. On vehicles with a factory-fitted towing device, the sensors are deactivated when towing a trailer. The driver is informed about this by a graphic display (vehicle towing
a trailer) in the radio* or the navigation*
display. The radio* or navigation system*, which is factory-fitted, can be set so that the play function volume decreases when acti
vating the parking ai
d, see Owner's Manual
radio* or navigation system*. This impr
oves the audibility of the parking aid.
Fig. 117 Parking aid: Detection range of rear sensors
AA
AB
sgg.6.book Page 113 Thursday, September 24, 2009 2:32 PM
Page 116 of 271

Starting-off and Driving
115
Using the system
Safety
Driving Tips
General Maintenance
Breakdown assistance
Technical Data
set so that the play function volume decr
eases when activating the parking aid, see
Owner's Manual radio* or na
vigation system*. This impr
oves the audibility of the
parking aid. Activating The parking aid is activated when the
reverse gear
is engaged and the ignition is
turned on or by pressing the button
⇒page 114, fig. 118
- the symbol lights up in
the button. The activation is confirme
d by a brief acknowledgement signal.
Deactivating The parking aid is deactivated after pressing the button°
⇒page 114, fig. 118
or at
a speed of more than 10 km/h - the symbol
in the button is no longer illuminated.
WARNING
•
The parking aid is not a substitute for the driver paying proper attention and
it is always the driver's responsibility to
take care when reversing the vehicle or
carrying out similar manoeuvres.•
You should therefore satisfy yourself, befo
re reversing, that there is no small
obstacle, such as a rock, thin post, trailer drawbar etc., in front or behind your vehicle. Such an obstacle might not be
within the range dete
cted by the sensors.
•
Under certain circumstances, surfaces
of certain objects and types of
clothing cannot reflect the signal of th
e parking aid. Thus, these objects or
people who wear such clothing are not re
cognised by the sensors of the parking
aid.
Note
•
Only the front parking aid operates if yo
u are towing a trailer (applies only to
models which feature a factory-fitted towing device*).•
If a warning signal sounds for about 3 seco
nds after activating the system and there
is no obstacle close to your
vehicle, this indicates a system fault. The fault is confirmed
additionally when the symbol flashes in the button
⇒page 114, fig. 118
. Have the
fault rectified by a specialist workshop.•
The sensors must be kept clean and free of ice to enable the parking aid to operate
properly.
•
If the parking aid is activated and the sele
ctor lever of the automatic gearbox is in
the position , warning signal indicates inte
rruption (vehicle can no longer move).
Park Assist*Description and important informationThe park assist assists you when parking in a suitable parallel parking space between two vehicles or
behind a vehicle.
The park assist automatically searches for
suitable parking spaces
after switching on
the ignition and when driving up to 30 km/h. During the parking procedure the park assist only takes over the steering movements, the pedals continue to be operated by the driver. Function of the system is based on:•
Length and depth measurement of the parking spaces when driving
•
Evaluation of the size of the parking space
•
Definition of the correct position of the vehicle for parking
•
Calculating the line on which the vehicle drives backwards into the parking space
•
Actuation of the steering force assistance, automatic spinning of the wheels of the
front axle when parking.
WARNING
The park assist does not take away the responsability from the driver when parking.•
Pay particular attention to small children and animals as they would not be
recognised by the sensors of the parking aid.•
Under certain circumstances, surfaces of certain objects and types of
clothing cannot reflect the signal of the park assist or the parking aid. Thus, these objects or people who wear such clothing are not recognised by the sensors of the parking aid.
AP
sgg.6.book Page 115 Thursday, September 24, 2009 2:32 PM