Page 235 of 273

DIESEL INJECTION
Fault finding – Fault Finding Chart13B
13B -235V3 MR-372-J84-13B250$855.mif
ALP8 Oil leaks from the turbocharger
NOTESBefore dealing with this customer complaint, check that there are no faults, and
the conformity (or otherwise) of the parameters and statuses using the
diagnostic tool.
If the customer complaint is not ironed out, perform the following checks:
Check the area around the turbocharger
Note:
An oil leak does not correspond always to a turbocharger fault, the oil leak can arise from the area around the
turbocharger.
According to the vehicle type, maximum visual access will either be from above or from below.
1Do not start the engine.
Check the area around the turbocharger and identify the origin of the leaks.
Clean the oil traces on the turbocharger.
2start the engine and let it warm up for several minutes.
IMPORTANT
If the air filter was removed previously, refit it before starting the engine (risks foreign matter entering the air inlet
circuit).
Accelerate with no load several times, progressively increasing the duration before releasing the accelerator pedal.
Visually inspect the exterior condition of the fuel supply pipes and the turbocharger oil return and the area around it.
Identify the origin of the leaks.
Is an oil leak present at the air compressor inlet or outlet?
YESNO
Check the air compressor inlet or outlet
Check for a loose interface (inlet or outlet) that is the cause of the air leak.
Note:
it is normal to find traces of oil inside the pipes at the turbocharger inlet or outlet as the air
passing into the compressor is laden with oil from the engine rebreathing circuit.
Is the suspected interface properly tightened?
YES NO
Replace the pipe concerned (see MR
364 (Mégane II) or 370 (Scénic II),
Mechanical systems, 12B,
turbocharging).Tighten the interface or the concerned
pipe.
End of procedure.
AFTER REPAIRCarry out a road test followed by a complete check with the diagnostic tool.
EDC16
PROGRAM No.: C1
Vdiag No.: 51
EDC16_V51_ALP8
Page 236 of 273
DIESEL INJECTION
Fault finding – Fault Finding Chart13B
13B -236V3 MR-372-J84-13B250$855.mif
EDC16
PROGRAM No.: C1
Vdiag No.: 51
ALP8
CONTINUED 1
Is an oil leak present only at the casing of the compressor section?
YES NO
The turbocharger is not
faulty.
The oil is coming from
another engine
component and the oil
is running into the
turbocharger.Is an oil leak present at the turbocharger oil supply inlet or outlet?
YES NO
Check the turbocharger oil supply inlet and outlet
Check for a loose interface (inlet or outlet) that is the cause of
the oil leak.
Is the suspected interface properly tightened?
YES NO
Replace only the seal or the
pipe of the section
concerned (see MR 364
(Mégane II) or 370 (Scénic
II), Mechanical, 12B,
Turbocharging).Tighten the pipe concerned.
end of the procedure
B
AFTER REPAIRCarry out a road test followed by a complete check with the diagnostic tool.
Page 237 of 273
DIESEL INJECTION
Fault finding – Fault Finding Chart13B
13B -237V3 MR-372-J84-13B250$855.mif
EDC16
PROGRAM No.: C1
Vdiag No.: 51
ALP8
CONTINUED 2
Is there an oil leak around the interfaces of the turbine housing and the exhaust pipes?
YESNO
The turbocharger is not faulty. There is probably another fault in the
engine.
Mark the component that is the source of the leak and refer to the
repair manual (see MR 364 (Mégane II) or 370 (Scénic II), 10A
Engine and peripherals).End of procedure.
B
AFTER REPAIRCarry out a road test followed by a complete check with the diagnostic tool.
Page 239 of 273

DIESEL INJECTION
Fault finding – Fault Finding Chart13B
13B -239V3 MR-372-J84-13B250$855.mif
EDC16
PROGRAM No.: C1
Vdiag No.: 51
ALP10 Exhaust fumes
Run test 9 Air line at the turbocharger.
Run test 5: Turbocharger control solenoid valve check.
Is the vehicle equipped with a particle filter?
NOYES
Start the engine and warm it up at idle speed for 10 min.
IMPORTANT
If the air filter was removed previously, refit it before starting the engine
(risks foreign matter entering the air inlet circuit).
Perform several rapid and brief accelerations under no load.
Note:
The presence of smoke is often normal.
The quantity, density, colour and persistence of the smoke are the important
factors.
Is the exhaust outlet producing abnormal smoke?Perform the fault
finding of the
"particle filter"
function, refer to
the TESTS or
corresponding
ALP
YES NO
Refer to test 6 Turbocharger.The turbocharger is not faulty. There
is probably another fault in the
engine. Refer to the corresponding
TEST or fault finding chart
AFTER REPAIRCarry out a road test followed by a complete check with the diagnostic tool.
EDC16_V51_ALP10
Page 241 of 273
DIESEL INJECTION
Fault finding – Test13B
13B -241V3 MR-372-J84-13B250$900.mif
EDC16
PROGRAM No.: C1
Vdiag No.: 51
TEST1 Exhaust system check
Engine stopped: Check that the silencer outlet is
not blocked. Repair or replace the silencer, if
necessary.
Check the seal of the exhaust manifold on the
contact surface between the turbocharger and the
exhaust manifold.
Is the seal in order?
YES
Loosen the catalytic pre-converter on the
turbocharger side. Place a wooden block between
the two parts.
Start the vehicle and check if the engine runs better.
Is the engine running normally?
YES
NORepair or replace the faulty part.
NOThe exhaust pipe is not the cause of the
fault. Continue with the engine fault finding
(see ALP5).
EDC16_V51_TEST1
Page 242 of 273

DIESEL INJECTION
Fault finding – Test13B
13B -242V3 MR-372-J84-13B250$900.mif
EDC16
PROGRAM No.: C1
Vdiag No.: 51
TEST1
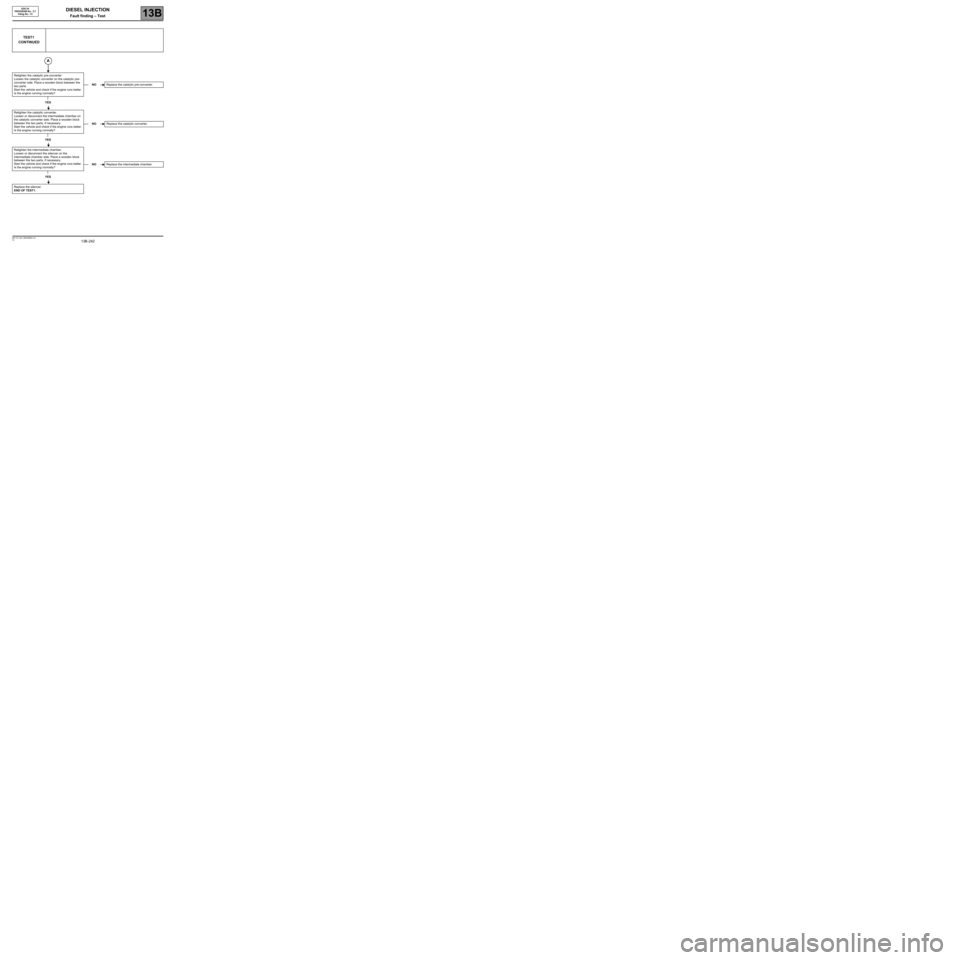
CONTINUED
Retighten the catalytic pre-converter.
Loosen the catalytic converter on the catalytic pre-
converter side. Place a wooden block between the
two parts.
Start the vehicle and check if the engine runs better.
Is the engine running normally?
YES
Retighten the catalytic converter.
Loosen or disconnect the intermediate chamber on
the catalytic converter side. Place a wooden block
between the two parts, if necessary.
Start the vehicle and check if the engine runs better.
Is the engine running normally?
YES
Retighten the intermediate chamber.
Loosen or disconnect the silencer on the
intermediate chamber side. Place a wooden block
between the two parts, if necessary.
Start the vehicle and check if the engine runs better.
Is the engine running normally?
YES
Replace the silencer.
END OF TEST1.
NOReplace the catalytic pre-converter.
NOReplace the catalytic converter.
NOReplace the intermediate chamber.
Page 243 of 273

DIESEL INJECTION
Fault finding – Test13B
13B -243V3 MR-372-J84-13B250$900.mif
EDC16
PROGRAM No.: C1
Vdiag No.: 51
TEST2 Low pressure circuit check
Check the fuel filter:
–Conformity of the fuel filter (correct part number and RENAULT filter).
–Positioning and amount of clogging in the filter element.
–Positioning and condition of the seals.
–If there is metal swarf in the filter:
Replace the fuel filter, bleed the circuit and continue the fault finding procedure.
Supplying the injection system with fuel from an additional tank.
This operation aims to detect possible faults in the low pressure supply system of a vehicle by replacing it entirely
with an additional tank.
Mode:
–Disconnect the diesel fuel supply pipe at the fuel filter inlet and seal it with a plug.
–Connect a pipe to the fuel filter inlet and insert the other end into a clean container which is approximately 5 litres
in volume.
–Disconnect the diesel fuel return pipe at the pump return and injector leak-off junction and seal it with a plug.
–Fill the container with clean diesel fuel.
–Start the engine and let the system drain itself of its air (there must not be any air bubbles in the return pipe).
Is the customer complaint still present?
NO
Are the low pressure circuit connections in order and
in good condition?
NO
Carry out the necessary repairs.
YESIf the low pressure circuit is in order,
reconnect the various pipes making up the
low pressure circuit and repeat the fault
finding procedure in the fault finding chart
or for the fault that referred you to this test.
YES
EDC16_V51_TEST2
Page 245 of 273

DIESEL INJECTION
Fault finding – Test13B
13B -245V3 MR-372-J84-13B250$900.mif
Checking the air filter.
If the engine is equipped accordingly, check:
–that the damper valve is open (AC012 Damper
valve, step B).
–the condition of the damper valve:
–the tightness of the mounting bolts,
–cracks in the damper valve.
Carry out the necessary repairs.
Replace the valve if necessary.
EDC16
PROGRAM No.: C1
Vdiag No.: 51
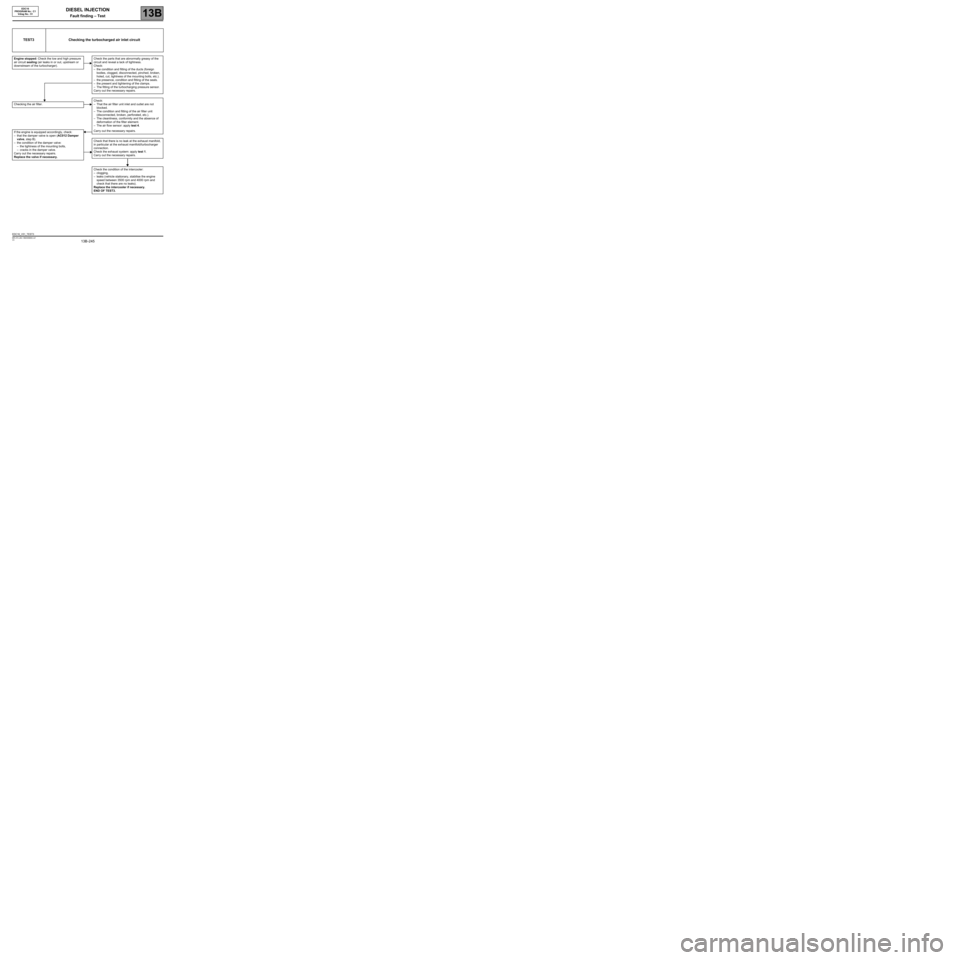
TEST3 Checking the turbocharged air inlet circuit
Engine stopped: Check the low and high pressure
air circuit sealing (air leaks in or out, upstream or
downstream of the turbocharger).Check the parts that are abnormally greasy of the
circuit and reveal a lack of tightness.
Check:
–the condition and fitting of the ducts (foreign
bodies, clogged, disconnected, pinched, broken,
holed, cut, tightness of the mounting bolts, etc.).
–the presence, condition and fitting of the seals.
–the present and tightening of the clamps.
–The fitting of the turbocharging pressure sensor.
Carry out the necessary repairs.
Check:
–That the air filter unit inlet and outlet are not
blocked.
–The condition and fitting of the air filter unit
(disconnected, broken, perforated, etc.).
–The cleanliness, conformity and the absence of
deformation of the filter element.
–The air flow sensor: apply test 4.
Carry out the necessary repairs.
Check that there is no leak at the exhaust manifold,
in particular at the exhaust manifold/turbocharger
connection.
Check the exhaust system: apply test 1.
Carry out the necessary repairs.
Check the condition of the intercooler:
–clogging,
–leaks (vehicle stationary, stabilise the engine
speed between 3500 rpm and 4000 rpm and
check that there are no leaks).
Replace the intercooler if necessary.
END OF TEST3.
EDC16_V51_TEST3