Page 264 of 4331

AT
N
O P
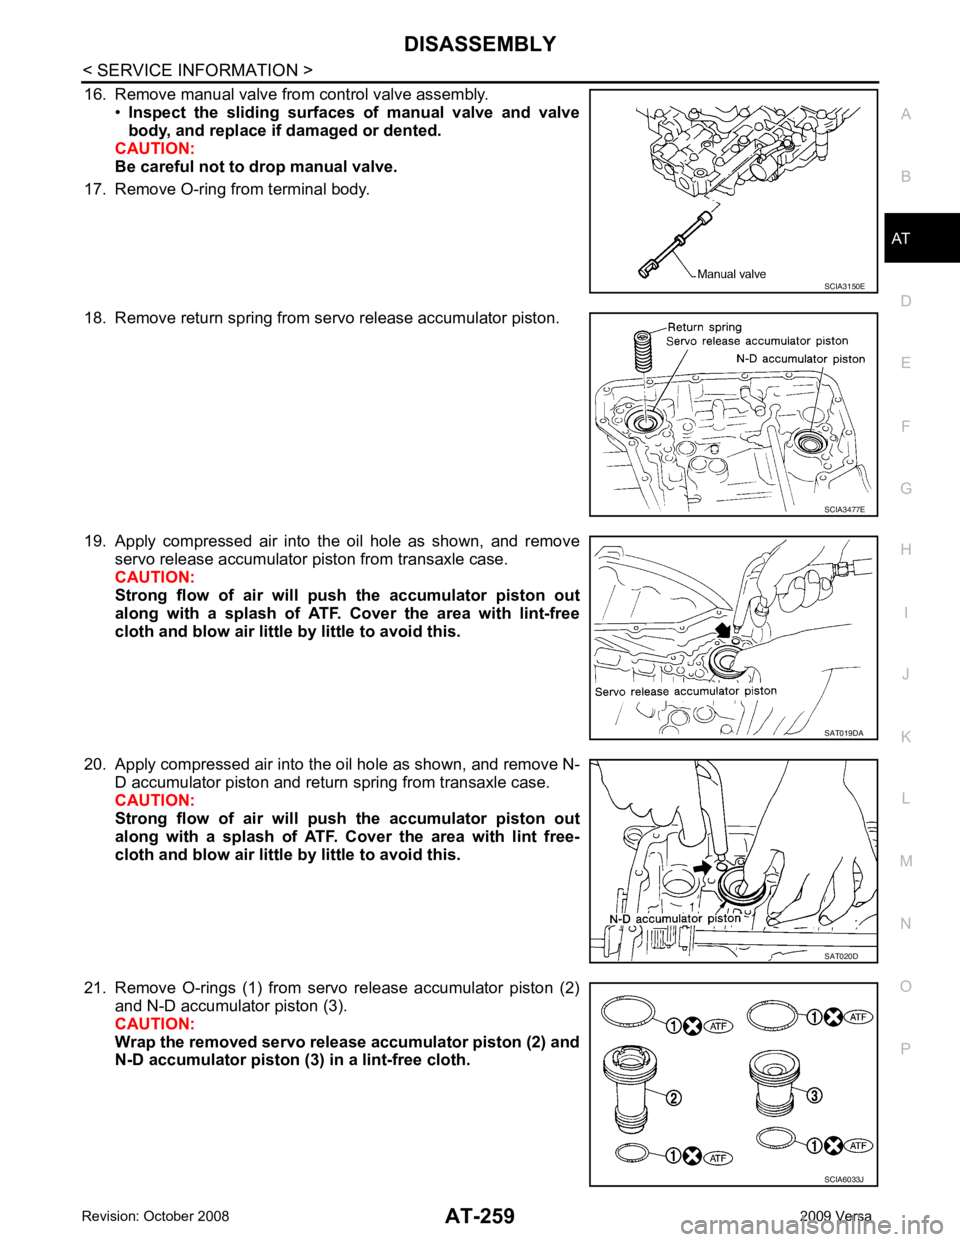
16. Remove manual valve from control valve assembly.
•Inspect the sliding surfaces of manual valve and valve
body, and replace if damaged or dented.
CAUTION:
Be careful not to drop manual valve.
17. Remove O-ring from terminal body.
18. Remove return spring from servo release accumulator piston.
19. Apply compressed air into the oil hole as shown, and remove servo release accumulator piston from transaxle case.
CAUTION:
Strong flow of air will pu sh the accumulator piston out
along with a splash of ATF. Cover the area with lint-free
cloth and blow air little by little to avoid this.
20. Apply compressed air into the oil hole as shown, and remove N- D accumulator piston and return spring from transaxle case.
CAUTION:
Strong flow of air will pu sh the accumulator piston out
along with a splash of ATF. Cover the area with lint free-
cloth and blow air little by little to avoid this.
21. Remove O-rings (1) from servo release accumulator piston (2) and N-D accumulator piston (3).
CAUTION:
Wrap the removed servo rel ease accumulator piston (2) and
N-D accumulator piston (3) in a lint-free cloth. SCIA3477E
SAT019DA
Page 285 of 4331

AT-280< SERVICE INFORMATION >
REPAIR FOR COMPONENT PARTS
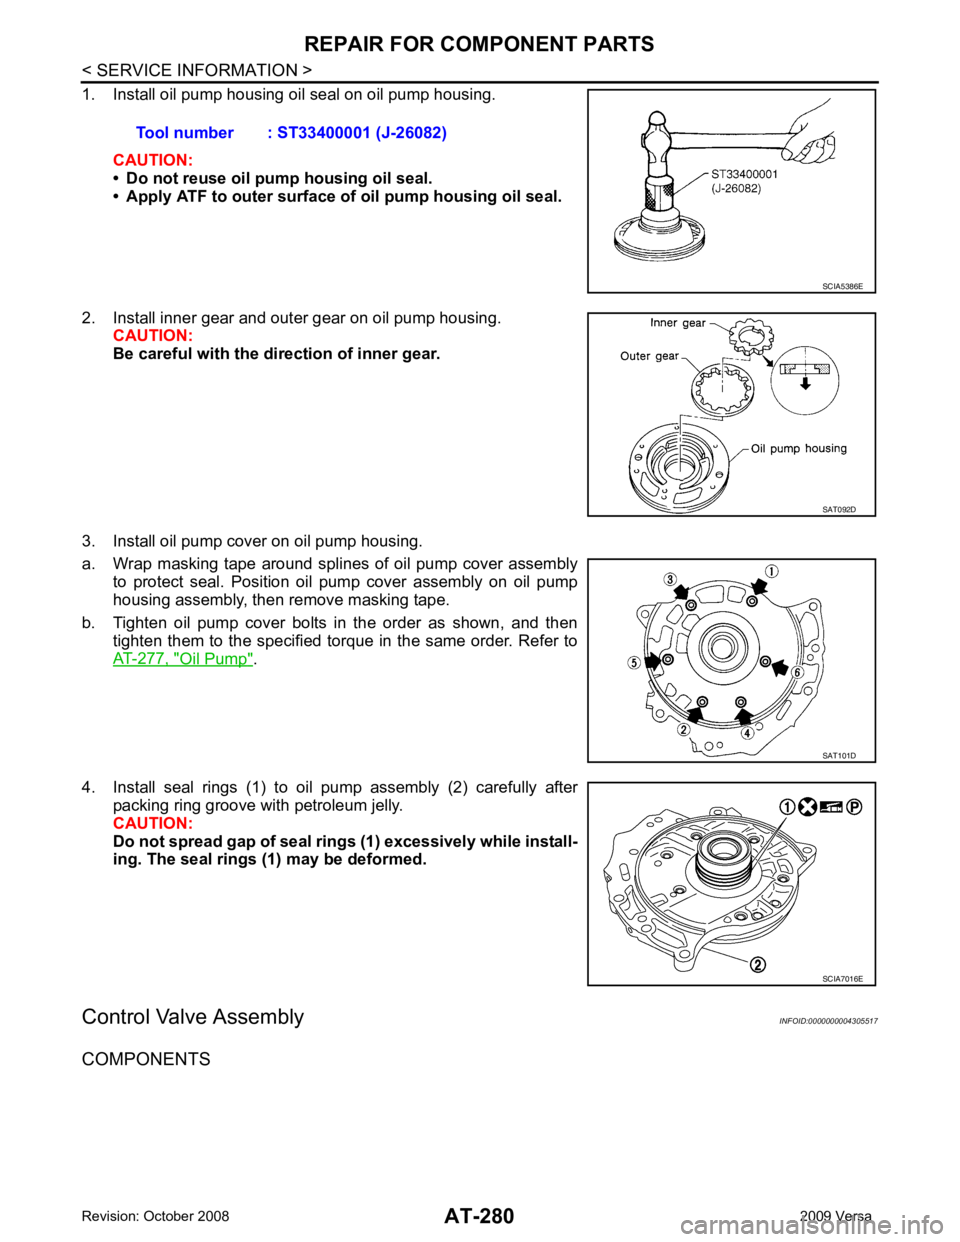
1. Install oil pump housing oil seal on oil pump housing.
CAUTION:
• Do not reuse oil pump housing oil seal.
• Apply ATF to outer surface of oil pump housing oil seal.
2. Install inner gear and outer gear on oil pump housing. CAUTION:
Be careful with the direction of inner gear.
3. Install oil pump cover on oil pump housing.
a. Wrap masking tape around splines of oil pump cover assembly to protect seal. Position oil pump cover assembly on oil pump
housing assembly, then remove masking tape.
b. Tighten oil pump cover bolts in the order as shown, and then tighten them to the specified torque in the same order. Refer to
AT-277, " Oil Pump " .
4. Install seal rings (1) to oil pump assembly (2) carefully after packing ring groove with petroleum jelly.
CAUTION:
Do not spread gap of seal ri ngs (1) excessively while install-
ing. The seal rings (1) may be deformed.
Control Valve Assembly INFOID:0000000004305517
COMPONENTS Tool number : ST33400001 (J-26082) SCIA5386E
SAT092D
SAT101D
SCIA7016E
Page 286 of 4331
AT
N
O P
DISASSEMBLY
Place control valve assembly with control valve upper body (1) side
down. Remove bolts (A) to (G), reamer bolts (F), nuts and support
plates (4) according to the following procedures. Separate control
valve upper body (1), control valve inter body (2) and control valve
lower body (3). 1. Pilot filter 2. Control valve upper body 3. Steel ball
4. Separating plate 5. Control valve inter body 6. Steel ball
7. Support plate 8. Separating plate 9. Control valve lower body
10. Line pressure relief valve spring 11. Check ball 12. Torque converter pressure holding spring
13. Solenoid valve assembly 14. Terminal body 15. O-ring
16. O-ring 17. O-ring 18. Oil strainer SCIA7058E
Page 288 of 4331
AT
N
O P
5. Remove control valve lower body (1) from control valve inter
body (2).
(3): Control valve upper body
6. Turn over control valve lower body (1).
7. Remove bolts (E), support plates (2) and separating plate (3) from control valve lower body (1).
8. Remove check balls (1), line pressure relief valve springs (2) and torque converter pressure holding spring (3) from control
valve lower body (4).
CAUTION:
Be careful not to lose check ba lls (1), line pressure relief
valve springs (2) and torque converter pressure holding
spring (3).
9. Remove control valve inter body from control valve upper body.
10. Remove pilot filter (1) from control valve upper body (2).
11. Remove separating plate from control valve upper body (2).
Page 290 of 4331

AT
N
O P
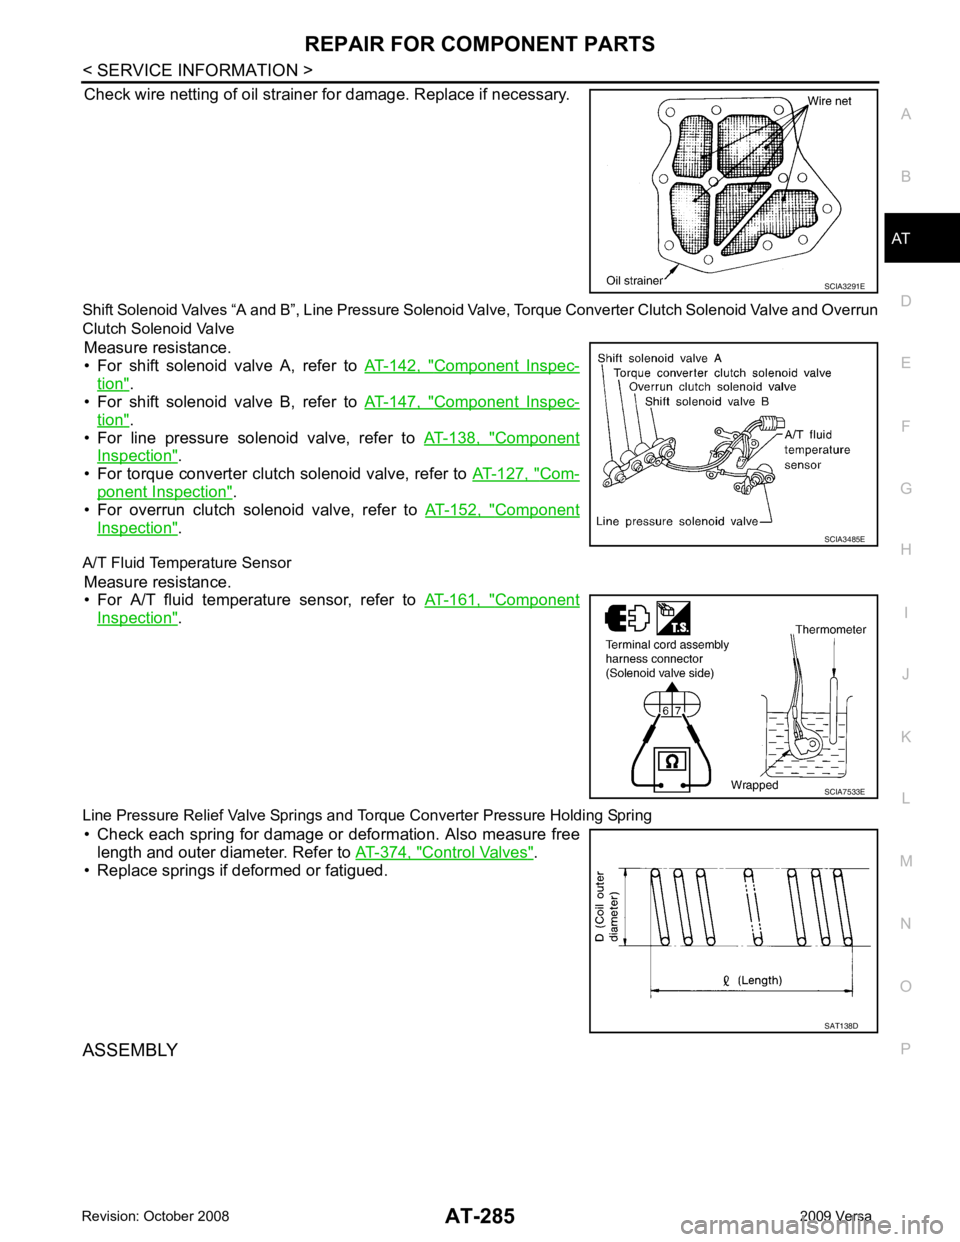
Check wire netting of oil strainer for damage. Replace if necessary.
Shift Solenoid Valves “A and B”, Line Pressure Solenoid Valve, Torque Conv erter Clutch Solenoid Valve and Overrun
Clutch Solenoid Valve
Measure resistance.
• For shift solenoid valve A, refer to AT-142, " Component Inspec-
tion " .
• For shift solenoid valve B, refer to AT-147, " Component Inspec-
tion " .
• For line pressure solenoid valve, refer to AT-138, " Component
Inspection " .
• For torque converter clutch solenoid valve, refer to AT-127, " Com-
ponent Inspection " .
• For overrun clutch solenoid valve, refer to AT-152, " Component
Inspection " .
A/T Fluid Temperature Sensor Measure resistance.
• For A/T fluid temperature sensor, refer to AT-161, " Component
Inspection " .
Line Pressure Relief Valve Springs and To rque Converter Pressure Holding Spring
• Check each spring for damage or deformation. Also measure free length and outer diameter. Refer to AT-374, " Control Valves " .
• Replace springs if deformed or fatigued.
ASSEMBLY SCIA3485E
SAT138D
Page 291 of 4331
AT-286< SERVICE INFORMATION >
REPAIR FOR COMPONENT PARTS
1. Install control valve upper, inter and lower body.
a. Place oil circuit of control valve upper body face up. Install steel balls in their proper positions.
b. Install reamer bolts (F) from bottom of control valve upper body (1). Using reamer bolts (F) as guides, install separating plate (2)
as a set.
c. Install pilot filter (1) on control valve upper body (2).
d. Place control valve inter body as shown (side of control valve lower body face up). Install steel balls in their proper positions.
e. Install control valve inter body (1) on control valve upper body (2) using reamer bolts (F) as guides.
CAUTION:
Be careful not to dislocate or drop steel balls. SAT871J
SCIA7010E
SCIA7011E
SAT870J
SCIA7012E
Page 292 of 4331
AT
N
O P
f. Install check balls (1), line pressure relief valve springs (2) and
torque converter pressure holding spring (3) in their proper posi-
tions in control valve lower body (4).
g. Install bolts (E) from bottom of control valve lower body (1). Using bolts (E) as guides, install separating plate (2) as a set.
h. Install support plates (3) on control valve lower body (1).
i. Install control valve lower body (1) on control valve inter body (2) using reamer bolts (F) as guides, and tighten reamer bolts (F)
slightly.
2. Install O-rings on solenoid valves and terminal body.
Page 294 of 4331
AT
N
O P
d. Remove reamer bolts (F), and then set oil strainer (1) on control
valve assembly
e. Install and tighten bolts (A), (D), reamer bolts (F) and nuts to the specified torque.
f. Tighten bolts (E) to the specified torque.
Control Valve Upper Body INFOID:0000000004305518
COMPONENTS