Page 209 of 4331

AT-204< SERVICE INFORMATION >
TROUBLE DIAGNOSIS FOR SYMPTOMS
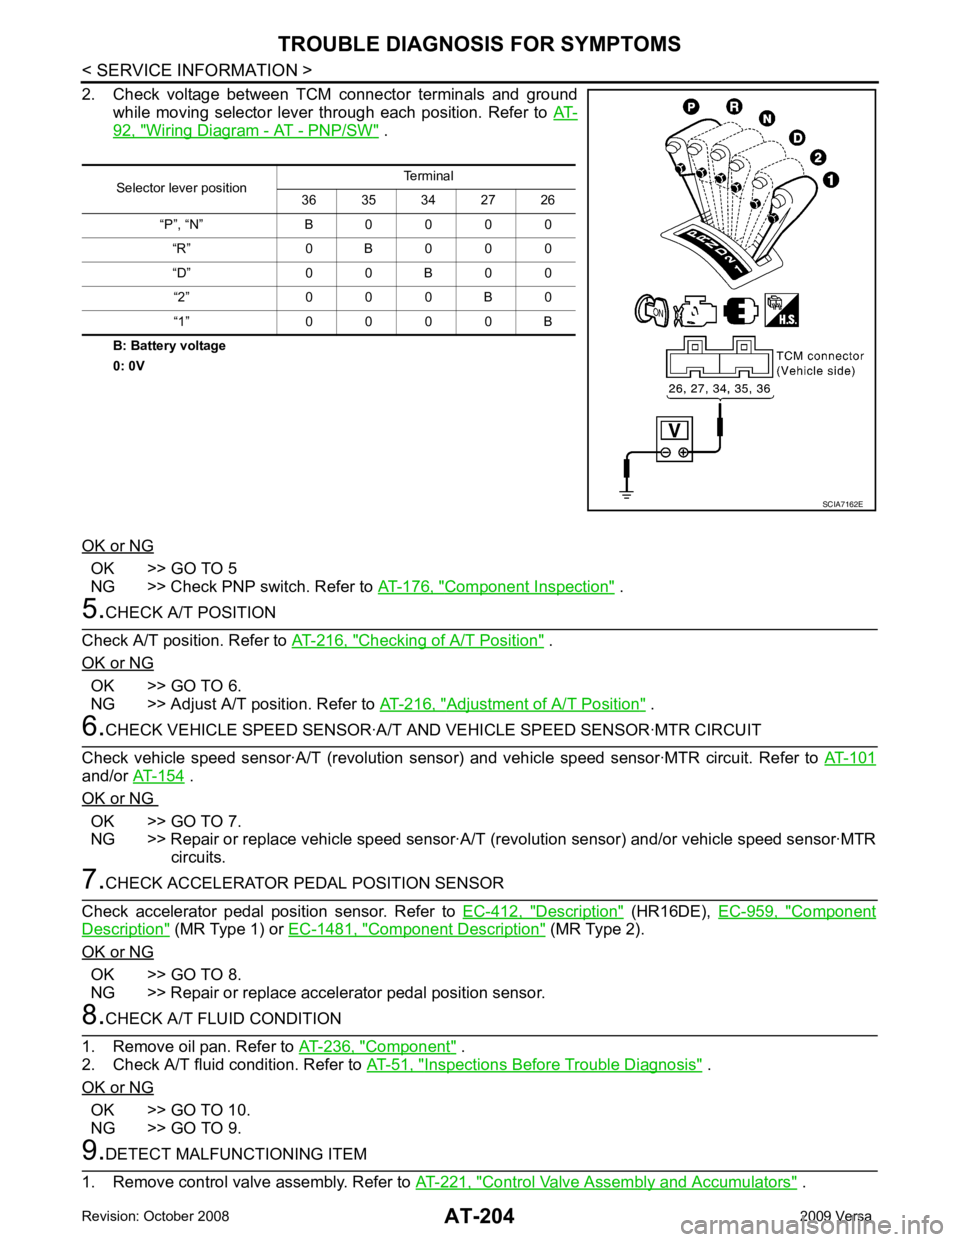
2. Check voltage between TCM connector terminals and ground while moving selector lever through each position. Refer to AT-92, " Wiring Diagram - AT - PNP/SW " .
B: Battery voltage
0: 0V
OK or NG OK >> GO TO 5
NG >> Check PNP switch. Refer to AT-176, " Component Inspection " .
5.
CHECK A/T POSITION
Check A/T position. Refer to AT-216, " Checking of A/T Position " .
OK or NG OK >> GO TO 6.
NG >> Adjust A/T position. Refer to AT-216, " Adjustment of A/T Position " .
6.
CHECK VEHICLE SPEED SENSOR·A/T A ND VEHICLE SPEED SENSOR·MTR CIRCUIT
Check vehicle speed sensor·A/T (revolution senso r) and vehicle speed sensor·MTR circuit. Refer to AT-101and/or
AT-154 .
OK or NG OK >> GO TO 7.
NG >> Repair or replace vehicle speed sensor·A/T (revolution sensor) and/or vehicle speed sensor·MTR
circuits. 7.
CHECK ACCELERATOR PEDAL POSITION SENSOR
Check accelerator pedal position sensor. Refer to EC-412, " Description " (HR16DE),
EC-959, " Component
Description " (MR Type 1) or
EC-1481, " Component Description " (MR Type 2).
OK or NG OK >> GO TO 8.
NG >> Repair or replace accelerator pedal position sensor. 8.
CHECK A/T FLUID CONDITION
1. Remove oil pan. Refer to AT-236, " Component " .
2. Check A/T fluid condition. Refer to AT-51, " Inspections Before Trouble Diagnosis " .
OK or NG OK >> GO TO 10.
NG >> GO TO 9. 9.
DETECT MALFUNCTIONING ITEM
1. Remove control valve assembly. Refer to AT-221, " Control Valve Assembly and Accumulators " .
Selector lever position
Terminal
36 35 34 27 26
“P”, “N” B 0 0 0 0 “R” 0 B 0 0 0
“D” 0 0 B 0 0 “2” 0 0 0 B 0
“1” 0 0 0 0 B SCIA7162E
Page 210 of 4331

AT
N
O P
2. Check the following.
- Shift valve A
- Overrun clutch solenoid valve
3. Disassemble A/T. Refer to AT-256, " Disassembly " .
4. Check the following.
- Overrun clutch assembly. Refer to AT-306, " Forward and Overrun Clutches " .
- Low & reverse brake assembly. Refer to AT-313, " Low & Reverse Brake " .
OK or NG OK >> GO TO 10.
NG >> Repair or replace damaged parts. Cruise Test - Part 3 " .
OK or NG OK >>
INSPECTION END
NG >> GO TO 11. TCM Terminal and Reference Value " .
2. If NG, recheck TCM pin terminals for dam age or loose connection with harness connector.
OK or NG OK >>
INSPECTION END
NG >> Repair or replace damaged parts.
TCM Self-Diagnosis Does Not Activate INFOID:0000000004305491
SYMPTOM: OD OFF indicator lamp does not come on in TCM sel f-diagnostic procedure even if the lamp circuit is
good.
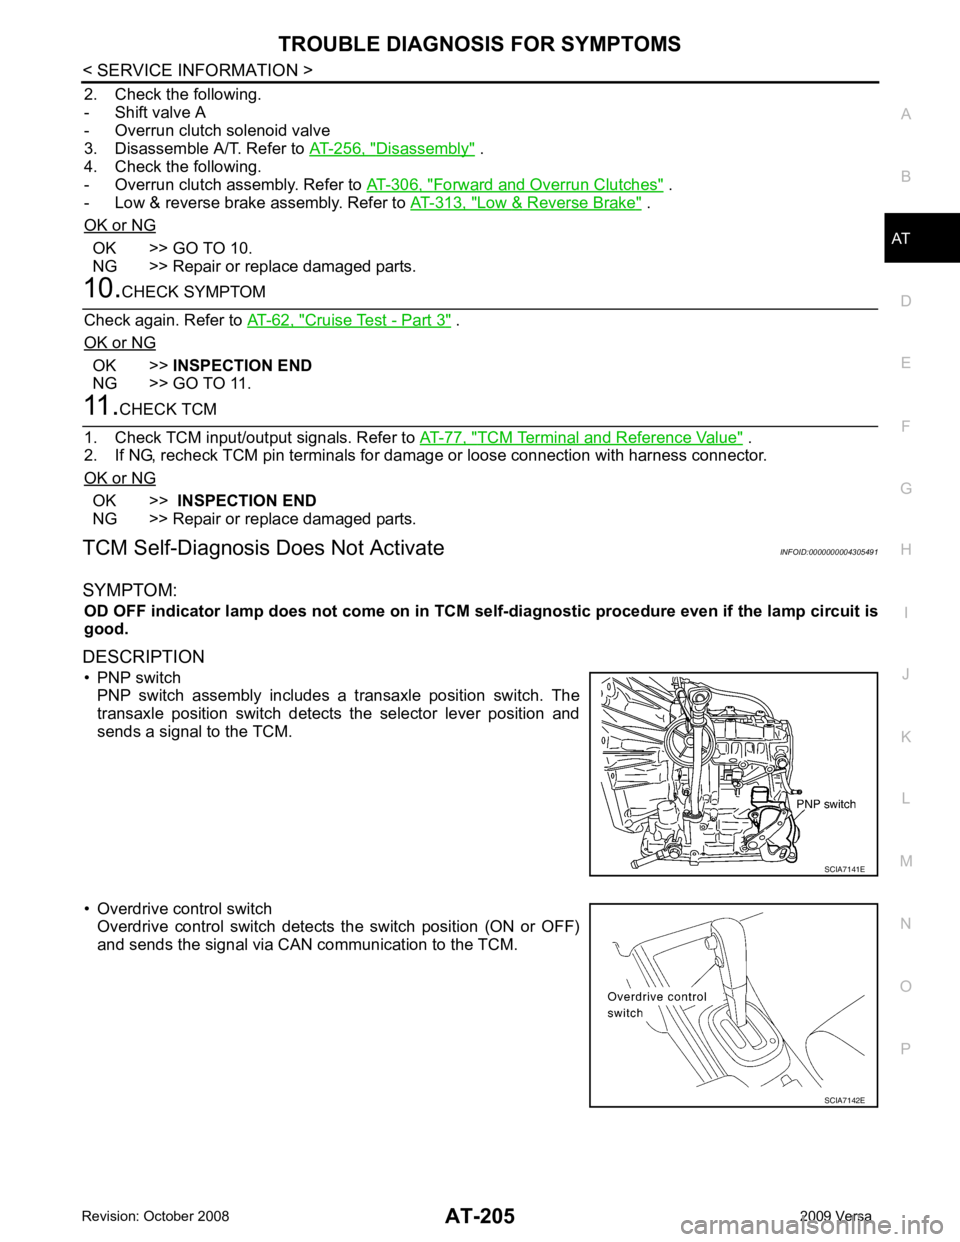
DESCRIPTION • PNP switch PNP switch assembly includes a transaxle position switch. The
transaxle position switch detects the selector lever position and
sends a signal to the TCM.
• Overdrive control switch Overdrive control switch detects the switch position (ON or OFF)
and sends the signal via CAN communication to the TCM.
Page 212 of 4331
AT
N
O P
A/T SHIFT LOCK SYSTEM
Description INFOID:0000000004305498
• The mechanical key interlock mechanism also operates as a shift lock: With the ignition switch turned to ON, selector lever cannot be shifted from “P” position to any other position
unless brake pedal is depressed.
With the key removed, selector lever cannot be shifted from “P” position to any other position.
The key cannot be removed unless selector lever is placed in “P” position.
• The shift lock and key interlock mechanisms are controlled by the ON-OFF operation of the shift lock sole-
noid and by the operation of the rotator and sli der located inside key cylinder, respectively.
Shift Lock System Parts Location INFOID:0000000004305499
1. Key interlock cable 2. Key cylinder 3. Stop lamp switch
4. Brake pedal 5. Shift lock release button 6. Key interlock cable
7. Shift lock solenoid 8. Park position switch
Page 214 of 4331
AT
N
O P
•
Selector lever can be moved fr om “P” position with ignition key in ON position and brake pedal
released.
• Selector lever can be moved from “P” position when ignition switch is removed from key cylinder.
SYMPTOM 2:
• Ignition key cannot be removed when sel ector lever is set to “P” position.
• Ignition key can be removed wh en selector lever is set to any position except “P” position.OK >> GO TO 2.
NG >> Repair key interlock cable. Refer to AT-218, " Removal and Installation " .
Checking of A/T Position " .
OK or NG OK >> GO TO 3.
NG >> Adjust control cable. Refer to AT-216, " Adjustment of A/T Position " .
OK >>
INSPECTION END
NG >> GO TO 4. OK >> GO TO 7.
NG >> GO TO 5.
Page 216 of 4331
AT
N
O P
TRANSMISSION CONTROL MODULE
Removal and Installation INFOID:0000000004305492
COMPONENTS
REMOVAL 1. Disconnect the battery negative terminal.
2. Disconnect TCM harness connectors (1) from TCM (2). • Instrument lower finisher (3)
3. Remove TCM (2).
INSTALLATION Installation is in the reverse order of removal. 1. TCM
Page 218 of 4331
AT
N
O P
REMOVAL
CAUTION:
Make sure that parking brake is a pplied before removal/installation.
1. Place the selector lever in the “N” position.
2. Remove the center console assembly. Refer to IP-11 .
3. Disconnect the A/T device harness connector (1).
4. Remove the key interlock cabl e from the control device assem-
bly. Refer to AT-218, " Removal and Installation " .
5. Remove the bolts (A) from the control device assembly (1).
6. Remove exhaust front tube, c enter muffler and heat plates.
Refer to EM-144 .
1. Selector lever knob 2. Control device assembly 3. Lock plate
4. Floor panel 5. Control cable 6. Bracket
7. Lock plate 8. Lock nut 9. A/T assembly
10. Bracket 11. Bracket
Page 220 of 4331

AT
N
O P
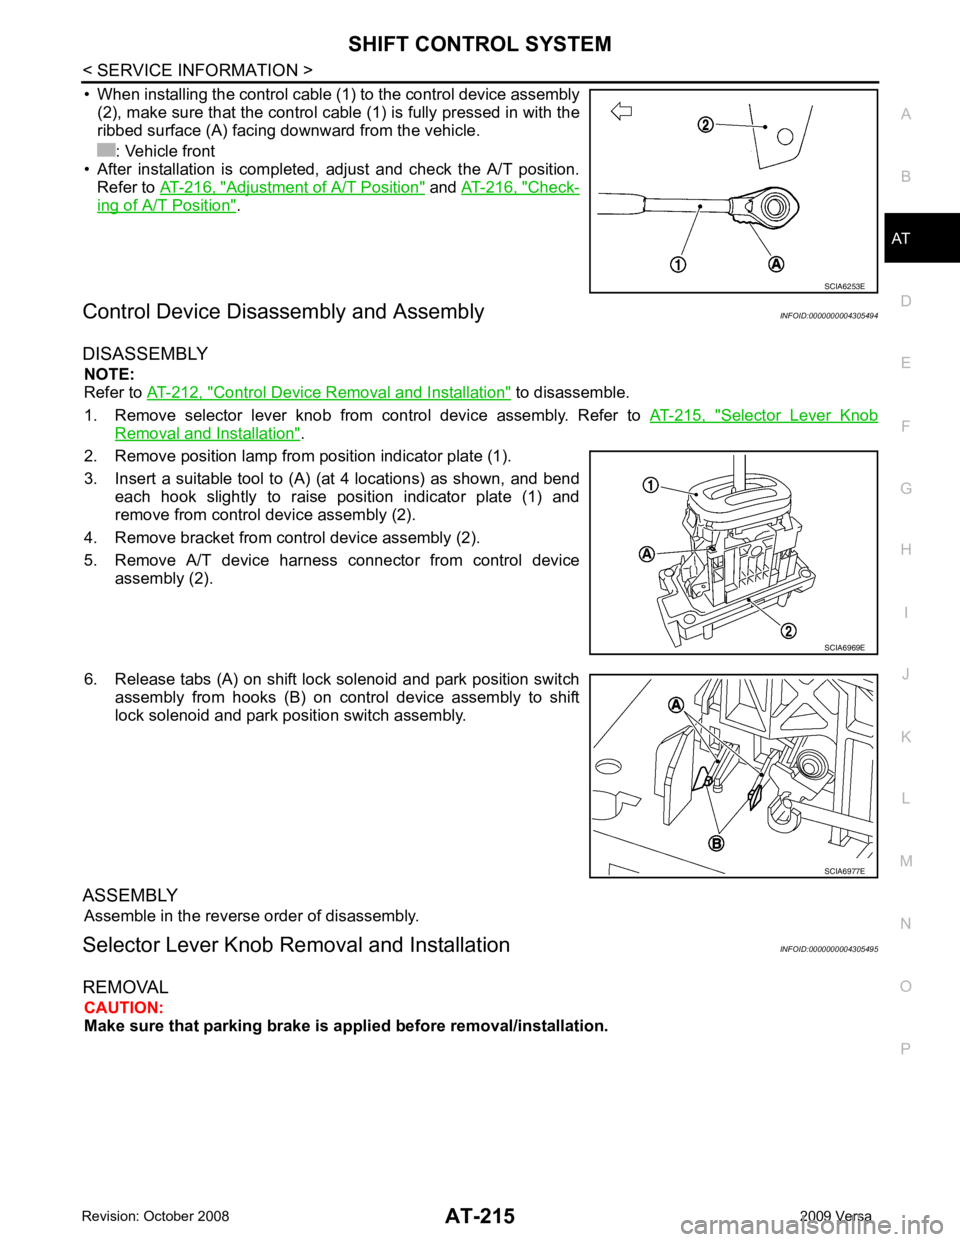
• When installing the control cable (1) to the control device assembly
(2), make sure that the control cable (1) is fully pressed in with the
ribbed surface (A) facing downward from the vehicle.
: Vehicle front
• After installation is completed, adjust and check the A/T position.
Refer to AT-216, " Adjustment of A/T Position " and
AT-216, " Check-
ing of A/T Position " .
Control Device Disassembly and Assembly INFOID:0000000004305494
DISASSEMBLY NOTE:
Refer to AT-212, " Control Device Removal and Installation " to disassemble.
1. Remove selector lever knob from control device assembly. Refer to AT-215, " Selector Lever Knob
Removal and Installation " .
2. Remove position lamp from position indicator plate (1).
3. Insert a suitable tool to (A) (at 4 locations) as shown, and bend each hook slightly to raise position indicator plate (1) and
remove from control device assembly (2).
4. Remove bracket from control device assembly (2).
5. Remove A/T device harness connector from control device assembly (2).
6. Release tabs (A) on shift lock solenoid and park position switch assembly from hooks (B) on control device assembly to shift
lock solenoid and park position switch assembly.
ASSEMBLY Assemble in the reverse order of disassembly.
Selector Lever Knob Re moval and Installation INFOID:0000000004305495
REMOVAL CAUTION:
Make sure that parking brake is a pplied before removal/installation.
Page 221 of 4331

.
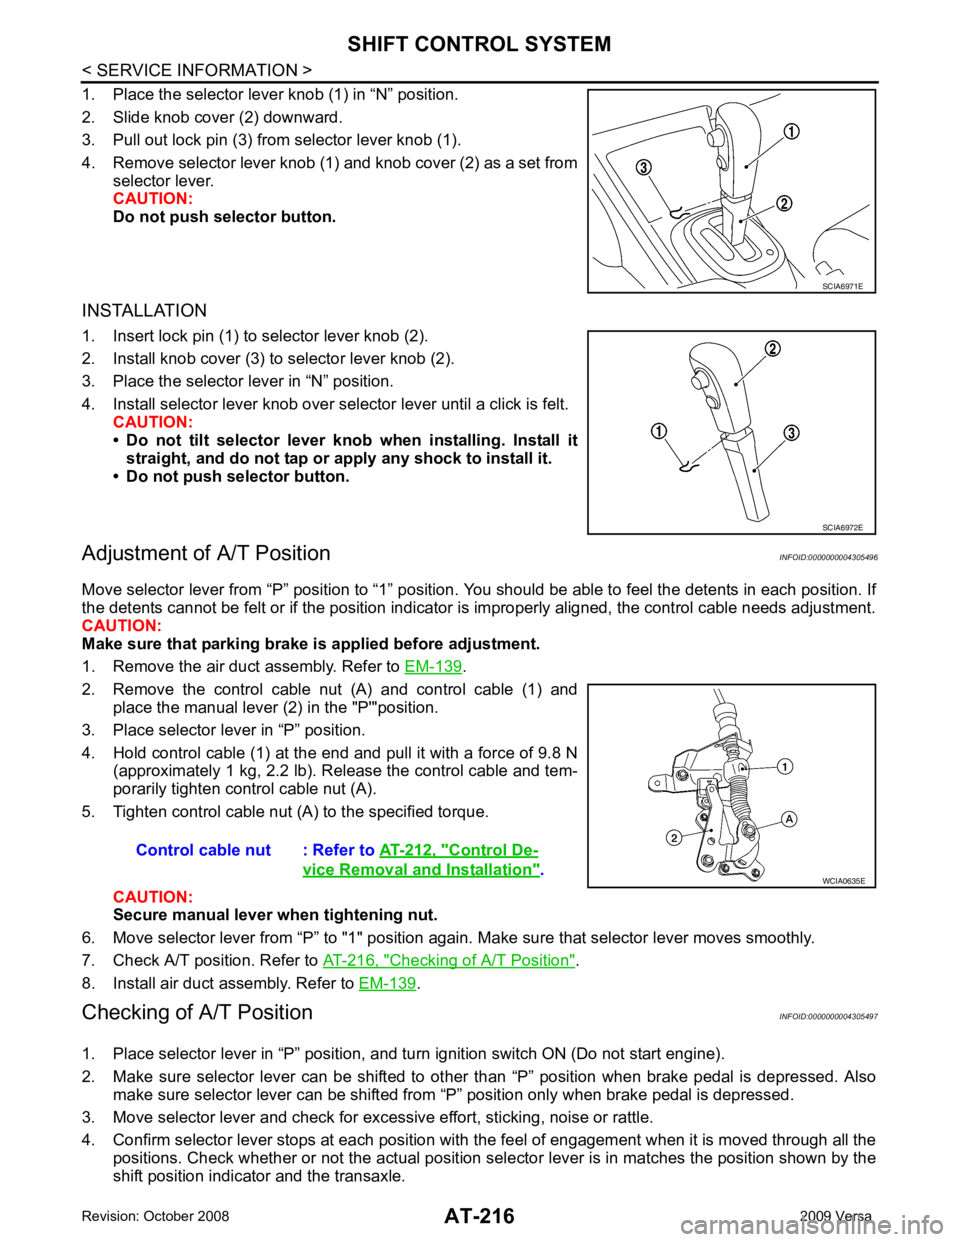
2. Remove the control cable nut (A) and control cable (1) and place the manual lever (2) in the "P'"position.
3. Place selector lever in “P” position.
4. Hold control cable (1) at the end and pull it with a force of 9.8 N (approximately 1 kg, 2.2 lb). Release the control cable and tem-
porarily tighten control cable nut (A).
5. Tighten control cable nut (A) to the specified torque.
CAUTION:
Secure manual lever when tightening nut.
6. Move selector lever from “P” to "1" position again. Make sure that selector lever moves smoothly.
7. Check A/T position. Refer to AT-216, " Checking of A/T Position " .
8. Install air duct assembly. Refer to EM-139 .
Checking of A/T Position INFOID:0000000004305497
1. Place selector lever in “P” position, and tu rn ignition switch ON (Do not start engine).
2. Make sure selector lever can be shifted to other than “P” position when brake pedal is depressed. Also
make sure selector lever can be shifted from “P” position only when brake pedal is depressed.
3. Move selector lever and check for excessive effort, sticking, noise or rattle.
4. Confirm selector lever stops at each position with the feel of engagement when it is moved through all the
positions. Check whether or not the actual position sele ctor lever is in matches the position shown by the
shift position indicator and the transaxle. SCIA6972E
Control De-
vice Removal and Installation " .