Page 157 of 4331
OK >> GO TO 4.
NG >> Repair open circuit or short to ground or short to power in harness or connectors. OK >> GO TO 5.
NG >> Repair or replace damaged parts. DTC Confirmation Procedure " .
OK or NG OK >>
INSPECTION END
NG >> GO TO 6. TCM Terminal and Reference Value " .
2. If NG, recheck TCM pin terminals for damage or loose connection with harness connector.
OK or NG OK >>
INSPECTION END
NG >> Repair or replace damaged parts.
Component Inspection INFOID:0000000004305434
OVERRUN CLUTCH SOLENOID VALVE
• For removal, refer to AT-221, " Control Valve Assembly and Accumulators " .
Resistance Check Item Connector Terminal Continuity
TCM E31 20 Yes
Terminal cord assembly
harness connector F30 3
Page 166 of 4331

DTC BATT/FLUID TEMP SEN (A/T FLU
ID TEMP SENSOR CIRCUIT AND TCM
POWER SOURCE)
AT-161
< SERVICE INFORMATION >
D
E
F
G H
I
J
K L
M A
B AT
N
O P
OK >> GO TO 7.
NG >> Repair open circuit or short to ground or short to power in harness or connectors. 7.
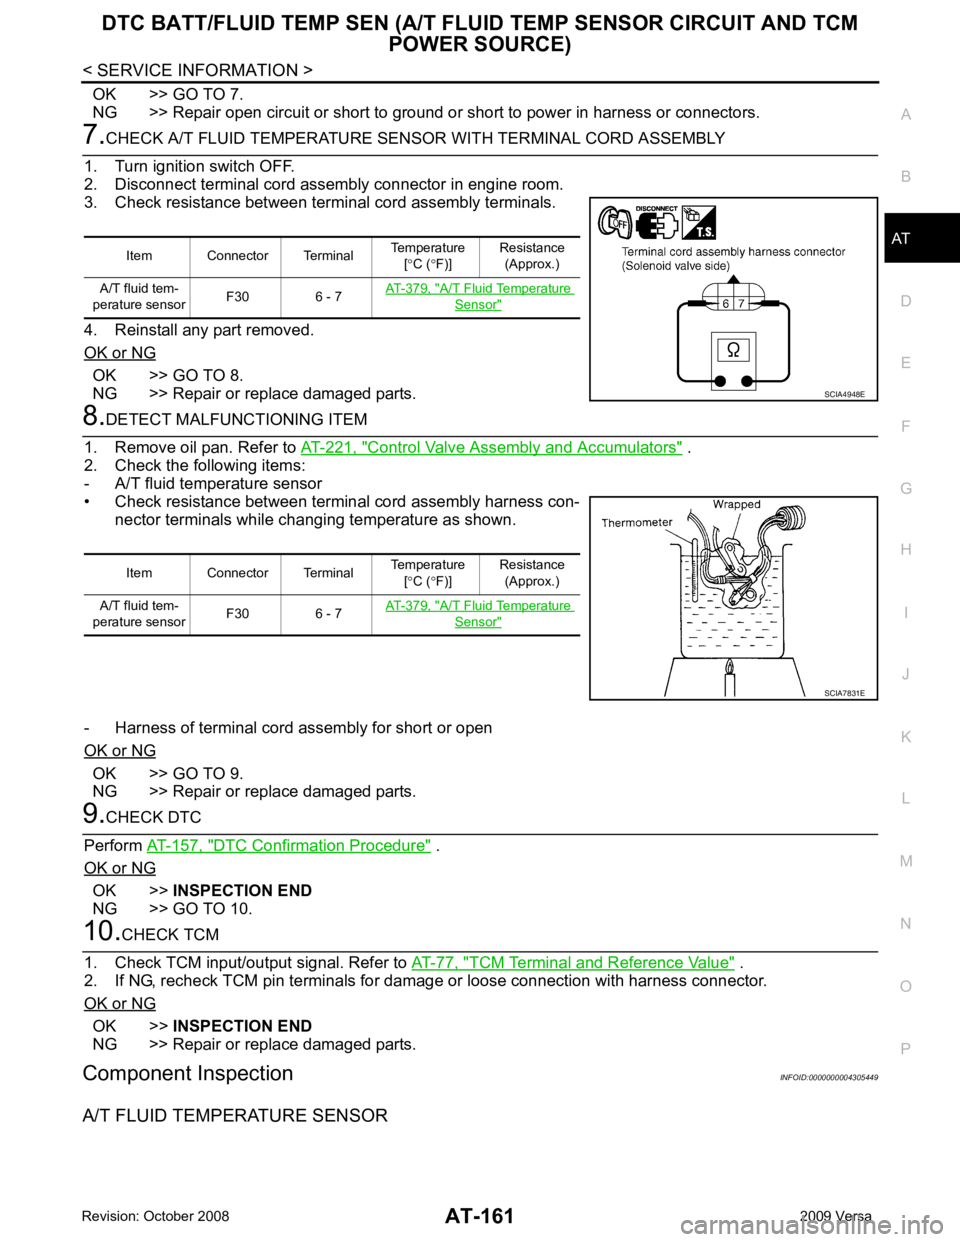
CHECK A/T FLUID TEMPERATURE SENSOR WITH TERMINAL CORD ASSEMBLY
1. Turn ignition switch OFF.
2. Disconnect terminal cord assembly connector in engine room.
3. Check resistance between terminal cord assembly terminals.
4. Reinstall any part removed.
OK or NG OK >> GO TO 8.
NG >> Repair or replace damaged parts. 8.
DETECT MALFUNCTIONING ITEM
1. Remove oil pan. Refer to AT-221, " Control Valve Assembly and Accumulators " .
2. Check the following items:
- A/T fluid temperature sensor
• Check resistance between terminal cord assembly harness con- nector terminals while changing temperature as shown.
- Harness of terminal cord assembly for short or open
OK or NG OK >> GO TO 9.
NG >> Repair or replace damaged parts. 9.
CHECK DTC
Perform AT-157, " DTC Confirmation Procedure " .
OK or NG OK >>
INSPECTION END
NG >> GO TO 10. 10.
CHECK TCM
1. Check TCM input/output signal. Refer to AT-77, " TCM Terminal and Reference Value " .
2. If NG, recheck TCM pin terminals for dam age or loose connection with harness connector.
OK or NG OK >>
INSPECTION END
NG >> Repair or replace damaged parts.
Component Inspection INFOID:0000000004305449
A/T FLUID TEMPERATURE SENSOR Item Connector Terminal
Temperature
[° C ( °F)] Resistance
(Approx.)
A/T fluid tem-
perature sensor F30 6 - 7 AT-379, " A/T Fluid Temperature
Sensor "
SCIA4948E
Item Connector Terminal
Temperature
[° C ( °F)] Resistance
(Approx.)
A/T fluid tem-
perature sensor F30 6 - 7 AT-379, " A/T Fluid Temperature
Sensor "
SCIA7831E
Page 167 of 4331
AT-162< SERVICE INFORMATION >
DTC BATT/FLUID TEMP SEN (A/T FLU
ID TEMP SENSOR CIRCUIT AND TCM
POWER SOURCE)
• Remove oil pan. Refer to AT-221, " Control Valve Assembly and
Accumulators " .
• Check resistance between terminal cord assembly harness con-
nector terminals while changing temperature as shown.
Item Connector Terminal Temperature
[° C ( °F)] Resistance
(Approx.)
A/T fluid tem-
perature sensor F30 6 - 7 AT-379, " A/T Fluid Temperature
Sensor "
SCIA7831E
Page 173 of 4331
Diagnosis Procedure " .
Diagnosis Procedure INFOID:0000000004305461DTC Confirmation Procedure " .
Is the “ CONTROL UNIT (RAM) ” or “ CONTROL UNIT (ROM) ” displayed again?
YES >> Replace TCM. Refer to
AT-211, " Removal and Installation " .
NO >> INSPECTION END
Page 177 of 4331

CONSULT-III Function (TRANSMISSION) " .
Is a malfunction in the CAN communication indicated in the results? YES >> Check CAN communication line. Refer to
AT-88 .
NO (With CONSULT-III) >>GO TO 2.
NO (Without CONSULT-III) >>GO TO 3. Item name Condition Display value
PN POSI SW When setting selector lever
to “N” or “P” position. ON
When setting selector lever to other positions. OFF
R POSITION SW When setting selector lever to “R” position. ON
When setting selector lever to other positions. OFF
D POSITION SW When setting selector lever to “D” position. ON
When setting selector lever to other positions. OFF
2 POSITION SW When setting selector lever to “2” position. ON
When setting selector lever to other positions. OFF
1 POSITION SW When setting selector lever to “1” position. ON
When setting selector lever to other positions. OFF
OVERDRIVE SW When overdrive control switch is depressed. ON
When overdrive control switch is released. OFF
CLOSED THL/SW Released accelerator pedal. ON
Depressed accelerator pedal. OFF
W/O THRL/P-SW Fully depressed accelerator pedal. ON
Released accelerator pedal. OFF Terminal Wire color Item Condition
Judgement standard
(Approx.)
26 Y PNP switch “1” posi-
tion
andWhen setting selector lever to “1” position. Battery voltage
When setting selector lever to other positions. 0 V
27 G PNP switch “2” posi-
tion When setting selector lever to “2” position. Battery voltage
When setting selector lever to other positions. 0 V
34 LG PNP switch “D” posi-
tion When setting selector lever to “D” position. Battery voltage
When setting selector lever to other positions. 0 V
35 SB PNP switch “R” posi-
tion When setting selector lever to “R” position. Battery voltage
When setting selector lever to other positions. 0 V
36 R PNP switch “N” or “P”
position When setting selector le
ver to “N” or “P” posi-
tions. Battery voltage
When setting selector lever to other positions. 0 V
Page 179 of 4331

AT-174< SERVICE INFORMATION >
PNP, OD SWITCH AND CLOSED THRO
TTLE, WIDE OPEN THROTTLE POSI-
TION SIGNAL CIRCUIT 4.
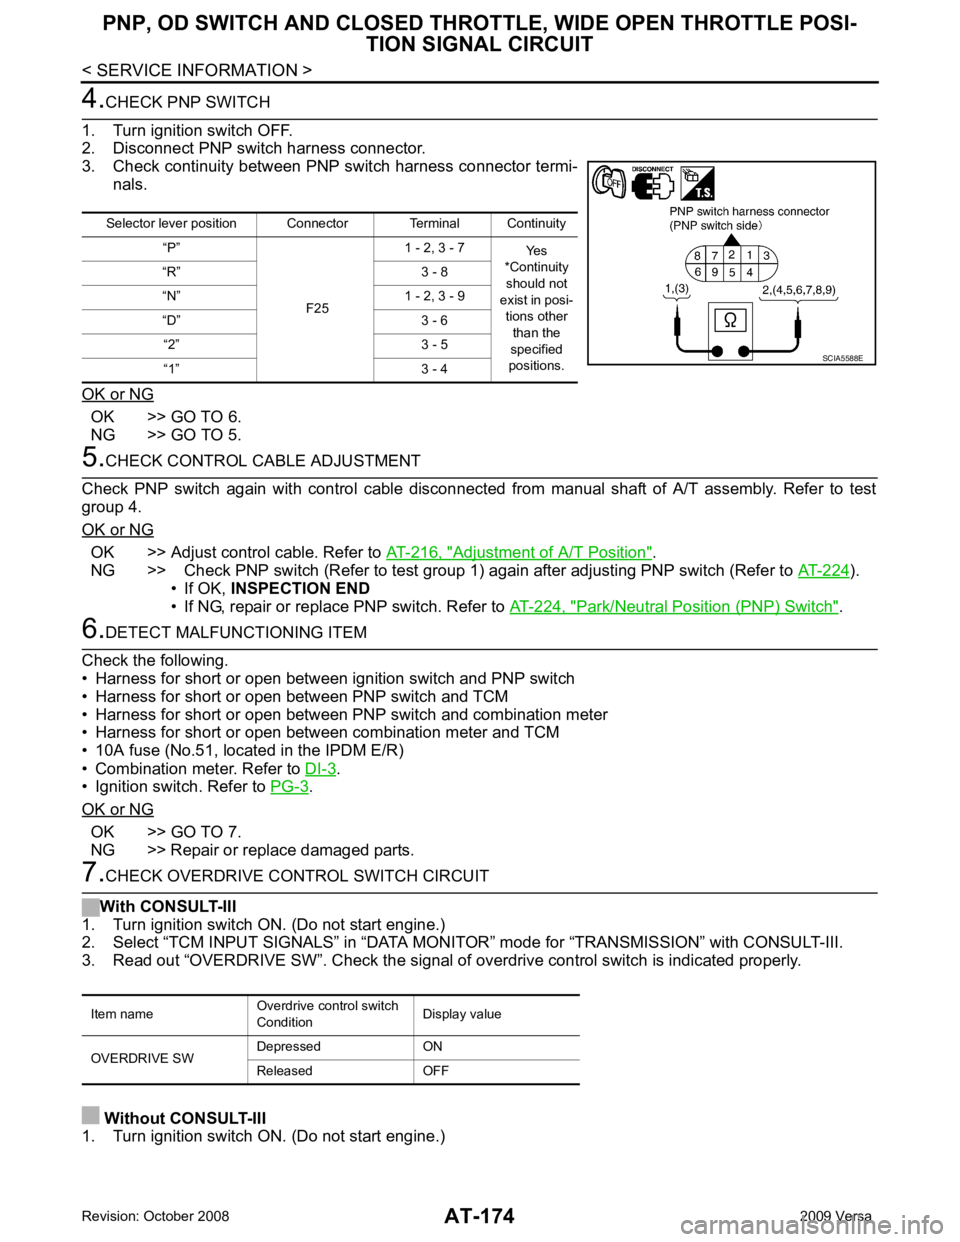
CHECK PNP SWITCH
1. Turn ignition switch OFF.
2. Disconnect PNP switch harness connector.
3. Check continuity between PNP switch harness connector termi- nals.
OK or NG OK >> GO TO 6.
NG >> GO TO 5. 5.
CHECK CONTROL CABLE ADJUSTMENT
Check PNP switch again with control cable disconnected from manual shaft of A/T assembly. Refer to test
group 4.
OK or NG OK >> Adjust control cable. Refer to
AT-216, " Adjustment of A/T Position " .
NG >> Check PNP switch (Refer to test group 1) again after adjusting PNP switch (Refer to AT-224 ).
• If OK, INSPECTION END
• If NG, repair or replace PNP switch. Refer to AT-224, " Park/Neutral Position (PNP) Switch " .
6.
DETECT MALFUNCTIONING ITEM
Check the following.
• Harness for short or open between ignition switch and PNP switch
• Harness for short or open between PNP switch and TCM
• Harness for short or open between PNP switch and combination meter
• Harness for short or open between combination meter and TCM
• 10A fuse (No.51, located in the IPDM E/R)
• Combination meter. Refer to DI-3 .
• Ignition switch. Refer to PG-3 .
OK or NG OK >> GO TO 7.
NG >> Repair or replace damaged parts. 7.
CHECK OVERDRIVE CONTROL SWITCH CIRCUIT
With CONSULT-III
1. Turn ignition switch ON. (Do not start engine.)
2. Select “TCM INPUT SIGNALS” in “DATA MONITO R” mode for “TRANSMISSION” with CONSULT-III.
3. Read out “OVERDRIVE SW”. Check the signal of ov erdrive control switch is indicated properly.
Without CONSULT-III
1. Turn ignition switch ON. (Do not start engine.) Selector lever position Connector Terminal Continuity
“P”
F251 - 2, 3 - 7
Yes
*Continuity
should not
exist in posi-
tions other than the
specified
positions.
“R” 3 - 8
“N” 1 - 2, 3 - 9
“D” 3 - 6 “2” 3 - 5
“1” 3 - 4 SCIA5588E
Item name
Overdrive control switch
Condition Display value
OVERDRIVE SW Depressed ON
Released OFF
Page 180 of 4331
AT
N
O P
2. Check voltage between A/T device harness connector terminal
and ground. Refer to AT-178, " Wiring Diagram - AT - NONDTC " .
OK or NG OK >> GO TO 10.
NG >> GO TO 8. Wiring Diagram - AT - NONDTC " .
OK or NG OK >> GO TO 9.
NG >> Repair or replace damaged parts. .
OK or NG OK >> GO TO 10.
NG >> Repair or replace damaged parts. OK >> GO TO 11.
NG >> Check the following. If any items are damaged, repair or replace damaged parts. • Accelerator pedal position sensor. Refer to EC-412, " Description " (HR16DE),
EC-959, " Compo-
nent Description " (MR Type 1) or
EC-1481, " Component Description " (MR Type 2).
Item Connector Terminal
Overdrive
control switch Condition Judge-
ment
standard
(Approx.)
A/T device harness
connector (Overdrive
control switch) M38 1 - Ground
Released
Battery
voltage
Depressed 0 V
Page 181 of 4331

AT-176< SERVICE INFORMATION >
PNP, OD SWITCH AND CLOSED THRO
TTLE, WIDE OPEN THROTTLE POSI-
TION SIGNAL CIRCUIT 11.
PERFORM SELF-DIAGNOSIS
Without CONSULT-III
Perform self-diagnosis. Refer to AT-83, " Diagnosis Procedure without CONSULT-III " .
OK or NG OK >>
INSPECTION END
NG − 1 >> Self-diagnosis does not activate: GO TO 12.
NG − 2 >> DTC is displayed: Check the malfunctioning system. Refer to AT-83, " Diagnosis Procedure with-
out CONSULT-III " .
12.
CHECK TCM
1. Check TCM input/output signal. Refer to AT-77, " TCM Terminal and Reference Value " .
2. If NG, recheck TCM pin terminals for damage or loose connection with harness connector.
OK or NG OK >>
INSPECTION END
NG >> Repair or replace damaged parts.
Component Inspection INFOID:0000000004305467
OVERDRIVE CONTROL SWITCH
• Check continuity between A/T device harness connector terminals.
PNP SWITCH
1. Check continuity between PNP switch harness connector termi- nals.
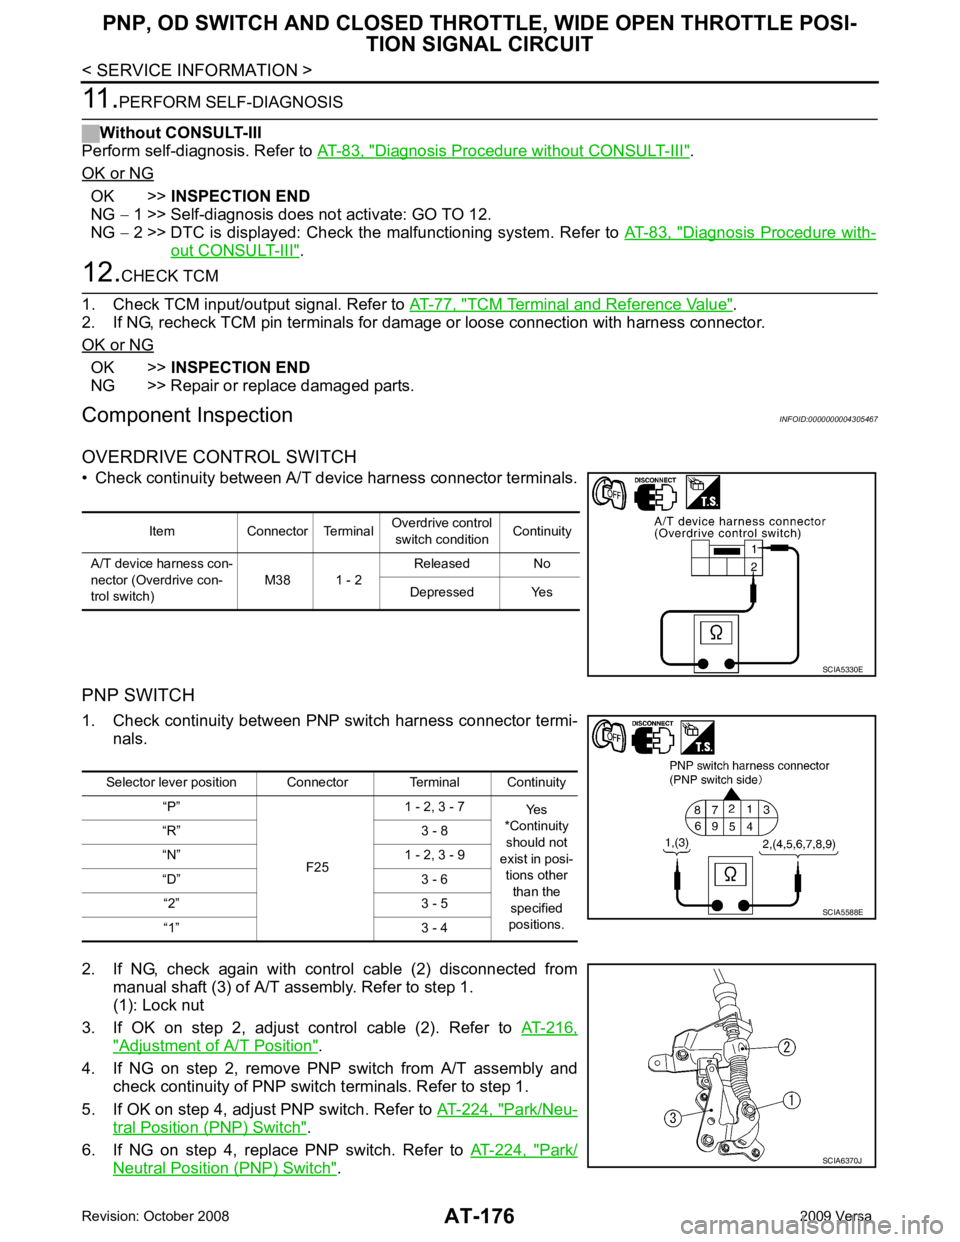
2. If NG, check again with control cable (2) disconnected from manual shaft (3) of A/T assembly. Refer to step 1.
(1): Lock nut
3. If OK on step 2, adjust control cable (2). Refer to AT-216," Adjustment of A/T Position " .
4. If NG on step 2, remove PNP switch from A/T assembly and check continuity of PNP switch terminals. Refer to step 1.
5. If OK on step 4, adjust PNP switch. Refer to AT-224, " Park/Neu-
tral Position (PNP) Switch " .
6. If NG on step 4, replace PNP switch. Refer to AT-224, " Park/
Neutral Position (PNP) Switch " .Item Connector Terminal
Overdrive control
switch condition Continuity
A/T device harness con-
nector (Overdrive con-
trol switch) M38 1 - 2Released No
Depressed Yes SCIA5330E
Selector lever position Connector Terminal Continuity
“P”
F251 - 2, 3 - 7
Yes
*Continuity
should not
exist in posi- tions other
than the
specified
positions.
“R” 3 - 8
“N” 1 - 2, 3 - 9
“D” 3 - 6 “2” 3 - 5
“1” 3 - 4 SCIA5588E
SCIA6370J