2009 NISSAN LATIO check engine
[x] Cancel search: check enginePage 3028 of 4331
![NISSAN LATIO 2009 Service Repair Manual CYLINDER HEAD
EM-81
< ON-VEHICLE REPAIR >
[HR16DE] C
D E
F
G H
I
J
K L
M A EM
NP
O
2. Tighten cylinder head bolts in numer
ical order as shown with the
following procedure to install cylinder head.
CA NISSAN LATIO 2009 Service Repair Manual CYLINDER HEAD
EM-81
< ON-VEHICLE REPAIR >
[HR16DE] C
D E
F
G H
I
J
K L
M A EM
NP
O
2. Tighten cylinder head bolts in numer
ical order as shown with the
following procedure to install cylinder head.
CA](/manual-img/5/57359/w960_57359-3027.png)
CYLINDER HEAD
EM-81
< ON-VEHICLE REPAIR >
[HR16DE] C
D E
F
G H
I
J
K L
M A EM
NP
O
2. Tighten cylinder head bolts in numer
ical order as shown with the
following procedure to install cylinder head.
CAUTION:
If cylinder head bolts are re -used, check their outer diame-
ters before installation. Fol low the “Cylinder Head Bolts
Outer Diameter” measurement procedure.
a. Apply new engine oil to threads and seating surfaces of bolts.
b. Tighten all bolts in the specified order.
c. Turn all bolts 60 degrees clockwise (angle tightening) using Tool (A) in the specified order.
CAUTION:
Check and confirm the tightening angle by using Tool (A) or
protractor. Avoid judgment by visual inspection without the
tool.
d. Completely loosen all bolts in reverse order. CAUTION:
In this step, loosen bolts in reverse order of that indicated.
e. Tighten all bolts in the specified order.
f. Turn all bolts 75 degrees clockwise (angle tightening) using Tool (A) in the specified order.
CAUTION:
Check and confirm the tightening angle by using Tool (A) or
protractor. Avoid judgment by visual inspection without the
tool.
g. Turn all bolts 75 degrees clockwise again (angle tightening) using Tool (A) in the specified order.
CAUTION:
Check and confirm the tightening angle by using To ol (A) or protractor. Avoid judgment by visual
inspection without the tool.
3. Installation of the remaining components is in the reverse order of removal.
INSPECTION AFTER INSTALLATION
Inspection for Leaks • Before starting engine, check oil/fluid levels incl uding engine coolant and engine oil. If less than required
quantity, fill to the specified level. Refer to MA-14, " Fluids and Lubricants " .
A : EXH side
B : INT side
: Engine front
: 40.0 N·m (4.1 kg-m, 30 ft-lb)
Tool number : KV10112100 (BT-8653-A) PBIC3732E
PBIC3733E
: 0 N·m (0 kg-m, 0 ft-lb)
: 40.0 N·m (4.1 kg-m, 30 ft-lb)
Tool number : KV10112100 (BT-8653-A) PBIC3733E
Page 3038 of 4331

EM
NP
O
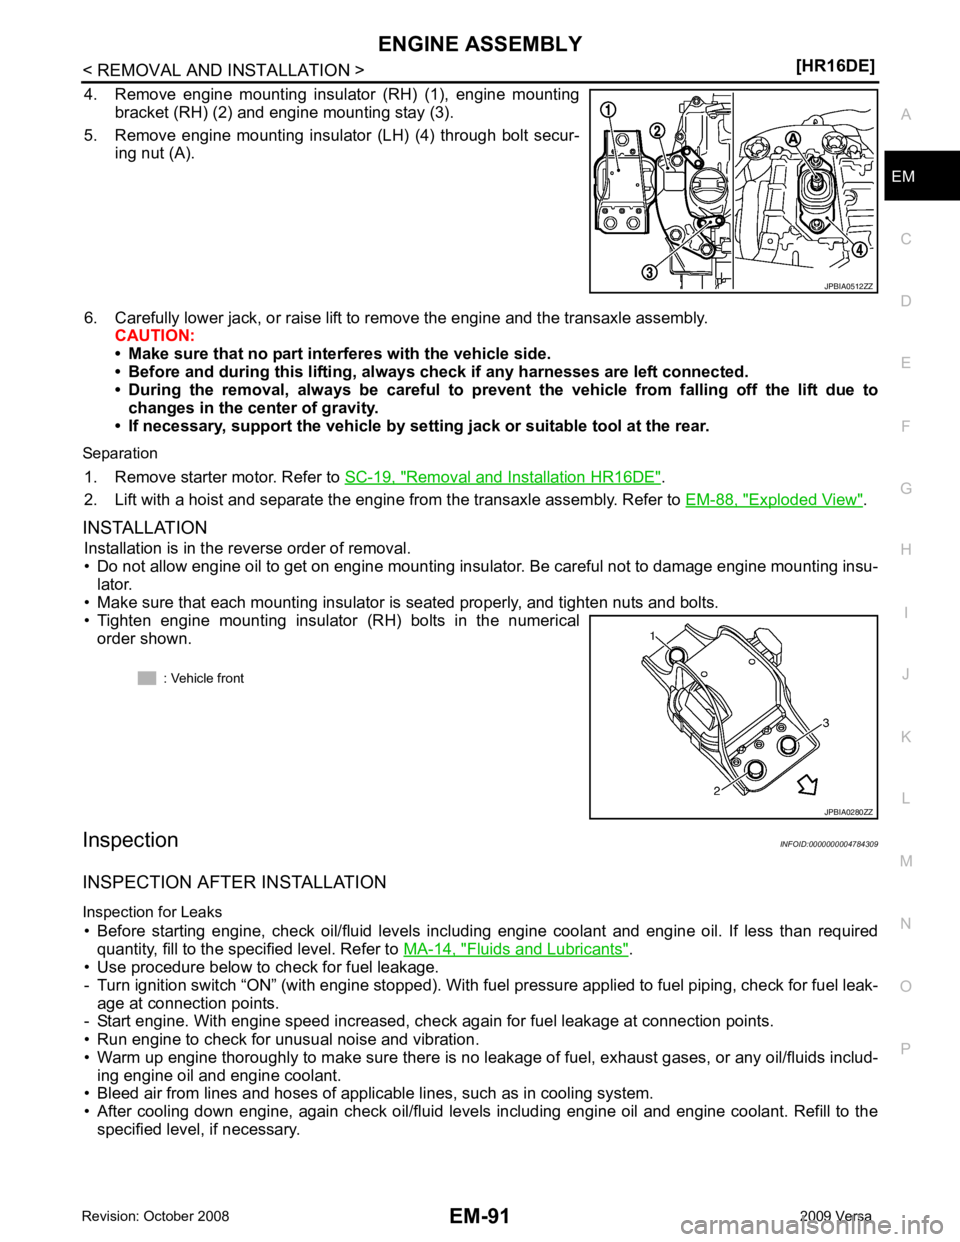
4. Remove engine mounting insulator (RH) (1), engine mounting
bracket (RH) (2) and engine mounting stay (3).
5. Remove engine mounting insulator (LH) (4) through bolt secur- ing nut (A).
6. Carefully lower jack, or raise lift to remove the engine and the transaxle assembly. CAUTION:
• Make sure that no part interferes with the vehicle side.
• Before and during this lifting, alw ays check if any harnesses are left connected.
• During the removal, always be careful to prevent the vehicle from falling off the lift due to
changes in the center of gravity.
• If necessary, support the vehicle by setting jack or suitable tool at the rear.
Separation 1. Remove starter motor. Refer to SC-19, " Removal and Installation HR16DE " .
2. Lift with a hoist and separate the engine from the transaxle assembly. Refer to EM-88, " Exploded View " .
INSTALLATION Installation is in the reverse order of removal.
• Do not allow engine oil to get on engine mounting insulator. Be careful not to damage engine mounting insu- lator.
• Make sure that each mounting insulator is seated properly, and tighten nuts and bolts.
• Tighten engine mounting insulator (RH) bolts in the numerical
order shown.
Inspection INFOID:0000000004784309
INSPECTION AFTER INSTALLATION
Inspection for Leaks • Before starting engine, check oil/fluid levels incl uding engine coolant and engine oil. If less than required
quantity, fill to the specified level. Refer to MA-14, " Fluids and Lubricants " .
• Use procedure below to check for fuel leakage.
- Turn ignition switch “ON” (with engine stopped). With fuel pressure applied to fuel piping, check for fuel leak-
age at connection points.
- Start engine. With engine speed increased, check again for fuel leakage at connection points.
• Run engine to check for unusual noise and vibration.
• Warm up engine thoroughly to make sure there is no leak age of fuel, exhaust gases, or any oil/fluids includ-
ing engine oil and engine coolant.
• Bleed air from lines and hoses of applicable lines, such as in cooling system.
• After cooling down engine, again check oil/fluid levels including engine oil and engine coolant. Refill to the specified level, if necessary.
Page 3045 of 4331
![NISSAN LATIO 2009 Service Repair Manual EM-98< DISASSEMBLY AND ASSEMBLY >
[HR16DE]
CYLINDER BLOCK
2. Install water drain plug (1) to cylinder block as shown.
Use Genuine Silicone RTV Seal ant or equivalent. Refer to
GI-42, " Recomm NISSAN LATIO 2009 Service Repair Manual EM-98< DISASSEMBLY AND ASSEMBLY >
[HR16DE]
CYLINDER BLOCK
2. Install water drain plug (1) to cylinder block as shown.
Use Genuine Silicone RTV Seal ant or equivalent. Refer to
GI-42, " Recomm](/manual-img/5/57359/w960_57359-3044.png)
EM-98< DISASSEMBLY AND ASSEMBLY >
[HR16DE]
CYLINDER BLOCK
2. Install water drain plug (1) to cylinder block as shown.
Use Genuine Silicone RTV Seal ant or equivalent. Refer to
GI-42, " Recommended Chemical
Product and Sealant " .
3. Install main bearings and thrust bearings in their original positions with the following procedure:
a. Remove dust, dirt, and engine oil on the bearing mating surfaces of cylinder block.
b. Install thrust bearings to the both sides of the No. 3 journal hous- ing (B) on cylinder block.
• Install thrust bearings with the oil groove (A) facing crankshaft arm (outside).
c. Install the main bearings (1) paying attention to the direction. • Install the one with oil holes (A) onto cylinder block and the
one without oil holes onto main bearing cap.
• Before installing main bearings, apply new engine oil to the bearing surface (inside). Do not apply engine oil to the back
surface, but thoroughly clean it.
• Ensure the oil holes on cylinder block and those on the corre- sponding bearing are aligned.
• Install the main bearing in the position shown.
NOTE:
Install the main bearing in the center position with the following
dimension. For service operati on, the center position can be
checked visually. : Engine front PBIC3742E
: Engine front
PBIC3258J
PBIC3746E
1 : Cylinder block
2 : Main bearing (upper)
3 : Main bearing (lower)
4 : Main bearing cap
: Engine front PBIC3747E
Journal position No. 1 No. 2 No. 3 No. 4 No. 5
L1 [Unit: mm (in)] 1.65–2.05 1.25–1.65 2.30–2.70 1.25–1.65 1.60–2.00
(0.065-0.081) (0.049-0.065) (0.091-0.106) (0.049-0.065) (0.063-0.079)
L2 [Unit: mm (in)] 1.30–1.70 1.30–1.70 2.30–2.70 1.30–1.70 1.30–1.70
(0.051-0.067) (0.051-0.067) (0.091-0.106) (0.051-0.067) (0.051-0.067)
Page 3048 of 4331

EM
NP
O
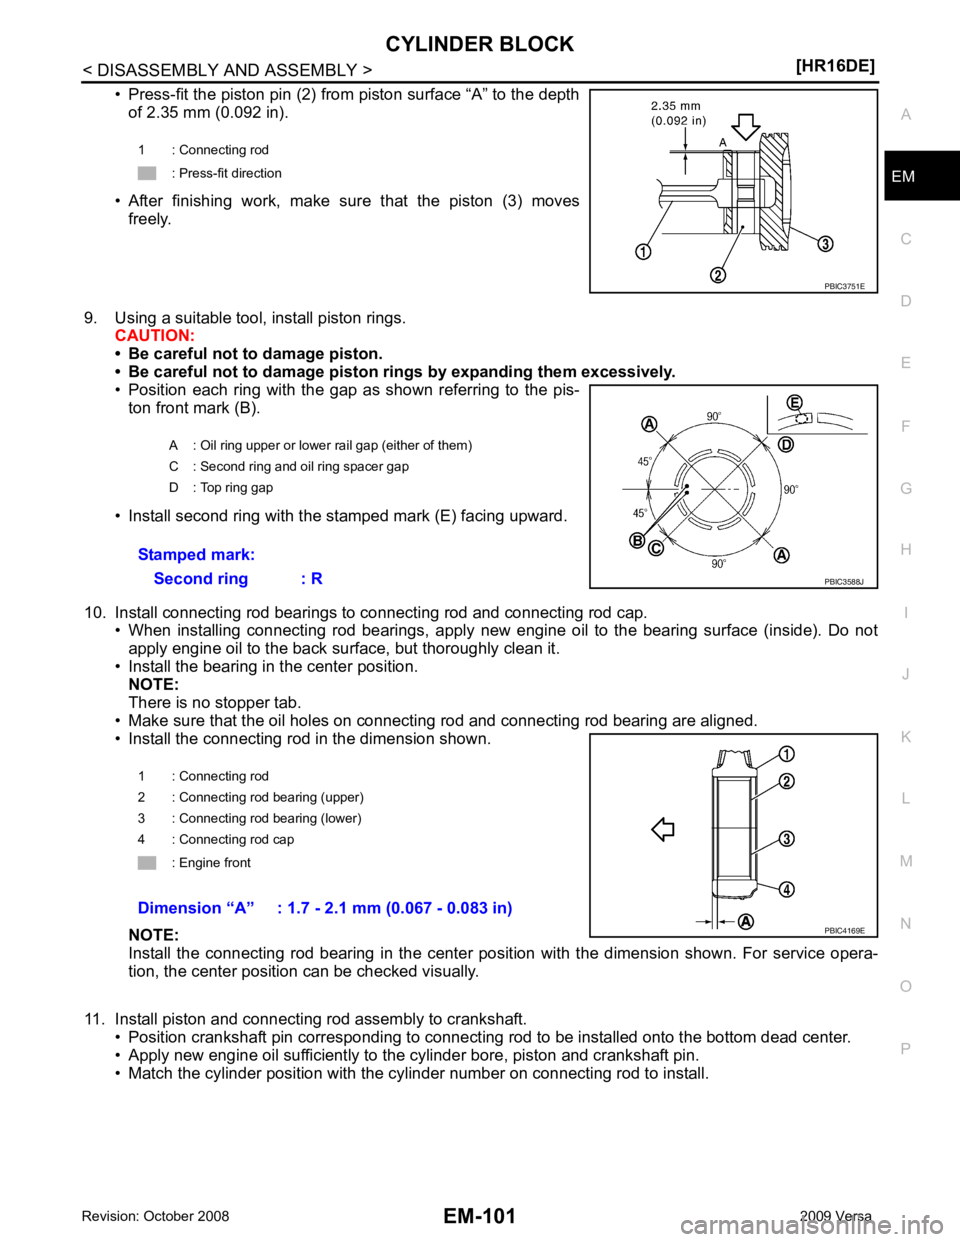
• Press-fit the piston pin (2) from piston surface “A” to the depth
of 2.35 mm (0.092 in).
• After finishing work, make sure that the piston (3) moves freely.
9. Using a suitable tool, install piston rings. CAUTION:
• Be careful not to damage piston.
• Be careful not to damage piston rings by expanding them excessively.
• Position each ring with the gap as shown referring to the pis-
ton front mark (B).
• Install second ring with the stamped mark (E) facing upward.
10. Install connecting rod bearings to connecting rod and connecting rod cap. • When installing connecting rod bearings, apply new engine oil to the bearing surface (inside). Do not
apply engine oil to the back surface, but thoroughly clean it.
• Install the bearing in the center position. NOTE:
There is no stopper tab.
• Make sure that the oil holes on connecting rod and connecting rod bearing are aligned.
• Install the connecting rod in the dimension shown.
NOTE:
Install the connecting rod bearing in the center pos ition with the dimension shown. For service opera-
tion, the center position can be checked visually.
11. Install piston and connecting rod assembly to crankshaft. • Position crankshaft pin corres ponding to connecting rod to be installed onto the bottom dead center.
• Apply new engine oil sufficiently to the cylinder bore, piston and crankshaft pin.
• Match the cylinder position with the cy linder number on connecting rod to install.
1 : Connecting rod
: Press-fit direction
Page 3049 of 4331

Inspection " .
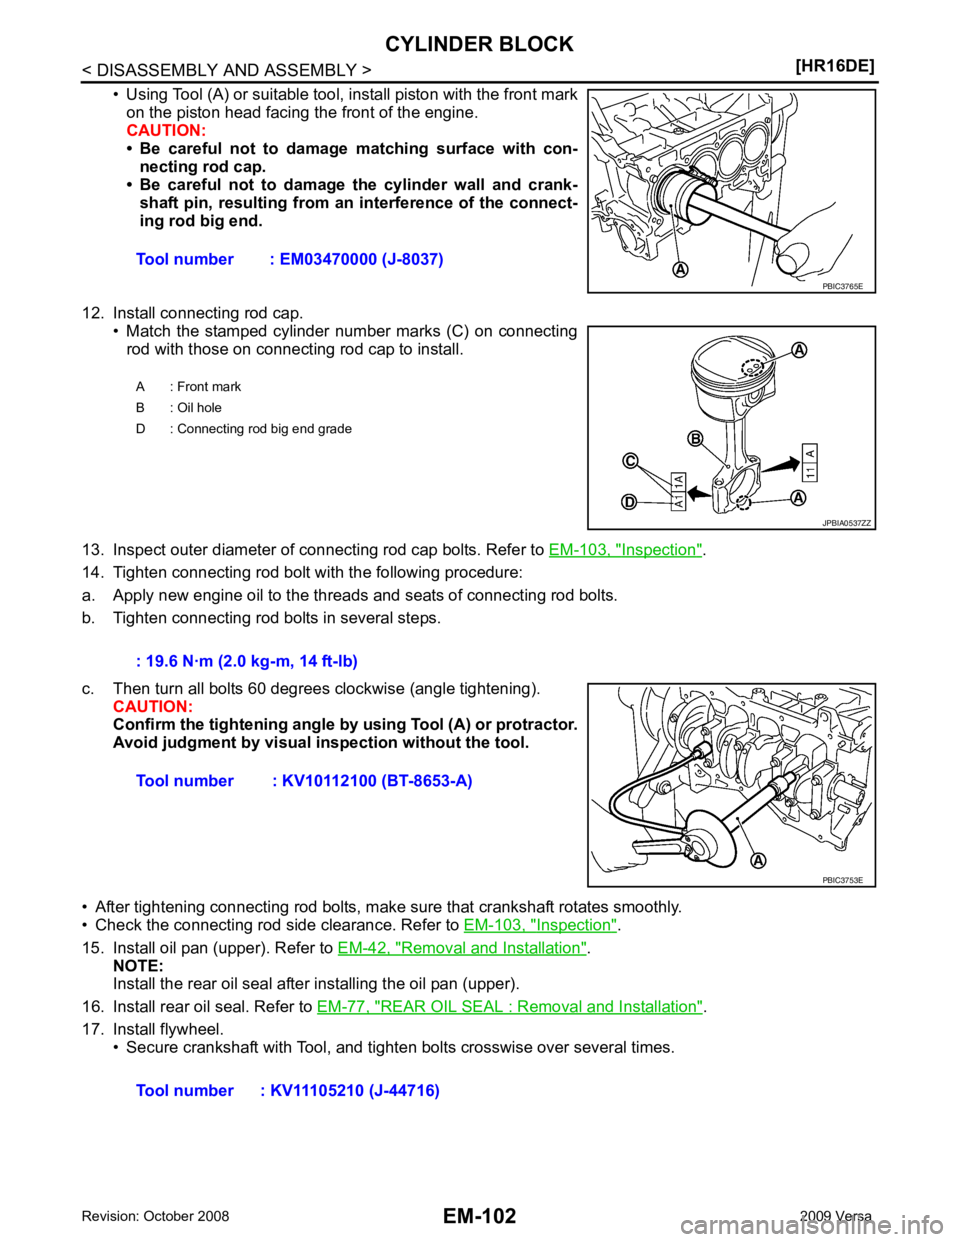
14. Tighten connecting rod bolt with the following procedure:
a. Apply new engine oil to the threads and seats of connecting rod bolts.
b. Tighten connecting rod bolts in several steps.
c. Then turn all bolts 60 degrees clockwise (angle tightening). CAUTION:
Confirm the tightening angle by using Tool (A) or protractor.
Avoid judgment by visual inspection without the tool.
• After tightening connecting rod bolts, make sure that crankshaft rotates smoothly.
• Check the connecting rod side clearance. Refer to EM-103, " Inspection " .
15. Install oil pan (upper). Refer to EM-42, " Removal and Installation " .
NOTE:
Install the rear oil seal after installing the oil pan (upper).
16. Install rear oil seal. Refer to EM-77, " REAR OIL SEAL : Removal and Installation " .
17. Install flywheel. • Secure crankshaft with Tool, and tighten bolts crosswise over several times.Tool number : EM03470000 (J-8037)
Page 3074 of 4331
![NISSAN LATIO 2009 Service Repair Manual PRECAUTIONS
EM-127
< SERVICE INFORMATION >
[MR18DE] C
D E
F
G H
I
J
K L
M A EM
NP
O
5. When the repair work is completed, return the ignition switch to the
″LOCK ″ position before c NISSAN LATIO 2009 Service Repair Manual PRECAUTIONS
EM-127
< SERVICE INFORMATION >
[MR18DE] C
D E
F
G H
I
J
K L
M A EM
NP
O
5. When the repair work is completed, return the ignition switch to the
″LOCK ″ position before c](/manual-img/5/57359/w960_57359-3073.png)
PRECAUTIONS
EM-127
< SERVICE INFORMATION >
[MR18DE] C
D E
F
G H
I
J
K L
M A EM
NP
O
5. When the repair work is completed, return the ignition switch to the
″LOCK ″ position before connecting
the battery cables. (At this time, the steering lock mechanism will engage.)
6. Perform a self-diagnosis check of al l control units using CONSULT-III.
Precaution for Procedur e without Cowl Top Cover INFOID:0000000004307110
When performing the procedure after removing cowl top cover, cover
the lower end of windshield.
Precaution for Drain Coolant INFOID:0000000004307112
• Drain coolant when engine is cooled.
Precaution for Disco nnecting Fuel Piping INFOID:0000000004307113
• Before starting work, make sure no fire or spark producing items are in the work area.
• Release fuel pressure before disassembly.
• After disconnecting pipes, plug openings to stop fuel leakage.
Precaution for Removal and Disassembly INFOID:0000000004307114
• When instructed to use special service tools, use the spec ified tools. Always be careful to work safely, avoid
forceful or uninstructed operations.
• Exercise maximum care to avoid damage to mating or sliding surfaces.
• Cover openings of engine system with tape or the equiva lent, if necessary, to seal out foreign materials.
• Mark and arrange disassembly parts in an organized way for easy troubleshooting and assembly.
• When loosening nuts and bolts, as a basic rule, start with the one furthest outside, then the one diagonally opposite, and so on. If the order of loosening is specif ied, do exactly as specified. Power tools may be used
where noted in the step.
Precaution for Inspection, Repair and Replacement INFOID:0000000004307115
• Before repairing or replacing, thoroughly inspect parts. Inspect new replacement parts in the same way, and
replace if necessary.
Precaution for Assembly and Installation INFOID:0000000004307116
• Use torque wrench to tighten bolts or nuts to specification.
• When tightening nuts and bolts, as a basic rule, equally tighten in several different steps starting with the ones in center, then ones on inside and outside diagonally in this order. If the order of tightening is specified,
do exactly as specified.
• Replace with new gasket, packing, oil seal or O-ring.
• Thoroughly wash, clean, and air-blow each part. Carefully check oil or coolant passages for any restriction
and blockage.
• Avoid damaging sliding or mating surfaces. Completely remove foreign materials such as cloth lint or dust. Before assembly, oil sliding surfaces well.
• Release air within route after draining coolant.
• Before starting engine, apply fuel pressure to fuel lines with turning ignition switch ON (with engine stopped). Then make sure that there are no leaks at fuel line connections.
• After repairing, start engine and increase engine speed to check coolant, fuel, oil, and exhaust systems for leakage. PIIB3706J
Page 3082 of 4331

EM
NP
O
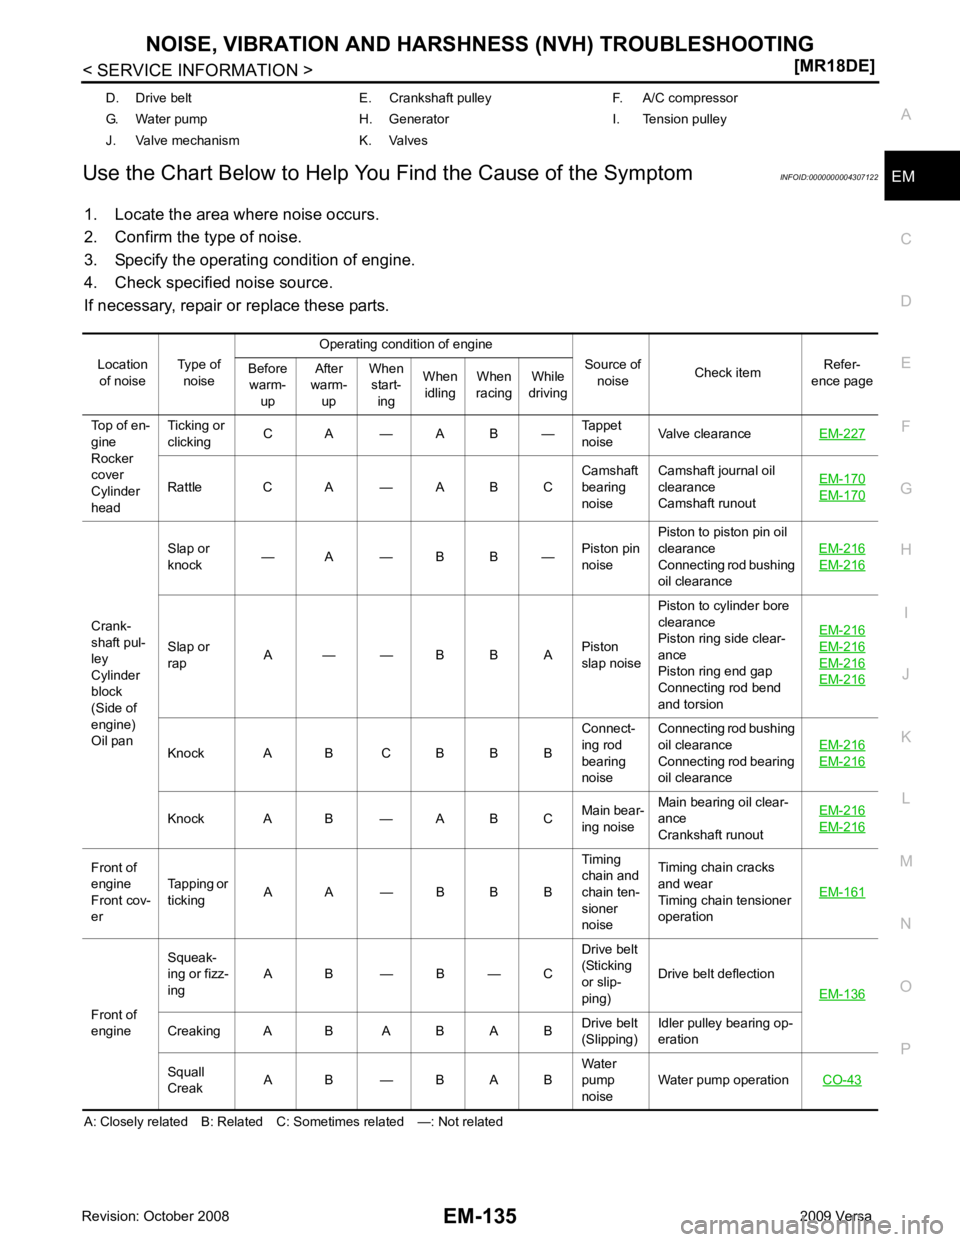
Use the Chart Below to Help You
Find the Cause of the Symptom INFOID:0000000004307122
1. Locate the area where noise occurs.
2. Confirm the type of noise.
3. Specify the operating condition of engine.
4. Check specified noise source.
If necessary, repair or replace these parts.
A: Closely related B: Related C: Sometimes related —: Not related D. Drive belt E. Crankshaft pulley F. A/C compressor
G. Water pump H. Generator I. Tension pulley
J. Valve mechanism K. Valves
Location of noise Type of
noise Operating condition of engine
Source of noise Check item
Refer-
ence page
Before
warm-
up After
warm-
up When
start-
ing When
idling When
racing While
driving
Top of en-
gine
Rocker
cover
Cylinder
head Ticking or
clicking C A — A B —
Tappet
noise Valve clearance
EM-227 Rattle C A — A B C
Camshaft
bearing
noise Camshaft journal oil
clearance
Camshaft runout EM-170 EM-170
Crank-
shaft pul-
ley
Cylinder
block
(Side of
engine)
Oil pan Slap or
knock — A — B B —
Piston pin
noise Piston to piston pin oil
clearance
Connecting rod bushing
oil clearance EM-216 EM-216
Slap or
rap A — — B B A
Piston
slap noise Piston to cylinder bore
clearance
Piston ring side clear-
ance
Piston ring end gap
Connecting rod bend
and torsion EM-216 EM-216
EM-216
EM-216
Knock A B C B B B
Connect-
ing rod
bearing
noise Connecting rod bushing
oil clearance
Connecting rod bearing
oil clearance EM-216 EM-216
Knock A B — A B C
Main bear-
ing noise Main bearing oil clear-
ance
Crankshaft runout EM-216 EM-216
Front of
engine
Front cov-
er Tapping or
ticking A A — B B B Timing
chain and
chain ten-
sioner
noise Timing chain cracks
and wear
Timing chain tensioner
operation EM-161Front of
engine Squeak-
ing or fizz-
ing A B — B — C Drive belt
(Sticking
or slip-
ping) Drive belt deflection
EM-136 Creaking A B A B A B
Drive belt
(Slipping) Idler pulley bearing op-
eration
Squall
Creak A B — B A B Water
pump
noise Water pump operation
CO-43
Page 3084 of 4331
![NISSAN LATIO 2009 Service Repair Manual DRIVE BELTS
EM-137
< SERVICE INFORMATION >
[MR18DE] C
D E
F
G H
I
J
K L
M A EM
NP
O
1. Hold the hexagonal part (A) of drive belt auto-tensioner (1) with
a box wrench securely. Then move the wre NISSAN LATIO 2009 Service Repair Manual DRIVE BELTS
EM-137
< SERVICE INFORMATION >
[MR18DE] C
D E
F
G H
I
J
K L
M A EM
NP
O
1. Hold the hexagonal part (A) of drive belt auto-tensioner (1) with
a box wrench securely. Then move the wre](/manual-img/5/57359/w960_57359-3083.png)
DRIVE BELTS
EM-137
< SERVICE INFORMATION >
[MR18DE] C
D E
F
G H
I
J
K L
M A EM
NP
O
1. Hold the hexagonal part (A) of drive belt auto-tensioner (1) with
a box wrench securely. Then move the wrench handle in the
direction of arrow (loosening direction of tensioner).
WARNING:
Never place hand in a location where pinching may occur if
the holding tool accidentally comes off.
2. Insert a rod such as short-length screwdriver approximately 6 mm (0.24 in) in diameter into the hole (B) of retaining boss to fix
drive belt auto-tensioner.
3. Install drive belt. CAUTION:
• Confirm drive belt is completely set to pulleys.
• Check for engine oil, working fluid and engine coolant are not adhered to drive belt and each
pulley groove.
4. Release drive belt auto-tensioner, and apply tension to drive belt.
5. Turn crankshaft pulley clockwise several times to equalize tension between each pulley.
6. Confirm tension of drive belt at indicator (notch on fixed side) is within the possible use range. Refer to
EM-136, " Checking Drive Belts " .
Component INFOID:0000000004307127
Removal and Installation of Drive Belt Auto Tensioner INFOID:0000000004307128
REMOVAL 1. Remove drive belt. Refer to EM-136, " Removal and Installation " .
2. Release the fixed drive belt auto-tensioner pulley.
3. Loosen bolt and remove drive belt auto-tensioner. NOTE: PBIC3936E
1. Front cover 2. Drive belt auto–tensioner 3. Idler pulley (models without A/C)
4. Bracket (models without A/C) 5. Shaft (models without A/C) PBIC4698E