2009 NISSAN LATIO oil type
[x] Cancel search: oil typePage 24 of 4331

A/T FLUID
AT-19
< SERVICE INFORMATION >
D
E
F
G H
I
J
K L
M A
B AT
N
O P
13. Flush each steel line from the cooler side back to
ward the A/T by spraying Transmission Cooler Cleaner
in a continuous stream for 5 seconds.
14. Blow compressed air regulated to 5 - 9 kg/cm 2
(71 - 128 psi) through each steel line from the cooler side
back toward the A/T for 10 seconds to force out any remaining A/T fluid.
15. Ensure all debris is removed from the steel cooler lines.
16. Ensure all debris is removed from the banjo bolts and fittings.
17. Perform "A/T FLUID COOL ER DIAGNOSIS PROCEDURE".
A/T FLUID COOLER DIAGNOSIS PROCEDURE NOTE:
Insufficient cleaning of the cooler inlet hose exte rior may lead to inaccurate debris identification.
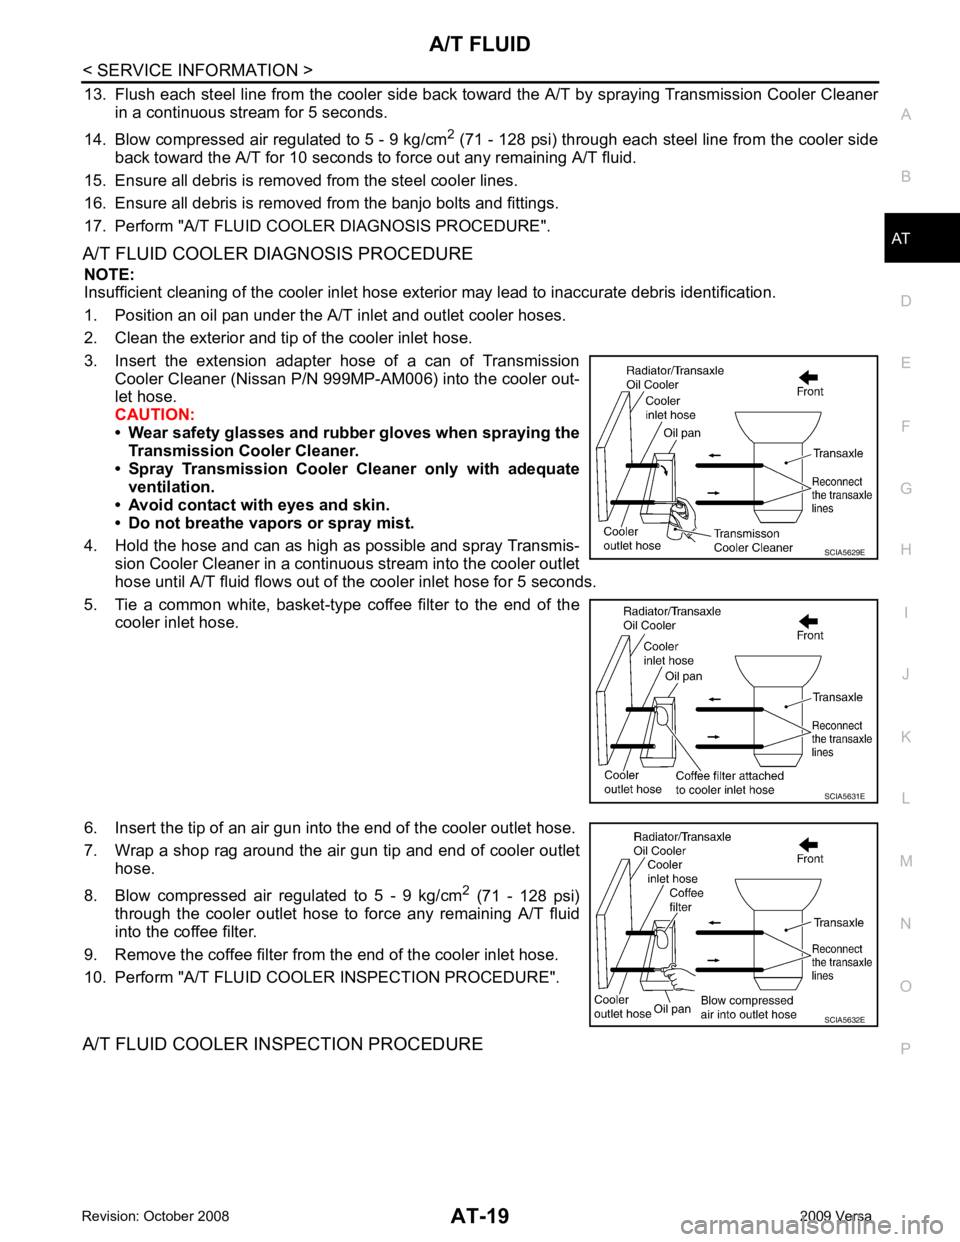
1. Position an oil pan under the A/T inlet and outlet cooler hoses.
2. Clean the exterior and tip of the cooler inlet hose.
3. Insert the extension adapter hose of a can of Transmission Cooler Cleaner (Nissan P/N 999MP-AM006) into the cooler out-
let hose.
CAUTION:
• Wear safety glasses and rubber gloves when spraying the
Transmission Cooler Cleaner.
• Spray Transmission Cooler Cleaner only with adequate
ventilation.
• Avoid contact with eyes and skin.
• Do not breathe vapors or spray mist.
4. Hold the hose and can as high as possible and spray Transmis- sion Cooler Cleaner in a continuous stream into the cooler outlet
hose until A/T fluid flows out of t he cooler inlet hose for 5 seconds.
5. Tie a common white, basket-type coffee filter to the end of the cooler inlet hose.
6. Insert the tip of an air gun into the end of the cooler outlet hose.
7. Wrap a shop rag around the air gun tip and end of cooler outlet hose.
8. Blow compressed air regulated to 5 - 9 kg/cm 2
(71 - 128 psi)
through the cooler outlet hose to force any remaining A/T fluid
into the coffee filter.
9. Remove the coffee filter from the end of the cooler inlet hose.
10. Perform "A/T FLUID COOL ER INSPECTION PROCEDURE".
A/T FLUID COOLER INSPECTION PROCEDURE SCIA5629E
SCIA5631E
SCIA5632E
Page 76 of 4331

AT
N
O P
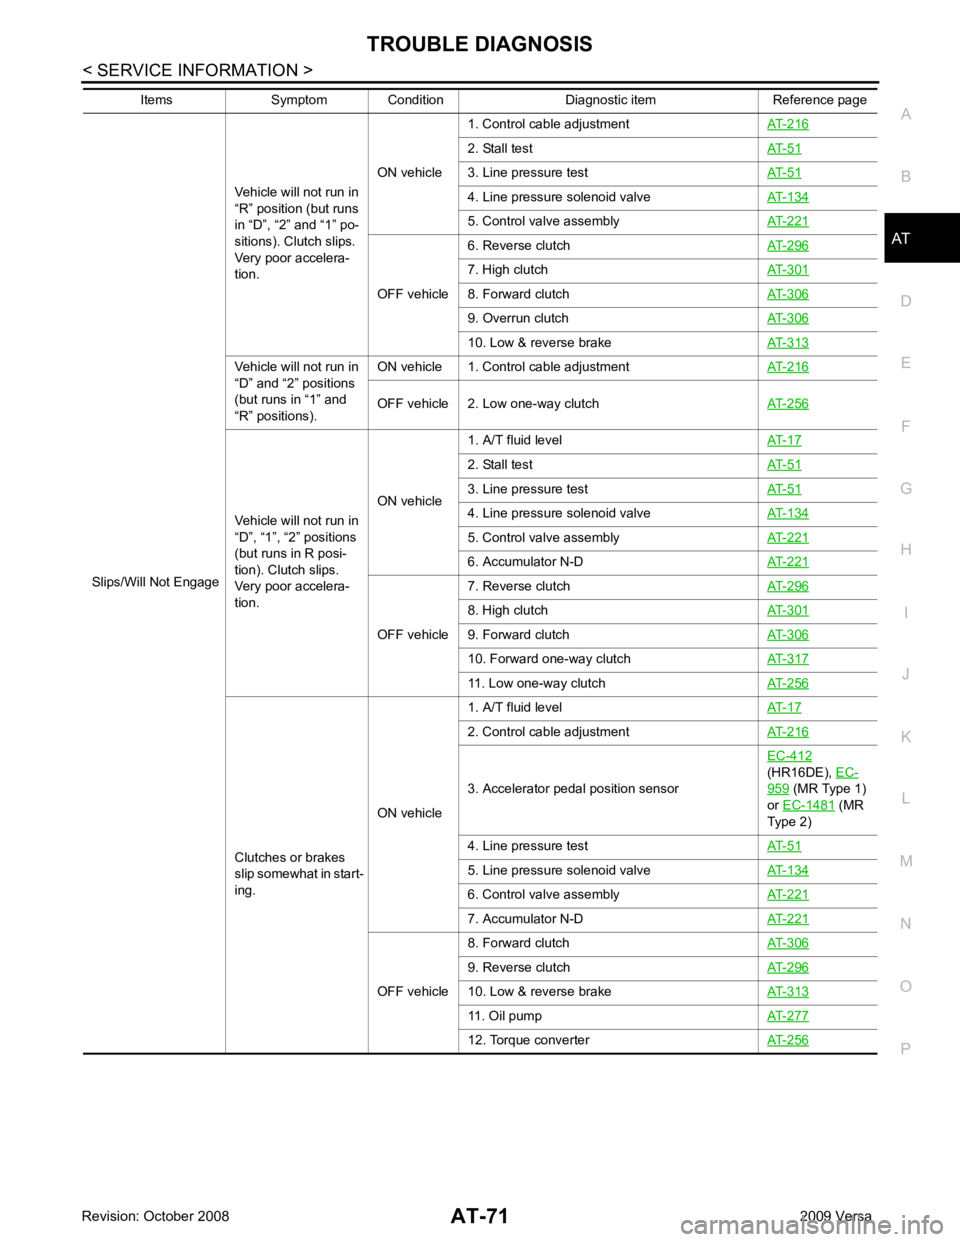
Slips/Will Not Engage
Vehicle will not run in
“R” position (but runs
in “D”, “2” and “1” po-
sitions). Clutch slips.
Very poor accelera-
tion. ON vehicle
1. Control cable adjustment
AT-216 2. Stall test
AT-51 3. Line pressure test
AT-51 4. Line pressure solenoid valve
AT-134 5. Control valve assembly
AT-221 OFF vehicle
6. Reverse clutch
AT-296 7. High clutch
AT-301 8. Forward clutch
AT-306 9. Overrun clutch
AT-306 10. Low & reverse brake
AT-313Vehicle will not run in
“D” and “2” positions
(but runs in “1” and
“R” positions). ON vehicle 1. Control cable adjustment
AT-216OFF vehicle 2. Low one-way clutch
AT-256Vehicle will not run in
“D”, “1”, “2” positions
(but runs in R posi-
tion). Clutch slips.
Very poor accelera-
tion. ON vehicle
1. A/T fluid level
AT-17 2. Stall test
AT-51 3. Line pressure test
AT-51 4. Line pressure solenoid valve
AT-134 5. Control valve assembly
AT-221 6. Accumulator N-D
AT-221 OFF vehicle
7. Reverse clutch
AT-296 8. High clutch
AT-301 9. Forward clutch
AT-306 10. Forward one-way clutch
AT-317 11. Low one-way clutch
AT-256Clutches or brakes
slip somewhat in start-
ing. ON vehicle1. A/T fluid level
AT-17 2. Control cable adjustment
AT-216 3. Accelerator pedal position sensor
EC-412
(HR16DE), EC- 959 (MR Type 1)
or EC-1481 (MR
Type 2)
4. Line pressure test AT-51 5. Line pressure solenoid valve
AT-134 6. Control valve assembly
AT-221 7. Accumulator N-D
AT-221 OFF vehicle
8. Forward clutch
AT-306 9. Reverse clutch
AT-296 10. Low & reverse brake
AT-313 11. Oil pump
AT-277 12. Torque converter
AT-256Items Symptom Condition Diagnostic item Reference page
Page 77 of 4331

,
AT-187 ON vehicle
1. A/T fluid level
AT-17 2. Line pressure test
AT-51 3. Control valve assembly
AT-221 OFF vehicle
4. Forward clutch
AT-306 5. Oil pump
AT-277 6. Torque converter
AT-256Almost no shock or
clutches slipping in
change from D 1 to D 2
. ON vehicle1. A/T fluid level
AT-17 2. Accelerator pedal position sensor
EC-412
(HR16DE), EC- 959 (MR Type 1)
or EC-1481 (MR
Type 2)
3. Line pressure test AT-51 4. Accumulator servo release
AT-221 5. Control valve assembly
AT-221 OFF vehicle 6. Brake band
AT-330Almost no shock or
slipping in changing
from D 2 to D 3 . ON vehicle 1. A/T fluid level
AT-17 2. Accelerator pedal position sensor
EC-412
(HR16DE), EC- 959 (MR Type 1)
or EC-1481 (MR
Type 2)
3. Line pressure test AT-51 4. Control valve assembly
AT-221 OFF vehicle
5. High clutch
AT-301 6. Forward clutch
AT-306Almost no shock or
slipping in changing
from D 3 to D 4 . ON vehicle 1. A/T fluid level
AT-17 2. Accelerator pedal position sensor
EC-412
(HR16DE), EC- 959 (MR Type 1)
or EC-1481 (MR
Type 2)
3. Line pressure test AT-51 4. Control valve assembly
AT-221 OFF vehicle 5. Brake band
AT-330Races extremely fast
or slips in changing
from D 4 to D 3 when
depressing accelera-
tor pedal. ON vehicle1. A/T fluid level
AT-17 2. Accelerator pedal position sensor
EC-412
(HR16DE), EC- 959 (MR Type 1)
or EC-1481 (MR
Type 2)
3. Line pressure test AT-51 4. Line pressure solenoid valve
AT-134 5. Shift solenoid valve A
AT-139 6. Control valve assembly
AT-221 OFF vehicle
7. Brake band
AT-330 8. Forward clutch
AT-306Races extremel y
ON hi l 2. Accelerator pedal position sensor
EC-412
(HR16DE), EC- 959 (MR Type 1)
or EC-1481 (MR
Type 2)
Items Symptom Condition Diagnostic item Reference page
Page 78 of 4331

AT
N
O P
Slips/Will Not Engage
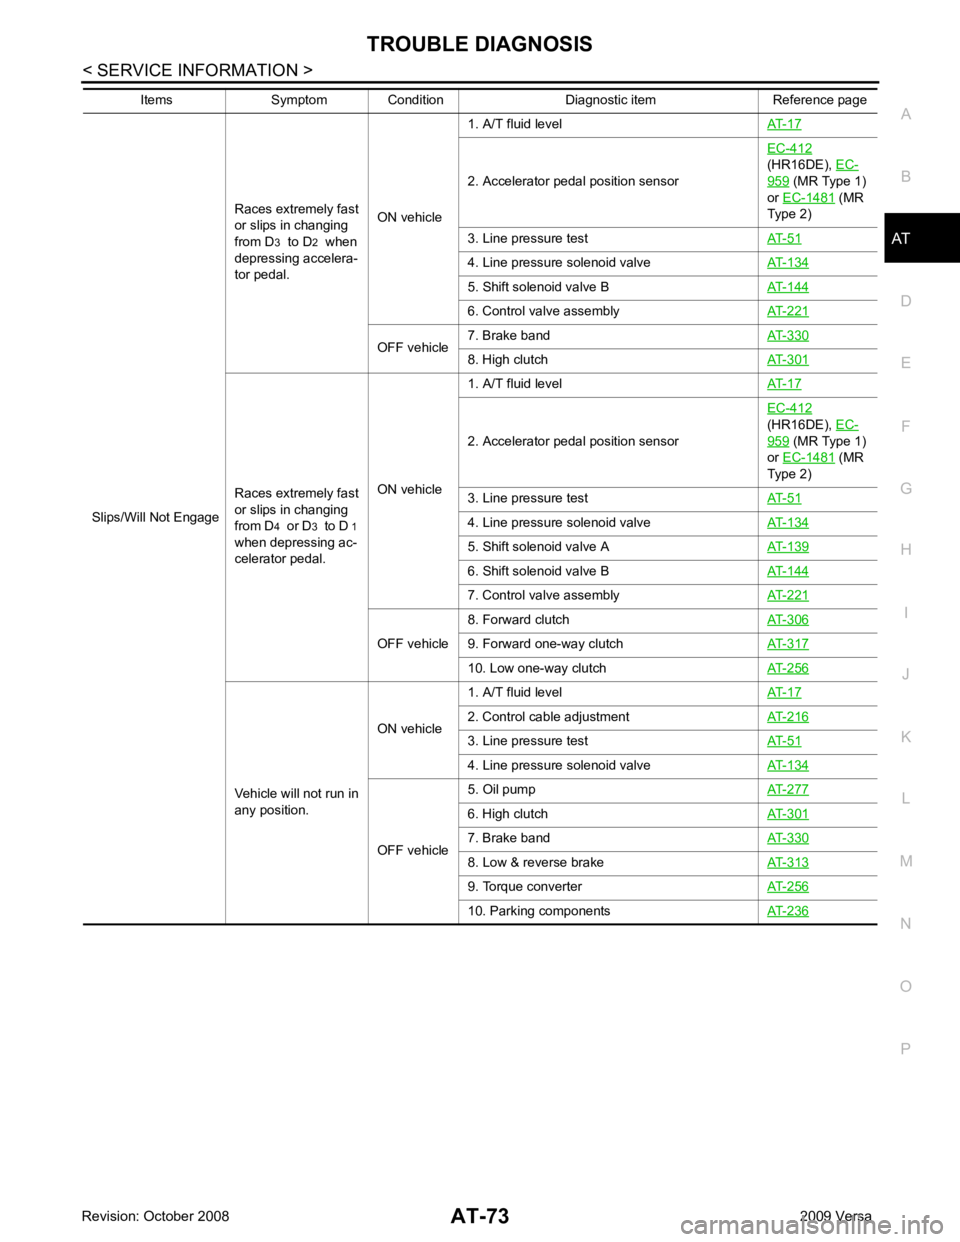
Races extremely fast
or slips in changing
from D 3 to D 2 when
depressing accelera-
tor pedal. ON vehicle1. A/T fluid level
AT-17 2. Accelerator pedal position sensor
EC-412
(HR16DE), EC- 959 (MR Type 1)
or EC-1481 (MR
Type 2)
3. Line pressure test AT-51 4. Line pressure solenoid valve
AT-134 5. Shift solenoid valve B
AT-144 6. Control valve assembly
AT-221 OFF vehicle
7. Brake band
AT-330 8. High clutch
AT-301Races extremely fast
or slips in changing
from D 4 or D 3 to D 1
when depressing ac-
celerator pedal. ON vehicle1. A/T fluid level
AT-17 2. Accelerator pedal position sensor
EC-412
(HR16DE), EC- 959 (MR Type 1)
or EC-1481 (MR
Type 2)
3. Line pressure test AT-51 4. Line pressure solenoid valve
AT-134 5. Shift solenoid valve A
AT-139 6. Shift solenoid valve B
AT-144 7. Control valve assembly
AT-221 OFF vehicle
8. Forward clutch
AT-306 9. Forward one-way clutch
AT-317 10. Low one-way clutch
AT-256Vehicle will not run in
any position. ON vehicle
1. A/T fluid level
AT-17 2. Control cable adjustment
AT-216 3. Line pressure test
AT-51 4. Line pressure solenoid valve
AT-134 OFF vehicle
5. Oil pump
AT-277 6. High clutch
AT-301 7. Brake band
AT-330 8. Low & reverse brake
AT-313 9. Torque converter
AT-256 10. Parking components
AT-236Items Symptom Condition Diagnostic item Reference page
Page 79 of 4331

ON vehicle
1. Ignition switch and starter
PG-3 ,
SC-9 2. Control cable adjustment
AT-216 3. PNP switch adjustment
AT-224Engine starts in posi-
tions other than “P”
and “N”. ON vehicle
1. Control cable adjustment
AT-216 2. PNP switch adjustment
AT-224Transaxle noise in“ P”
and “N” positions. ON vehicle1. A/T fluid level
AT-17 2. Line pressure test
AT-51 3. Accelerator pedal position sensor
EC-412
(HR16DE), EC- 959 (MR Type 1)
or EC-1481 (MR
Type 2)
4. Vehicle speed sensor·A/T (Revolution sensor)
and vehicle speed sensor·MTR AT-101 ,
AT-154 OFF vehicle
5. Oil pump
AT-277 6. Torque converter
AT-256Items Symptom Condition Diagnostic item Reference page
Page 81 of 4331

2. PNP switch adjustment
AT-224 3. Overdrive control switch
AT-172 4. Accelerator pedal position sensor
EC-412
(HR16DE), EC- 959 (MR Type 1)
or EC-1481 (MR
Type 2)
5. Vehicle speed sensor·A/T (Revolution sensor)
and vehicle speed sensor·MTR AT-101 ,
AT-154 6. Shift solenoid valve A
AT-139 7. Shift solenoid valve B
AT-144 8. Control valve assembly
AT-221 OFF vehicle
9. Reverse clutch
AT-296 10. High clutch
AT-301 11. Brake band
AT-330 12. Low & reverse brake
AT-313 13. Oil pump
AT-277 14. Torque converter
AT-256Transaxle noise in
“D”, “2”, “1” and “R”
positions. ON vehicle 1. A/T fluid level
AT-17OFF vehicle 2. Torque converter
AT-256Engine brake does
not operate in “1” po-
sition. ON vehicle1. PNP switch adjustment
AT-224 2. Control cable adjustment
AT-216 3. Vehicle speed sensor·A/T (Revolution sensor)
and vehicle speed sensor·MTR AT-101 ,
AT-154 4. Control valve assembly
AT-221 5. Overrun clutch solenoid valve
AT-149 OFF vehicle
6. Overrun clutch
AT-306 7. Low & reverse brake
AT-313Transaxle overheats.
ON vehicle1. A/T fluid level
AT-17 2. Engine idling speed
EC-30
(HR16DE), EC- 570 (MR Type 1)
or EC-1082 (MR
Type 2)
3. Accelerator pedal position sensor EC-412
(HR16DE), EC- 959 (MR Type 1)
or EC-1481 (MR
Type 2)
4. Line pressure test AT-51 5. Line pressure solenoid valve
AT-134 6. Control valve assembly
AT-221 OFF vehicle
7. Oil pump
AT-277 8. Reverse clutch
AT-296 9. High clutch
AT-301 10. Brake band
AT-330 11. Forward clutch
AT-306 12. Overrun clutch
AT-306Items Symptom Condition Diagnostic item Reference page
Page 194 of 4331

AT
N
O P
DIAGNOSTIC PROCEDURE Check at Idle " .
Is “ Vehicle Dose Not Creep Backward in “ R ” Position ” OK?
OK >> GO TO 2.
NG >> Go to AT-186, " Vehicle Does Not Creep Backward in "R" Position " .
CONSULT-III Functi
on (TRANSMISSION) " or
AT-83, " Diagnosis Pro-
cedure without CONSULT-III " .
Is any malfunction detected by self-diagnostic results? YES >> Check the malfuncti
oning system. Refer to AT-79, " CONSULT-III Functi
on (TRANSMISSION) " or
AT-83, " Diagnosis Procedure without CONSULT-III " .
NO >> GO TO 3. Description " (HR16DE),
EC-959, " Component
Description " (MR Type 1) or
EC-1481, " Component Description " (MR Type 2).
OK or NG OK >> GO TO 4.
NG >> Repair or replace accelerator pedal position sensor. Inspections Before Trou-
ble Diagnosis " .
OK or NG OK >> GO TO 6.
NG >> GO TO 5. Control Valve Assembly and Accumulators " .
2. Check the following items:
- Shift valve A
- Shift valve B
- Shift solenoid valve A
- Shift solenoid valve B
- Pilot valve
- Pilot filter
3. Disassemble A/T. Refer to AT-256, " Disassembly " .
4. Check the following items:
- Forward clutch assembly. Refer to AT-306, " Forward and Overrun Clutches " .
- Low one-way clutch. Refer to AT-256, " Disassembly " .
- Forward one-way clutch. Refer to AT-317, " Rear Internal Gear and Forward Clutch Hub " .
- High clutch assembly. Refer to AT-301, " High Clutch " .
- Torque converter. Refer to AT-256, " Disassembly " .
- Oil pump assembly. Refer to AT-277, " Oil Pump " .
OK or NG OK >> GO TO 8.
NG >> Repair or replace damaged parts. Component " .
2. Check A/T fluid condition. Refer to AT-51, " Inspections Before Trouble Diagnosis " .
OK or NG OK >> GO TO 7.
NG >> GO TO 5.
Page 197 of 4331

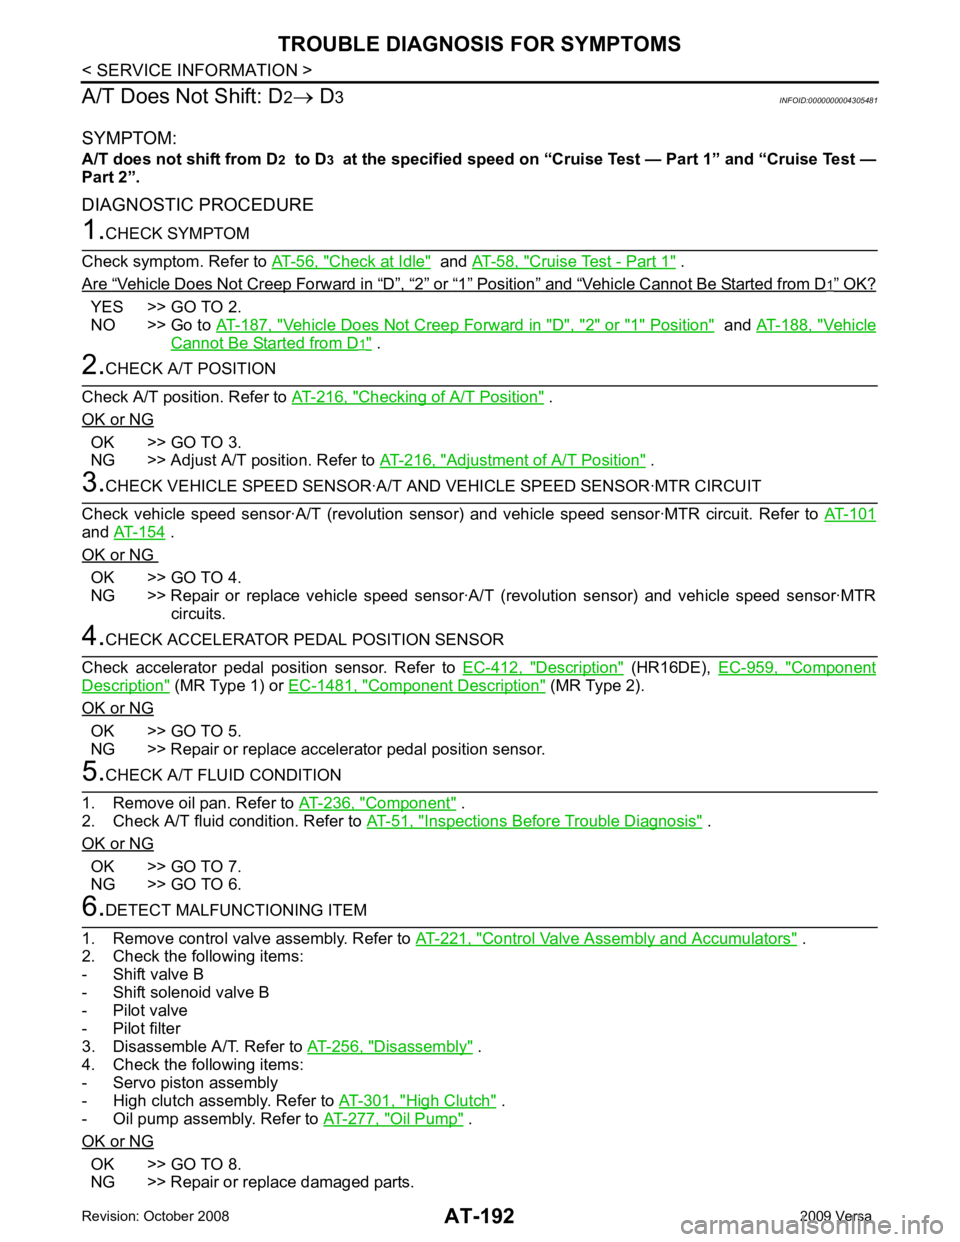
Check at Idle " and
AT-58, " Cruise Test - Part 1 " .
Are “ Vehicle Does Not Creep Forward in “ D ” , “ 2 ” or “ 1 ” Position ” and “ Vehicle Cannot Be Started from D OK?
YES >> GO TO 2.
NO >> Go to AT-187, " Vehicle Does Not Creep Forward in "D", "2" or "1" Position " and
AT-188, " Vehicle
Cannot Be Started from D .
Checking of A/T Position " .
OK or NG OK >> GO TO 3.
NG >> Adjust A/T position. Refer to AT-216, " Adjustment of A/T Position " .
and
AT-154 .
OK or NG OK >> GO TO 4.
NG >> Repair or replace vehicle speed sensor·A/T (revolution sensor) and vehicle speed sensor·MTR circuits. Description " (HR16DE),
EC-959, " Component
Description " (MR Type 1) or
EC-1481, " Component Description " (MR Type 2).
OK or NG OK >> GO TO 5.
NG >> Repair or replace accelerator pedal position sensor. Component " .
2. Check A/T fluid condition. Refer to AT-51, " Inspections Before Trouble Diagnosis " .
OK or NG OK >> GO TO 7.
NG >> GO TO 6. Control Valve Assembly and Accumulators " .
2. Check the following items:
- Shift valve B
- Shift solenoid valve B
- Pilot valve
- Pilot filter
3. Disassemble A/T. Refer to AT-256, " Disassembly " .
4. Check the following items:
- Servo piston assembly
- High clutch assembly. Refer to AT-301, " High Clutch " .
- Oil pump assembly. Refer to AT-277, " Oil Pump " .
OK or NG OK >> GO TO 8.
NG >> Repair or replace damaged parts.