Page 4068 of 4331
Rotation " .
5. Loosen steering outer socket (1) mounting nut.
6. Remove steering outer socket (1) from steering knuckle (2) so as not to damage ball joint boot (3) using the ball joint remover
(suitable tool).
CAUTION:
Temporarily tighten the nut to prevent damage to threads
and to prevent the ball joint remover (suitable tool) from
suddenly coming off.
7. Remove front suspension member. Refer to FSU-11, " Removal and Installation " .
8. Remove mounting bolts and nuts of steering gear assembly.
INSTALLATION
Installation is in the reverse order of removal.
• Clean mounting surface on the body side of lower dash seal when installing steering gear assembly.
• Check wheel alignment under unladen conditions with tires on level ground. Refer to FSU-7, " Wheel Align-
ment Inspection " .
1. Steering gear assembly 2. Washer 3. Lower dash seal
4. Heat insulator 5. Front suspension member
Refer to GI-7 for the symbols.
SGIA1298E
Page 4078 of 4331
—
RAX-5
RSU-5, "
NVH Troubleshooting Chart
"
WT-5, "
NVH Troubleshooting Chart
"
WT-5, "
NVH Troubleshooting Chart
"
BR-5, "
NVH Troubleshooting Chart
"
PS-5, "
NVH Troubleshooting Chart
" Possible cause and SUSPECTED PARTS
Improper installation, looseness
Parts interference
Wheel bearing damage
REAR SUSPENSION
TIRES
ROAD WHEEL
BRAKES
STEERING
Symptom REAR AXLE Noise
× × × × × × ×
Shake × × × × × × ×
Vibration × × × × ×
Shimmy × × × × × × ×
Shudder × × × × × ×
Poor quality ride or handling × × × × × ×
Page 4079 of 4331

WHEEL HUB
RAX-5
< SERVICE INFORMATION >
C
E F
G H
I
J
K L
M A
B RAX
N
O P
WHEEL HUB
On-Vehicle Inspection and Service INFOID:0000000004305854
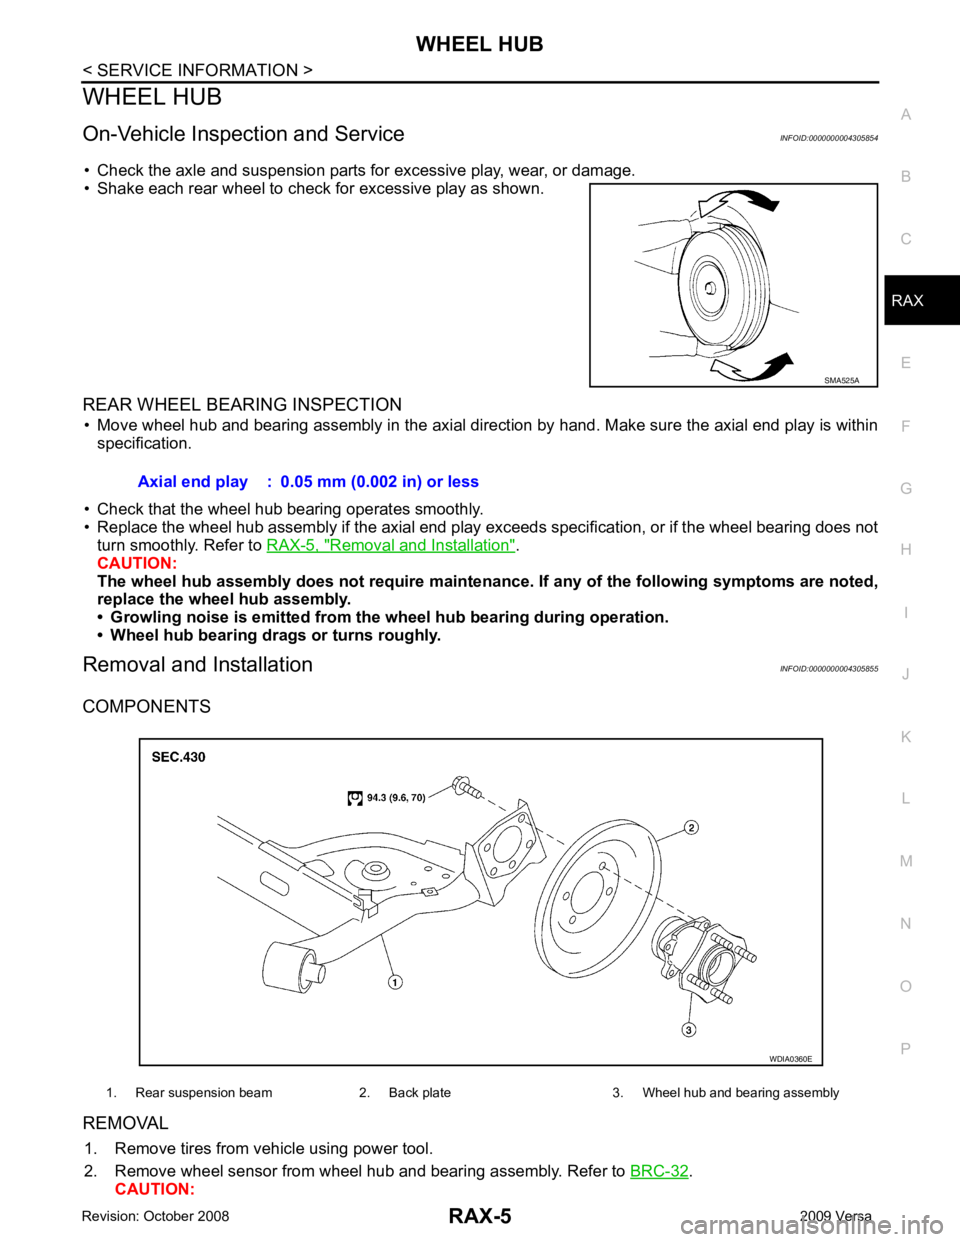
• Check the axle and suspension parts for excessive play, wear, or damage.
• Shake each rear wheel to check for excessive play as shown.
REAR WHEEL BEARING INSPECTION • Move wheel hub and bearing assembly in the axial direction by hand. Make sure the axial end play is within specification.
• Check that the wheel hub bearing operates smoothly.
• Replace the wheel hub assembly if the axial end play e xceeds specification, or if the wheel bearing does not
turn smoothly. Refer to RAX-5, " Removal and Installation " .
CAUTION:
The wheel hub assembly does not requ ire maintenance. If any of the following symptoms are noted,
replace the wheel hub assembly.
• Growling noise is emitted from th e wheel hub bearing during operation.
• Wheel hub bearing dr ags or turns roughly.
Removal and Installation INFOID:0000000004305855
COMPONENTS
REMOVAL 1. Remove tires from vehicle using power tool.
2. Remove wheel sensor from wheel hub and bearing assembly. Refer to BRC-32 .
CAUTION: SMA525A
Axial end play : 0.05 mm (0.002 in) or less
1. Rear suspension beam 2. Back plate 3. Wheel hub and bearing assembly WDIA0360E
Page 4112 of 4331

RSU
N
O P
CONTENTS
REAR SUSPENSION
SERVICE INFORMATION .. ..........................2
PRECAUTIONS .............................................. .....2
Precaution for Supplemental Restraint System
(SRS) "AIR BAG" and "SEAT BELT PRE-TEN-
SIONER" ............................................................. ......
2
Precaution Necessary fo r Steering Wheel Rota-
tion After Battery Disconnect ............................... ......
2
Precaution for Rear Su spension ......................... ......3
PREPARATION .............................................. .....4
Commercial Service Tool .................................... ......4
NOISE, VIBRATION AND HARSHNESS
(NVH) TROUBLESHOOTING ........................ .....5
NVH Troubleshooting Chart ................................ ......5 REAR SUSPENSION
ASSEMBLY .................... 6
On-Vehicle Inspection and Service ..................... .....6
Wheel AlignmentInspection ................................. .....6
Component .......................................................... .....8
SHOCK ABSORBER ......................................... 9
Removal and Installation ..................................... .....9
COIL SPRING ................................................... 11
Removal and Installation ..................................... ....11
REAR SUSPENSION BEAM ............................ 12
Removal and Installation ..................................... ....12
SERVICE DATA AND SPECIFICATIONS
(SDS) ................................................................. 13
Wheel Alignment (Unladen*) ............................... ....13
Wheelarch Height (Unladen*) .............................. ....13
Page 4114 of 4331
RSU
N
O P
5. When the repair work is completed, return the ignition switch to the
″LOCK ″ position before connecting
the battery cables. (At this time, the steering lock mechanism will engage.)
6. Perform a self-diagnosis check of al l control units using CONSULT-III.
Precaution for Rear Suspension INFOID:0000000004305875
• When installing the rubber bushings, the final tightening must be done under unladen condition and with the tires on level ground. Oil will shorten the life of the rubber bushings, so wipe off any spilled oil immediately.
• Unladen condition means the fuel tank, engine coolant and l ubricants are at the full specification. The spare
tire, jack, hand tools, and mats are in their designated positions.
• After installing suspension components, check the wheel alignment.
• Caulking nuts are not reusable. Always use new caulking nuts for installation. New caulking nuts are pre-
oiled, do not apply any additional lubrication.
Page 4116 of 4331
RSU
N
O P
NOISE, VIBRATION AND HARSHN
ESS (NVH) TROUBLESHOOTING
NVH Troubleshooting Chart INFOID:0000000004305877
Use chart below to help you find the cause of the symptom. If necessary, repair or replace these parts.
× : ApplicableReference pageRSU-8RSU-9RSU-9RSU-9RSU-11RSU-8RSU-6
RSU-5, "
NVH Troubleshooting Chart
"
WT-5, "
NVH Troubleshooting Chart
"
WT-5, "
NVH Troubleshooting Chart
"
BR-5, "
NVH Troubleshooting Chart
"
PS-5, "
NVH Troubleshooting Chart
" Possible cause and SUSPECTED PARTS
Improper installation, looseness
Shock absorber deformation, damage or deflection
Bushing or mounting deterioration
Parts interference
Spring fatigue
Suspension looseness
Incorrect wheel alignment
REAR AXLE
TIRES
ROAD WHEEL
BRAKES
STEERING
Symptom Noise
× × × × × × × × × × ×
Shake × × × × × × × × × ×
Vibration × × × × × × × ×
Shimmy × × × × × × × × × ×
Shudder × × × × × × × ×
Poor quality ride or handling × × × × × × × × ×
Page 4117 of 4331

.
3. Wheel bearing axial end play. Refer to RAX-5, " On-Vehicle Inspection and Service " .
4. Shock absorber operation.
5. Each mounting part of suspension for looseness and deformation.
6. Rear suspension beam for cracks, deformation, and other damage.
7. Vehicle height (posture).
GENERAL INFORMATION AND RECOMMENDATIONS
1. A Four-Wheel Thrust Alignment should be performed. • This type of alignment is recommended for any NISSAN vehicle.
• The four-wheel “thrust” process helps ensure that the vehicle is properly aligned and the steering wheel
is centered.
• The alignment machine itself should be ca pable of accepting any NISSAN vehicle.
• The alignment machine should be checked to ensure that it is level.
2. Make sure the alignment machine is properly calibrated. • Your alignment machine should be regularly calibrated in order to give correct information.
• Check with the manufacturer of your specific al ignment machine for their recommended Service/Cali-
bration Schedule.
THE ALIGNMENT PROCESS
IMPORTANT: Use only the alignment specifications listed in this Service Manual. Refer to RSU-13, " Wheel
Alignment (Unladen*) " .
1. When displaying the alignment settings, many alignm ent machines use “indicators”: (Green/red, plus or
minus, Go/No Go). Do NOT use these indicators.
• The alignment specifications programmed into your alignment machine that operate these indicators
may not be correct.
• This may result in an ERROR.
2. Some newer alignment machines are equipped with an optional “Rolling Compensation” method to “com- pensate” the sensors (alignment targets or head units). Do NOT use this “Rolling Compensation”
method.
• Use the “Jacking Compensation” method. After inst alling the alignment targets or head units, raise the
vehicle and rotate the wheels 1/2 turn both ways.
• See Instructions in the alignment machine you are using for more information.
CAMBER INSPECTION
Page 4118 of 4331

RSU
N
O P
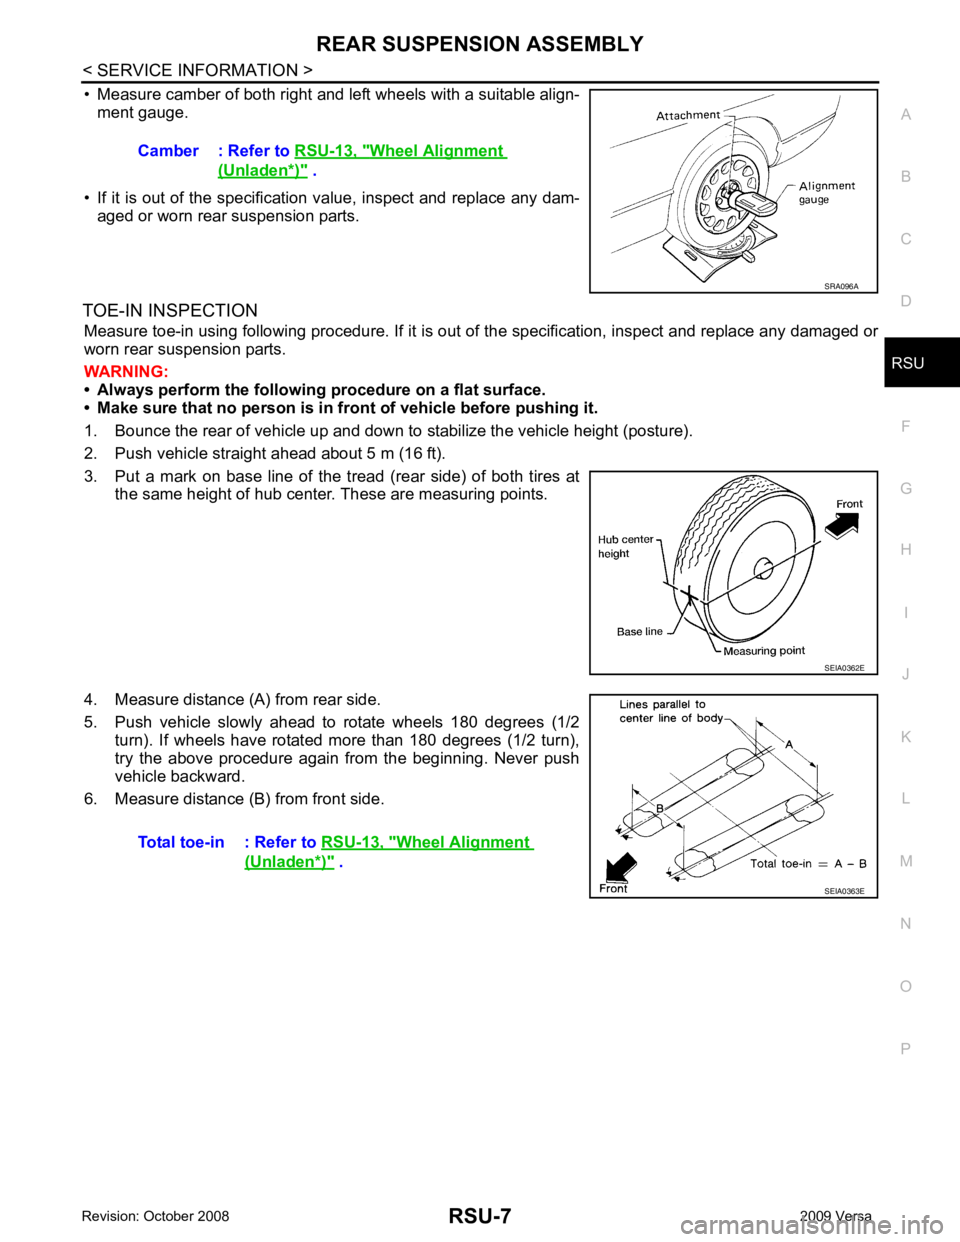
• Measure camber of both right and left wheels with a suitable align-
ment gauge.
• If it is out of the specificati on value, inspect and replace any dam-
aged or worn rear suspension parts.
TOE-IN INSPECTION Measure toe-in using following procedure. If it is out of the specification, inspect and replace any damaged or
worn rear suspension parts.
WARNING:
• Always perform the following procedure on a flat surface.
• Make sure that no person is in fron t of vehicle before pushing it.
1. Bounce the rear of vehicle up and down to stabilize the vehicle height (posture).
2. Push vehicle straight ahead about 5 m (16 ft).
3. Put a mark on base line of the tread (rear side) of both tires at the same height of hub center. These are measuring points.
4. Measure distance (A) from rear side.
5. Push vehicle slowly ahead to rotate wheels 180 degrees (1/2 turn). If wheels have rotated more than 180 degrees (1/2 turn),
try the above procedure again from the beginning. Never push
vehicle backward.
6. Measure distance (B) from front side. Camber : Refer to
RSU-13, " Wheel Alignment
(Unladen*) " .
SEIA0362E
Wheel Alignment
(Unladen*) " .