2009 MERCEDES-BENZ GL SUV ignition
[x] Cancel search: ignitionPage 150 of 309
Convenience opening/closing
G
Risk of injury
Make sure that nobody can become trapped
between the side window and the door frame
as the side windows are opened and closed.
Do not place objects or lean against the side
windows when they are being opened or
closed. You or the objects could be drawn in
or become trapped between the side window
and the door frame as the window moves. If
there is a risk of entrapment, press the
d button again. Press the button for stop-
ping, opening or closing the side windows in
the opposite direction as appropriate.
Make sure that nobody can become trapped
when you are opening or closing the sliding/
tilting sunroof*. If there is a risk of entrap-
ment, press the dbutton again. Press the
button to stop, open or close the panorama
sliding/tilting sunroof* in the opposite direc-
tion as appropriate.
X Convenience closing: press and hold
the d button until the side windows and
the sliding/tilting sunroof* are closed.
The indicator lamp in the dbutton lights
up. Air-recirculation mode is activated.
X Convenience opening: press and hold the
d button until the side windows and the
sliding/tilting sunroof* have reached their
original position.
The indicator lamp in the dbutton goes
out. Air-recirculation mode is deactivated.
i If you open the side windows or the slid-
ing/tilting sunroof* manually after closing
with the convenience closing feature, they
will remain in this position when opened
using the convenience opening feature. Switching the residual heat on/off
It is possible to make use of the residual heat
of the engine to continue heating the station-
ary vehicle for up to 30 minutes after the engine has been switched off. The heating
time depends on the temperature that has
been set.
i
The blower will run at a low speed regard-
less of the airflow setting.
i If you activate the "residual heat" function
at high temperatures, only the ventilation
will be activated. The blower runs at
medium speed.
X Turn the key to position 0in the ignition
lock or remove it.
X To activate: press theÁbutton.
The indicator lamp in the Ábutton
comes on.
X To switch off: press theÁbutton.
The indicator lamp in the Ábutton goes
out.
i The residual heat automatically switches
off after around 30 minutes or if:
R the ignition is switched on
R the battery voltage drops Auxiliary heating/ventilation*
Notes on the auxiliary heating/ventila-
tion system G
Risk of poisoning
Exhaust fumes are produced when the auxili-
ary heating is in operation. Inhaling these
exhaust fumes can be poisonous. You should
therefore switch off the auxiliary heating in
confined spaces without an extraction sys-
tem, e.g. a garage. G
Risk of fire
When operating the auxiliary heating, parts of
the vehicle may become very hot, and highly
inflammable material such as fuels could be
ignited. Operating the auxiliary heating is thus
prohibited at filling stations or when your vehi-
cle is being refuelled. You must therefore Air conditioning
147Controls
* optional
X164_AKB; 2; 3, en-GB
wobuchh,
Version: 2.11.8.1 2009-03-31T14:14:58+02:00 - Seite 147 Z
Dateiname: 6515431202_buchblock.pdf; erzeugt am 01. Apr 2009 00:17:31; WK
Page 151 of 309
switch off the auxiliary heating at filling sta-
tions.
i Switch the auxiliary heating on regularly
once a month for about ten minutes.
The auxiliary heating heats the air in the vehi-
cle interior to the set temperature without
using the heat of the running engine. The aux-
iliary heating is operated using the vehicle's
fuel. For this reason, the tank content must
be at least at reserve fuel level to ensure that
the auxiliary heating functions.
The auxiliary heating/ventilation automati-
cally adjusts to changes in temperature and
weather conditions. For this reason, the aux-
iliary heating could switch from ventilation
mode to heating mode or from heating mode
to ventilation mode.
You cannot use the auxiliary ventilation to
cool the vehicle interior to a temperature
lower than the outside temperature.
Before activating X
Turn the key to position 2in the ignition
lock.
X Set the temperature.
The auxiliary heating/ventilation can be acti-
vated even when the air conditioning is being
controlled manually. Optimum comfort can
be attained when the system is set to auto-
matic mode. Set the temperature to 22 †.
The auxiliary heating/ventilation can be acti-
vated or deactivated using the remote control
or the button on the centre console.
The on-board computer can be used to spec-
ify up to three departure times, one of which
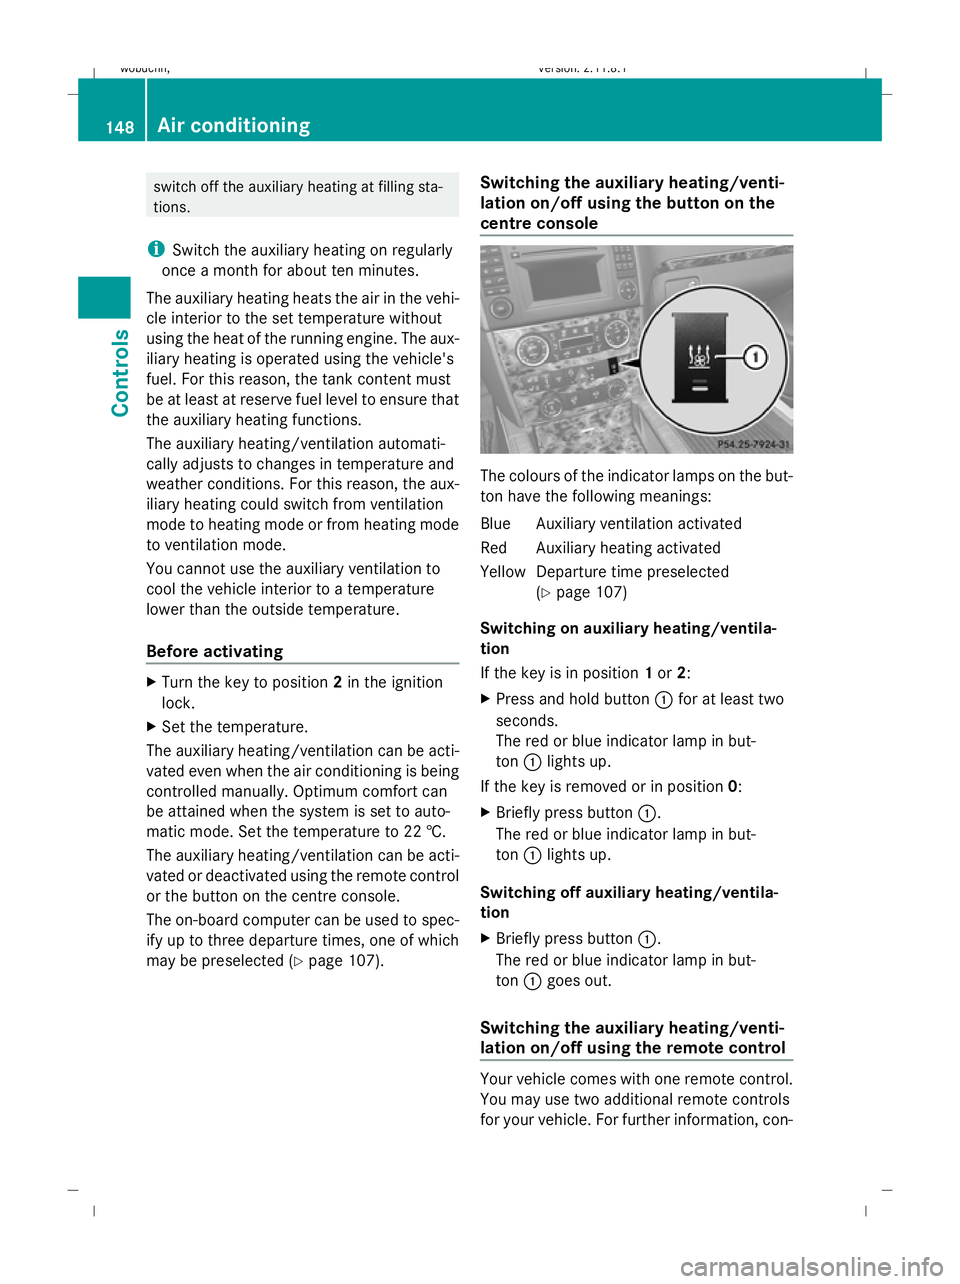
may be preselected (Y page 107). Switching the auxiliary heating/venti-
lation on/off using the button on the
centre console The colours of the indicator lamps on the but-
ton have the following meanings:
Blue Auxiliary ventilation activated
Red Auxiliary heating activated
YellowD eparture time preselected
(Y page 107)
Switching on auxiliary heating/ventila-
tion
If the key is in position 1or 2:
X Press and hold button :for at least two
seconds.
The red or blue indicator lamp in but-
ton :lights up.
If the key is removed or in position 0:
X Briefly press button :.
The red or blue indicator lamp in but-
ton :lights up.
Switching off auxiliary heating/ventila-
tion
X Briefly press button :.
The red or blue indicator lamp in but-
ton :goes out.
Switching the auxiliary heating/venti-
lation on/off using the remote control Your vehicle comes with one remote control.
You may use two additional remote controls
for your vehicle. For further information, con-148
Air conditioningControls
X164_AKB; 2; 3, en-GB
wobuchh,
Version: 2.11.8.1 2009-03-31T14:14:58+02:00 - Seite 148
Dateiname: 6515431202_buchblock.pdf; erzeugt am 01. Apr 2009 00:17:32; WK
Page 153 of 309
G
Risk of injury
Children could injure themselves if they oper-
ate the sliding sunroof.
Never leave children unsupervised in the vehi-
cle. Always take the key with you when leaving
the vehicle, even if you are only leaving it for
a short time. G
Risk of injury
The glass in the panorama sunroof could
break in an accident. If you are not wearing a
seat belt, there is a risk that you could be
thrown through the opening in the event of the
vehicle overturning. Therefore, always wear a
seat belt to reduce the risk of injuries.
! Only open the panorama sliding sunroof
if it is free of snow and ice. Otherwise, mal-
functions may occur.
Do not allow anything to protrude from the
sliding sunroof. The seals could otherwise
be damaged.
i When the sliding sunroof is open, apart
from the normal airflow noises resonance
noises may also occur. They are caused by
minor pressure fluctuations in the vehicle
interior. Change the position of the sliding
sunroof or open a side window slightly to
reduce or eliminate these noises.
i Related topics:
R convenience opening from the out-
side (Y page 87) or from the inside
(Y page 147)
R convenience closing from the out-
side (Y page 87) or from the inside
(Y page 147)
R automatic closing of the sliding sunroof
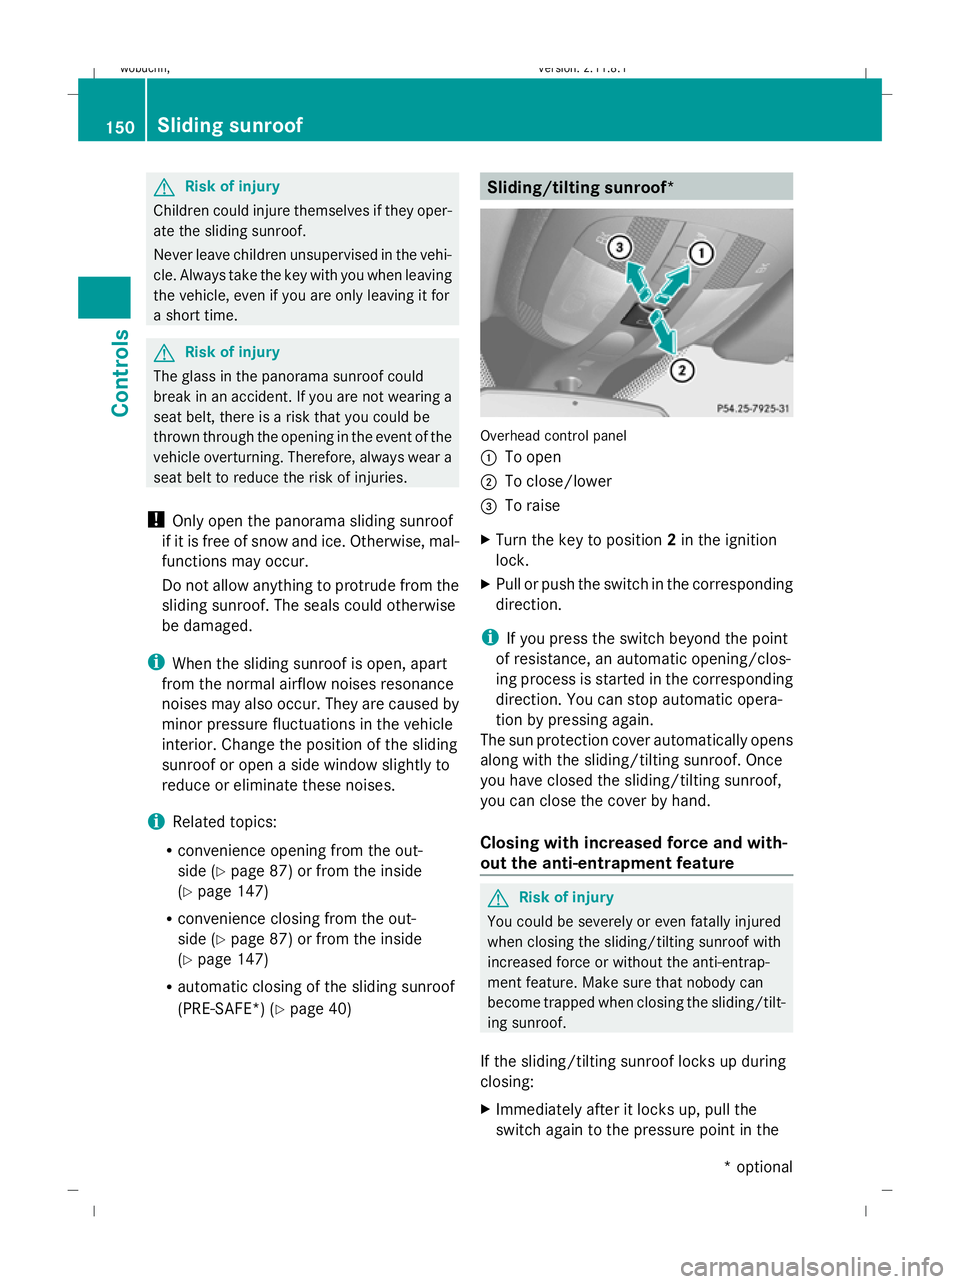
(PRE-SAFE*) (Y page 40) Sliding/tilting sunroof*
Overhead control panel
:
To open
; To close/lower
= To raise
X Turn the key to position 2in the ignition
lock.
X Pull or push the switch in the corresponding
direction.
i If you press the switch beyond the point
of resistance, an automatic opening/clos-
ing process is started in the corresponding
direction. You can stop automatic opera-
tion by pressing again.
The sun protection cover automatically opens
along with the sliding/tilting sunroof. Once
you have closed the sliding/tilting sunroof,
you can close the cover by hand.
Closing with increased force and with-
out the anti-entrapment feature G
Risk of injury
You could be severely or even fatally injured
when closing the sliding/tilting sunroof with
increased force or without the anti-entrap-
ment feature. Make sure that nobody can
become trapped when closing the sliding/tilt-
ing sunroof.
If the sliding/tilting sunroof locks up during
closing:
X Immediately after it locks up, pull the
switch again to the pressure point in the 150
Sliding sunroofControls
* optional
X164_AKB; 2; 3, en-GB
wobuchh,
Version: 2.11.8.1 2009-03-31T14:14:58+02:00 - Seite 150
Dateiname: 6515431202_buchblock.pdf; erzeugt am 01. Apr 2009 00:17:32; WK
Page 154 of 309
direction of arrow
;until the sliding/tilt-
ing sunroof is closed.
The sliding/tilting sunroof is closed with
more force.
If the sliding/tilting sunroof locks up during
closing again:
X Immediately after it locks up, pull the
switch again to the pressure point in the
direction of arrow ;until the sliding/tilt-
ing sunroof is closed.
The sliding/tilting sunroof is closed without
the anti-entrapment feature.
Rain closing feature* The sliding/tilting sunroof closes automati-
cally:
R
if it starts to rain
R after 12 hours
The rear of the sliding/tilting sunroof is then
raised in order to ventilate the interior of the
vehicle.
i The sliding/tilting sunroof is opened
slightly again if it is obstructed while being
closed by the rain closing feature. The rain
closing feature is then deactivated.
The sliding/tilting sunroof does not close if:
R it is raised at the rear
R it is blocked
R no rain is falling on the area of the wind-
screen being monitored by the rain sensor
(e.g. because the vehicle is under a bridge
or in a carport)
Resetting Reset the sliding/tilting sunroof if it does not
open smoothly, or if the battery has been dis-
connected or has become discharged.
X
Switch the ignition off and then on again.
X The sliding/tilting sunroof is raised fully at
the rear. X
Keep the switch pressed for an additional
second.
X Make sure that the sliding/tilting sunroof
can be opened or closed fully again
(Y page 150).
X If this is not the case, consult a qualified
specialist workshop. Loading and stowing
Loading guidelines
G
Risk of injury
Secure and position the load as described in
the loading guidelines.
Otherwise, vehicle occupants could
be injured by the load being thrown around in
the event of sharp braking, a sudden change
in direction or an accident.
You will find further information in the "Secur-
ing a load" section.
Even if you follow all the loading guidelines,
the load will increase the risk of injury in the
event of an accident. G
Risk of poisoning
Keep the tailgate closed when the engine is
running. Otherwise, you could be poisoned by
exhaust fumes entering the vehicle.
The handling characteristics of a laden vehi-
cle are dependent on the distribution of the
load within the vehicle. For this reason, you
should observe the following notes when
transporting a load:
R never exceed the maximum permissible
gross vehicle weight or the permissible axle
loads for the vehicle (including occupants).
R position heavy loads as far forwards and as
low down in the luggage compartment as
possible.
R the load must not protrude above the upper
edge of the seat backrests.
R always place the load against the rear or
front seat backrests. Make sure that the Loading and stowing
151Controls
* optional
X164_AKB; 2; 3, en-GB
wobuchh,
Version: 2.11.8.1 2009-03-31T14:14:58+02:00 - Seite 151 Z
Dateiname: 6515431202_buchblock.pdf; erzeugt am 01. Apr 2009 00:17:32; WK
Page 166 of 309
X
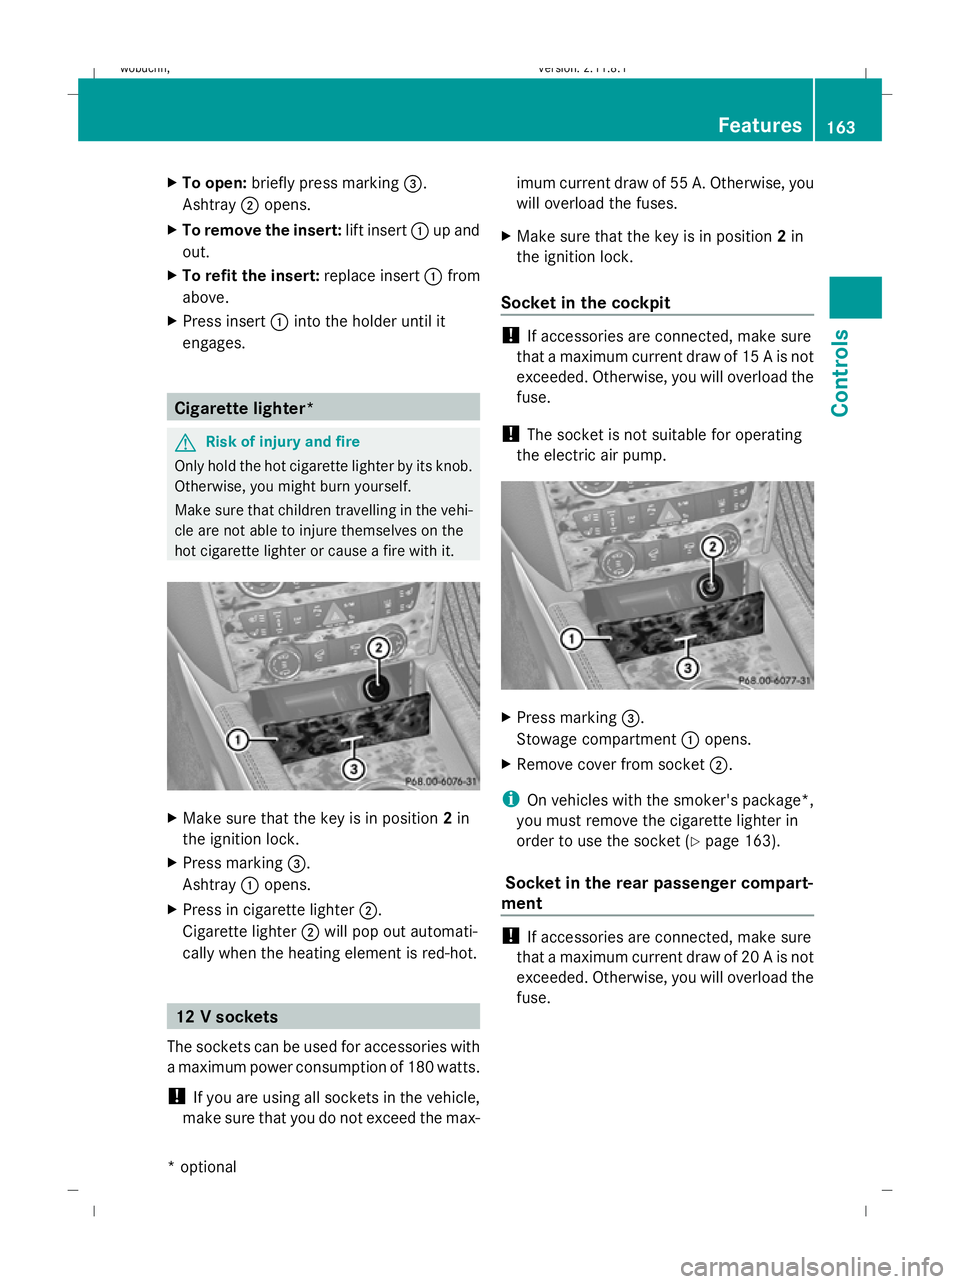
To open: briefly press marking =.
Ashtray ;opens.
X To remove the insert: lift insert:up and
out.
X To refit the insert: replace insert:from
above.
X Press insert :into the holder until it
engages. Cigarette lighter*
G
Risk of injury and fire
Only hold the hot cigarette lighter by its knob.
Otherwise, you might burn yourself.
Make sure that children travelling in the vehi-
cle are not able to injure themselves on the
hot cigarette lighter or cause a fire with it. X
Make sure that the key is in position 2in
the ignition lock.
X Press marking =.
Ashtray :opens.
X Press in cigarette lighter ;.
Cigarette lighter ;will pop out automati-
cally when the heating element is red-hot. 12 V sockets
The sockets can be used for accessories with
a maximum power consumption of 180 watts.
! If you are using all sockets in the vehicle,
make sure that you do not exceed the max- imum current draw of 55 A. Otherwise, you
will overload the fuses.
X Make sure that the key is in position 2in
the ignition lock.
Socket in the cockpit !
If accessories are connected, make sure
that a maximum current draw of 15 A is not
exceeded. Otherwise, you will overload the
fuse.
! The socket is not suitable for operating
the electric air pump. X
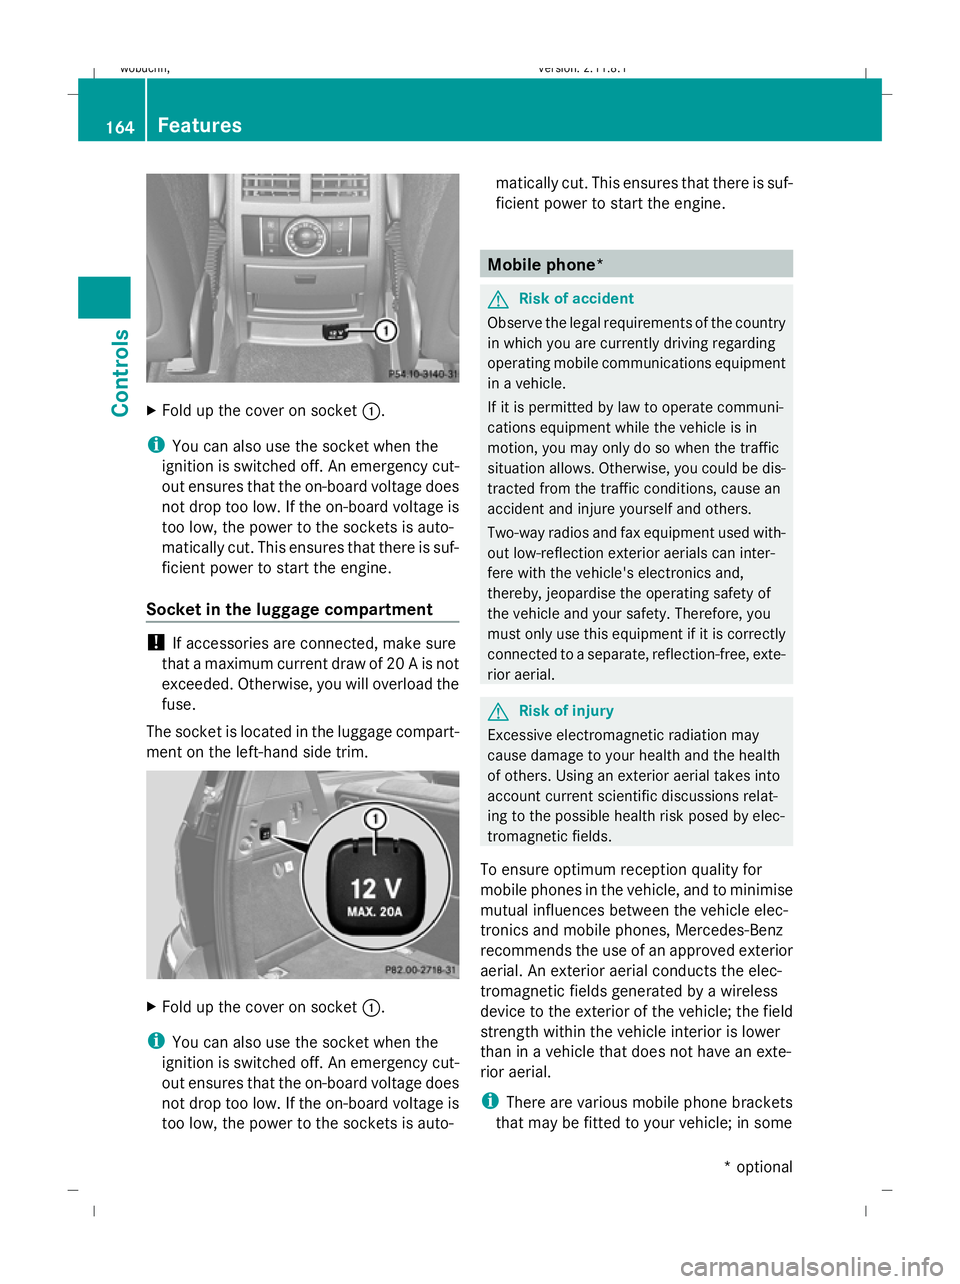
Press marking =.
Stowage compartment :opens.
X Remove cover from socket ;.
i On vehicles with the smoker's package*,
you must remove the cigarette lighter in
order to use the socket ( Ypage 163).
Socket in the rear passenger compart-
ment !
If accessories are connected, make sure
that a maximum current draw of 20 A is not
exceeded. Otherwise, you will overload the
fuse. Features
163Controls
* optional
X164_AKB; 2; 3, en-GB
wobuchh
,V ersion: 2.11.8.1
2009-03-31T14:14:58+02:00 - Seite 163 Z
Dateiname: 6515431202_buchblock.pdf; erzeugt am 01. Apr 2009 00:17:42; WK
Page 167 of 309
X
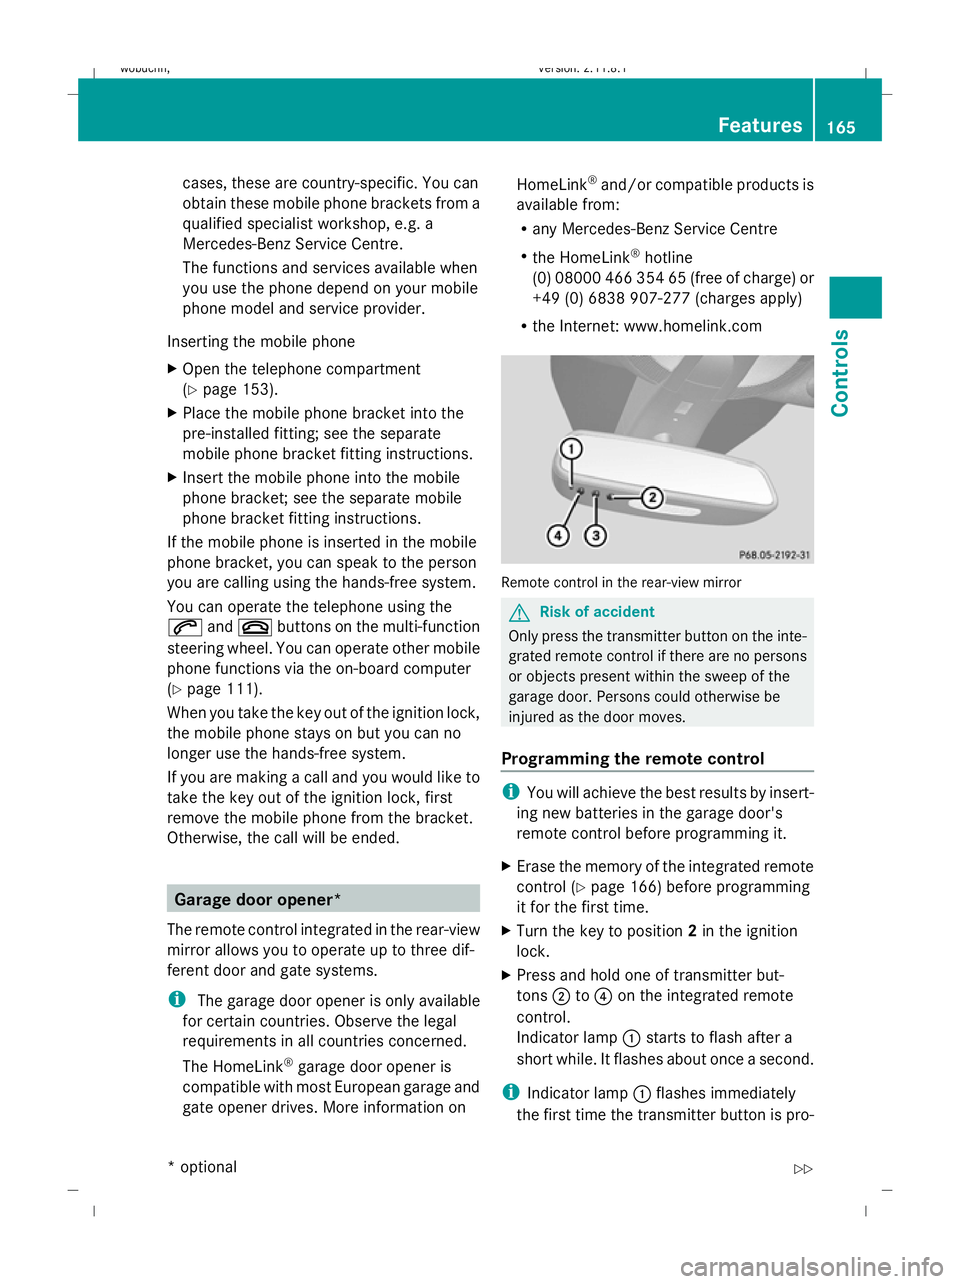
Fold up the cover on socket :.
i You can also use the socket when the
ignition is switched off. An emergency cut-
out ensures that the on-board voltage does
not drop too low. If the on-board voltage is
too low, the power to the sockets is auto-
matically cut. This ensures that there is suf-
ficient power to start the engine.
Socket in the luggage compartment !
If accessories are connected, make sure
that a maximum current draw of 20 A is not
exceeded. Otherwise, you will overload the
fuse.
The socket is located in the luggage compart-
ment on the left-hand side trim. X
Fold up the cover on socket :.
i You can also use the socket when the
ignition is switched off. An emergency cut-
out ensures that the on-board voltage does
not drop too low. If the on-board voltage is
too low, the power to the sockets is auto- matically cut. This ensures that there is suf-
ficient power to start the engine. Mobile phone*
G
Risk of accident
Observe the legal requirements of the country
in which you are currently driving regarding
operating mobile communications equipment
in a vehicle.
If it is permitted by law to operate communi-
cations equipment while the vehicle is in
motion, you may only do so when the traffic
situation allows. Otherwise, you could be dis-
tracted from the traffic conditions, cause an
accident and injure yourself and others.
Two-way radios and fax equipment used with-
out low-reflection exterior aerials can inter-
fere with the vehicle's electronics and,
thereby, jeopardise the operating safety of
the vehicle and your safety. Therefore, you
must only use this equipment if it is correctly
connected to a separate, reflection-free, exte-
rior aerial. G
Risk of injury
Excessive electromagnetic radiation may
cause damage to your health and the health
of others. Using an exterior aerial takes into
account current scientific discussions relat-
ing to the possible health risk posed by elec-
tromagnetic fields.
To ensure optimum reception quality for
mobile phones in the vehicle, and to minimise
mutual influences between the vehicle elec-
tronics and mobile phones, Mercedes-Benz
recommends the use of an approved exterior
aerial. An exterior aerial conducts the elec-
tromagnetic fields generated by a wireless
device to the exterior of the vehicle; the field
strength within the vehicle interior is lower
than in a vehicle that does not have an exte-
rior aerial.
i There are various mobile phone brackets
that may be fitted to your vehicle; in some 164
FeaturesControls
* optional
X164_AKB; 2; 3, en-GB
wobuchh
,V ersion: 2.11.8.1
2009-03-31T14:14:58+02:00 - Seite 164
Dateiname: 6515431202_buchblock.pdf; erzeugt am 01. Apr 2009 00:17:42; WK
Page 168 of 309
cases, these are country-specific. You can
obtain these mobile phone brackets from a
qualified specialist workshop, e.g. a
Mercedes-Benz Service Centre.
The functions and services available when
you use the phone depend on your mobile
phone model and service provider.
Inserting the mobile phone
X Open the telephone compartment
(Y page 153).
X Place the mobile phone bracket into the
pre-installed fitting; see the separate
mobile phone bracket fitting instructions.
X Insert the mobile phone into the mobile
phone bracket; see the separate mobile
phone bracket fitting instructions.
If the mobile phone is inserted in the mobile
phone bracket, you can speak to the person
you are calling using the hands-free system.
You can operate the telephone using the
6 and~ buttons on the multi-function
steering wheel. You can operate other mobile
phone functions via the on-board computer
(Y page 111).
When you take the key out of the ignition lock,
the mobile phone stays on but you can no
longer use the hands-free system.
If you are making a call and you would like to
take the key out of the ignition lock, first
remove the mobile phone from the bracket.
Otherwise, the call will be ended. Garage door opener*
The remote control integrated in the rear-view
mirror allows you to operate up to three dif-
ferent door and gate systems.
i The garage door opener is only available
for certain countries. Observe the legal
requirements in all countries concerned.
The HomeLink ®
garage door opener is
compatible with most European garage and
gate opener drives. More information on HomeLink
®
and/or compatible products is
available from:
R any Mercedes-Benz Service Centre
R the HomeLink ®
hotline
(0) 08000 466 354 65 (free of charge) or
+49 (0) 6838 907-277 (charges apply)
R the Internet: www.homelink.com Remote control in the rear-view mirror
G
Risk of accident
Only press the transmitter button on the inte-
grated remote control if there are no persons
or objects present within the sweep of the
garage door. Persons could otherwise be
injured as the door moves.
Programming the remote control i
You will achieve the best results by insert-
ing new batteries in the garage door's
remote control before programming it.
X Erase the memory of the integrated remote
control ( Ypage 166) before programming
it for the first time.
X Turn the key to position 2in the ignition
lock.
X Press and hold one of transmitter but-
tons ;to? on the integrated remote
control.
Indicator lamp :starts to flash after a
short while. It flashes about once a second.
i Indicator lamp :flashes immediately
the first time the transmitter button is pro- Features
165Controls
* optional
X164_AKB; 2; 3, en-GB
wobuchh,
Version: 2.11.8.1 2009-03-31T14:14:58+02:00 - Seite 165 Z
Dateiname: 6515431202_buchblock.pdf; erzeugt am 01. Apr 2009 00:17:43; WK
Page 169 of 309
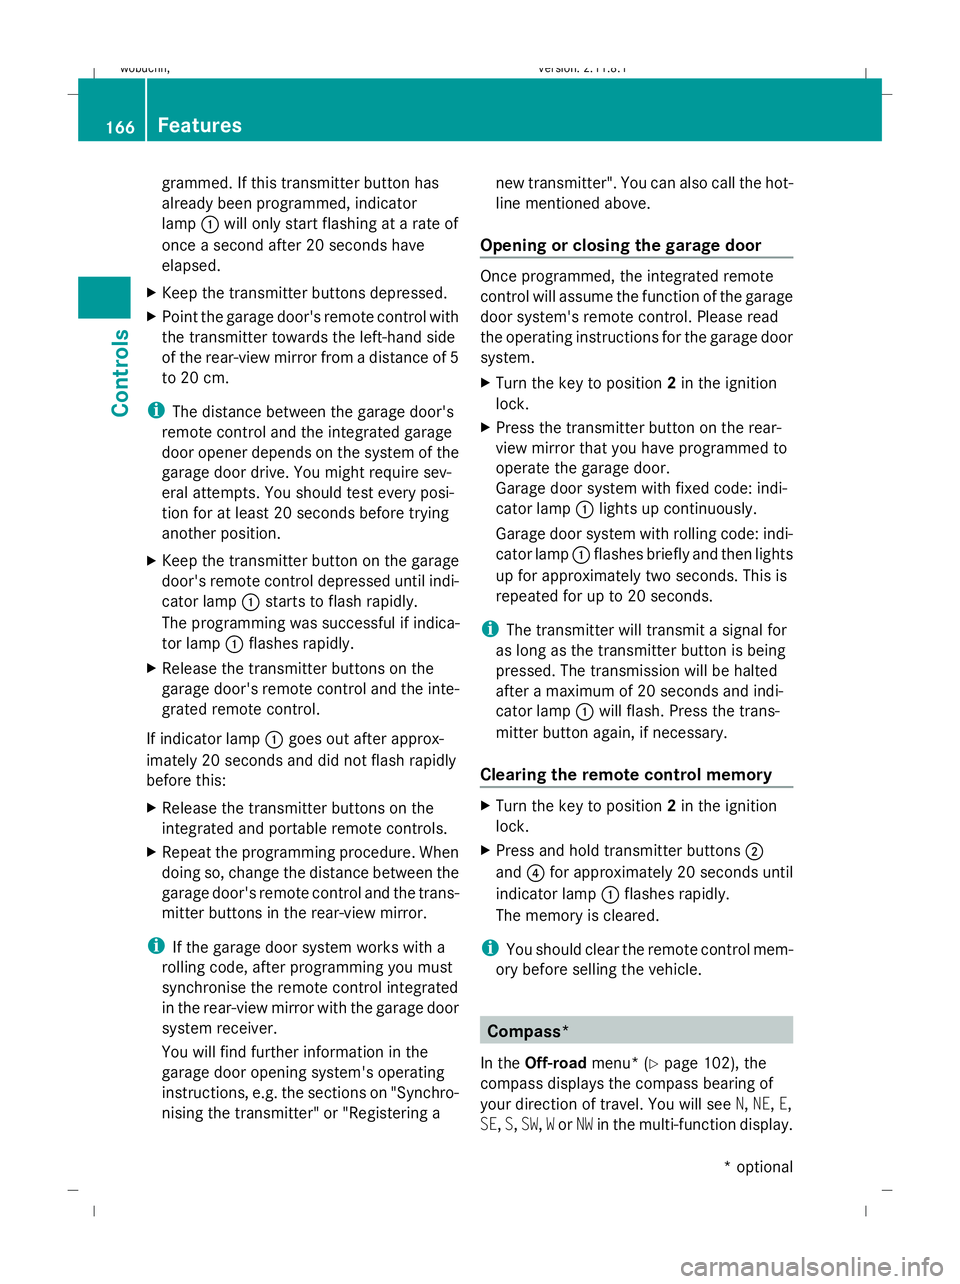
grammed. If this transmitter button has
already been programmed, indicator
lamp
:will only start flashing at a rate of
once a second after 20 seconds have
elapsed.
X Keep the transmitter buttons depressed.
X Point the garage door's remote control with
the transmitter towards the left-hand side
of the rear-view mirror from a distance of 5
to 20 cm.
i The distance between the garage door's
remote control and the integrated garage
door opener depends on the system of the
garage door drive. You might require sev-
eral attempts. You should test every posi-
tion for at least 20 seconds before trying
another position.
X Keep the transmitter button on the garage
door's remote control depressed until indi-
cator lamp :starts to flash rapidly.
The programming was successful if indica-
tor lamp :flashes rapidly.
X Release the transmitter buttons on the
garage door's remote control and the inte-
grated remote control.
If indicator lamp :goes out after approx-
imately 20 seconds and did not flash rapidly
before this:
X Release the transmitter buttons on the
integrated and portable remote controls.
X Repeat the programming procedure. When
doing so, change the distance between the
garage door's remote control and the trans-
mitter buttons in the rear-view mirror.
i If the garage door system works with a
rolling code, after programming you must
synchronise the remote control integrated
in the rear-view mirror with the garage door
system receiver.
You will find further information in the
garage door opening system's operating
instructions, e.g. the sections on "Synchro-
nising the transmitter" or "Registering a new transmitter". You can also call the hot-
line mentioned above.
Opening or closing the garage door Once programmed, the integrated remote
control will assume the function of the garage
door system's remote control. Please read
the operating instructions for the garage door
system.
X
Turn the key to position 2in the ignition
lock.
X Press the transmitter button on the rear-
view mirror that you have programmed to
operate the garage door.
Garage door system with fixed code: indi-
cator lamp :lights up continuously.
Garage door system with rolling code: indi-
cator lamp :flashes briefly and then lights
up for approximately two seconds. This is
repeated for up to 20 seconds.
i The transmitter will transmit a signal for
as long as the transmitter button is being
pressed. The transmission will be halted
after a maximum of 20 seconds and indi-
cator lamp :will flash. Press the trans-
mitter button again, if necessary.
Clearing the remote control memory X
Turn the key to position 2in the ignition
lock.
X Press and hold transmitter buttons ;
and ?for approximately 20 seconds until
indicator lamp :flashes rapidly.
The memory is cleared.
i You should clear the remote control mem-
ory before selling the vehicle. Compass*
In the Off-road menu* (Y page 102), the
compass displays the compass bearing of
your direction of travel. You will see N,NE, E,
SE, S,SW, Wor NW in the multi-function display. 166
FeaturesControls
* optional
X164_AKB; 2; 3, en-GB
wobuchh,
Version: 2.11.8.1 2009-03-31T14:14:58+02:00 - Seite 166
Dateiname: 6515431202_buchblock.pdf; erzeugt am 01. Apr 2009 00:17:43; WK