2009 MERCEDES-BENZ GL SUV ignition
[x] Cancel search: ignitionPage 266 of 309
X
Vehicles with the AIRMATIC package*
or Off-Road Pro engineering package*:
remove the Start/Stop button from the
ignition lock.
X Get out of the vehicle.
X Close the driver’s door.
X Place the warning triangle (Y page 208) at
a suitable distance. Observe legal require-
ments.
i Only operate the electric air pump using
the socket in the footwell of the second row
of seats (Y page 163), even if the ignition
is turned off.
An emergency cut-off ensures that the on-
board voltage does not drop too low. If the
on-board voltage is too low, power to the
sockets is automatically cut-off. This
ensures that there is sufficient power to
start the engine. Using the TIREFIT kit
You can use the TIREFIT kit to seal small
punctures, particularly those in the tyre tread.
You can use TIREFIT at outside temperatures
down to -20 †. G
Risk of accident
In the following cases your safety is especially
endangered, as tyre sealant is insufficient if:
R there are cuts or punctures in the tyre
greater than 4 mm.
R the wheel rim is damaged.
R you have driven at very low tyre pressures
or on a flat tyre.
Do not drive any further. Consult a qualified
specialist workshop which has the necessary
specialist knowledge and tools to carry out
the work required.
Mercedes-Benz recommends that you use a
Mercedes-Benz Service Centre for this pur-
pose. In particular, work relevant to safety or
on safety-related systems must be carried out
at a qualified specialist workshop. X
Do not remove any foreign objects which
have penetrated the tyre, e.g. screws or
nails.
X Remove the TIREFIT kit, the accompanying
"max. 80 km/h" sticker and the electric air
pump from the stowage well underneath
the luggage compartment floor
(Y page 209). X
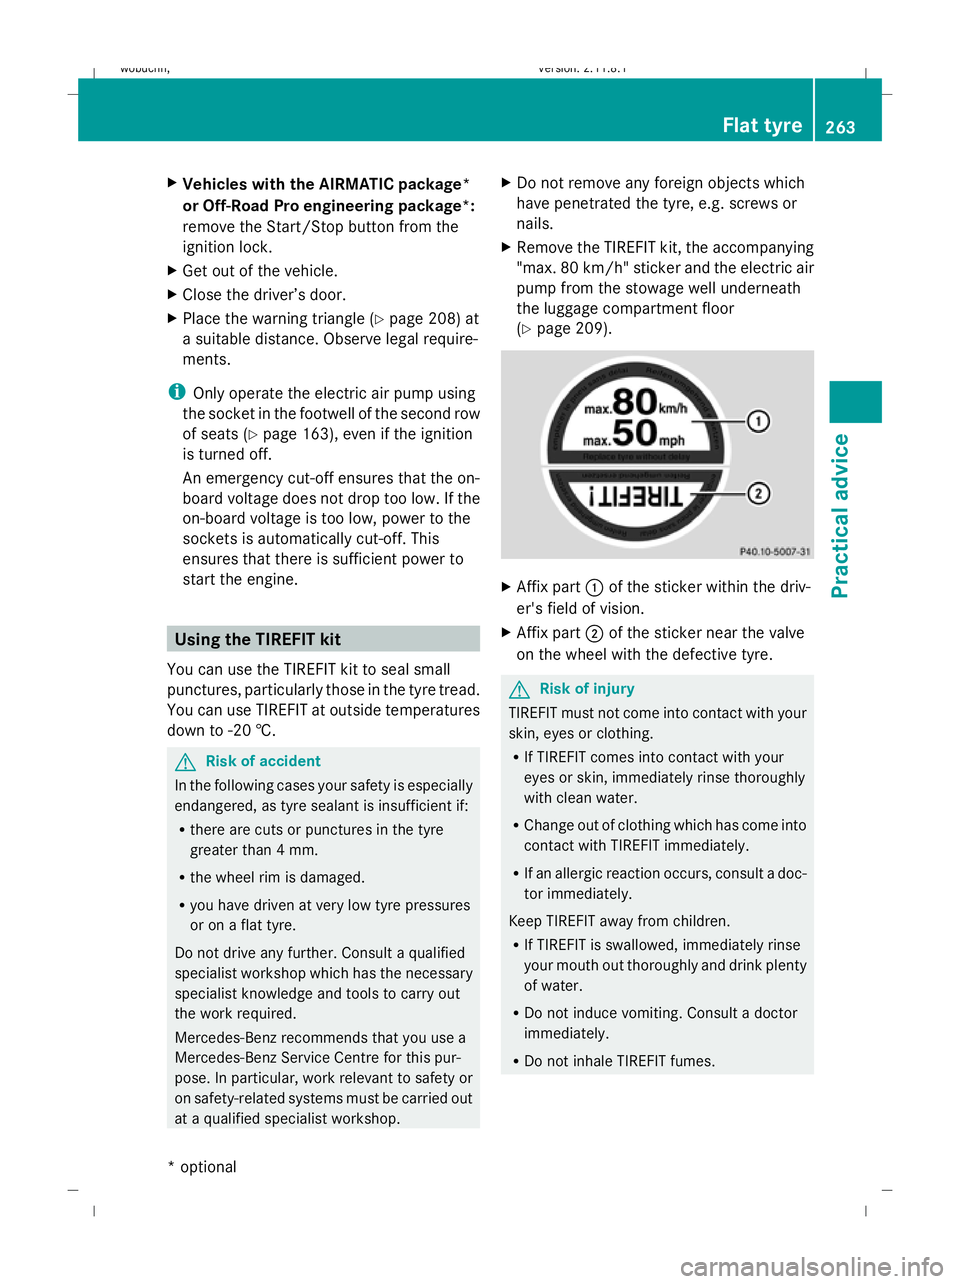
Affix part :of the sticker within the driv-
er's field of vision.
X Affix part ;of the sticker near the valve
on the wheel with the defective tyre. G
Risk of injury
TIREFIT must not come into contact with your
skin, eyes or clothing.
R If TIREFIT comes into contact with your
eyes or skin, immediately rinse thoroughly
with clean water.
R Change out of clothing which has come into
contact with TIREFIT immediately.
R If an allergic reaction occurs, consult a doc-
tor immediately.
Keep TIREFIT away from children.
R If TIREFIT is swallowed, immediately rinse
your mouth out thoroughly and drink plenty
of water.
R Do not induce vomiting. Consult a doctor
immediately.
R Do not inhale TIREFIT fumes. Flat tyre
263Practical advice
* optional
X164_AKB; 2; 3, en-GB
wobuchh,
Version: 2.11.8.1 2009-03-31T14:14:58+02:00 - Seite 263 Z
Dateiname: 6515431202_buchblock.pdf; erzeugt am 01. Apr 2009 00:18:09; WK
Page 267 of 309
i
If TIREFIT leaks out, allow it to dry. It can
then be removed like a layer of film.
If you get TIREFIT on your clothing, have it
cleaned as soon as possible with perchloro-
ethylene. G
Risk of injury
Comply with the manufacturer's safety
instructions shown on the sticker on the elec-
tric air pump.
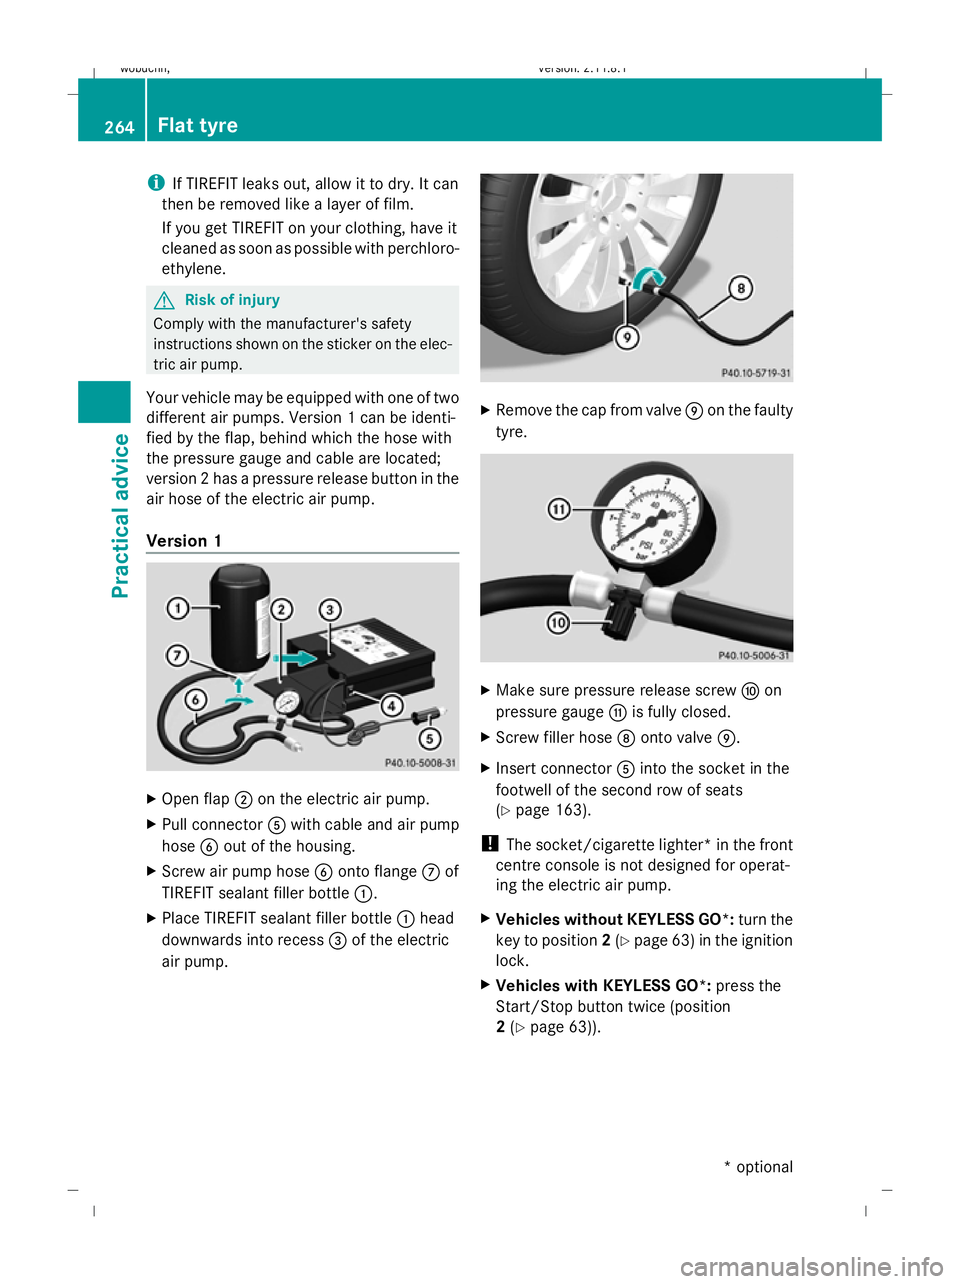
Your vehicle may be equipped with one of two
different air pumps. Version 1 can be identi-
fied by the flap, behind which the hose with
the pressure gauge and cable are located;
version 2 has a pressure release button in the
air hose of the electric air pump.
Version 1 X
Open flap ;on the electric air pump.
X Pull connector Awith cable and air pump
hose Bout of the housing.
X Screw air pump hose Bonto flange Cof
TIREFIT sealant filler bottle :.
X Place TIREFIT sealant filler bottle :head
downwards into recess =of the electric
air pump. X
Remove the cap from valve Eon the faulty
tyre. X
Make sure pressure release screw Fon
pressure gauge Gis fully closed.
X Screw filler hose Donto valve E.
X Insert connector Ainto the socket in the
footwell of the second row of seats
(Y page 163).
! The socket/cigarette lighter* in the front
centre console is not designed for operat-
ing the electric air pump.
X Vehicles without KEYLESS GO*: turn the
key to position 2(Y page 63) in the ignition
lock.
X Vehicles with KEYLESS GO*: press the
Start/Stop button twice (position
2 (Y page 63)). 264
Flat tyrePractical advice
* optional
X164_AKB; 2; 3, en-GB
wobuchh,
Version: 2.11.8.1 2009-03-31T14:14:58+02:00 - Seite 264
Dateiname: 6515431202_buchblock.pdf; erzeugt am 01. Apr 2009 00:18:10; WK
Page 269 of 309
H
Environmental note
Have the used TIREFIT kit disposed of profes-
sionally, e.g. at a Mercedes-Benz Service
Centre.
X Have the TIREFIT kit replaced every four
years at a qualified specialist workshop,
e.g. a Mercedes-Benz Service Centre.
Version 2 X
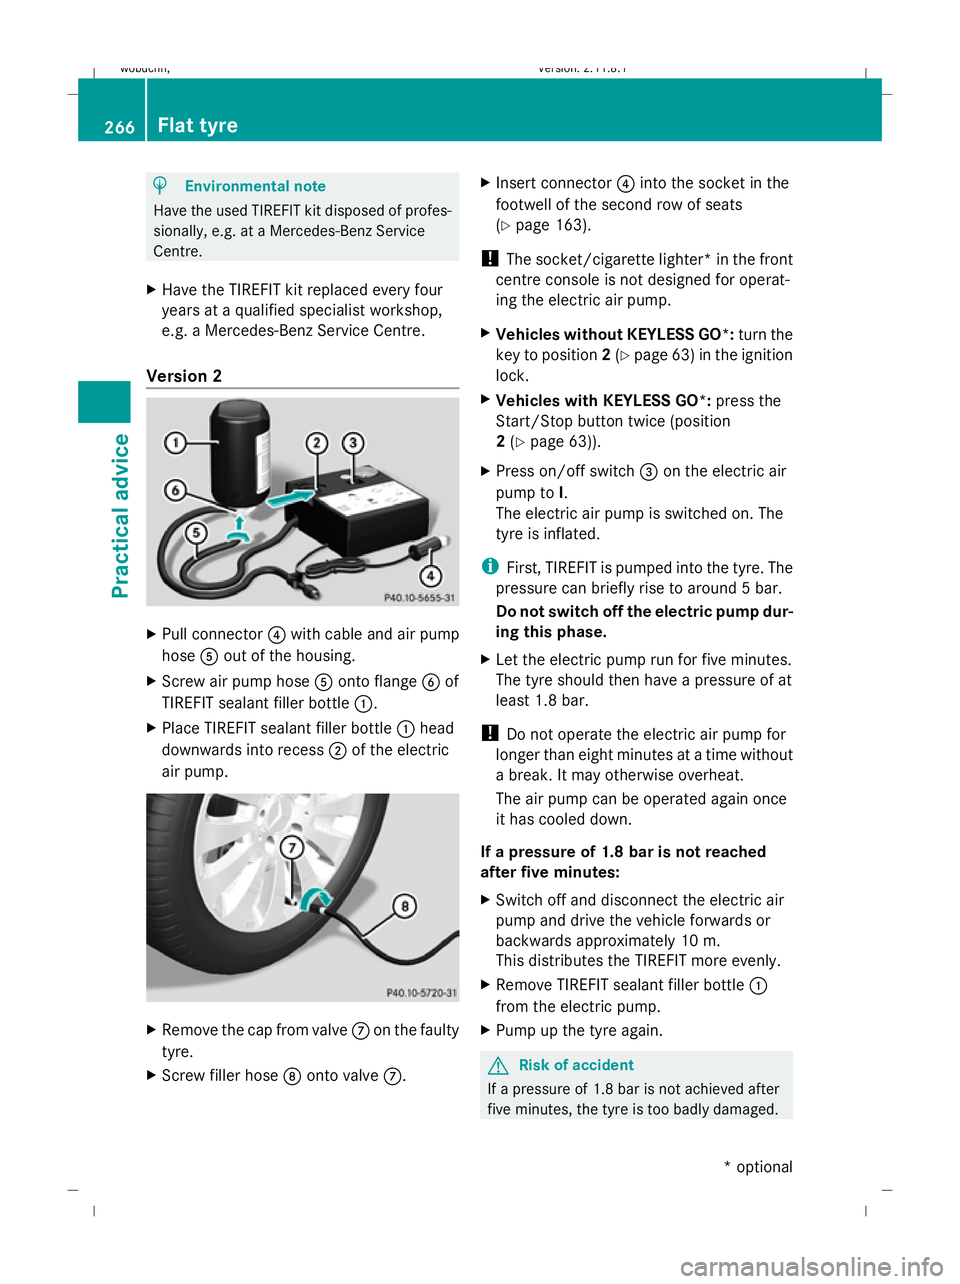
Pull connector ?with cable and air pump
hose Aout of the housing.
X Screw air pump hose Aonto flange Bof
TIREFIT sealant filler bottle :.
X Place TIREFIT sealant filler bottle :head
downwards into recess ;of the electric
air pump. X
Remove the cap from valve Con the faulty
tyre.
X Screw filler hose Donto valve C. X
Insert connector ?into the socket in the
footwell of the second row of seats
(Y page 163).
! The socket/cigarette lighter* in the front
centre console is not designed for operat-
ing the electric air pump.
X Vehicles without KEYLESS GO*: turn the
key to position 2(Y page 63 )in the ignition
lock.
X Vehicles with KEYLESS GO*: press the
Start/Stop button twice (position
2 (Y page 63)).
X Press on/off switch =on the electric air
pump to I.
The electric air pump is switched on. The
tyre is inflated.
i First, TIREFIT is pumped into the tyre. The
pressure can briefly rise to around 5 bar.
Do not switch off the electric pump dur-
ing this phase.
X Let the electric pump run for five minutes.
The tyre should then have a pressure of at
least 1.8 bar.
! Do not operate the electric air pump for
longer than eight minutes at a time without
a break. It may otherwise overheat.
The air pump can be operated again once
it has cooled down.
If a pressure of 1.8 bar is not reached
after five minutes:
X Switch off and disconnect the electric air
pump and drive the vehicle forwards or
backwards approximately 10 m.
This distributes the TIREFIT more evenly.
X Remove TIREFIT sealant filler bottle :
from the electric pump.
X Pump up the tyre again. G
Risk of accident
If a pressure of 1.8 bar is not achieved after
five minutes, the tyre is too badly damaged. 266
Flat tyrePractical advice
* optional
X164_AKB; 2; 3, en-GB
wobuchh
,V ersion: 2.11.8.1
2009-03-31T14:14:58+02:00 - Seite 266
Dateiname: 6515431202_buchblock.pdf; erzeugt am 01. Apr 2009 00:18:10; WK
Page 276 of 309
R
never touch the battery first. To discharge
a possible electrostatic charge, step out of
the vehicle first and touch the bodywork.
R do not wipe the battery using a cloth. The
battery may explode as a result of electro-
static charge or due to flying sparks.
! Before loosening the terminal clamps of
the battery, switch off the engine and
remove the key or, on vehicles with KEY-
LESS GO*, make sure that the ignition is
not switched on. In the instrument cluster,
all of the indicator lamps must be out. Oth-
erwise, you may destroy electronic compo-
nents, such as the alternator.
i Mercedes-Benz recommends that you
have work involving the battery, e.g.
removal, charging and replacement, car-
ried out at a qualified specialist workshop,
e.g. a Mercedes-Benz Service Centre.
The battery is located under the front seat on
the right-hand side when viewed in the direc-
tion of travel. Disconnecting the battery
G
Risk of accident
If the battery is disconnected:
R the brake boosting effect will not be avail-
able. Greater braking force will then be
required and brake pedal travel will be lon-
ger. If necessary, depress the brake pedal
with maximum force.
R the transmission is locked in position P
! Always disconnect the battery in
the order described below. Never swap the
battery terminals. You may otherwise dam-
age the vehicle electronics. X
Firmly depress the parking brake and move
the transmission to position P.
X Position the right-hand front seat as far for-
wards as possible.
X Switch off all electrical consumers (e.g.
radio, blower, etc.). X
Get into the rear compartment.
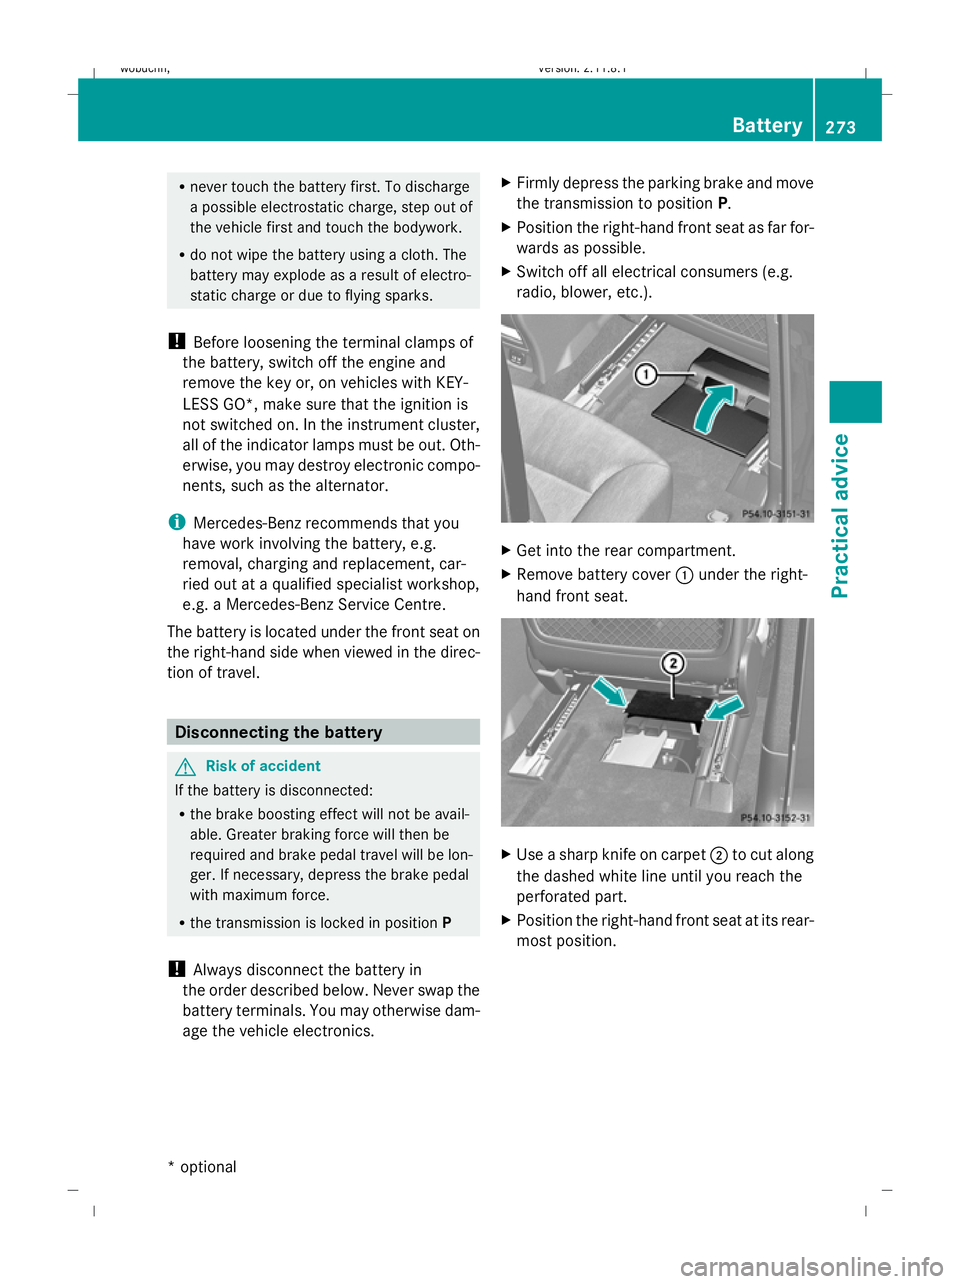
X Remove battery cover :under the right-
hand front seat. X
Use a sharp knife on carpet ;to cut along
the dashed white line until you reach the
perforated part.
X Position the right-hand front seat at its rear-
most position. Battery
273Practical advice
* optional
X164_AKB; 2; 3, en-GB
wobuchh,
Version: 2.11.8.1 2009-03-31T14:14:58+02:00 - Seite 273 Z
Dateiname: 6515431202_buchblock.pdf; erzeugt am 01. Apr 2009 00:18:14; WK
Page 277 of 309
X
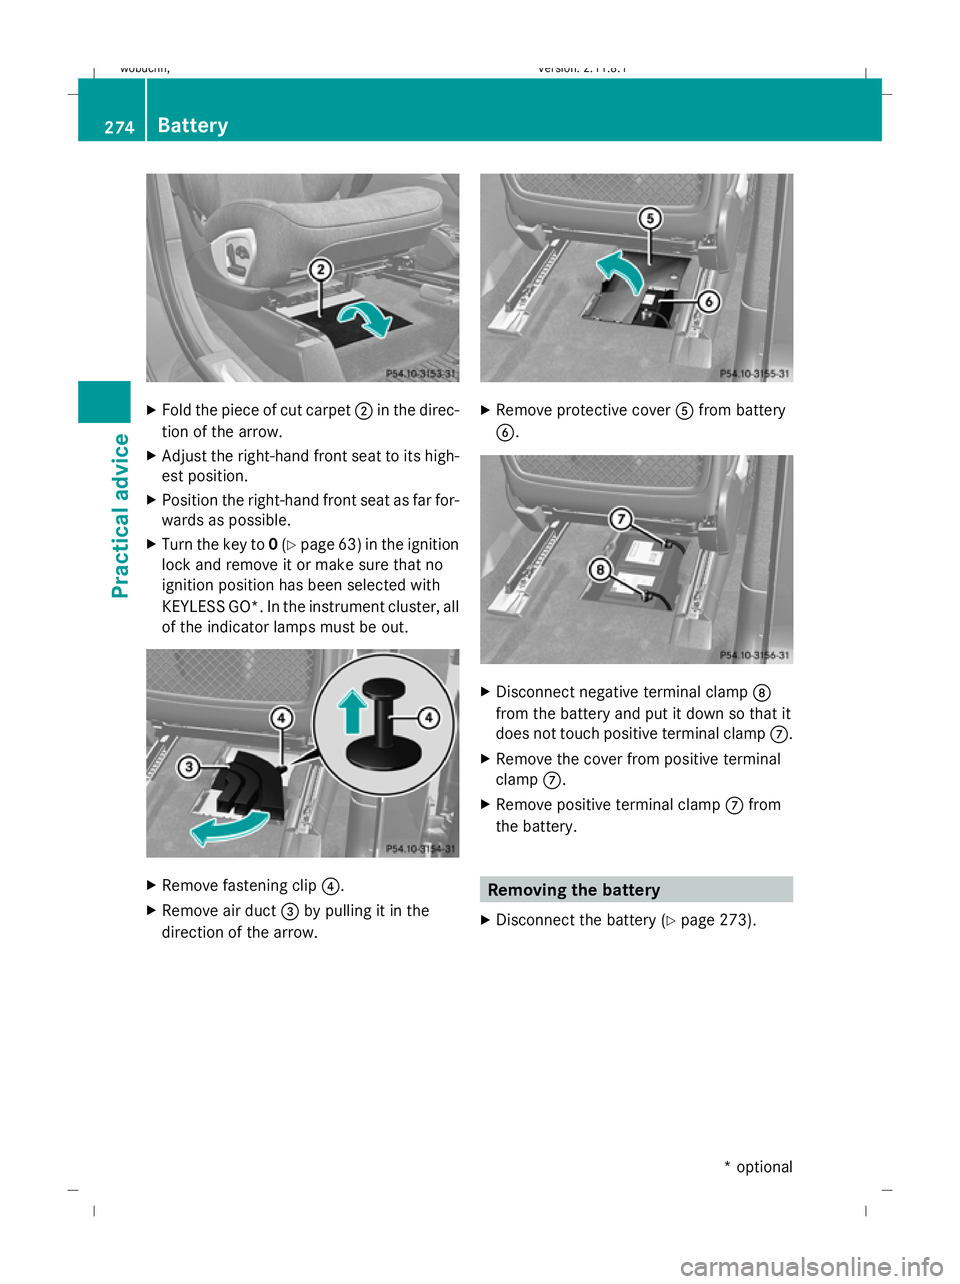
Fold the piece of cut carpet ;in the direc-
tion of the arrow.
X Adjust the right-hand front seat to its high-
est position.
X Position the right-hand front seat as far for-
wards as possible.
X Turn the key to 0(Y page 63) in the ignition
lock and remove it or make sure that no
ignition position has been selected with
KEYLESS GO*. In the instrument cluster, all
of the indicator lamps must be out. X
Remove fastening clip ?.
X Remove air duct =by pulling it in the
direction of the arrow. X
Remove protective cover Afrom battery
B. X
Disconnect negative terminal clamp D
from the battery and put it down so that it
does not touch positive terminal clamp C.
X Remove the cover from positive terminal
clamp C.
X Remove positive terminal clamp Cfrom
the battery. Removing the battery
X Disconnect the battery ( Ypage 273). 274
BatteryPractical advice
* optional
X164_AKB; 2; 3, en-GB
wobuchh
,V ersion: 2.11.8.1
2009-03-31T14:14:58+02:00 - Seite 274
Dateiname: 6515431202_buchblock.pdf; erzeugt am 01. Apr 2009 00:18:16; WK
Page 281 of 309
It is better to have the vehicle transported
than to have it towed.
When towing, observe the legal requirements
in all countries concerned.
! When towing, pull away slowly and
smoothly. If the tractive power is too high,
the vehicles could be damaged.
! Do not use the towing eye for recovery,
as this could damage the vehicle. If in
doubt, recover the vehicle with a crane.
! You may tow the vehicle for a maximum
of 50 km. A towing speed of 50 km/h must
not be exceeded.
For towing distances over 50 km, the entire
vehicle must be lifted up and transported.
! On vehicles with KEYLESS GO*, use the
key instead of the Start/Stop button. Turn
the key to position 2in the ignition lock and
shift the automatic transmission to N. Then
turn the key back to 0and leave it in the
ignition lock.
! Only secure the tow cable or towing bar
to the towing eyes. You could otherwise
damage the vehicle.
R Tow-starting the vehicle is not permitted.
R The vehicle may not be towed with the front
or rear axle raised.
R If the vehicle has suffered transmission
damage, have it carried away on a trans-
porter or trailer.
R If the engine does not start, try jump-start-
ing it (Y page 276).
R If it is not possible to jump-start the vehicle,
have it towed to the nearest qualified spe-
cialist workshop, e.g. a Mercedes-Benz
Service Centre.
R If you are towing the vehicle, move the
automatic transmission selector lever to N
and turn the key to position
2 (Y page 63) in the ignition lock.
R Before towing the vehicle, make sure that
the battery is connected and charged. Oth-
erwise:
- you cannot switch on the ignition.
- you cannot shift the transmission to posi-
tion N.
- you have no support when braking.
i Switch off the automatic locking feature
before the vehicle is towed (Y page 107).
Otherwise, you could be locked out when
pushing or towing the vehicle.
Deactivate tow-away protection*
(Y page 55) before the vehicle is towed. Fitting the towing eye
Vehicles with a trailer tow hitch*: if you
intend to use the vehicle for towing, fit the ball
coupling and connect the towbar to this.
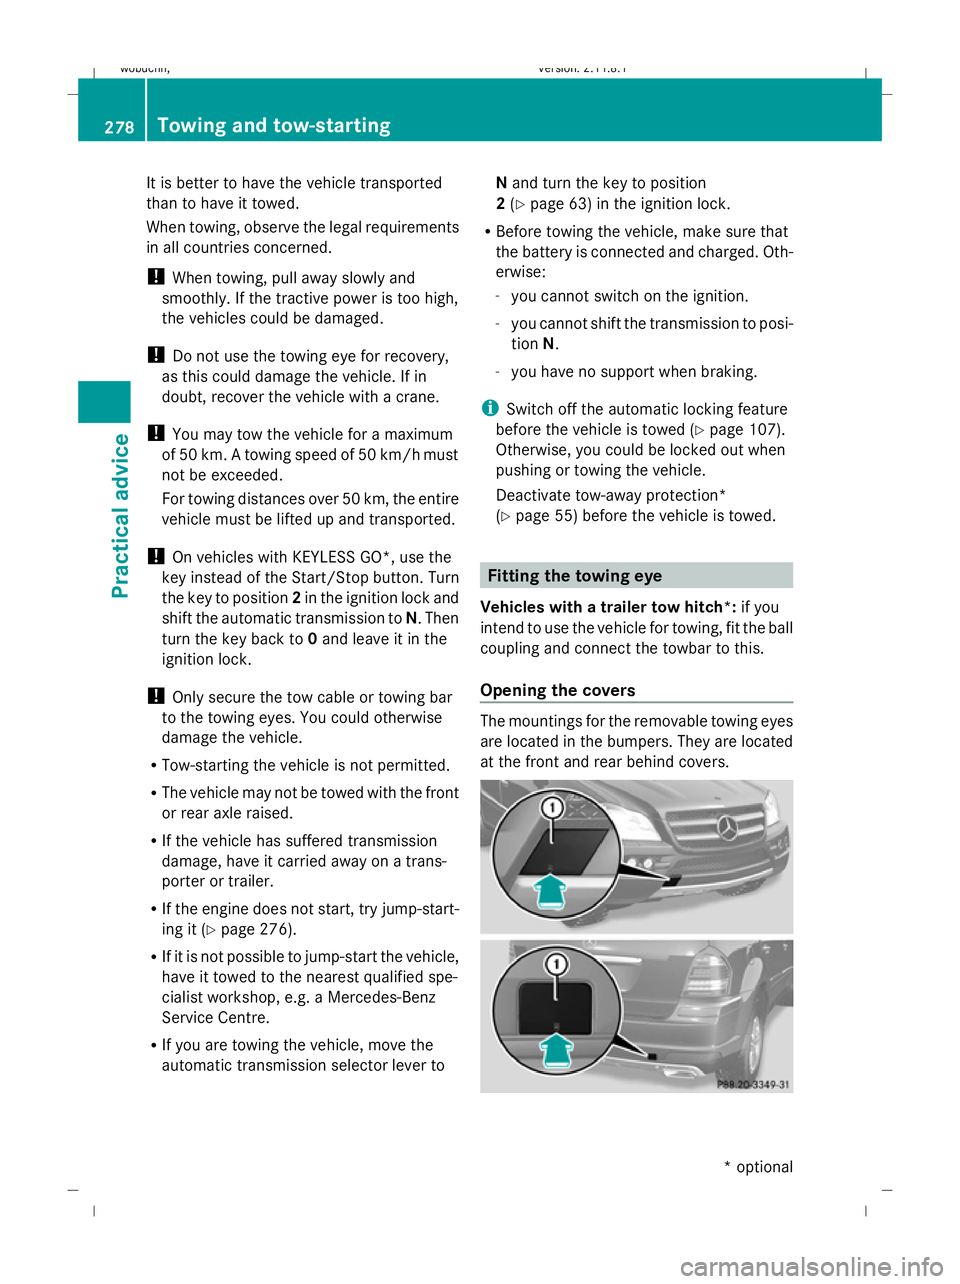
Opening the covers The mountings for the removable towing eyes
are located in the bumpers. They are located
at the front and rear behind covers. 278
Towing and tow-startingPractical advice
* optional
X164_AKB; 2; 3, en-GB
wobuchh,
Version: 2.11.8.1 2009-03-31T14:14:58+02:00 - Seite 278
Dateiname: 6515431202_buchblock.pdf; erzeugt am 01. Apr 2009 00:18:19; WK
Page 282 of 309
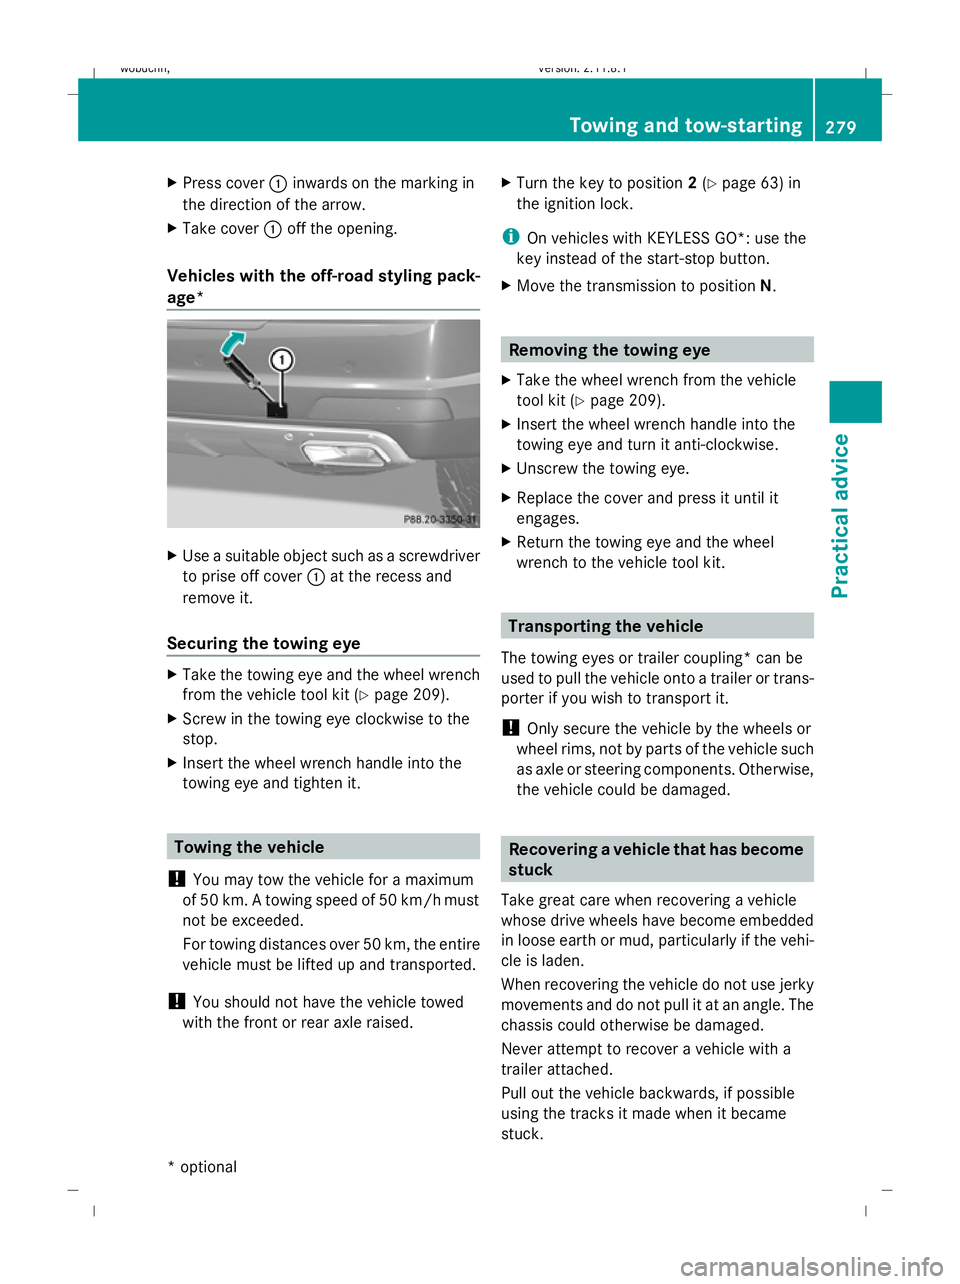
X
Press cover :inwards on the marking in
the direction of the arrow.
X Take cover :off the opening.
Vehicles with the off-road styling pack-
age* X
Use a suitable object such as a screwdriver
to prise off cover :at the recess and
remove it.
Securing the towing eye X
Take the towing eye and the wheel wrench
from the vehicle tool kit (Y page 209).
X Screw in the towing eye clockwise to the
stop.
X Insert the wheel wrench handle into the
towing eye and tighten it. Towing the vehicle
! You may tow the vehicle for a maximum
of 50 km. A towing speed of 50 km/hm ust
not be exceeded.
For towing distances over 50 km, the entire
vehicle must be lifted up and transported.
! You should not have the vehicle towed
with the front or rear axle raised. X
Turn the key to position 2(Y page 63) in
the ignition lock.
i On vehicles with KEYLESS GO*: use the
key instead of the start-stop button.
X Move the transmission to position N. Removing the towing eye
X Take the wheel wrench from the vehicle
tool kit (Y page 209).
X Insert the wheel wrench handle into the
towing eye and turn it anti-clockwise.
X Unscrew the towing eye.
X Replace the cover and press it until it
engages.
X Return the towing eye and the wheel
wrench to the vehicle tool kit. Transporting the vehicle
The towing eyes or trailer coupling* can be
used to pull the vehicle onto a trailer or trans-
porter if you wish to transport it.
! Only secure the vehicle by the wheels or
wheel rims, not by parts of the vehicle such
as axle or steering components. Otherwise,
the vehicle could be damaged. Recovering a vehicle that has become
stuck
Take great care when recovering a vehicle
whose drive wheels have become embedded
in loose earth or mud, particularly if the vehi-
cle is laden.
When recovering the vehicle do not use jerky
movements and do not pull it at an angle. The
chassis could otherwise be damaged.
Never attempt to recover a vehicle with a
trailer attached.
Pull out the vehicle backwards, if possible
using the tracks it made when it became
stuck. Towing and tow-starting
279Practical advice
* optional
X164_AKB; 2; 3, en-GB
wobuchh,
Version: 2.11.8.1 2009-03-31T14:14:58+02:00 - Seite 279 Z
Dateiname: 6515431202_buchblock.pdf; erzeugt am 01. Apr 2009 00:18:20; WK
Page 284 of 309

Before changing a fuse
X Park the vehicle.
X Switch off all electrical consumers.
X Remove the key from the ignition lock. Dashboard fuse boxes
!
Do not use a pointed object such as a
screwdriver to open the cover in the dash-
board. You could damage the dashboard or
the cover.
X To open: open the front-passenger door.
X Pull cover :outwards in the direction of
the arrow and remove it.
X To close: clip in cover :at the front.
X Fold cover :inwards until it engages.
X Close the front-passenger door. Fuse box in the engine compartment
Illustrated: GL 320 CDI X
To open: open the bonnet (Y page 174).
X Remove moisture from the fuse box using
a dry cloth.
X Fold clamps ;upwards.
X Fold up fuse box cover :and remove it
towards the front of the vehicle.
X To close: check whether the rubber seal is
lying correctly in lid :.
X Insert lid :into the bracket at the rear of
the fuse box.
! The cover must be fitted properly; other-
wise, moisture or dirt could affect the oper-
ation of the fuses.
X Fold down lid :and secure with
clamps ;.
X Close the bonnet (Y page 175). Fuse box in the luggage compartment
X
To open: open the tailgate.
X Turn catch :in the direction of the arrow.
X Open cover ;downwards. Fuses
281Practical advice
X164_AKB; 2; 3, en-GB
wobuchh, Version: 2.11.8.1 2009-03-31T14:14:58+02:00 - Seite 281 Z
Dateiname: 6515431202_buchblock.pdf; erzeugt am 01. Apr 2009 00:18:21; WK