2009 MERCEDES-BENZ GL SUV ECO mode
[x] Cancel search: ECO modePage 8 of 309

Automatic transmission
DIRECT SELECT lever .......................92
Display mes-
sage .............................. 213, 216, 217
Driving tips ...................................... 94
Emergency running mode ..............244
Gear indicator .................................. 93
Kickdown ......................................... 94
Malfunction ................................... .244
Program selector button ..................95
Shift ranges ..................................... 94
Trailer towing ................................... 94
Transmission positions ....................93
Auxiliary heating ............................... 147
Display message .................... 231, 232
Notes ............................................. 147
Remote control .............................. 148
Setting (on-board computer) .......... 107
Auxiliary ventilation ..........................147 B
Backrest angle Adjusting (2nd row of seats) ............67
Ball coupling
Fitting ............................................ 194
Folding in ....................................... 198
Folding out ..................................... 193
Removing ....................................... 198
BAS (Brake Assist) ............................... 50
Battery Changing (auxiliary heating
remote control) .............................. 254
Charging ........................................ 275
Checking (key) ............................... 253
Check lamp (key )........................... 253
Disconnecting ................................ 273
Display message ............................ 220
Jump-starting ................................. 276
Maintenance (vehicle) .................... 272
Reconnecting ................................. 276
Removing/fitting ........................... 274
Vehicle battery .............................. 272
Belt force limiters
Activation ......................................... 35
Belt height adjustment .......................77
Belt reel (Easy-Pack fix kit) ..............160Belt tensioners
Activation ......................................... 35
Belt warning ......................................... 77
BlueTEC
AdBlue ®
......................................... 288
Bonnet
Bonnet catch ................................. 175
Display message ............................ 219
Opening/closing ........................... 174
Bonnet release lever
Release leve r................................. 175
Boot
Automatic opening ........................... 62
Boot lid
Opening/closing .............................. 60
Brake Assist
See BAS ........................................... 50
Brake fluid .......................................... 291
Display message ............................ 221
Brake lamps
Adaptive .......................................... .51
Display message ............................ 226
Brakes
Parking brake ................................... 91
Warning lamp ........................ 235, 236
Brake system
Display message ............................ 220
Bulbs .................................................. 254
Brake lamp .................................... 260
Dipped-beam headlamps ...............258
Display message ............................ 225
Licence plate lamp ......................... 260
Main-beam headlamps ................... 258
Overview ........................................ 256
Parking lamp .......................... 258, 260
Rear foglamp ................................. 260
Replacing .............................. .258, 259
Reversing lamp .............................. 260
Side lamp ....................................... 258
Tail lamp ........................................ 260
Turn signal lamp ....................258, 260
see Lamp Index
5 X164_AKB; 2; 3, en-GB
wobuchh,
Version: 2.11.8.1
2009-03-31T14:14:58+02:00 - Seite 5Dateiname: 6515431202_buchblock.pdf; erzeugt am 01. Apr 2009 00:16:29; WK
Page 9 of 309

C
Calling up a fault see Display message .....................211
Care
Automatic car wash .......................201
Care products ................................ 201
Cleaning agents ............................. 201
Dashboard ..................................... 204
Display ........................................... 204
Exterior .......................................... 201
Headlamps ..................................... 203
High-pressure cleaners ..................202
Interior ........................................... 204
Paintwork ...................................... 202
Plastic trim .................................... 205
Reversing camera ..........................203
Seat covers .................................... 204
Sensors ......................................... 203
Steering wheel boss ......................204
Tail pipes ....................................... 203
Trailer tow hitch ............................. 203
Trim strips ..................................... 205
Wheels ........................................... 202
Windows ........................................ 202
Wiper blades .................................. 202
Wooden trim .................................. 205
Care products .................................... 201
CD player/CD changer Operating (on-board computer) .....101
Central locking
Automatic locking (on-board com-
puter) ............................................. 107
Key .................................................. 58
Central locking/unlocking button .....59
Central unlocking Key .................................................. 58
Centre console
Overview .......................................... 29
Changing a wheel
see Flat tyre
Checklist (off-road driving) ..............189
Child-proof locks Rear doors ....................................... 49
Children
in the vehicle ................................... 41
Restraint systems ............................ 41Child seat
Automatic recognition .....................43
Automatic recognition (malfunc-
tion) ............................................... 234
Child seat lock ................................ 47
Display message ............................ 216
ISOFIX .............................................. 47
On the front-passenger sea t............ 42
Recommendations ...........................46
Suitable positions ............................ 44
TopTether ........................................ 48
Child seat lock ..................................... 47
Cigarette lighter ................................ 163
Cleaning agents ................................. 201
Cleaning the sensors ........................203
Climate control Cooling with air dehumidification ..141
Misted up windows ........................146
Cockpit
Overview .......................................... 23
Collapsible wheel
Technical data ............................... 297
COMAND display
Cleaning ......................................... 204
Compass ............................................ 166
Display message ............................ 216
Constant headlamp mode
see Daytime driving lights ..............105
Consumption statistics (on-board
computer) .......................................... 110
Convenience closing ...........................87
Convenience opening ..........................87
Coolant Checking the level .........................177
Display mes-
sage ...................................... .219, 224
Mixture ratio .................................. 291
Temperature gauge ........................ 100
Cornering lights
Display message ............................ 225
Cruise control .................................... 117
Display message .................... 218, 219
Cup holder ......................................... 1536
Index X164_AKB; 2; 3, en-GB
wobuchh,
Version: 2.11.8.1 2009-03-31T14:14:58+02:00 - Seite 6Dateiname: 6515431202_buchblock.pdf; erzeugt am 01. Apr 2009 00:16:29; WK
Page 67 of 309
X
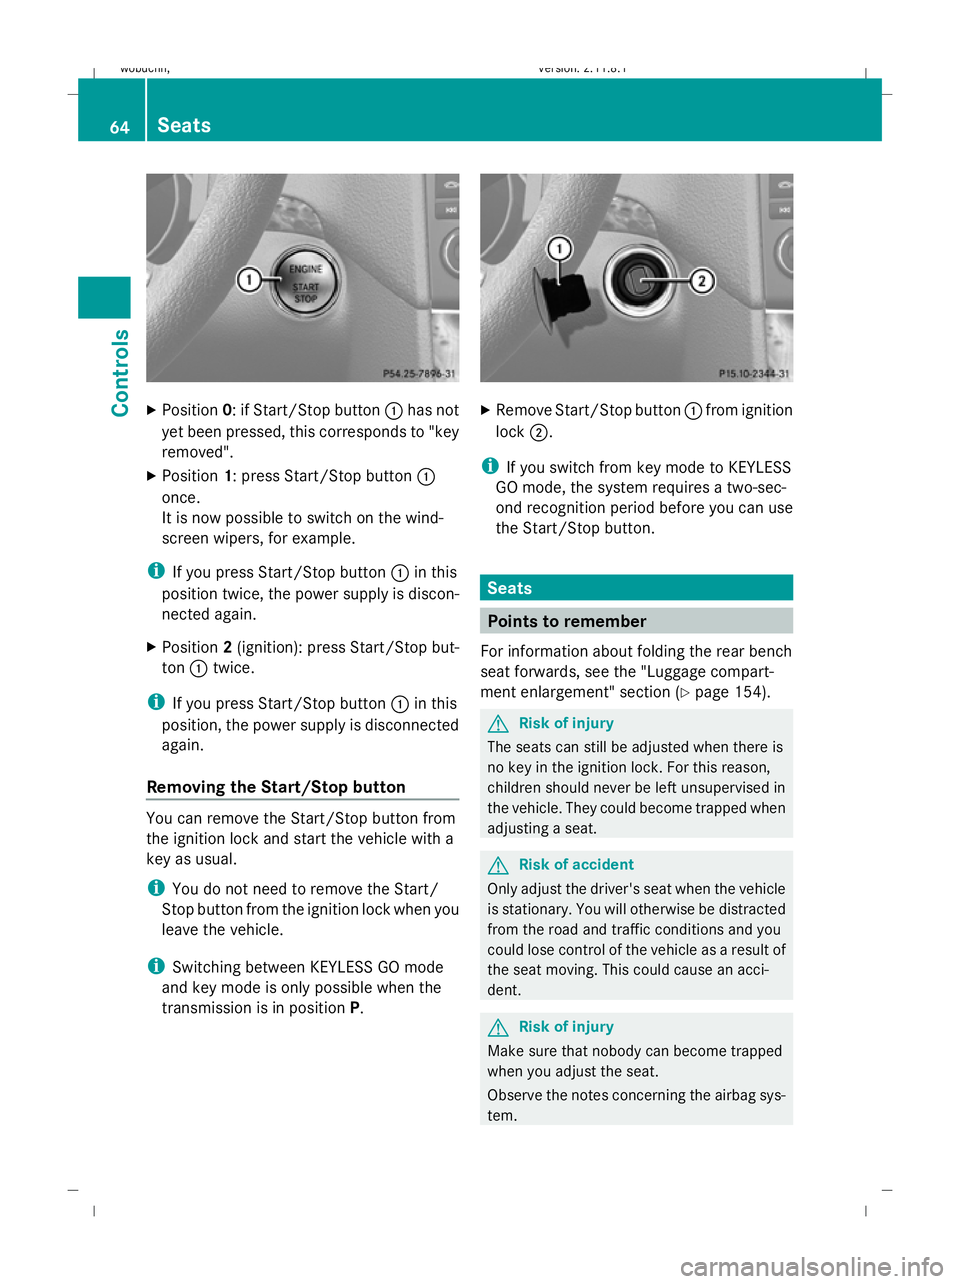
Position 0: if Start/Stop button :has not
yet been pressed, this corresponds to "key
removed".
X Position 1: press Start/Stop button :
once.
It is now possible to switch on the wind-
screen wipers, for example.
i If you press Start/Stop button :in this
position twice, the power supply is discon-
nected again.
X Position 2(ignition): press Start/Stop but-
ton :twice.
i If you press Start/Stop button :in this
position, the power supply is disconnected
again.
Removing the Start/Stop button You can remove the Start/Stop button from
the ignition lock and start the vehicle with a
key as usual.
i You do not need to remove the Start/
Stop button from the ignition lock when you
leave the vehicle.
i Switching between KEYLESS GO mode
and key mode is only possible when the
transmission is in position P. X
Remove Start/Stop button :from ignition
lock ;.
i If you switch from key mode to KEYLESS
GO mode, the system requires a two-sec-
ond recognition period before you can use
the Start/Stop button. Seats
Points to remember
For information about folding the rear bench
seat forwards, see the "Luggage compart-
ment enlargement" section (Y page 154). G
Risk of injury
The seats can still be adjusted when there is
no key in the ignition lock. For this reason,
children should never be left unsupervised in
the vehicle. They could become trapped when
adjusting a seat. G
Risk of accident
Only adjust the driver's seat when the vehicle
is stationary. You will otherwise be distracted
from the road and traffic conditions and you
could lose control of the vehicle as a result of
the seat moving. This could cause an acci-
dent. G
Risk of injury
Make sure that nobody can become trapped
when you adjust the seat.
Observe the notes concerning the airbag sys-
tem. 64
SeatsControls
X164_AKB; 2; 3, en-GB
wobuchh,
Version: 2.11.8.1 2009-03-31T14:14:58+02:00 - Seite 64
Dateiname: 6515431202_buchblock.pdf; erzeugt am 01. Apr 2009 00:16:55; WK
Page 75 of 309
Easy-entry/exit feature*
The EASY-ENTRY/EXIT feature makes getting
in and out of your vehicle easier.
The steering wheel swings upwards when
you:
R remove the key from the ignition lock
R open the driver's door when the key is in
position 0or 1in the ignition lock
When the key is inserted into the ignition lock
with the driver's door closed, the steering
wheel is automatically moved to the previ-
ously set position. G
Risk of injury
Make sure that nobody can become trapped
when you activate the easy-entry/exit fea-
ture.
If there is a risk of becoming trapped, stop the
adjustment procedure. To halt the procedure:
R press the steering-column adjustment
switch
R press one of the memory function position
buttons
The steering column stops moving immedi-
ately.
Never leave children unsupervised in the vehi-
cle. They could open the driver's door and
thereby unintentionally activate the easy-
entry feature and become trapped.
The most recent position of the steering
wheel is stored when you switch off the igni-
tion or when you store a memory position
(Y page 74).
You can activate and deactivate the EASY-
ENTRY/EXIT feature via the on-board com-
puter (Y page 108).
i The crash-responsive EASY-EXIT fea-
ture* can only be activated after an acci-
dent if the EASY-ENTRY/EXIT feature is
activated in the on-board computer.
When the crash-responsive EASY-EXIT fea-
ture is triggered in an accident, the steering
wheel column will move upwards irrespec- tive of the position of the key in the ignition
lock. This makes it easier to exit the vehicle
or rescue the occupants. Mirrors
Rear-view mirror
X Adjust the rear-view mirror by hand so you
have a good overview of the traffic condi-
tions.
Rear-view mirror (manual anti-dazzle) X
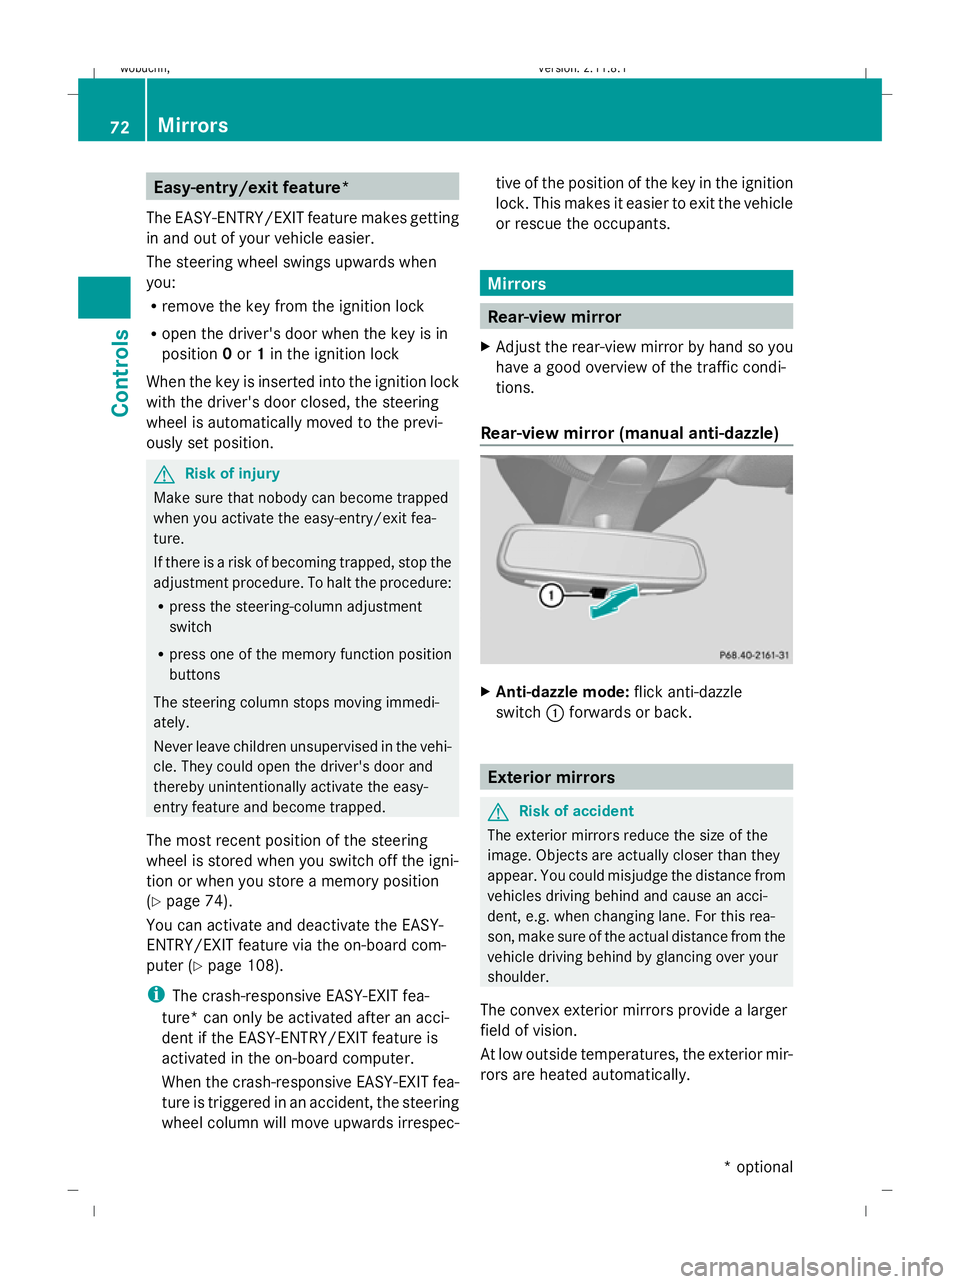
Anti-dazzle mode: flick anti-dazzle
switch :forwards or back. Exterior mirrors
G
Risk of accident
The exterior mirrors reduce the size of the
image. Objects are actually closer than they
appear. You could misjudge the distance from
vehicles driving behind and cause an acci-
dent, e.g. when changing lane. For this rea-
son, make sure of the actual distance from the
vehicle driving behind by glancing over your
shoulder.
The convex exterior mirrors provide a larger
field of vision.
At low outside temperatures, the exterior mir-
rors are heated automatically. 72
MirrorsControls
* optional
X164_AKB; 2; 3, en-GB
wobuchh,
Version: 2.11.8.1 2009-03-31T14:14:58+02:00 - Seite 72
Dateiname: 6515431202_buchblock.pdf; erzeugt am 01. Apr 2009 00:17:03; WK
Page 76 of 309
Adjusting the exterior mirrors
X
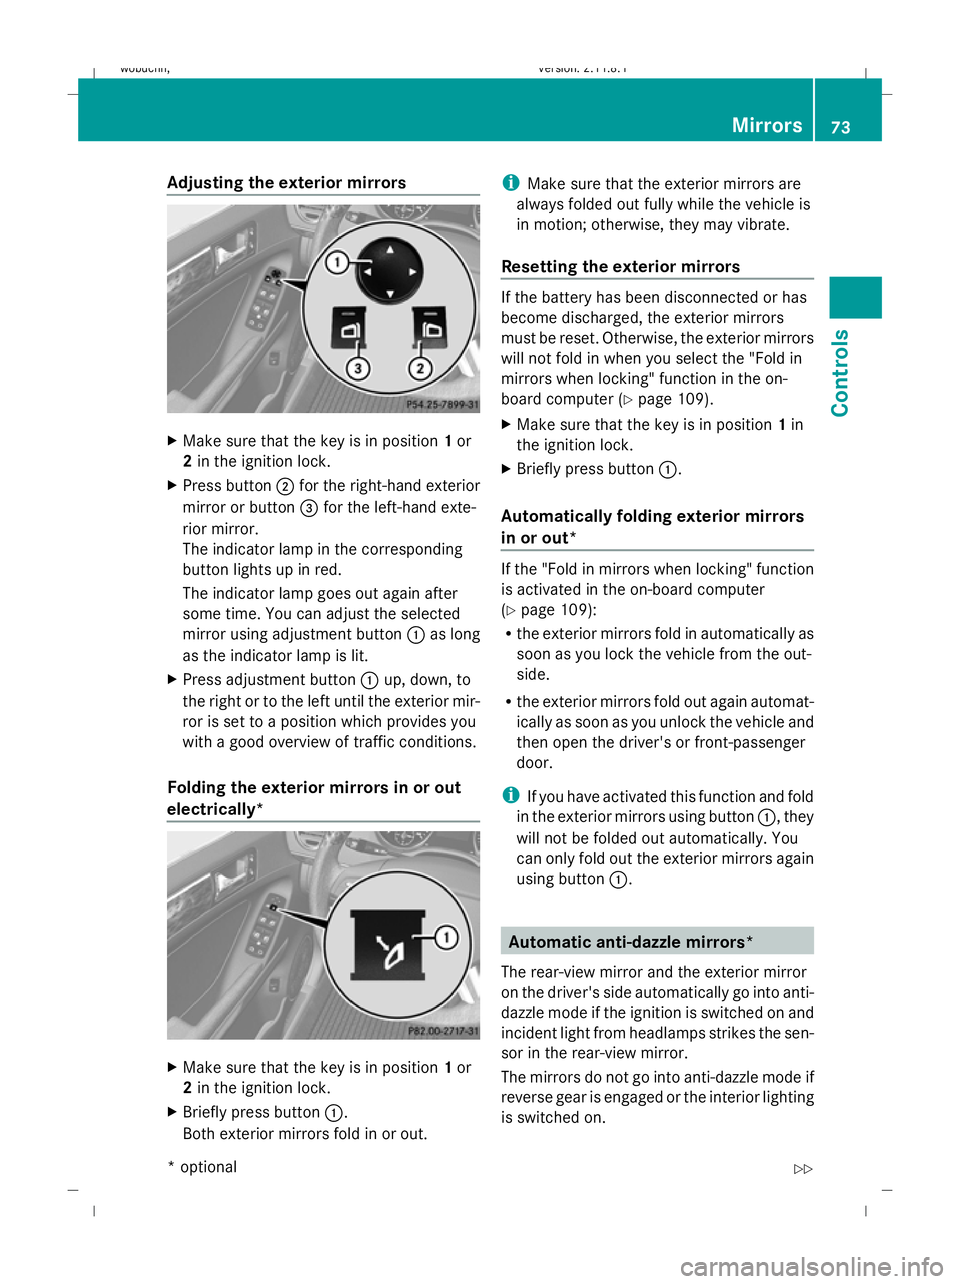
Make sure that the key is in position 1or
2 in the ignition lock.
X Press button ;for the right-hand exterior
mirror or button =for the left-hand exte-
rior mirror.
The indicator lamp in the corresponding
button lights up in red.
The indicator lamp goes out again after
some time. You can adjust the selected
mirror using adjustment button :as long
as the indicator lamp is lit.
X Press adjustment button :up, down, to
the right or to the left until the exterior mir-
ror is set to a position which provides you
with a good overview of traffic conditions.
Folding the exterior mirrors in or out
electrically* X
Make sure that the key is in position 1or
2 in the ignition lock.
X Briefly press button :.
Both exterior mirrors fold in or out. i
Make sure that the exterior mirrors are
always folded out fully while the vehicle is
in motion; otherwise, they may vibrate.
Resetting the exterior mirrors If the battery has been disconnected or has
become discharged, the exterior mirrors
must be reset. Otherwise, the exterior mirrors
will not fold in when you select the "Fold in
mirrors when locking" function in the on-
board computer (Y
page 109).
X Make sure that the key is in position 1in
the ignition lock.
X Briefly press button :.
Automatically folding exterior mirrors
in or out* If the "Fold in mirrors when locking" function
is activated in the on-board computer
(Y
page 109):
R the exterior mirrors fold in automatically as
soon as you lock the vehicle from the out-
side.
R the exterior mirrors fold out again automat-
ically as soon as you unlock the vehicle and
then open the driver's or front-passenger
door.
i If you have activated this function and fold
in the exterior mirrors using button :, they
will not be folded out automatically. You
can only fold out the exterior mirrors again
using button :. Automatic anti-dazzle mirrors*
The rear-view mirror and the exterior mirror
on the driver's side automatically go into anti-
dazzle mode if the ignition is switched on and
incident light from headlamps strikes the sen-
sor in the rear-view mirror.
The mirrors do not go into anti-dazzle mode if
reverse gear is engaged or the interior lighting
is switched on. Mirrors
73Controls
* optional
X164_AKB; 2; 3, en-GB
wobuchh,
Version: 2.11.8.1 2009-03-31T14:14:58+02:00 - Seite 73 Z
Dateiname: 6515431202_buchblock.pdf; erzeugt am 01. Apr 2009 00:17:03; WK
Page 85 of 309
The hazard warning lamp switches on auto-
matically if:
R an airbag is deployed.
R the vehicle is braked to a standstill from a
speed of over 70 km/h.
The hazard warning lamps still operate if the
ignition is switched off.
X To switch on: press button:.
All turn signals flash.
X Hazard warning lights on one side: push
the combination switch in the direction of
arrow ForH past the point of resistance
(Y page 80).
The indicator lamp flashes on the corre-
sponding side of the vehicle.
X To switch off: press button:.
The hazard warning lamp switches off auto-
matically after full brake application if the
vehicle then reaches a speed of over
10 km/h again.
Intelligent Light System* (bi-xenon
headlamps*) The Intelligent Light System is a system which
adjusts the headlamps automatically to suit
the prevailing driving and weather conditions.
The bi-xenon headlamps offer enhanced func-
tions to improve illumination of the road sur-
face, e.g. depending on the vehicle speed or
weather conditions. The system includes the
active light function, motorway mode and
extended range foglamps. The system is only
active when it is dark.
You can activate or deactivate the "Intelligent
Light System" using the on-board computer
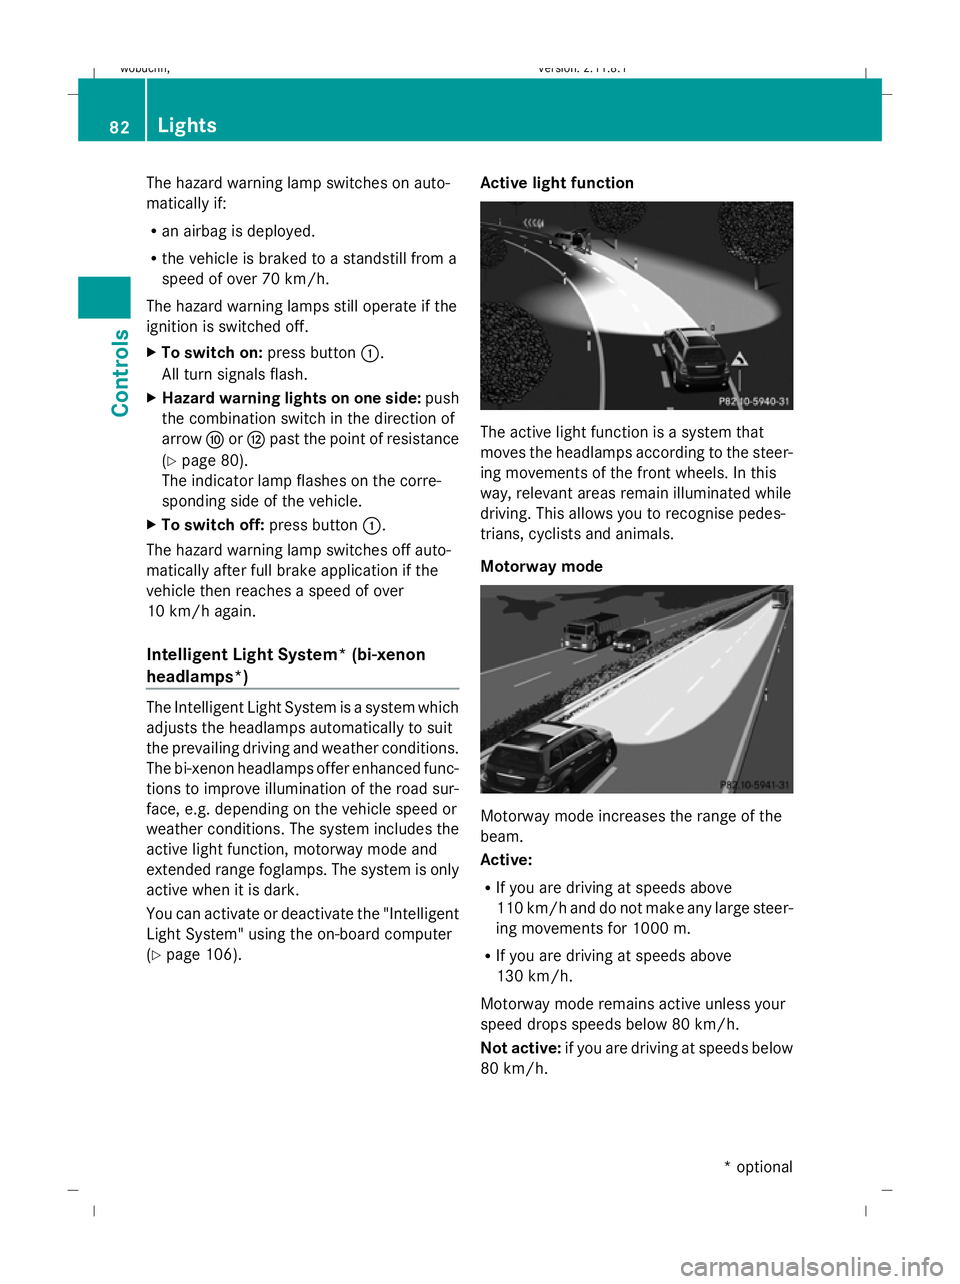
(Y page 106). Active light function The active light function is a system that
moves the headlamps according to the steer-
ing movements of the front wheels. In this
way, relevant areas remain illuminated while
driving. This allows you to recognise pedes-
trians, cyclists and animals.
Motorway mode
Motorway mode increases the range of the
beam.
Active:
R
If you are driving at speeds above
110 km/ha nd do not make any large steer-
ing movements for 1000 m.
R If you are driving at speeds above
130 km/h.
Motorway mode remains active unless your
speed drops speeds below 80 km/h.
Not active: if you are driving at speeds below
80 km/h. 82
LightsControls
* optional
X164_AKB; 2; 3, en-GB
wobuchh
,V ersion: 2.11.8.1
2009-03-31T14:14:58+02:00 - Seite 82
Dateiname: 6515431202_buchblock.pdf; erzeugt am 01. Apr 2009 00:17:07; WK
Page 109 of 309
X
Press the WorX button to select the
Lighting submenu.
X Press the &button to select Head‐
lamps delayed switch-off.
X Press the WorX button to activate
or deactivate the Headlamps delayed
switch-off function.
X Press the &,VorU button to
select a different display.
Deactivating the delayed switch-off tempora-
rily:
X Before leaving the vehicle, turn the key to
position 0in the ignition lock.
X Turn the key to position 2in the ignition
lock and back to position 0.
Delayed switch-off is deactivated.
Delayed switch-off is deactivated the next
time you start the engine.
Activating/deactivating the interior light-
ing delayed switch-off
If you remove the key from the ignition lock
while the Interior lighting delayed
switch off function is activated, the interior
lighting remains on for 10 seconds if it is dark.
X Press VorU on the steering wheel
to select the Settings... menu.
X Press the &button to select submenus.
X Press the WorX button to select the
Lighting submenu.
X Press the &button to select Interior
lighting delayed switch-off.
X Press the WorX button to activate
or deactivate Interior lighting
delayed switch-off.
X Press the &,VorU button to
select a different display.
Activating/deactivating the Intelligent
Light System*
When you activate the Intelligent Light
System you activate the following functions: R
motorway mode
R active light function
R extended range foglamps
X Press VorU on the steering wheel
to select the Settings... menu.
X Press the &button to select submenus.
X Press WorX to select the Light‐
ing submenu.
X Press &to select Intelligent Light
System.
X Press the WorX button to activate
or deactivate the Intelligent Light
System.
X Press the &,VorU button to
select a different display.
Setting the ambient lighting*
X Press VorU on the steering wheel
to select the Settings... menu.
X Press the &button to select submenus.
X Press the WorX button to select the
Lighting submenu.
X Press the &button to select Ambient
light.
X Press WorX to adjust the bright-
ness to any level from Level 0(off) to
Level 5 (bright).
X Press &, VorU to select a dif-
ferent display.
Vehicle submenu In the
Vehicle submenu, you can call up the
following functions:
R compass* (Y page 166)
R display when the ignition is switched off
(Y page 107)
R permanent Speedtronic (Y page 126)
R automatic locking feature (Y page 107)106
On-board computerControls
* optional
X164_AKB; 2; 3, en-GB
wobuchh,
Version: 2.11.8.1 2009-03-31T14:14:58+02:00 - Seite 106
Dateiname: 6515431202_buchblock.pdf; erzeugt am 01. Apr 2009 00:17:17; WK
Page 141 of 309
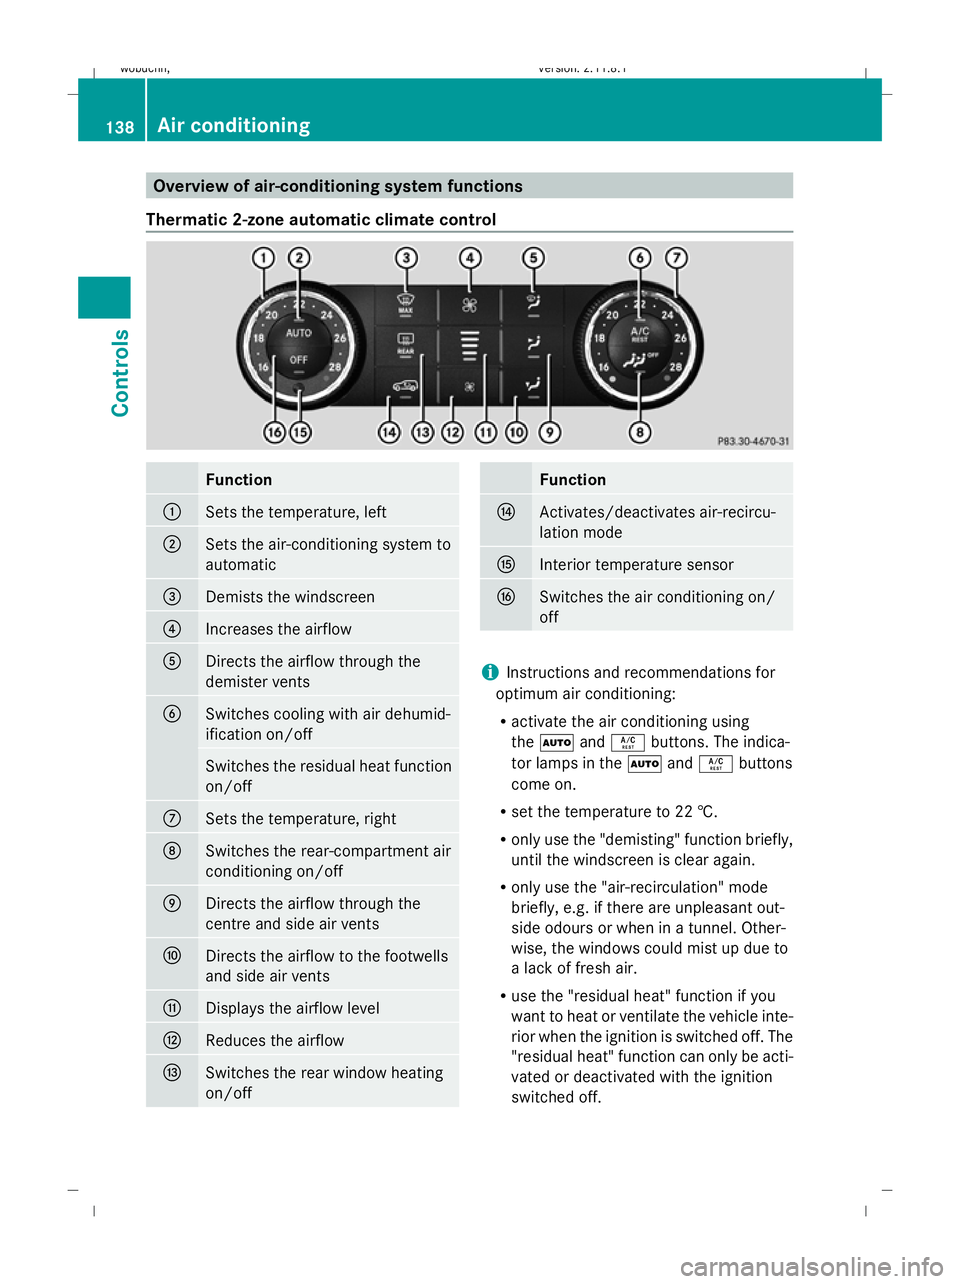
Overview of air-conditioning system functions
Thermatic 2-zone automatic climate control Function
:
Sets the temperature, left
;
Sets the air-conditioning system to
automatic
=
Demists the windscreen
?
Increases the airflow
A
Directs the airflow through the
demister vents
B
Switches cooling with air dehumid-
ification on/off
Switches the residual heat function
on/off
C
Sets the temperature, right
D
Switches the rear-compartment air
conditioning on/off
E
Directs the airflow through the
centre and side air vents
F
Directs the airflow to the footwells
and side air vents
G
Displays the airflow level
H
Reduces the airflow
I
Switches the rear window heating
on/off Function
J
Activates/deactivates air-recircu-
lation mode
K
Interior temperature sensor
L
Switches the air conditioning on/
off
i
Instructions and recommendations for
optimum air conditioning:
R activate the air conditioning using
the à andÁ buttons. The indica-
tor lamps in the ÃandÁ buttons
come on.
R set the temperature to 22 †.
R only use the "demisting" function briefly,
until the windscreen is clear again.
R only use the "air-recirculation" mode
briefly, e.g. if there are unpleasant out-
side odours or when in a tunnel. Other-
wise, the windows could mist up due to
a lack of fresh air.
R use the "residual heat" function if you
want to heat or ventilate the vehicle inte-
rior when the ignition is switched off. The
"residual heat" function can only be acti-
vated or deactivated with the ignition
switched off. 138
Air conditioningControls
X164_AKB; 2; 3, en-GB
wobuchh,
Version: 2.11.8.1 2009-03-31T14:14:58+02:00 - Seite 138
Dateiname: 6515431202_buchblock.pdf; erzeugt am 01. Apr 2009 00:17:28; WK