2009 MERCEDES-BENZ GL SUV lock
[x] Cancel search: lockPage 204 of 309
Care
Care and cleaning products
Regular care of your vehicle is a condition for
retaining the quality in the long term.
Use only care products and cleaning agents
recommended and approved by Mercedes-
Benz.
! For cleaning your vehicle, do not use any
of the following:
R dry, rough or hard cloths
R abrasive cleaning agents
R solvents
R cleaning agents containing solvents
and do not scrub.
Do not touch the surfaces and protective
films with hard objects, e.g. rings or ice
scrapers. You could otherwise scratch or
damage the surfaces and protective film. H
Environmental note
Dispose of empty packaging, cleaning cloths
and polishing wads in an environmentally
responsible manner.
! Do not park the vehicle for a long period
of time directly after cleaning, especially if
the wheels have just been cleaned with a
wheel cleaner. Wheel cleaners could cause
rapid corrosion of the brake discs and
brake pads/linings. After cleaning, park
the vehicle when it is at normal operating
temperature. Exterior care
Automatic car wash G
Risk of accident
The efficiency of the brakes is reduced after
using an automatic car wash. This could cause
an accident. For this reason, following a car
wash, drive with particular care until the
brakes are dry. You can wash the vehicle in an automatic car
wash from the beginning.
!
Do not wash vehicles with an exterior
spare wheel bracket* in an automatic car
wash.
If the vehicle is very dirty, pre-wash it before
cleaning it in an automatic car wash.
! Make sure that the automatic car wash is
suitable for the size of the vehicle. Fold in
the exterior mirrors before the vehicle is
washed. There is otherwise a risk of dam-
age to the exterior mirrors.
! When washing your vehicle in a tow-
through car wash, make sure that the auto-
matic transmission is in position N, other-
wise the vehicle could be damaged.
R Vehicles with a key:
Do not remove the key from the ignition
lock. Do not open the driver's or front-
passenger door when the engine is
switched off, as this automatically shifts
the automatic transmission to park posi-
tion Pand locks the wheels, unless you
have previously shifted the automatic
transmission to N.
R Vehicles with KEYLESS GO*:
Do not open the driver's or front-
passenger door when the engine is
switched off, as this shifts the automatic
transmission to park position Pand locks
the wheels.
! Make sure that the side windows are com-
pletely closed, that the ventilation/heater
blower is fully turned off and that the wind-
screen wiper switch is set to 0. Otherwise,
the rain/light sensor may be activated, trig-
gering unintended wiper movements. This
could cause damage to the vehicle.
After using an automatic car wash, wipe off
wax and drying agents from the windscreen
and the wiper blades. This will prevent smears
and reduce wiping noises caused by residue
on the windscreen. Care
201Operation
* optional
X164_AKB; 2; 3, en-GB
wobuchh,
Version: 2.11.8.1 2009-03-31T14:14:58+02:00 - Seite 201 Z
Dateiname: 6515431202_buchblock.pdf; erzeugt am 01. Apr 2009 00:17:53; WK
Page 205 of 309
High-pressure cleaners
G
Risk of accident
Do not use high-pressure cleaners with circu-
lar-jet nozzles (dirt grinders) to clean your
vehicle, in particular the tyres. You could oth-
erwise damage the tyres and cause an acci-
dent.
! Observe the instructions issued by the
equipment manufacturer concerning the
distance to be maintained between the
nozzle of the high-pressure cleaner and the
vehicle (at least 30 cm).
Move the high-pressure cleaner nozzle
around when cleaning your vehicle.
Do not aim directly at any of the following:
R tyres
R door joint
R electrical components
R battery
R connectors
R lights
R seals
R trim elements
R ventilation slots
Damaged seals or electrical components
can lead to failures or leaks.
Cleaning the paintwork Scratches, corrosive deposits, areas affected
by corrosion and damage caused by inade-
quate care cannot always be completely
repaired. In such cases, visit a qualified spe-
cialist workshop immediately, e.g. a
Mercedes-Benz Service Centre.
X Remove the following types of dirt immedi-
ately, whilst avoiding rubbing too hard.
Soak:
R insect remains with insect remover
R bird droppings with water and rinse off the treated surface after-
wards.
Remove:
R
tree resin, oils, fuels and greases by rub-
bing gently with a cloth soaked in petro-
leum ether or lighter fluid.
R tar stain with tar remover
R wax with silicone remover
! Do not affix:
R stickers
R films
R magnetic plates or similar items
to painted surfaces. Otherwise, you could
damage the paintwork.
Cleaning the wheels !
Do not use acidic wheel cleaners to
remove brake dust. This could damage
wheel bolts and brake components.
Cleaning the windows X
Clean the inside and outside of the win-
dows with a damp cloth and a cleaning
product approved and recommended by
Mercedes-Benz.
! Clean the water drainage channels of the
windscreen and the rear window at regular
intervals. Under certain circumstances,
deposits such as leaves, petals and pollen
may prevent water from draining away
leading to corrosion damage.
Cleaning the wiper blades G
Risk of injury
Before cleaning the windscreen or wiper
blades, turn the key to position 0in the igni-
tion lock or press the Start/Stop button* until
all indicator lamps have gone out in the instru-
ment cluster. The windscreen wipers could
otherwise move and cause injury. 202
CareOperation
* optional
X164_AKB; 2; 3, en-GB
wobuchh,
Version: 2.11.8.1 2009-03-31T14:14:58+02:00 - Seite 202
Dateiname: 6515431202_buchblock.pdf; erzeugt am 01. Apr 2009 00:17:53; WK
Page 206 of 309
!
Do not clean the wiper blades too often,
and avoid rubbing too hard, as this could
result in damage to the graphite coating.
This could cause wiper noise.
X Fold the wiper arms away from the wind-
screen.
X Clean the wiper blades carefully with a
damp cloth.
X Fold the wiper arms back again before
switching on the ignition.
Cleaning the headlamps X
Clean the plastic lenses of the headlamps
with a wet sponge and windscreen washer
fluid or cleaning cloths.
! Only use washer fluid or cleaning cloths
suitable for plastic lenses. Unsuitable
washer fluid or cleaning cloths could
scratch or damage the plastic lenses of the
headlamps.
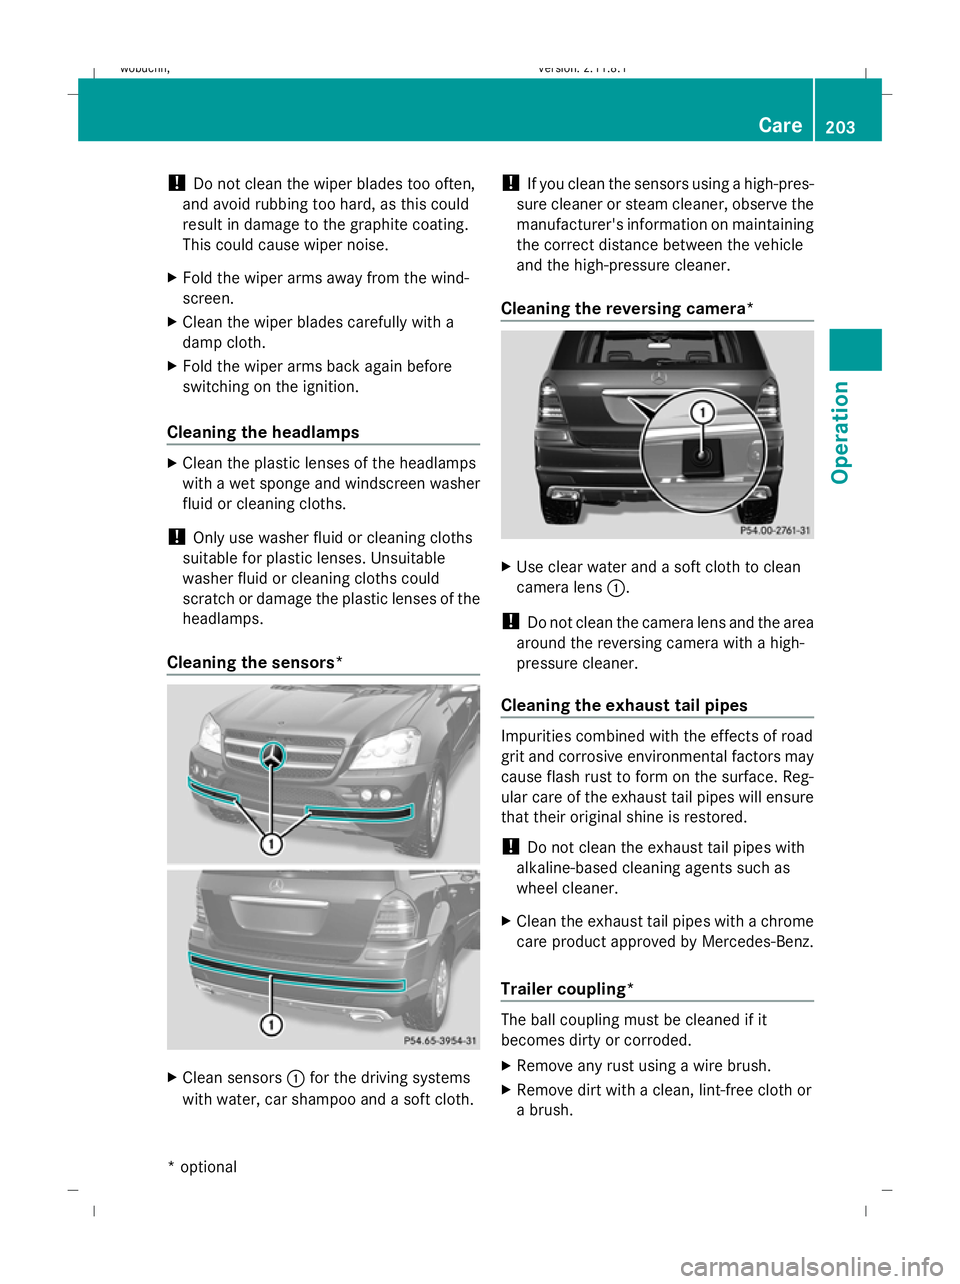
Cleaning the sensors* X
Clean sensors :for the driving systems
with water, car shampoo and a soft cloth. !
If you clean the sensors using a high-pres-
sure cleaner or steam cleaner, observe the
manufacturer's information on maintaining
the correct distance between the vehicle
and the high-pressure cleaner.
Cleaning the reversing camera* X
Use clear water and a soft cloth to clean
camera lens :.
! Do not clean the camera lens and the area
around the reversing camera with a high-
pressure cleaner.
Cleaning the exhaust tail pipes Impurities combined with the effects of road
grit and corrosive environmental factors may
cause flash rust to form on the surface. Reg-
ular care of the exhaust tail pipes will ensure
that their original shine is restored.
!
Do not clean the exhaust tail pipes with
alkaline-based cleaning agents such as
wheel cleaner.
X Clean the exhaust tail pipes with a chrome
care product approved by Mercedes-Benz.
Trailer coupling* The ball coupling must be cleaned if it
becomes dirty or corroded.
X
Remove any rust using a wire brush.
X Remove dirt with a clean, lint-free cloth or
a brush. Care
203Operation
* optional
X164_AKB; 2; 3, en-GB
wobuchh,
Version: 2.11.8.1 2009-03-31T14:14:58+02:00 - Seite 203 Z
Dateiname: 6515431202_buchblock.pdf; erzeugt am 01. Apr 2009 00:17:53; WK
Page 207 of 309
!
Do not clean the ball coupling with a high-
pressure cleaner. Do not use solvents. :
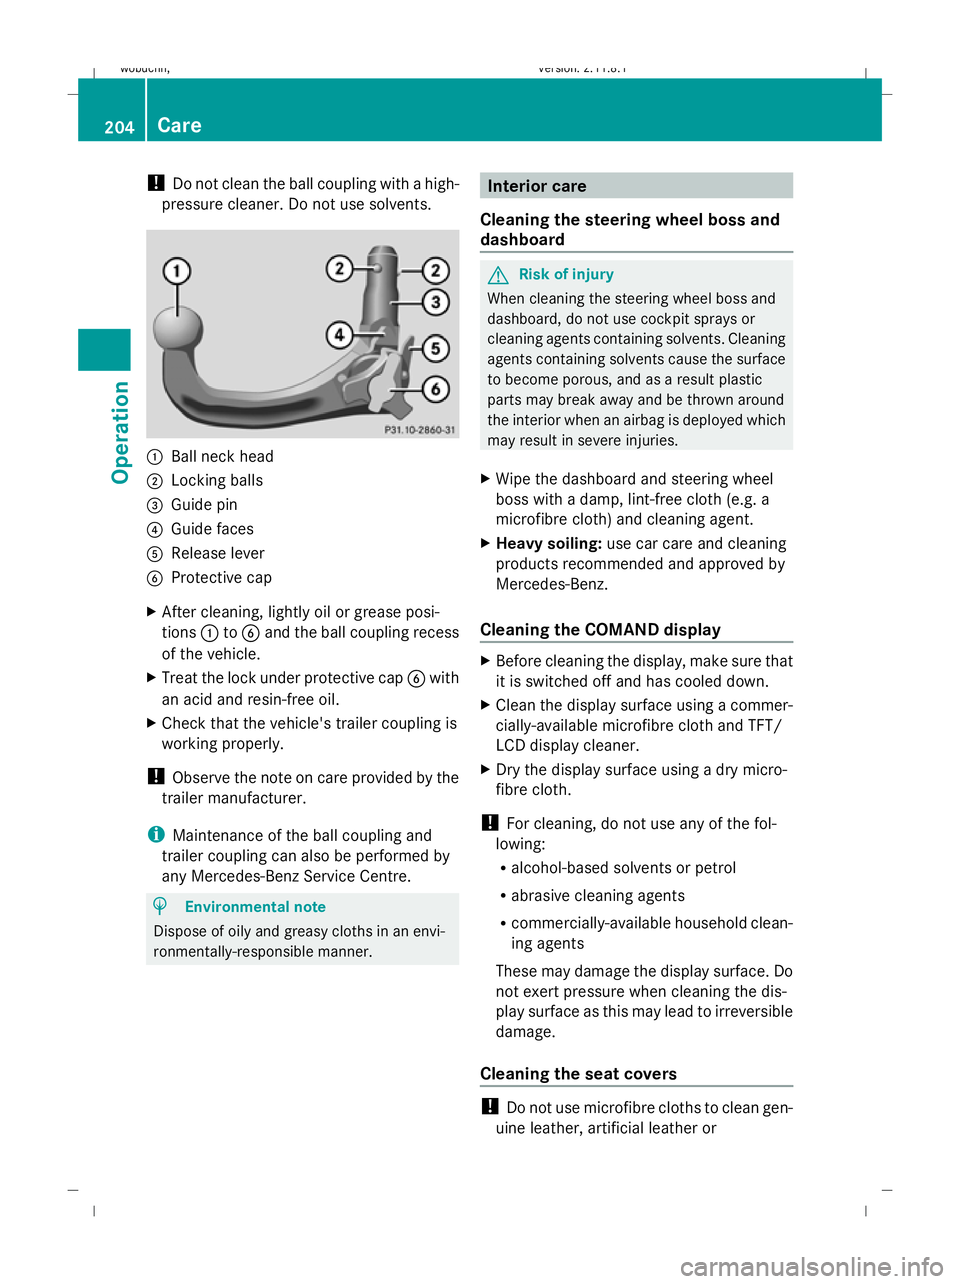
Ball neck head
; Locking balls
= Guide pin
? Guide faces
A Release lever
B Protective cap
X After cleaning, lightly oil or grease posi-
tions :toB and the ball coupling recess
of the vehicle.
X Treat the lock under protective cap Bwith
an acid and resin-free oil.
X Check that the vehicle's trailer coupling is
working properly.
! Observe the note on care provided by the
trailer manufacturer.
i Maintenance of the ball coupling and
trailer coupling can also be performed by
any Mercedes-Benz Service Centre. H
Environmental note
Dispose of oily and greasy cloths in an envi-
ronmentally-responsible manner. Interior care
Cleaning the steering wheel boss and
dashboard G
Risk of injury
When cleaning the steering wheel boss and
dashboard, do not use cockpit sprays or
cleaning agents containing solvents. Cleaning
agents containing solvents cause the surface
to become porous, and as a result plastic
parts may break away and be thrown around
the interior when an airbag is deployed which
may result in severe injuries.
X Wipe the dashboard and steering wheel
boss with a damp, lint-free cloth (e.g. a
microfibre cloth) and cleaning agent.
X Heavy soiling: use car care and cleaning
products recommended and approved by
Mercedes-Benz.
Cleaning the COMAND display X
Before cleaning the display, make sure that
it is switched off and has cooled down.
X Clean the display surface using a commer-
cially-available microfibre cloth and TFT/
LCD display cleaner.
X Dry the display surface using a dry micro-
fibre cloth.
! For cleaning, do not use any of the fol-
lowing:
R alcohol-based solvents or petrol
R abrasive cleaning agents
R commercially-available household clean-
ing agents
These may damage the display surface. Do
not exert pressure when cleaning the dis-
play surface as this may lead to irreversible
damage.
Cleaning the seat covers !
Do not use microfibre cloths to clean gen-
uine leather, artificial leather or 204
CareOperation
X164_AKB; 2; 3, en-GB
wobuchh,
Version: 2.11.8.1 2009-03-31T14:14:58+02:00 - Seite 204
Dateiname: 6515431202_buchblock.pdf; erzeugt am 01. Apr 2009 00:17:54; WK
Page 208 of 309
Alcantara
®
covers, as these are too aggres-
sive and, if used often, may damage the
cover.
! Clean:
R genuine leather covers with a damp
cloth, then wipe the covers down with a
dry cloth. Make sure that the leather
does not become soaked. For leather
care, use a leather care agent recom-
mended by Mercedes-Benz. You can
obtain information about this from any
Mercedes-Benz Service Centre.
R artificial leather covers with a cloth mois-
tened with a solution containing 1%
detergent (e.g. washing-up liquid).
R cloth covers with a microfibre cloth mois-
tened with a solution containing 1%
detergent (e.g. washing-up liquid). Rub
carefully and always wipe entire seat sec-
tions to avoid leaving visible lines. Leave
the seat to dry afterwards. Cleaning
results depend on the type of dirt and
how long it has been there.
R Alcantara ®
covers with a damp cloth.
Make sure you wipe entire seat sections
to avoid leaving visible lines.
i Note that regular care is essential to
ensure that the quality (both appearance
and comfort) of the covers is retained over
time.
Cleaning the plastic trim !
Do not affix the following to plastic surfa-
ces:
R stickers
R films
R scented oil bottles or similar items
You can otherwise damage the plastic.
! Ensure that cosmetics, insect repellent
and suntan lotion do not come into contact
with the vehicle's trim. This will protect the vehicle's high-quality trim and help retain
its overall appearance.
X Wipe the plastic trim with a damp, lint-free
cloth (e.g. a microfibre cloth).
X Heavy soiling: use car care and cleaning
products recommended and approved by
Mercedes-Benz.
Cleaning the wooden trim* and trim
strips X
Wipe the wooden trim and trim strips with
a damp, lint-free cloth (e.g. a microfibre
cloth).
X Heavy soiling: use car care and cleaning
products recommended and approved by
Mercedes-Benz. Care
205Operation
* optional
X164_AKB; 2; 3, en-GB
wobuchh
,V ersion: 2.11.8.1
2009-03-31T14:14:58+02:00 - Seite 205 Z
Dateiname: 6515431202_buchblock.pdf; erzeugt am 01. Apr 2009 00:17:54; WK
Page 209 of 309

206 X164_AKB; 2; 3, en-GB
wobuchh,
Version: 2.11.8.1 2009-03-31T14:14:58+02:00 - Seite 206Dateiname: 6515431202_buchblock.pdf; erzeugt am 01. Apr 2009 00:17:54; WK
Page 210 of 309
Where will I find...?
...........................208
Display messages ............................. 211
Troubleshooting ................................ 233
Locking/unlocking in an emer-
gency ................................................. 250
Resetting triggered NECK-PRO
head restraints .................................. 252
Replacing batteries (key and
remote control) ................................. 253
Changing bulbs ................................. 254
Replacing the wiper blades ..............261
Flat tyre ............................................. 262
Battery ............................................... 272
Jump-starting .................................... 276
Towing and tow-starting ..................277
Fuses .................................................. 280 207Practical advice
X164_AKB; 2; 3, en-GB
wobuchh,
Version: 2.11.8.1 2009-03-31T14:14:58+02:00 - Seite 207
Dateiname: 6515431202_buchblock.pdf; erzeugt am 01. Apr 2009 00:17:55; WK
Page 211 of 309
Where will I find...?
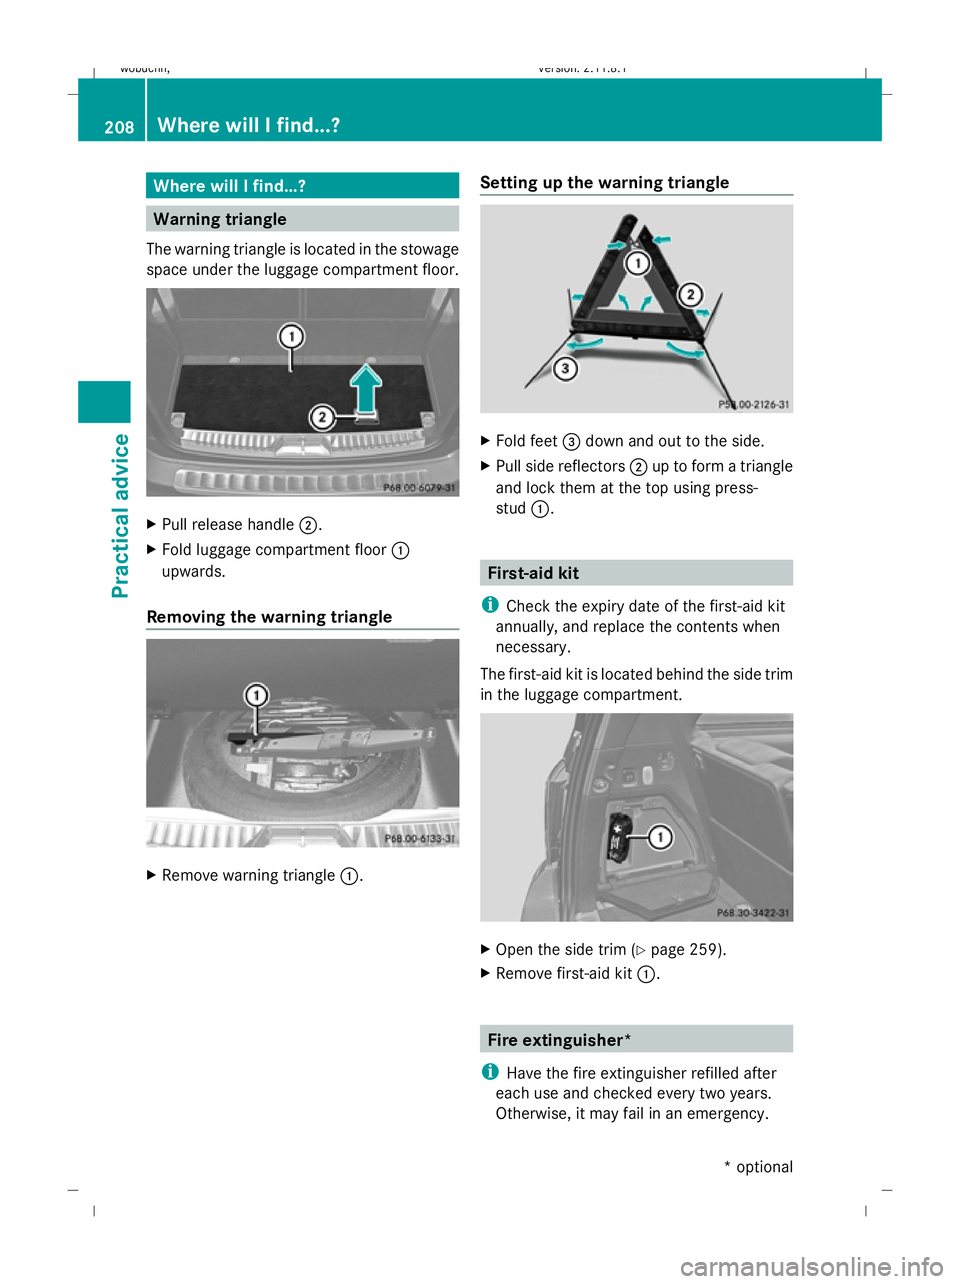
Warning triangle
The warning triangle is located in the stowage
space under the luggage compartment floor. X
Pull release handle ;.
X Fold luggage compartment floor :
upwards.
Removing the warning triangle X
Remove warning triangle :.Setting up the warning triangle X
Fold feet =down and out to the side.
X Pull side reflectors ;up to form a triangle
and lock them at the top using press-
stud :. First-aid kit
i Check the expiry date of the first-aid kit
annually, and replace the contents when
necessary.
The first-aid kit is located behind the side trim
in the luggage compartment. X
Open the side trim (Y page 259).
X Remove first-aid kit :. Fire extinguisher*
i Have the fire extinguisher refilled after
each use and checked every two years.
Otherwise, it may fail in an emergency. 208
Where will I find...?Practical advice
* optional
X164_AKB; 2; 3, en-GB
wobuchh,
Version: 2.11.8.1 2009-03-31T14:14:58+02:00 - Seite 208
Dateiname: 6515431202_buchblock.pdf; erzeugt am 01. Apr 2009 00:17:56; WK