2009 MERCEDES-BENZ GL SUV heating
[x] Cancel search: heatingPage 27 of 309
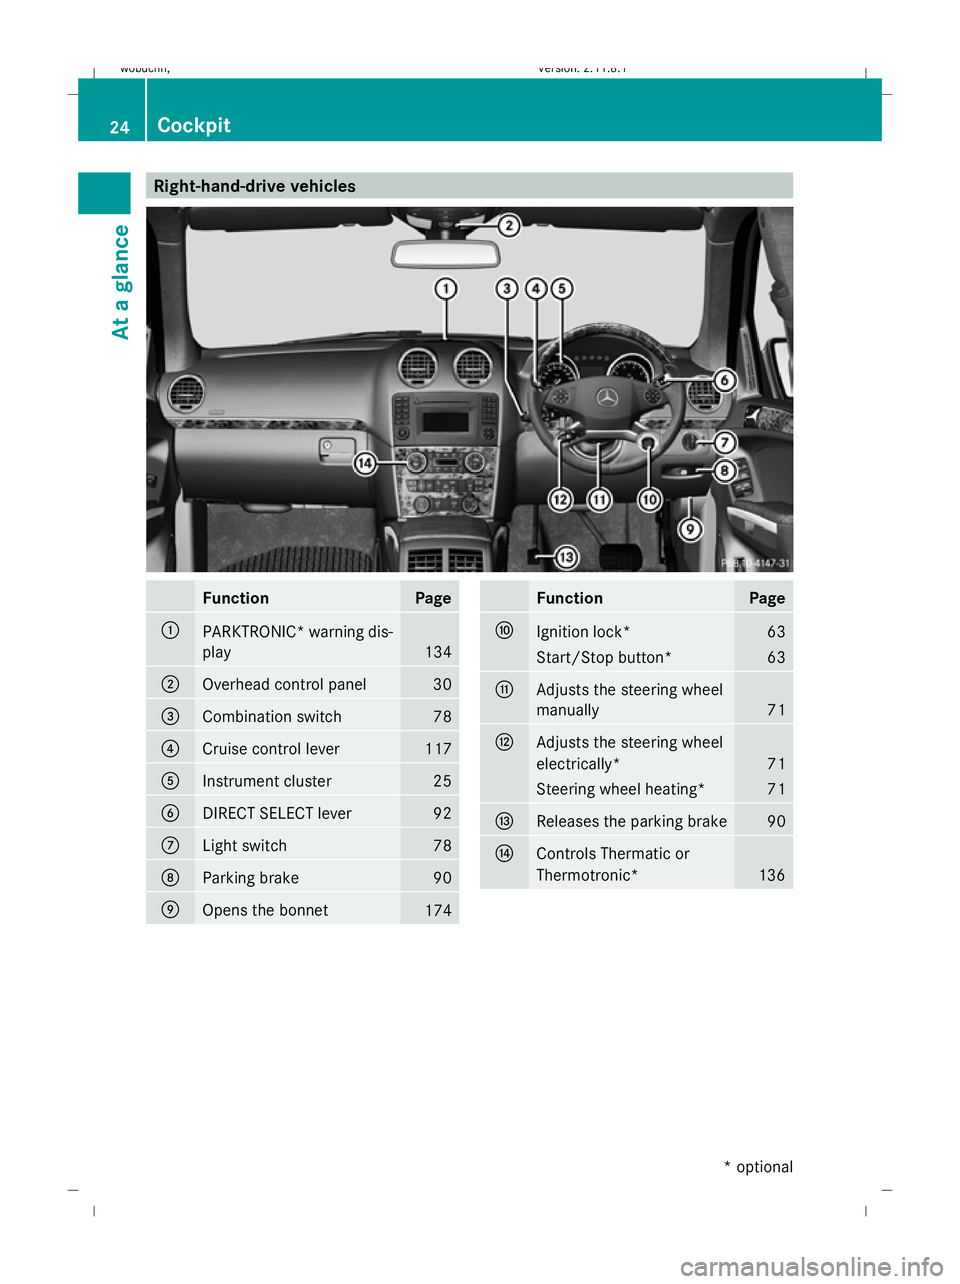
Right-hand-drive vehicles
Function Page
:
PARKTRONIC
*warning dis-
play 134
;
Overhead control panel 30
=
Combination switch 78
?
Cruise control lever 117
A
Instrument cluster 25
B
DIRECT SELECT lever 92
C
Light switch 78
D
Parking brake 90
E
Opens the bonnet
174 Function Page
F
Ignition lock* 63
Start/Stop button* 63
G
Adjusts the steering wheel
manually
71
H
Adjusts the steering wheel
electrically*
71
Steering wheel heating* 71
I
Releases the parking brake 90
J
Controls Thermatic or
Thermotronic*
13624
CockpitAt a glance
* optional
X164_AKB; 2; 3, en-GB
wobuchh,
Version: 2.11.8.1 2009-03-31T14:14:58+02:00 - Seite 24
Dateiname: 6515431202_buchblock.pdf; erzeugt am 01. Apr 2009 00:16:35; WK
Page 32 of 309

Centre console
Function Page
:
Operates COMAND APS*
or the audio system
;
Hazard warning lamps 81
=
Selects the drive program 95
?
Adjusts the seat heating* 70
A
Seat ventilation* 69
B
Auxiliary heating* 147
C
42warning
lamp
2 43
D
Engages the differential
locks
116 Function Page
E
LOW RANGE off-road gear 114
F
DSR 113
G
Level control 129
H
ESP
® 52
I
Select ADS settings 129
J
PARKTRONIC* 133
K
Stowage compartment 152
L
Stowage compartment 153
M
Cup holder 153
2
The warning lamp also lights up briefly when you turn the key to position 2 in the ignition lock on vehicles
without automatic child seat recognition on the front-passenger seat*. It has no function, however, and does
not indicate that the front-passenger seat is equipped with automatic child seat recognition. Centre console
29At a glance
* optional
X164_AKB; 2; 3, en-GB
wobuchh,
Version: 2.11.8.1 2009-03-31T14:14:58+02:00 - Seite 29 Z
Dateiname: 6515431202_buchblock.pdf; erzeugt am 01. Apr 2009 00:16:40; WK
Page 73 of 309
X
Make sure that the key is in position 1or
2 in the ignition lock.
X To switch on: press button:repeatedly
until the required ventilation level is set.
i If you open the side windows and the slid-
ing/tilting sunroof* using the key
(Y page 87), the seat ventilation of the
driver's seat automatically switches to the
highest level.
X To switch off: press button:repeatedly
until all indicator lamps go out.
i If the battery voltage is too low, the seat
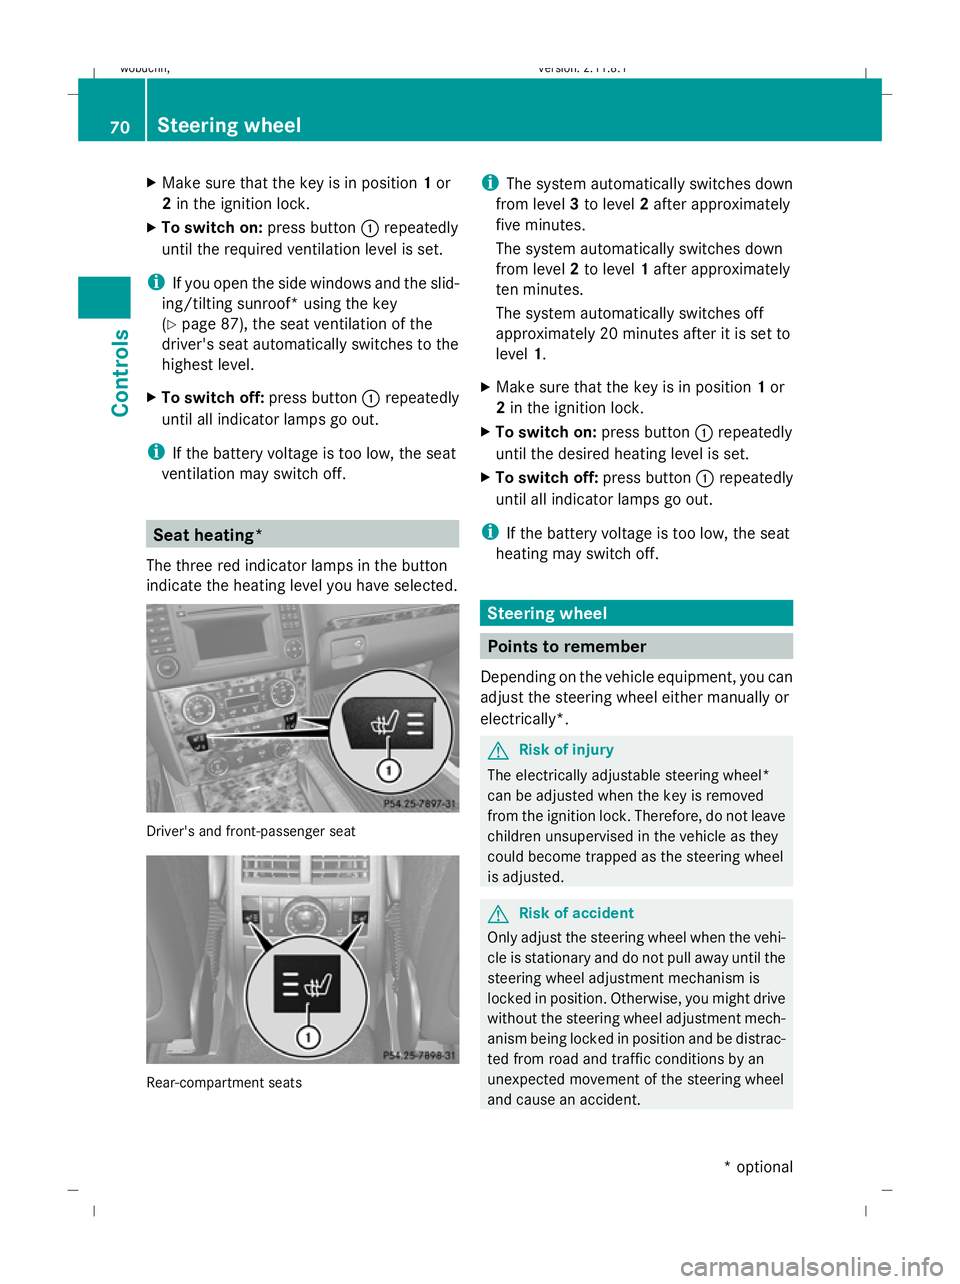
ventilation may switch off. Seat heating*
The three red indicator lamps in the button
indicate the heating level you have selected. Driver's and front-passenger seat
Rear-compartment seats i
The system automatically switches down
from level 3to level 2after approximately
five minutes.
The system automatically switches down
from level 2to level 1after approximately
ten minutes.
The system automatically switches off
approximately 20 minutes after it is set to
level 1.
X Make sure that the key is in position 1or
2 in the ignition lock.
X To switch on: press button:repeatedly
until the desired heating level is set.
X To switch off: press button:repeatedly
until all indicator lamps go out.
i If the battery voltage is too low, the seat
heating may switch off. Steering wheel
Points to remember
Depending on the vehicle equipment, you can
adjust the steering wheel either manually or
electrically*. G
Risk of injury
The electrically adjustable steering wheel*
can be adjusted when the key is removed
from the ignition lock. Therefore, do not leave
children unsupervised in the vehicle as they
could become trapped as the steering wheel
is adjusted. G
Risk of accident
Only adjust the steering wheel when the vehi-
cle is stationary and do not pull away until the
steering wheel adjustment mechanism is
locked in position. Otherwise, you might drive
without the steering wheel adjustment mech-
anism being locked in position and be distrac-
ted from road and traffic conditions by an
unexpected movement of the steering wheel
and cause an accident. 70
Steering wheelControls
* optional
X164_AKB; 2; 3, en-GB
wobuchh,
Version: 2.11.8.1 2009-03-31T14:14:58+02:00 - Seite 70
Dateiname: 6515431202_buchblock.pdf; erzeugt am 01. Apr 2009 00:17:02; WK
Page 74 of 309
However, the steerability of the vehicle is not
affected.
When you adjust the steering wheel, make
sure that:
R the steering wheel can be reached with
your arms slightly bent
R you can move your legs freely
R you can see all the displays in the instru-
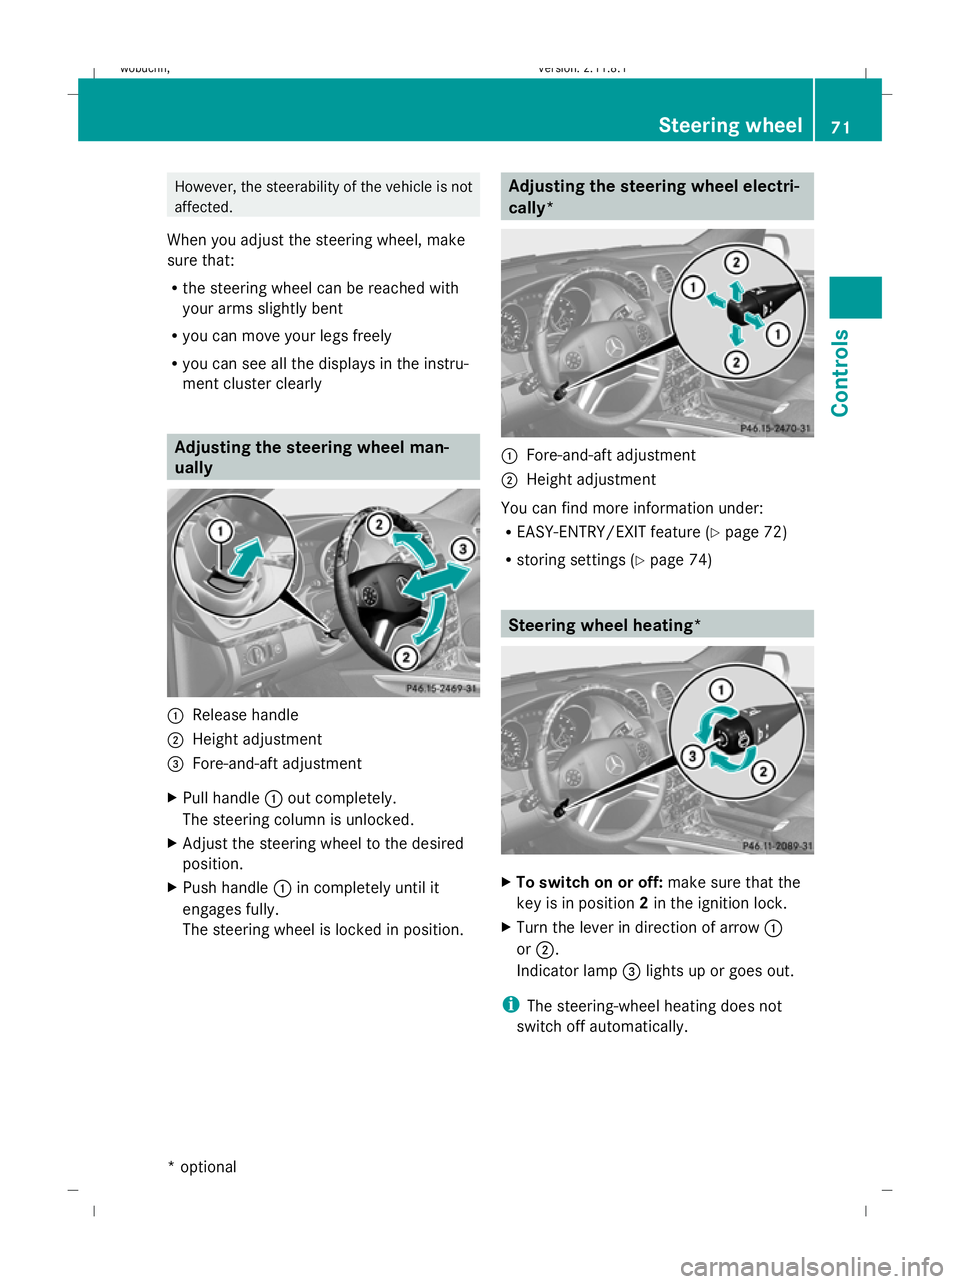
ment cluster clearly Adjusting the steering wheel man-
ually
:
Release handle
; Height adjustment
= Fore-and-aft adjustment
X Pull handle :out completely.
The steering column is unlocked.
X Adjust the steering wheel to the desired
position.
X Push handle :in completely until it
engages fully.
The steering wheel is locked in position. Adjusting the steering wheel electri-
cally*
:
Fore-and-aft adjustment
; Height adjustment
You can find more information under:
R EASY-ENTRY/EXIT feature (Y page 72)
R storing settings (Y page 74) Steering wheel heating*
X
To switch on or off: make sure that the
key is in position 2in the ignition lock.
X Turn the lever in direction of arrow :
or ;.
Indicator lamp =lights up or goes out.
i The steering-wheel heating does not
switch off automatically. Steering wheel
71Controls
* optional
X164_AKB; 2; 3, en-GB
wobuchh
,V ersion: 2.11.8.1
2009-03-31T14:14:58+02:00 - Seite 71 Z
Dateiname: 6515431202_buchblock.pdf; erzeugt am 01. Apr 2009 00:17:02; WK
Page 106 of 309
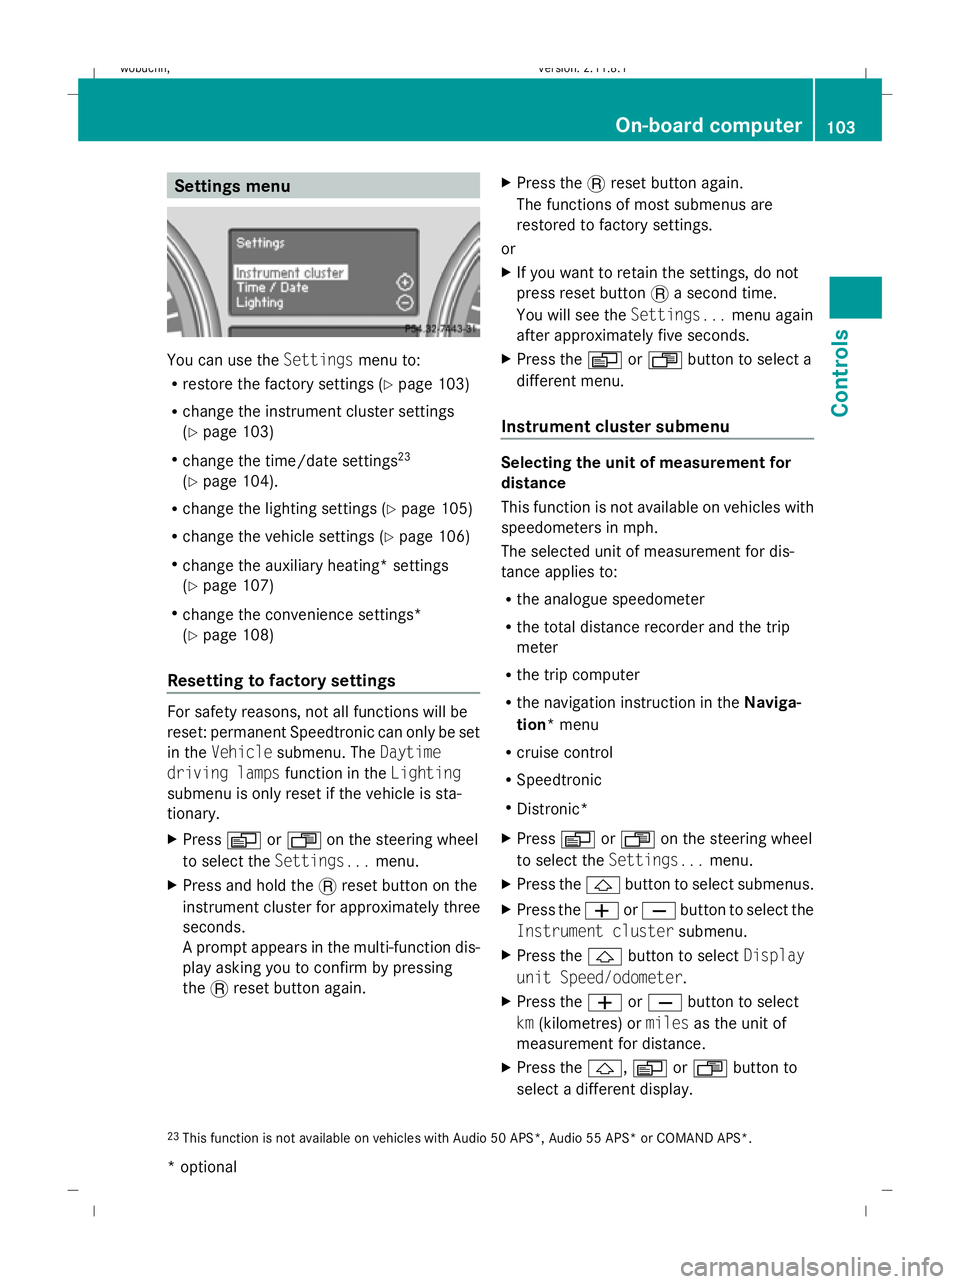
Settings menu
You can use the
Settingsmenu to:
R restore the factory settings (Y page 103)
R change the instrument cluster settings
(Y page 103)
R change the time/date settings 23
(Y page 104).
R change the lighting settings (Y page 105)
R change the vehicle settings (Y page 106)
R change the auxiliary heating* settings
(Y page 107)
R change the convenience settings*
(Y page 108)
Resetting to factory settings For safety reasons, not all functions will be
reset: permanent Speedtronic can only be set
in the Vehicle submenu. The Daytime
driving lamps function in theLighting
submenu is only reset if the vehicle is sta-
tionary.
X Press VorU on the steering wheel
to select the Settings... menu.
X Press and hold the .reset button on the
instrument cluster for approximately three
seconds.
A prompt appears in the multi-function dis-
play asking you to confirm by pressing
the .reset button again. X
Press the .reset button again.
The functions of most submenus are
restored to factory settings.
or
X If you want to retain the settings, do not
press reset button .a second time.
You will see the Settings...menu again
after approximately five seconds.
X Press the VorU button to select a
different menu.
Instrument cluster submenu Selecting the unit of measurement for
distance
This function is not available on vehicles with
speedometers in mph.
The selected unit of measurement for dis-
tance applies to:
R
the analogue speedometer
R the total distance recorder and the trip
meter
R the trip computer
R the navigation instruction in the Naviga-
tion* menu
R cruise control
R Speedtronic
R Distronic*
X Press VorU on the steering wheel
to select the Settings... menu.
X Press the &button to select submenus.
X Press the WorX button to select the
Instrument cluster submenu.
X Press the &button to select Display
unit Speed/odometer.
X Press the WorX button to select
km (kilometres) or milesas the unit of
measurement for distance.
X Press the &,VorU button to
select a different display.
23 This function is not available on vehicles with Audio 50 APS*, Audio 55 APS* or COMAND APS*. On-board computer
103Controls
* optional
X164_AKB; 2; 3, en-GB
wobuchh,
Version: 2.11.8.1 2009-03-31T14:14:58+02:00 - Seite 103 Z
Dateiname: 6515431202_buchblock.pdf; erzeugt am 01. Apr 2009 00:17:16; WK
Page 110 of 309
Setting the display when the ignition is
switched off
The
Display when ignition off function
allows you to set which display you see in the
multi-function display after removing the key
from the ignition lock.
X Press VorU on the steering wheel
to select the Settings... menu.
X Press the &button to select submenus.
X Press the WorX button to select the
Vehicle submenu.
X Press the &button to select Display
when ignition off.
X Press the WorX button to select
Interior motion sensor, Tow-away
protection orMiles/km.
X Press the &,VorU button to
select a different display.
Activating/deactivating the automatic
door locking feature
When you activate the Automatic door
locking function, your vehicle will be cen-
trally locked above a speed of approximately
15 km/h.
i For more information on the automatic
door locking feature, see (Y page 60).
X Press VorU on the steering wheel
to select the Settings... menu.
X Press the &button to select submenus.
X Press the WorX button to select the
Vehicle submenu.
X Press the &button to select Auto‐
matic door locking.
X Press the WorX button to activate
or deactivate the Automatic door lock‐
ing feature.
X Press the &,VorU button to
select a different display. Heating submenu Auxiliary heating* departure time
Only vehicles with auxiliary heating have this
function.
The
Aux.heating departure time function
allows you to select a stored departure time
or change the departure time for which the
vehicle with auxiliary heating is preheated.
The auxiliary heating timer function calcu-
lates the switch-on time according to the out-
side temperature so that the vehicle is pre-
heated by the departure time. When the
departure time is reached, the auxiliary heat-
ing continues to heat for a further five
minutes and then switches off. The auxiliary
heating adopts the temperature settings
selected for Thermatic 2-zone automatic cli-
mate control or Thermotronic luxury multi-
zone automatic climate control*.
You can switch off the auxiliary heating by
using the remote control or the auxiliary heat-
ing button on the centre console. G
Risk of poisoning
Exhaust fumes are produced when the auxili-
ary heating is in operation. Inhaling these
exhaust fumes can be poisonous. You should
therefore switch off the auxiliary heating in
confined spaces without an extraction sys-
tem, e.g. a garage. G
Risk of fire
When the auxiliary heating is in operation,
parts of the vehicle can become very hot.
Make sure that the exhaust system does
not under any circumstances come into con-
tact with highly flammable materials such as
dry grass or fuels. The highly flammable mate-
rial could otherwise ignite and set the vehicle
alight. Select your parking space accordingly.
Operating the auxiliary heating is therefore
prohibited at filling stations or when your vehi-
cle is being refuelled. Always switch off the
auxiliary heating at filling stations. On-board computer
107Controls
* optional
X164_AKB; 2; 3, en-GB
wobuchh,
Version: 2.11.8.1 2009-03-31T14:14:58+02:00 - Seite 107 Z
Dateiname: 6515431202_buchblock.pdf; erzeugt am 01. Apr 2009 00:17:17; WK
Page 111 of 309
Selecting the departure time or deactivat-
ing a selected departure time
You can call up the Aux.heating depar‐
ture time function directly.
X Turn the key to position 1or 2in the ignition
lock.
X Press the button for the auxiliary heating on
the centre console (Y page 147).
or
X Press VorU on the steering wheel
to select the Settings... menu.
X Press the &button to select submenus.
X Press the WorX button to select the
Heater submenu.
X Press the &button to select Aux.heat‐
ing departure time.
You will see the selected setting.
X Press the WorX button to select
one of the three departure times or Timer
off (no timer active).
When a switch-on time is selected, the yel-
low indicator lamp lights up in the auxiliary
heating button.
Changing the departure time
X Press VorU on the steering wheel
to select the Settings... menu.
X Press the &button to select submenus.
X Press the WorX button to select the
Heater submenu.
X Press the &button to select Aux.heat‐
ing departure time.
X Press WorX to select Time 1,
Time 2 orTime 3 to be changed.
X Press &to select Departure time
X Set hour.
X Press the WorX button to set the
hour.
X Press the &button to select Depar‐
ture time X Set minutes. X
Press the WorX button to set the
minutes.
X Press the *button to select a different
display.
After changing from one menu to another,
the new time setting is stored. The yellow
indicator lamp lights up on the button for
the auxiliary heating on the centre console.
Convenience submenu* Activating or deactivating the easy-entry/
exit feature*
G
Risk of injury
The steering wheel moves when the EASY-
ENTRY/EXIT feature is active. There is a risk
of occupants becoming trapped. Before acti-
vating the EASY-ENTRY/EXIT feature, make
sure that nobody can become trapped.
Do not leave children unsupervised in the
vehicle, even if they are secured in a child
restraint system. The children could open the
driver's door and thereby unintentionally acti-
vate the EASY-ENTRY/EXIT feature and
become trapped.
X Press VorU on the steering wheel
to select the Settings... menu.
X Press the &button to select submenus.
X Press the WorX button to select the
Convenience submenu.
X Press the &button to select the EASY-
ENTRY feature.
X Press the WorX button to activate
or deactivate the EASY-ENTRY system.
X Press the &,VorU button to
select a different display.
Switching the belt adjustment on/off
X Press VorU on the steering wheel
to select the Settings... menu.
X Press the WorX button to select the
Convenience submenu. 108
On-board computerControls
* optional
X164_AKB; 2; 3, en-GB
wobuchh,
Version: 2.11.8.1 2009-03-31T14:14:58+02:00 - Seite 108
Dateiname: 6515431202_buchblock.pdf; erzeugt am 01. Apr 2009 00:17:17; WK
Page 120 of 309

The engaged differential appears in the multi-
function display:
A
The differential lock for the transfer case
is locked.
The differential locks are not controlled auto-
matically. The steerability of the vehicle is
restricted considerably. Drive carefully and
accelerate gently for optimum traction.
You can switch back to automatic mode at
any time. For safety reasons, the differential
locks disengage automatically at speeds
above 50 km/h. If you stop the vehicle and
switch off the ignition for longer than ten sec-
onds, the differential locks switch back to
automatic mode.
Message in the multi-function display
Diff. lock system overheated.
Wait briefly
The differential lock system has overheated
and briefly disengaged.
X Continue driving.
The differential locks cool off and are soon
available once again. Driving systems
Overview of driving systems
The vehicle's driving systems are described
on the following pages:
R cruise control, Distronic *and Speedtronic,
which are used to control the speed of the
vehicle
R Adaptive damping system (ADS), for indi-
vidual adjustment of suspension tuning R
level control, for individual adjustment of
ground clearance
R PARKTRONIC*, which assists you in park-
ing and manoeuvring
R reversing camera*, which assists you when
parking and manoeuvring
The ABS, BAS, adaptive brake lights, ESP ®
,
EBV and 4ETS driving safety systems and the
distance warning function* are described in
the "Driving safety systems" section
(Y page 49). Cruise control
Cruise control maintains a constant road
speed for you. It brakes automatically in order
to avoid exceeding the set speed. On long and
steep downhill gradients, especially if the
vehicle is laden or towing a trailer, you must
select shift range 1,2or 3in good time. By
doing so, you will make use of the braking
effect of the engine, which relieves the load
on the brake system and prevents the brakes
from overheating and wearing too quickly. G
Risk of accident
Do not change down for additional engine
braking on a slippery road surface. This could
cause the drive wheels to lose their grip and
the vehicle could skid.
Use cruise control only if road and traffic con-
ditions make it appropriate to maintain a
steady speed for a prolonged period. You can
store any road speed above 30 km/h. G
Risk of accident
Cruise control cannot take account of road
and traffic conditions.
Always pay attention to traffic conditions
even when cruise control is activated.
Cruise control is only an aid designed to assist
driving. You are responsible for the vehicle's
speed and for braking in good time. Driving systems
117Controls
* optional
X164_AKB; 2; 3, en-GB
wobuchh
,V ersion: 2.11.8.1
2009-03-31T14:14:58+02:00 - Seite 117 Z
Dateiname: 6515431202_buchblock.pdf; erzeugt am 01. Apr 2009 00:17:20; WK