2009 KIA Sportage clock
[x] Cancel search: clockPage 9 of 371

23
1
2
3
4
5
6
7
8
9
Your vehicle at a glance
INSTRUMENT PANEL OVERVIEW
1. Driver’s air bag
2. Light control / Turn signals
3. Instrument cluster
4. Wiper/Washer
5. Ignition switch
6. Steering wheel
7. Digital clock
8. Hazard
9. Audio controls (if equipped)
10. Climate control system (if equipped)
11. Passenger’s air bag
12. Vent controls
13. Glove box
14. Ashtray
15. Cigar lighter
16. Gear shift lever
17. Auto cruise controls (if equipped)
18. PASSENGER AIR BAG “OFF”indicator
OKM029003L
Page 90 of 371
381
1
2
3
4
5
6
7
8
9
Knowing your vehicle
Closing the hood1. Before closing the hood, check thefollowing:
ment must be correctly installed.
bustible material must be
removed from the engine com-
partment.
2. Secure the support rod in its clip.
3. Lower the hood to about 30 cm (12 inches) height and then let it
drop to properly lock in place.
Make sure the hood is properly
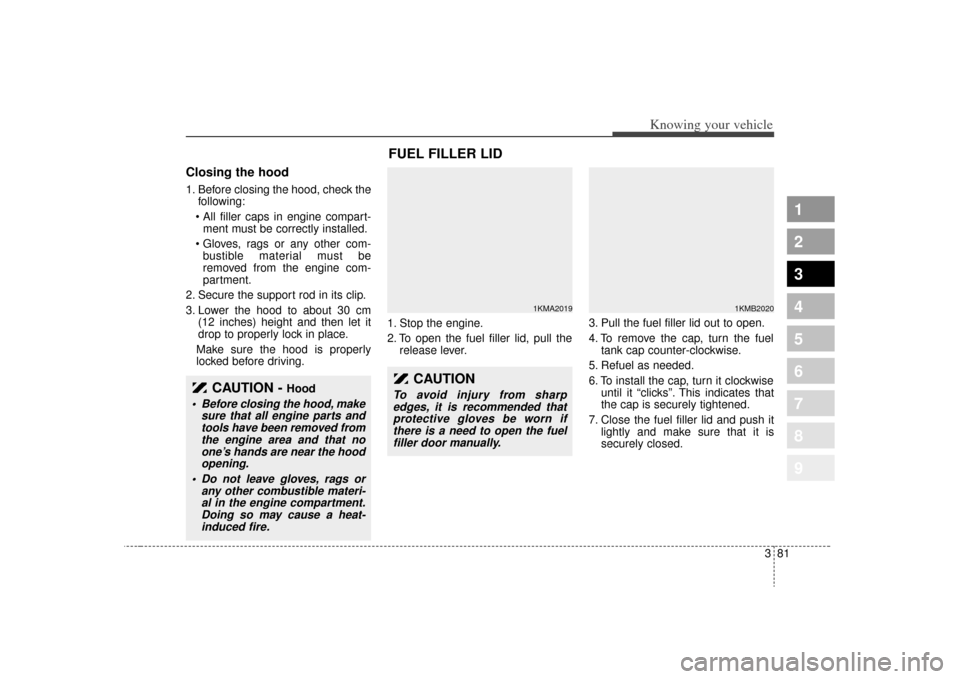
locked before driving. 1. Stop the engine.
2. To open the fuel filler lid, pull the
release lever. 3. Pull the fuel filler lid out to open.
4. To remove the cap, turn the fuel
tank cap counter-clockwise.
5. Refuel as needed.
6. To install the cap, turn it clockwise until it “clicks”. This indicates that
the cap is securely tightened.
7. Close the fuel filler lid and push it lightly and make sure that it is
securely closed.
CAUTION -
Hood
Before closing the hood, makesure that all engine parts andtools have been removed fromthe engine area and that noone’s hands are near the hoodopening.
Do not leave gloves, rags or any other combustible materi-al in the engine compartment.Doing so may cause a heat-induced fire.
FUEL FILLER LID
1KMA2019
1KMB2020
CAUTION
To avoid injury from sharpedges, it is recommended thatprotective gloves be worn ifthere is a need to open the fuelfiller door manually.
Page 104 of 371
395
1
2
3
4
5
6
7
8
9
Knowing your vehicle
✽ ✽NOTICE• Use when the engine is running,
and remove a plug from the power
outlet after using the electric
appliance. Using when the engine
stops or remaining the electric
appliance with plugged in for
many hours may cause the battery
to be discharged.
• Only use 12V electric appliances which are less than 10A in electric
capacity.
• Adjust the air-conditioner or heater to the lowest operating level
when you have to use the power
socket.
• Close the cover when not in use.
• Some electronic devices can cause electronic interference when
plugged into a vehicle’s power out-
let. These devices may cause exces-
sive audio static and malfunctions
in other electronic systems or
devices used in your vehicle.
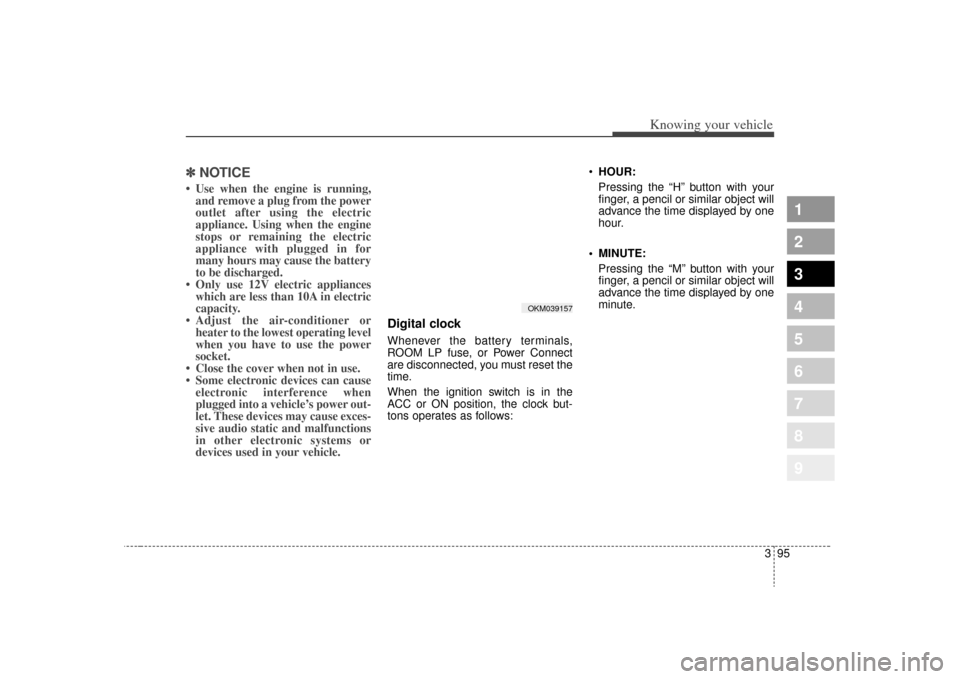
Digital clockWhenever the battery terminals,
ROOM LP fuse, or Power Connect
are disconnected, you must reset the
time.
When the ignition switch is in the
ACC or ON position, the clock but-
tons operates as follows:
HOUR:
Pressing the “H” button with your
finger, a pencil or similar object will
advance the time displayed by one
hour.
MINUTE: Pressing the “M” button with your
finger, a pencil or similar object will
advance the time displayed by one
minute.
OKM039157
Page 121 of 371
Knowing your vehicle112
3
1
2
3
4
5
6
7
8
9
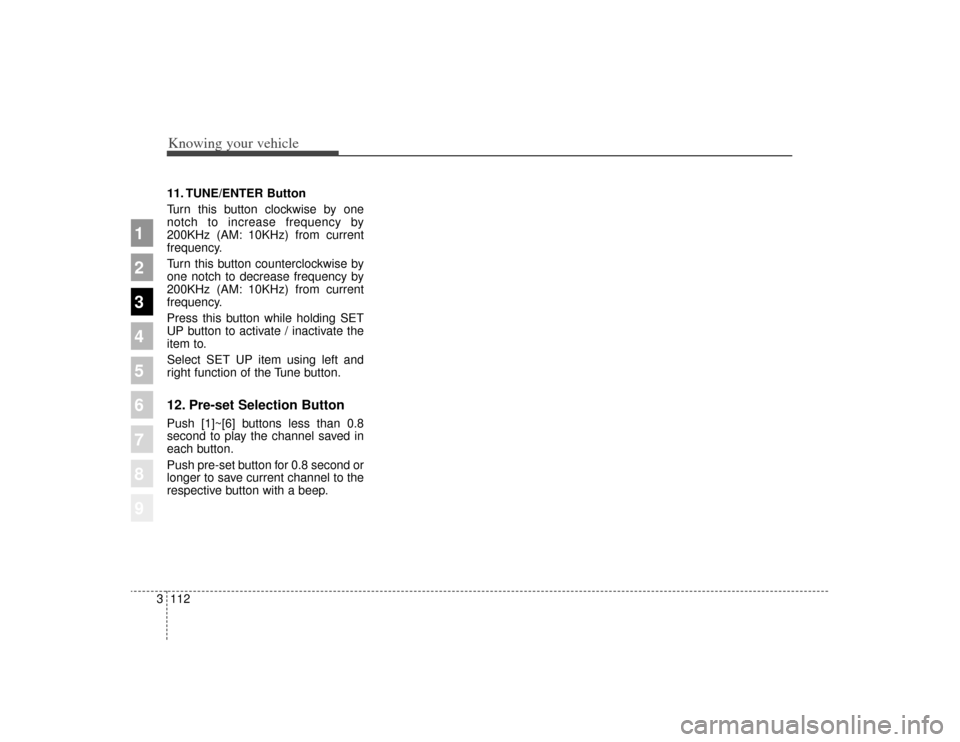
11. TUNE/ENTER Button
Turn this button clockwise by one
notch to increase frequency by
200KHz (AM: 10KHz) from current
frequency.
Turn this button counterclockwise by
one notch to decrease frequency by
200KHz (AM: 10KHz) from current
frequency.
Press this button while holding SET
UP button to activate / inactivate the
item to.
Select SET UP item using left and
right function of the Tune button.12. Pre-set Selection ButtonPush [1]~[6] buttons less than 0.8
second to play the channel saved in
each button.
Push pre-set button for 0.8 second or
longer to save current channel to the
respective button with a beep.
Page 123 of 371
Knowing your vehicle114
3
1
2
3
4
5
6
7
8
9
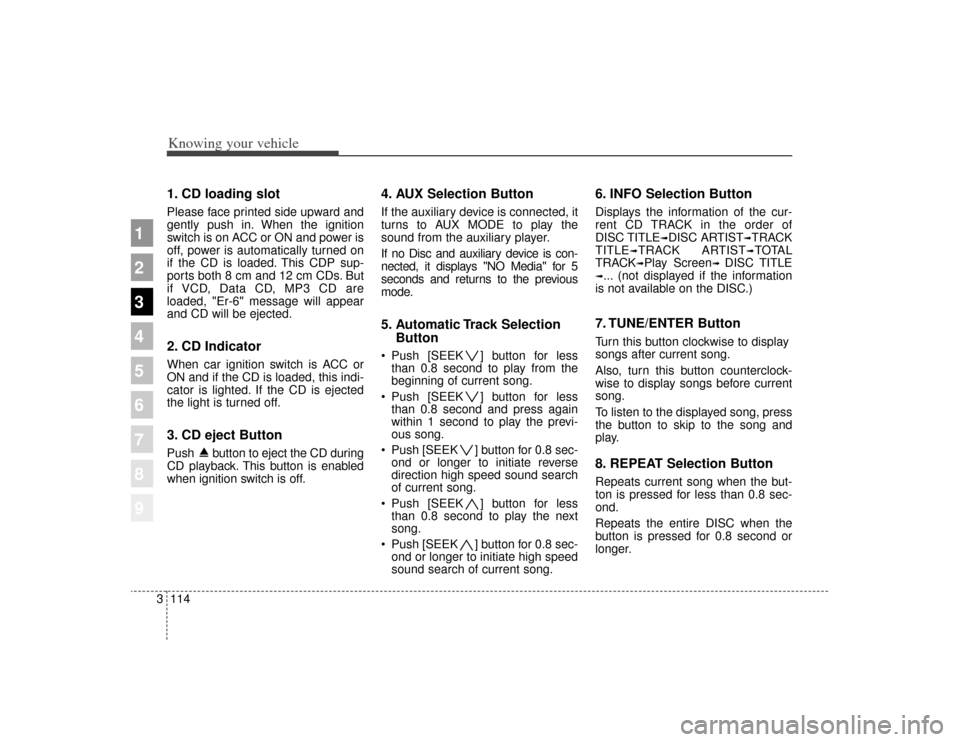
1. CD loading slotPlease face printed side upward and
gently push in. When the ignition
switch is on ACC or ON and power is
off, power is automatically turned on
if the CD is loaded. This CDP sup-
ports both 8 cm and 12 cm CDs. But
if VCD, Data CD, MP3 CD are
loaded, "Er-6" message will appear
and CD will be ejected.2. CD Indicator When car ignition switch is ACC or
ON and if the CD is loaded, this indi-
cator is lighted. If the CD is ejected
the light is turned off.3. CD eject ButtonPush button to eject the CD during
CD playback. This button is enabled
when ignition switch is off.
4. AUX Selection ButtonIf the auxiliary device is connected, it
turns to AUX MODE to play the
sound from the auxiliary player.
If no Disc and auxiliary device is con-
nected, it displays "NO Media" for 5
seconds and returns to the previous
mode.5. Automatic Track Selection
Button Push [SEEK ] button for less
than 0.8 second to play from the
beginning of current song.
Push [SEEK ] button for less than 0.8 second and press again
within 1 second to play the previ-
ous song.
Push [SEEK ] button for 0.8 sec- ond or longer to initiate reverse
direction high speed sound search
of current song.
Push [SEEK ] button for less than 0.8 second to play the next
song.
Push [SEEK ] button for 0.8 sec- ond or longer to initiate high speed
sound search of current song.
6. INFO Selection ButtonDisplays the information of the cur-
rent CD TRACK in the order of
DISC TITLE
➟DISC ARTIST
➟TRACK
TITLE
➟TRACK ARTIST
➟TOTAL
TRACK
➟Play Screen
➟
DISC TITLE
➟... (not displayed if the information
is not available on the DISC.)7. TUNE/ENTER ButtonTurn this button clockwise to display
songs after current song.
Also, turn this button counterclock-
wise to display songs before current
song.
To listen to the displayed song, press
the button to skip to the song and
play.8. REPEAT Selection ButtonRepeats current song when the but-
ton is pressed for less than 0.8 sec-
ond.
Repeats the entire DISC when the
button is pressed for 0.8 second or
longer.
Page 127 of 371
Knowing your vehicle118
3
1
2
3
4
5
6
7
8
9
In case USB is connected to the mul-
tiple terminal inside the console on
the right hand side of the driver’s
seat. When USB is connected, the
‘USB’ icon will be displayed on the
top right corner of the display screen.1.AUX Selection ButtonIf USB is not connected, it switches
to the USB mode from the Radio and
CD mode to play the song files
stored in the USB.
If AUX is not connected, it is invalid
key.2. Track Moving Button Press the [SEEK ] button for
less than 0.8 second to play from
the beginning of the song currently
played.
Press the button for less than 0.8
second and press it again within 1
second to move to and play the pre-
vious track.
Press the button for 0.8 second or
longer to play the song in reverse
direction in fast speed. Press the [SEEK ] button for
less
than 0.8 second to move to the
next track.
Press the button for 0.8 second or
longer to play the song in forward
direction in fast speed.
3. INFO Selection ButtonDisplays the information of the file
currently played in the order of FILE
NAME
➟TITLE
➟ARTIST
➟ALBUM
➟
FOLDER
➟TOTAL FILE
➟FILE NAME
➟… (Displays no information if the
file has no song information.)
4. Folder moving Button Moves [FLDR ] button child fold- er of the current folder and displays
the first song in the folder. Press
TUNE/ENTER button to move to
the folder displayed. It will play the
first song in the folder.
Moves [FLDR ] button parent folder and displays the first song in
the folder. Press TUNE/ENTER
button to move to the folder dis-
played. It will play the first song in
the folder.5. TUNE/ENTER ButtonTurn this button clockwise to display
the songs next to the currently
played song.
Turn the button counterclockwise to
display the songs before the current-
ly played song.
Press the button to skip to and play
the selected song.
Page 130 of 371
3121
Knowing your vehicle
1
2
3
4
5
6
7
8
9
In case the iPod exclusive cable is
connected to the multiple terminal
inside the console on the right hand
side of the driver’s seat. When the
iPod is connected, the ‘iPod’ icon will
be displayed on the top right corner
of the display screen.1. iPod Selection ButtonIf iPod is connected, it switches to
the iPod mode from the Radio and
CD mode to play the song files
stored in the iPod.
If there are no CD and AUX mode
from the Radio mode, it displays ‘NO
MEDIA’.2. Track Moving Button Press the [SEEK ] button for less
than 0.8 second to play from the
beginning of the song currently
played.
Press the button for less than 0.8
second and press it again within 1
second to move to and play the
previous track. Press the button for
0.8 second or longer to play the
song in reverse direction in fast
speed. Press the [SEEK ] button for
less
than 0.8 second to move to the
next track.
Press the button for 0.8 second or
longer to play the song in forward
direction in fast speed.
3. INFO Selection ButtonDisplays the information of the file
currently played in the order of FILE
NAME
➟TITLE
➟ARTIST
➟ALBUM
➟
FILE NAME
➟… (Displays no infor-
mation if the file has no song infor-
mation.)
4. Category Selection ButtonMoves to the upper category from
currently played category of the iPod.
To move to (play) the category
(song) displayed, press TUNE/
ENTER key.
You will be able to search through
the lower category of the selected
category.
The order of iPod’s category is
SONG, ALBUMES, ARTISTS, GEN-
RES, and iPod.
5. TUNE/ENTER ButtonWhen you turn the button clockwise,
it will display the songs (category)
next to the song currently played
(category in the same level).
Also, when you turn the button coun-
terclockwise, it will display the songs
(category) before the song currently
played (category in the same level).
If you want to listen to the song dis-
played in the song category, press
the button, then it will skip to the
selected song and play.6. RANDOM Playback ButtonPress the button for less than 0.8
second to activate or deactivate the
random playback of the songs within
the current category.
Press the button for longer than 0.8
second to randomly play all songs in
the entire album of the iPod.
Press the button once again to can-
cel the mode.7. REPEAT Selection ButtonRepeats the song currently played.
Page 134 of 371
3125
Knowing your vehicle
1
2
3
4
5
6
7
8
9
11. TUNE/ENTER Button
Turn this button clockwise by one
notch to increase frequency by
200kHz (AM: 10KHz) from current
frequency.
Turn this button counterclockwise by
one notch to decrease frequency by
200kHz (AM:10KHz) from current
frequency.
Press this button while holding SET
UP button to activate / inactivate the
item to.
Select SET UP item using left and
right function of the Tune button.12. Pre-set Selection ButtonPush [1]~[6] buttons less than 0.8 sec-
ond to play the channel saved in each
button.
Push pre-set button for 0.8 second or
longer to save current channel to the
respective button with a beep.