2009 KIA Sportage clock
[x] Cancel search: clockPage 137 of 371
Knowing your vehicle128
3
1
2
3
4
5
6
7
8
9
8. TUNE/ENTER ButtonTurn this button clockwise to display
songs after current song.
Also, turn this button counterclock-
wise to display songs before current
song.
To listen to the displayed song, press
the button to skip to the song and
play.9. REPEAT Selection ButtonRepeats current song when the but-
ton is pressed for less than 0.8 sec-
ond.
Repeats the entire DISC when the
button is pressed for 0.8 second or
longer.10. RANDOM Selection ButtonTurns on/off the randomization of the
play list of files in the currently played
DISC.
To cancel the mode, press the key
once again.
11. DISC Selection Button [DISC ] Change Button
Changes disc to the previous disc.
[DISC ] Change Button Changes disc to the next disc.12. SCAN Selection ButtonPlays first 10 seconds of each song
in the DISC.
To cancel the mode, press the key
once again.
CAUTION
- Using USB
device
To use the external USB device, make sure the deviceis not mounted when startingup the vehicle and mount thedevice after starting up.
If you start the vehicle when the USB device is mounted, itmay damage the USB device.(USB is not ESA)
If the vehicle is started up or turned off while the externalUSB device is connected, theexternal USB device may notwork.
It may not play inauthentic MP3 or WMA files.
1) It can only play MP3 files with the compression ratebetween 8Kbps~320Kbps.
2) It can only play WMA music files with the compressionrate between 8Kbps~320Kbps.
(Continued)
Page 140 of 371
3131
Knowing your vehicle
1
2
3
4
5
6
7
8
9
In case USB is connected to the mul-
tiple terminal inside the console on
the right hand side of the driver’s
seat. When USB is connected, the
‘USB’ icon will be displayed on the
top right corner of the display screen.1. AUX Selection ButtonIf USB is not connected, it switches
to the USB mode from the Radio and
CD mode to play the song files
stored in the USB.
If AUX is not connected, it is invalid
key.2. Track Moving Button Press the [SEEK ] button forless than 0.8 second to play from
the beginning of the song currently
played.
Press the button for less than 0.8
second and press it again within 1
second to move to and play the pre-
vious track.
Press the button for 0.8 second or
longer to play the song in reverse
direction in fast speed. Press the [SEEK ] button for
less
than 0.8 second to move to the
next track.
Press the button for 0.8 second or
longer to play the song in forward
direction in fast speed.
3. INFO Selection ButtonDisplays the information of the file
currently played in the order of FILE
NAME
➟TITLE
➟ARTIST
➟ALBUM
➟
FOLDER
➟TOTAL FILE
➟FILE NAME
➟… (Displays no information if the
file has no song information.)4. Folder moving Button Moves [FLDR ] button child fold- er of the current folder and displays
the first song in the folder. Press
TUNE/ENTER button to move to
the folder displayed. It will play the
first song in the folder.
Moves [FLDR ] button parent folder and displays the first song in
the folder. Press TUNE/ENTER
button to move to the folder dis-
played. It will play the first song in
the folder.
5. TUNE/ENTER ButtonTurn this button clockwise to display
the songs next to the currently
played song.
Turn the button counterclockwise to
display the songs before the current-
ly played song.
Press the button to skip to and play
the selected song.6. RANDOM Playback ButtonPress the button for less than 0.8
second to start or stop the random
playback of the songs in the current
folder.
Press the button for more than 0.8
second to randomly play the entire
songs in the USB device.
Press the button again to cancel the
mode.
Page 143 of 371
Knowing your vehicle134
3
1
2
3
4
5
6
7
8
9
In case the iPod exclusive cable is
connected to the multiple terminal
inside the console on the right hand
side of the driver’s seat. When the
iPod is connected, the ‘iPod’ icon will
be displayed on the top right corner
of the display screen.1. iPod Selection ButtonIf iPod is connected, it switches to
the iPod mode from the Radio and
CD mode to play the song files
stored in the iPod.
If there are no CD and AUX mode
from the Radio mode, it displays "NO
MEDIA".2. Track Moving Button Press the [SEEK ] b utton for less
than 0.8 second to play from the
beginning of the song currently
played.
Press the button for less than 0.8
second and press it again within 1
second to move to and play the
previous track. Press the button for
0.8 second or longer to play the
song in reverse direction in fast
speed. Press the [SEEK ] button for
less
than 0.8 second to move to the
next track.
Press the button for 0.8 second or
longer to play the song in forward
direction in fast speed.
3. INFO Selection ButtonDisplays the information of the file
currently played in the order of FILE
NAME
➟TITLE
➟ARTIST
➟ALBUM
➟
FILE NAME
➟… (Displays no infor-
mation if the file has no song infor-
mation.)
4. Category Selection ButtonMoves to the upper category from
currently played category of the iPod.
To move to (play) the category
(song) displayed, press TUNE/
ENTER key.
You will be able to search through
the lower category of the selected
category.
The order of iPod’s category is
SONG, ALBUMES, ARTISTS, GEN-
RES, and iPod.
5. TUNE/ENTER ButtonWhen you turn the button clockwise,
it will display the songs (category)
next to the song currently played
(category in the same level).
Also, when you turn the button coun-
terclockwise, it will display the songs
(category) before the song currently
played (category in the same level).
If you want to listen to the song dis-
played in the song category, press
the button, then it will skip to the
selected song and play.6. RANDOM Playback ButtonPress the button for less than 0.8
second to activate or deactivate the
random playback of the songs within
the current category.
Press the button for longer than 0.8
second to randomly play all songs in
the entire album of the iPod.
Press the button once again to can-
cel the mode.7. REPEAT Selection ButtonRepeats the song currently played.
Page 147 of 371
Knowing your vehicle138
3
1
2
3
4
5
6
7
8
9
6. INFO Selection ButtonDisplays the information of the chan-
nel currently played by in the order of
CATEGORY NAME
➟ARTIST NAME
➟COMPOSER NAME
➟CHANNEL
NAME
➟...(CAT /CH Selection)
Displays the information of the chan-
nel currently played in the order of
SONG TITLE
➟ARTIST NAME
➟
COMPOSER NAME
➟... (CH/TITLE
Selection) (If there is no information
of COMPOSER NAME, it returns to
main display.)
7. SETUP Selection ButtonPress this button to adjust to the
SCROLL, SDVC, SIRIUS and adjust-
ment modes.
If no action is taken for 5 seconds
after pressing the button, it will return
to the play mode. (After entering SET
UP mode, move between items
using the left, right and PUSH func-
tions of the TUNE button.)
The set up item changes from
SCROLL
➟ SDVC
➟SIRIUS
➟SCROLL
➟...
8. CAT/FOLDER ButtonPress this button to turn to the
Category search mode. Turn the tune
knob to see available categories.
Press the tune button to go to the
desired category.9. TUNE knob /ENTER ButtonTurn this button clockwise by one
notch to increase the channel.
Turn this button counterclockwise by
one notch to decrease the channel.
Press this button while holding SET
UP button to activate / inactivate the
item to.
Select SET UP item using left and
right function of the Tune button.10. Preset Selection ButtonPush [1]~[6] buttons less than 0.8
second to play the channel saved in
each button.
Hold down the preset button for 0.8
second or longer to save current
channel to the respective button with
a beep.
Troubleshooting1. Antenna Error
If this message is displayed, the
antenna or antenna cable is broken
or unplugged. Please consult with
your Kia dealership.
2. Acquiring Signal
If this message is displayed, it
means that the antenna is covered
and that the SIRIUS Satellite Radio
signal is not available. Ensure the
antenna is uncovered and has a
clear view of the sky.
Page 197 of 371
Driving your vehicle50
4
1
2
3
4
5
6
7
8
9
4) Make sure the vehicle windshield
wipers are turned off.
5) Drive your vehicle in at least 2 complete (either clockwise or
counter-clockwise) circles at less
than 8 km/h (5 mph) until the com-
pass heading appears. Driving in
a circle in right-handed direction
and opposite direction is possible
and if possible, stop the wiper
operation.
6) If the vehicle's compass headings become inaccurate again, repeat
steps 1 through 6 above.✽ ✽NOTICEIf new vehicle is first driven or if the
battery has been disconnected, do
the calibration procedure as above.
Setting the compass zoneThis compass must be set to com-
pensate for the variation between
true north and magnetic north. To set
variation:
1. Find your current location and
variance zone number on the zone
map.
2. Press and hold the ON/OFF but- ton for 6~9 seconds. The current
zone number will appear in the
display.
3. Release and press the ON/OFF button until the new zone number
appears in the display. After you
stop pressing the button in, the
display will show a compass direc-
tion within a few seconds.
✽ ✽NOTICE1. Do not install a ski rack, antenna,
etc. that are attached to the vehi-
cle using a magnet as anything
attached to the roof of the vehicle
with a magnet will effect compass
operation.
2. If the compass deviates from the correct indication soon after
repeated adjustment, have the
compass checked at an authorized
dealer.
3. The compass may not indicate the correct compass point in tunnels
or while driving up or down a
steep hill.
(The compass returns to the cor-
rect compass point when the vehi-
cle moves to an area where the
geomagnetism is stabilized.)
Page 255 of 371
523
Driving tips
1
2
3
4
5
6
7
8
9
Stalling while driving uphillWhat should I do if my vehicle stalls,or is about to stall, and I can’t makeit up the hill?If your vehicle stalls, or is about to
stall while driving uphill, there are
some things you should do, and
there are some things you must not
do. First, here’s what you should do:
Push the brake pedal to stop the vehicle and keep it from rolling
backwards. Also, apply the parking
brake.
If your engine is still running, shift the transaxle into reverse, release
the parking brake, and slowly back
down the hill in reverse. If your engine has stopped run-
ning, you’ll need to restart it. With
the brake pedal depressed and the
parking brake still applied, shift a
manual transaxle to N (Neutral), or
an automatic transaxle to P (Park)
and restart the engine. Then, shift
to reverse, release the parking
brake, and slowly back down the
hill in reverse.
As you are backing down the hill, put your left hand on the steering
wheel at the 12 o’clock position.
This way, you’ll be able to tell if
your wheels are straight or turned
to the left or right as you back
down. Here are some things you must not
do if you stall, or are about to stall,
when going up a hill.
Never attempt to prevent a stall by
depressing the clutch or shifting to
N (Neutral) to “rev-up” the engine
and regain forward momentum.
This won’t work. Your vehicle will
roll backwards very quickly and
you could go out of control or roll
over.
Instead, apply the brake to stop the
vehicle. Then apply the parking
brake. Shift into reverse, release the
parking brake, and slowly back
down.
Page 295 of 371
611
In case of an emergency
1
2
3
4
5
6
7
8
9
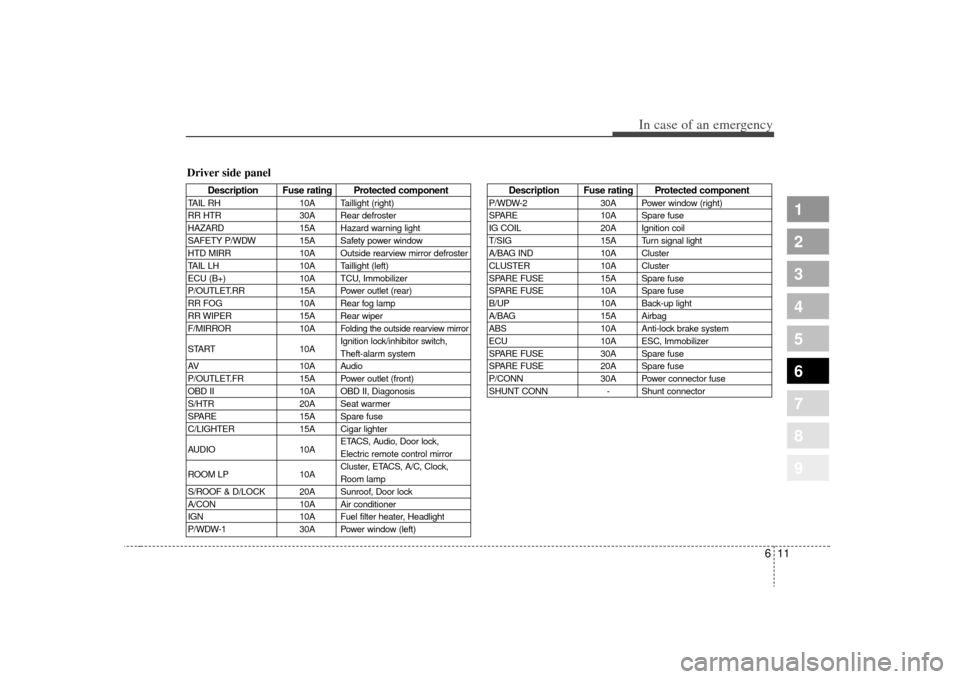
Description Fuse rating Protected component
TAIL RH10A Taillight (right)
RR HTR 30A Rear defroster
HAZARD 15A Hazard warning light
SAFETY P/WDW 15A Safety power window
HTD MIRR 10A Outside rearview mirror defroster
TAIL LH 10A Taillight (left)
ECU (B+) 10A TCU, Immobilizer
P/OUTLET.RR 15A Power outlet (rear)
RR FOG 10A Rear fog lamp
RR WIPER 15A Rear wiper
F/MIRROR 10A
Folding the outside rearview mirror
START10AIgnition lock/inhibitor switch,
Theft-alarm system
AV 10A Audio
P/OUTLET.FR 15A Power outlet (front)
OBD II 10A OBD II, Diagonosis
S/HTR 20A Seat warmer
SPARE 15A Spare fuse
C/LIGHTER 15A Cigar lighter
AUDIO 10AETACS, Audio, Door lock,
Electric remote control mirror
ROOM LP 10ACluster, ETACS, A/C, Clock,
Room lamp
S/ROOF & D/LOCK 20A Sunroof, Door lock
A/CON 10A Air conditioner
IGN 10A Fuel filter heater, Headlight
P/WDW-1 30A Power window (left)
Description Fuse rating Protected component
P/WDW-230A Power window (right)
SPARE 10A Spare fuse
IG COIL 20A Ignition coil
T/SIG 15A Turn signal light
A/BAG IND 10A Cluster
CLUSTER 10A Cluster
SPARE FUSE 15A Spare fuse
SPARE FUSE 10A Spare fuse
B/UP 10A Back-up light
A/BAG 15A Airbag
ABS 10A Anti-lock brake system
ECU 10A ESC, Immobilizer
SPARE FUSE 30A Spare fuse
SPARE FUSE 20A Spare fuse
P/CONN 30A Power connector fuse
SHUNT CONN - Shunt connector
Driver side panel
Page 297 of 371
613
In case of an emergency
1
2
3
4
5
6
7
8
9
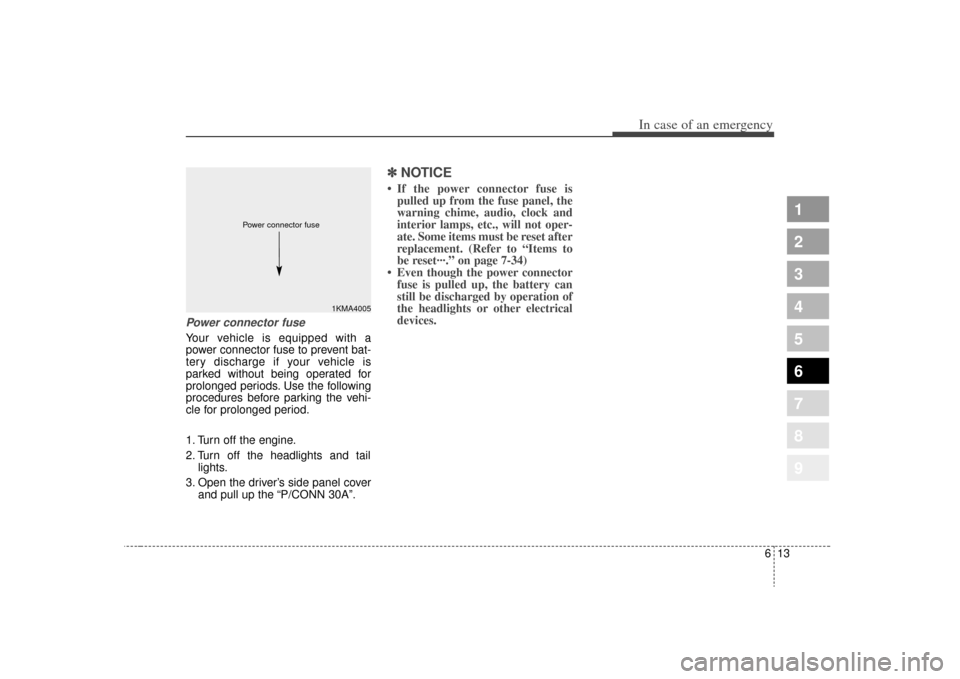
Power connector fuseYour vehicle is equipped with a
power connector fuse to prevent bat-
tery discharge if your vehicle is
parked without being operated for
prolonged periods. Use the following
procedures before parking the vehi-
cle for prolonged period.
1. Turn off the engine.
2. Turn off the headlights and taillights.
3. Open the driver’s side panel cover and pull up the “P/CONN 30A”.
✽ ✽NOTICE• If the power connector fuse is
pulled up from the fuse panel, the
warning chime, audio, clock and
interior lamps, etc., will not oper-
ate. Some items must be reset after
replacement. (Refer to “Items to
be reset···.” on page 7-34)
• Even though the power connector fuse is pulled up, the battery can
still be discharged by operation of
the headlights or other electrical
devices.
1KMA4005
Power connector fuse