Page 1382 of 1903
Downloaded from www.Manualslib.com manuals search engine 11. On each side of the steering gear, remove the nut(1) attaching the outer tie rod end to the steering
knuckle.
(Tighten: Outer tie rod end nut to 32 - 38 N·m)
12. Using special tool CH-10002, separate the outer tie rod ends from both steering knuckles.
13. Remove the wheel speed sensor mounting bolt (1). (Tighten: Wheel speed sensor mounting bolt to
10 ± 1 N·m)
14. Remove the wheel speed sensor and set it aside.
ON-VEHICLE SERVICE
LTSM110034
LTSM110027
LTSM100045
11
11 –27Chery Automobile Co., Ltd.
Page 1383 of 1903

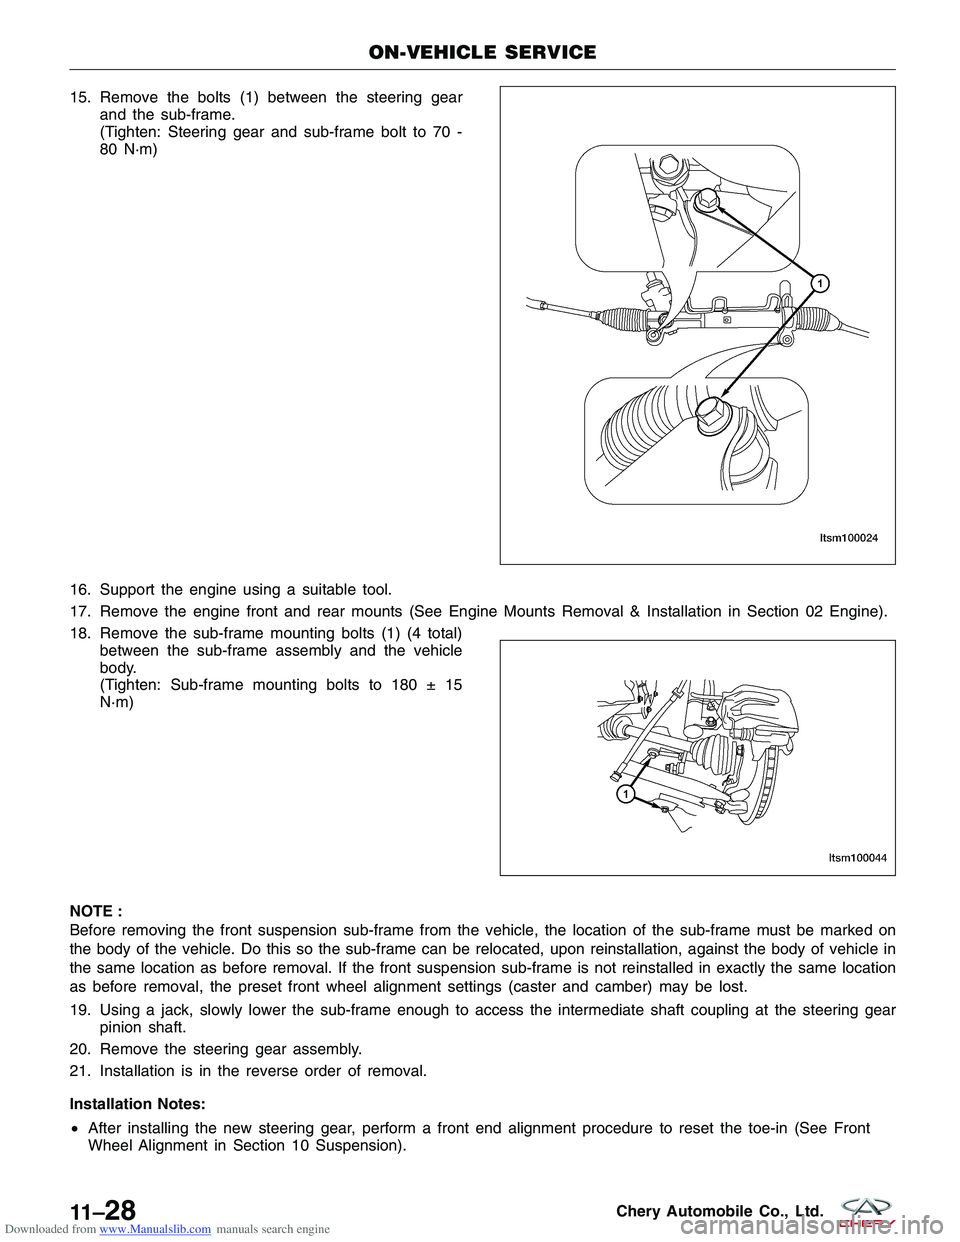
Downloaded from www.Manualslib.com manuals search engine 15. Remove the bolts (1) between the steering gearand the sub-frame.
(Tighten: Steering gear and sub-frame bolt to 70 -
80 N·m)
16. Support the engine using a suitable tool.
17. Remove the engine front and rear mounts (See Engine Mounts Removal & Installation in Section 02 Engine).
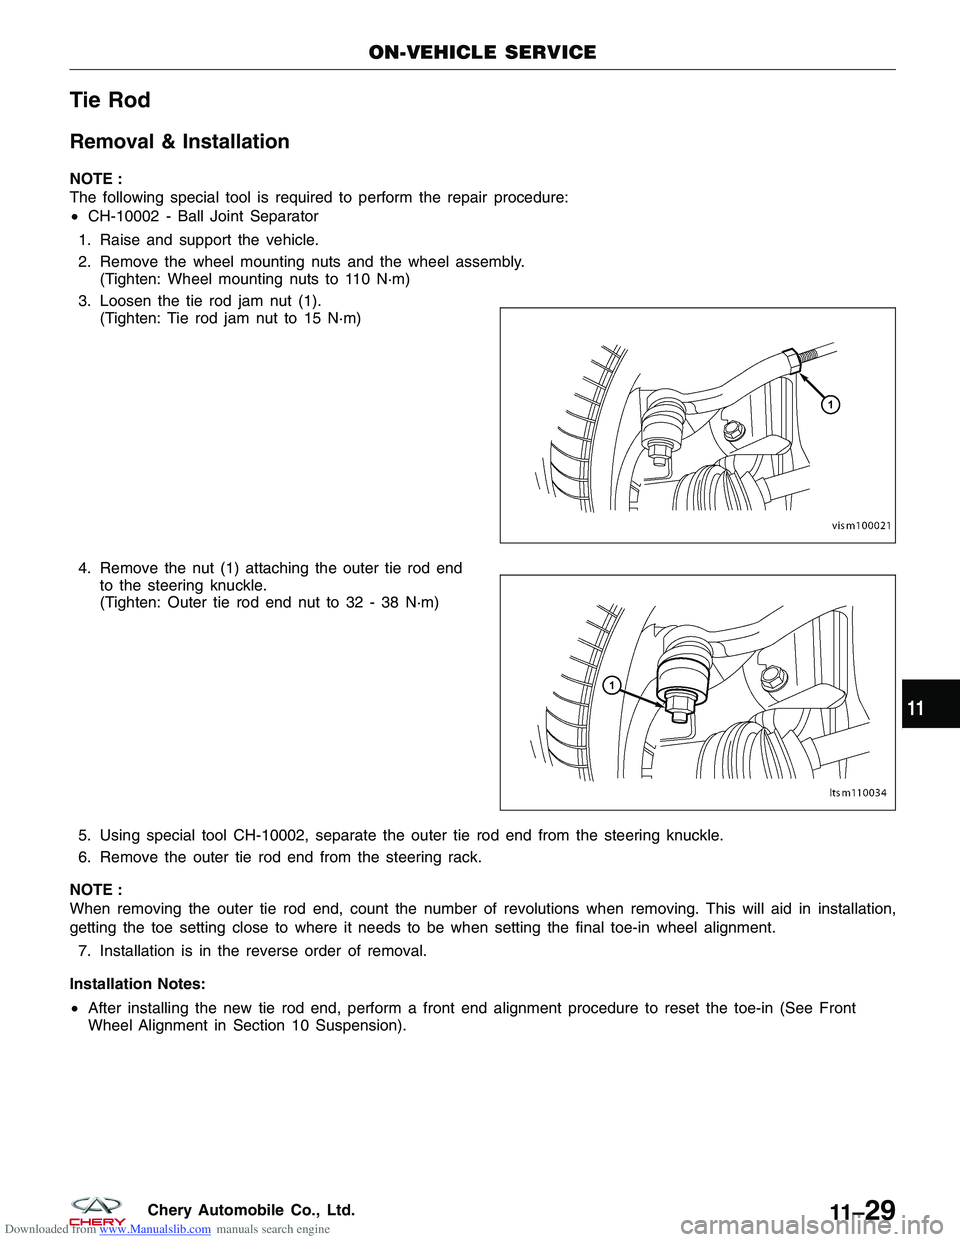
18. Remove the sub-frame mounting bolts (1) (4 total) between the sub-frame assembly and the vehicle
body.
(Tighten: Sub-frame mounting bolts to 180 ± 15
N·m)
NOTE :
Before removing the front suspension sub-frame from the vehicle, the location of the sub-frame must be marked on
the body of the vehicle. Do this so the sub-frame can be relocated, upon reinstallation, against the body of vehicle in
the same location as before removal. If the front suspension sub-frame is not reinstalled in exactly the same location
as before removal, the preset front wheel alignment settings (caster and camber) may be lost.
19. Using a jack, slowly lower the sub-frame enough to access the intermediate shaft coupling at the steering gear pinion shaft.
20. Remove the steering gear assembly.
21. Installation is in the reverse order of removal.
Installation Notes:
• After installing the new steering gear, perform a front end alignment procedure to reset the toe-in (See Front
Wheel Alignment in Section 10 Suspension).
ON-VEHICLE SERVICE
LTSM100024
LTSM100044
11 –28Chery Automobile Co., Ltd.
Page 1384 of 1903

Downloaded from www.Manualslib.com manuals search engine Tie Rod
Removal & Installation
NOTE :
The following special tool is required to perform the repair procedure:
•CH-10002 - Ball Joint Separator
1. Raise and support the vehicle.
2. Remove the wheel mounting nuts and the wheel assembly. (Tighten: Wheel mounting nuts to 110 N·m)
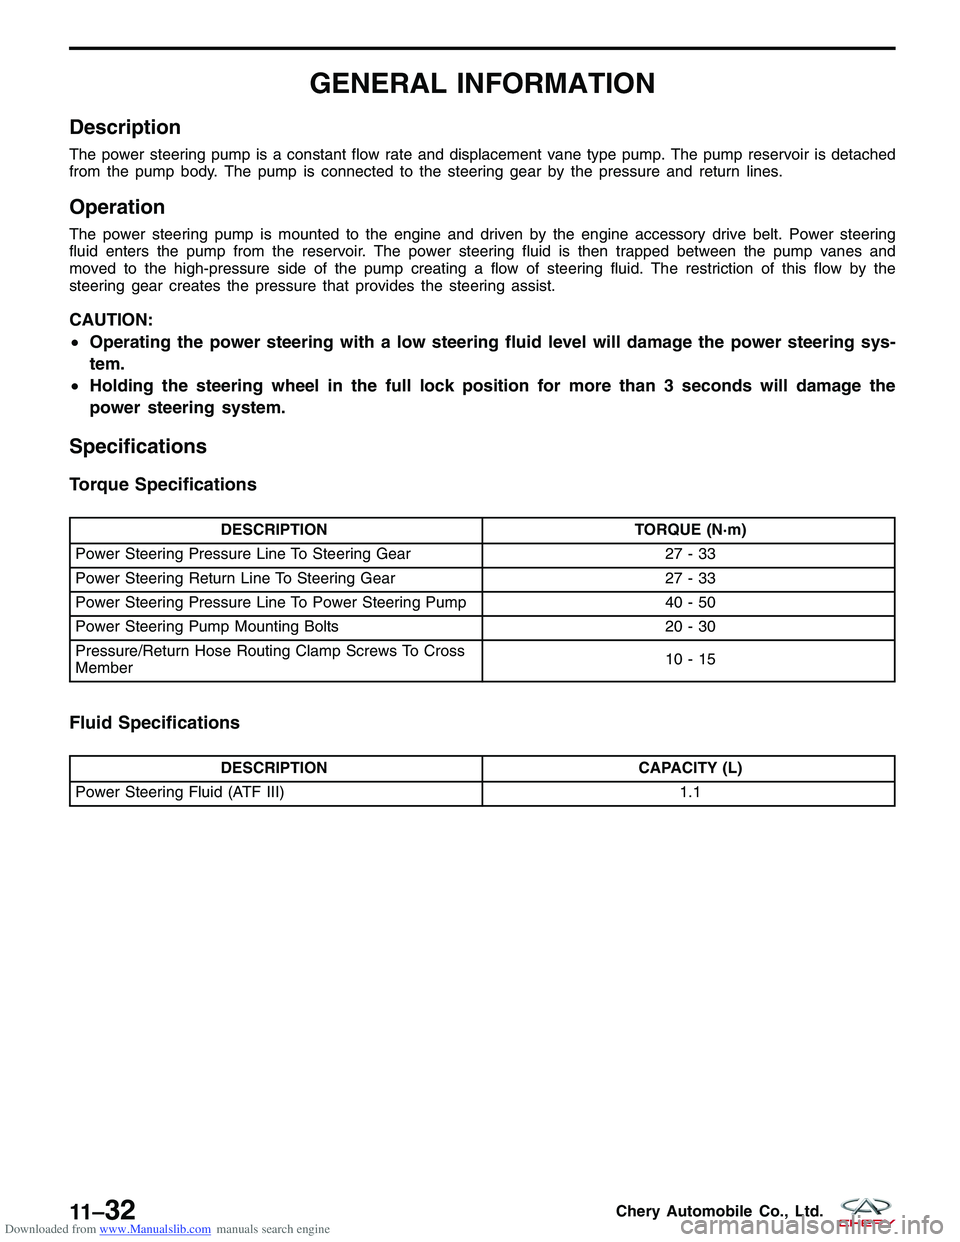
3. Loosen the tie rod jam nut (1). (Tighten: Tie rod jam nut to 15 N·m)
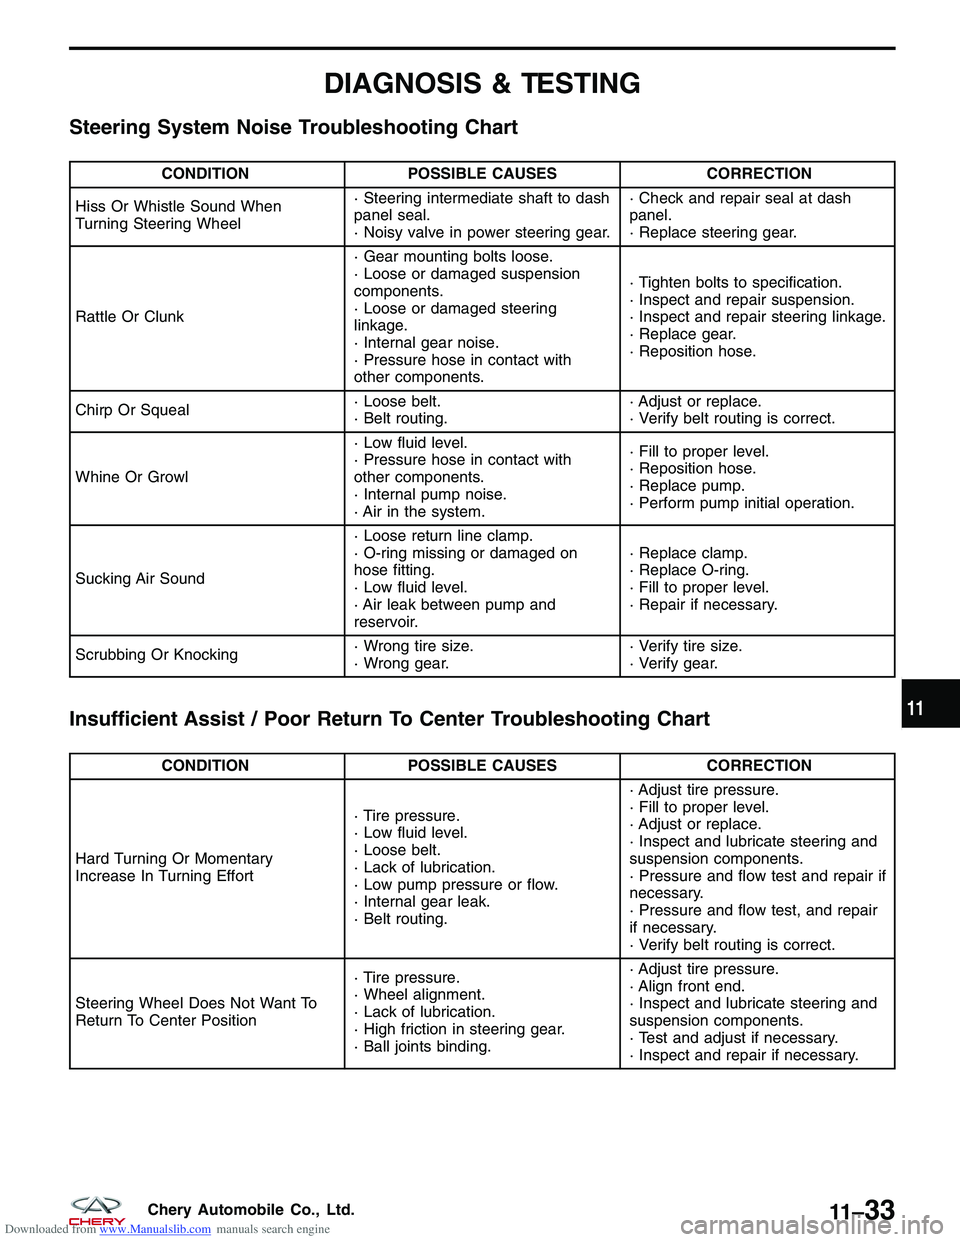
4. Remove the nut (1) attaching the outer tie rod end to the steering knuckle.
(Tighten: Outer tie rod end nut to 32 - 38 N·m)
5. Using special tool CH-10002, separate the outer tie rod end from the steering knuckle.
6. Remove the outer tie rod end from the steering rack.
NOTE :
When removing the outer tie rod end, count the number of revolutions when removing. This will aid in installation,
getting the toe setting close to where it needs to be when setting the final toe-in wheel alignment. 7. Installation is in the reverse order of removal.
Installation Notes:
• After installing the new tie rod end, perform a front end alignment procedure to reset the toe-in (See Front
Wheel Alignment in Section 10 Suspension).
ON-VEHICLE SERVICE
VISM100021
LTSM110034
11
11 –29Chery Automobile Co., Ltd.
Page 1387 of 1903

Downloaded from www.Manualslib.com manuals search engine GENERAL INFORMATION
Description
The power steering pump is a constant flow rate and displacement vane type pump. The pump reservoir is detached
from the pump body. The pump is connected to the steering gear by the pressure and return lines.
Operation
The power steering pump is mounted to the engine and driven by the engine accessory drive belt. Power steering
fluid enters the pump from the reservoir. The power steering fluid is then trapped between the pump vanes and
moved to the high-pressure side of the pump creating a flow of steering fluid. The restriction of this flow by the
steering gear creates the pressure that provides the steering assist.
CAUTION:
•Operating the power steering with a low steering fluid level will damage the power steering sys-
tem.
• Holding the steering wheel in the full lock position for more than 3 seconds will damage the
power steering system.
Specifications
Torque Specifications
DESCRIPTION TORQUE (N·m)
Power Steering Pressure Line To Steering Gear 27 - 33
Power Steering Return Line To Steering Gear 27 - 33
Power Steering Pressure Line To Power Steering Pump 40 - 50
Power Steering Pump Mounting Bolts 20 - 30
Pressure/Return Hose Routing Clamp Screws To Cross
Member 10-15
Fluid Specifications
DESCRIPTION
CAPACITY (L)
Power Steering Fluid (ATF III) 1.1
11 –32Chery Automobile Co., Ltd.
Page 1388 of 1903

Downloaded from www.Manualslib.com manuals search engine DIAGNOSIS & TESTING
Steering System Noise Troubleshooting Chart
CONDITIONPOSSIBLE CAUSES CORRECTION
Hiss Or Whistle Sound When
Turning Steering Wheel · Steering intermediate shaft to dash
panel seal.
· Noisy valve in power steering gear.· Check and repair seal at dash
panel.
· Replace steering gear.
Rattle Or Clunk · Gear mounting bolts loose.
· Loose or damaged suspension
components.
· Loose or damaged steering
linkage.
· Internal gear noise.
· Pressure hose in contact with
other components.· Tighten bolts to specification.
· Inspect and repair suspension.
· Inspect and repair steering linkage.
· Replace gear.
· Reposition hose.
Chirp Or Squeal · Loose belt.
· Belt routing.· Adjust or replace.
· Verify belt routing is correct.
Whine Or Growl · Low fluid level.
· Pressure hose in contact with
other components.
· Internal pump noise.
· Air in the system.· Fill to proper level.
· Reposition hose.
· Replace pump.
· Perform pump initial operation.
Sucking Air Sound · Loose return line clamp.
· O-ring missing or damaged on
hose fitting.
· Low fluid level.
· Air leak between pump and
reservoir.· Replace clamp.
· Replace O-ring.
· Fill to proper level.
· Repair if necessary.
Scrubbing Or Knocking · Wrong tire size.
· Wrong gear.· Verify tire size.
· Verify gear.
Insufficient Assist / Poor Return To Center Troubleshooting Chart
CONDITION
POSSIBLE CAUSES CORRECTION
Hard Turning Or Momentary
Increase In Turning Effort · Tire pressure.
· Low fluid level.
· Loose belt.
· Lack of lubrication.
· Low pump pressure or flow.
· Internal gear leak.
· Belt routing.· Adjust tire pressure.
· Fill to proper level.
· Adjust or replace.
· Inspect and lubricate steering and
suspension components.
· Pressure and flow test and repair if
necessary.
· Pressure and flow test, and repair
if necessary.
· Verify belt routing is correct.
Steering Wheel Does Not Want To
Return To Center Position · Tire pressure.
· Wheel alignment.
· Lack of lubrication.
· High friction in steering gear.
· Ball joints binding.· Adjust tire pressure.
· Align front end.
· Inspect and lubricate steering and
suspension components.
· Test and adjust if necessary.
· Inspect and repair if necessary.
11
11 –33Chery Automobile Co., Ltd.
Page 1390 of 1903
Downloaded from www.Manualslib.com manuals search engine Power Steering Pump - 2.4L
Removal & Installation
1. Siphon out as much power steering fluid as possible from the reservoir.
2. Raise and support the vehicle.
3. Remove the return hose clamp (1) from the steer-ing liquid reservoir and insert the end of the hose
into a container.
4. Start the engine and turn the steering wheel from lock-to-lock until all power steering fluid has been drained from the system.
5. Stop the engine.
6. Remove the engine lower shield.
7. Loosen the power steering pump belt adjustment bolt (1).
ON-VEHICLE SERVICE
LTSM110042
LTSM020185
11
11 –35Chery Automobile Co., Ltd.
Page 1430 of 1903
Downloaded from www.Manualslib.com manuals search engine GENERAL INFORMATION
Description
This Antilock Brake System (ABS) uses components of the base brake system, but also features the following com-
ponents:
•Hydraulic Control Unit and Antilock Brake System Module (ABS module)
• Wheel Speed Sensors (wheel speed sensor) - Four sensors (one sensor at each wheel making it a four-chan-
nel system)
The purpose of the ABS is to prevent wheel lockup under braking conditions on virtually any type of road surface.
Antilock braking is desirable because a vehicle that is stopped without locking the wheels retains directional stability
and some steering capability. This allows the driver to retain greater control of the vehicle during braking.LTSM120040
12
12–35Chery Automobile Co., Ltd.
Page 1629 of 1903
Downloaded from www.Manualslib.com manuals search engine INSTRUMENT PANEL
Removal & Installation
1. Remove the steering wheel (See Steering Wheel Removal & Installation in Section 11 Steering).
2. Remove the multi-function switch and the wiper switch.
3. Remove the instrument cluster (See Instrument Cluster Removal & Installation in Section 15 Body & Accesso-ries).
4. Remove the radio (See Radio Removal & Installation in Section 15 Body & Accessories).
5. Remove the HVAC control panel (See HVAC Control Panel Removal & Installation in Section 13 Heating & Air Conditioning).
6. Remove lower center bezel retaining screws (1).
LTSM150131
15
15–45Chery Automobile Co., Ltd.