Page 1682 of 1903
Downloaded from www.Manualslib.com manuals search engine Power Window System (Page 2 of 3)
POWER WINDOW
LTSMW150047T
15–98Chery Automobile Co., Ltd.
Page 1683 of 1903
Downloaded from www.Manualslib.com manuals search engine Power Window System (Page 3 of 3)
POWER WINDOW
LTSMW150048T
15
15–99Chery Automobile Co., Ltd.
Page 1684 of 1903
Downloaded from www.Manualslib.com manuals search engine Power Window Switch
Removal & Installation
1. Turn the ignition switch off.
2. Remove the power window and door lock/unlockswitch bezel mounting screw (1).
3. Using a trim stick, pry out the power window and door lock/unlock switch assembly from the front door.
4. Disconnect the power window and door lock/unlock switch electrical connectors.
5. Remove the power window and door lock/unlock switch retaining screws to remove the power window and door lock/unlock switch.
6. Installation is in the reverse order of removal.
Power Window Motor
Removal & Installation
NOTE :
The passenger door is shown, all other doors are similar.
1. Turn the ignition switch off.
2. Using a small trim stick, remove the pull handle cover (1) from the pull handle (2).
POWER WINDOW
LTSM150097
LTSM150139
15–100Chery Automobile Co., Ltd.
Page 1685 of 1903
Downloaded from www.Manualslib.com manuals search engine 3. Remove the inner door handle mounting screw (1).
4. Remove the pull handle mounting screws (2).
5. Using a small trim stick, remove the inner doorhandle trim bezel (1).
6. Carefully pry the door trim panel clips from the door.
7. Disconnect the power window switch and the door lamp electrical connector.
8. Remove the door trim panel.
9. Disconnect the speaker connector (1).
10. Remove the inner door handle assembly mounting screw (2).
11. Disconnect the inner door handle cables (3).
12. Remove the protective film (4).
POWER WINDOW
LTSM150134
LTSM150140
LTSM150135
15
15–101Chery Automobile Co., Ltd.
Page 1686 of 1903

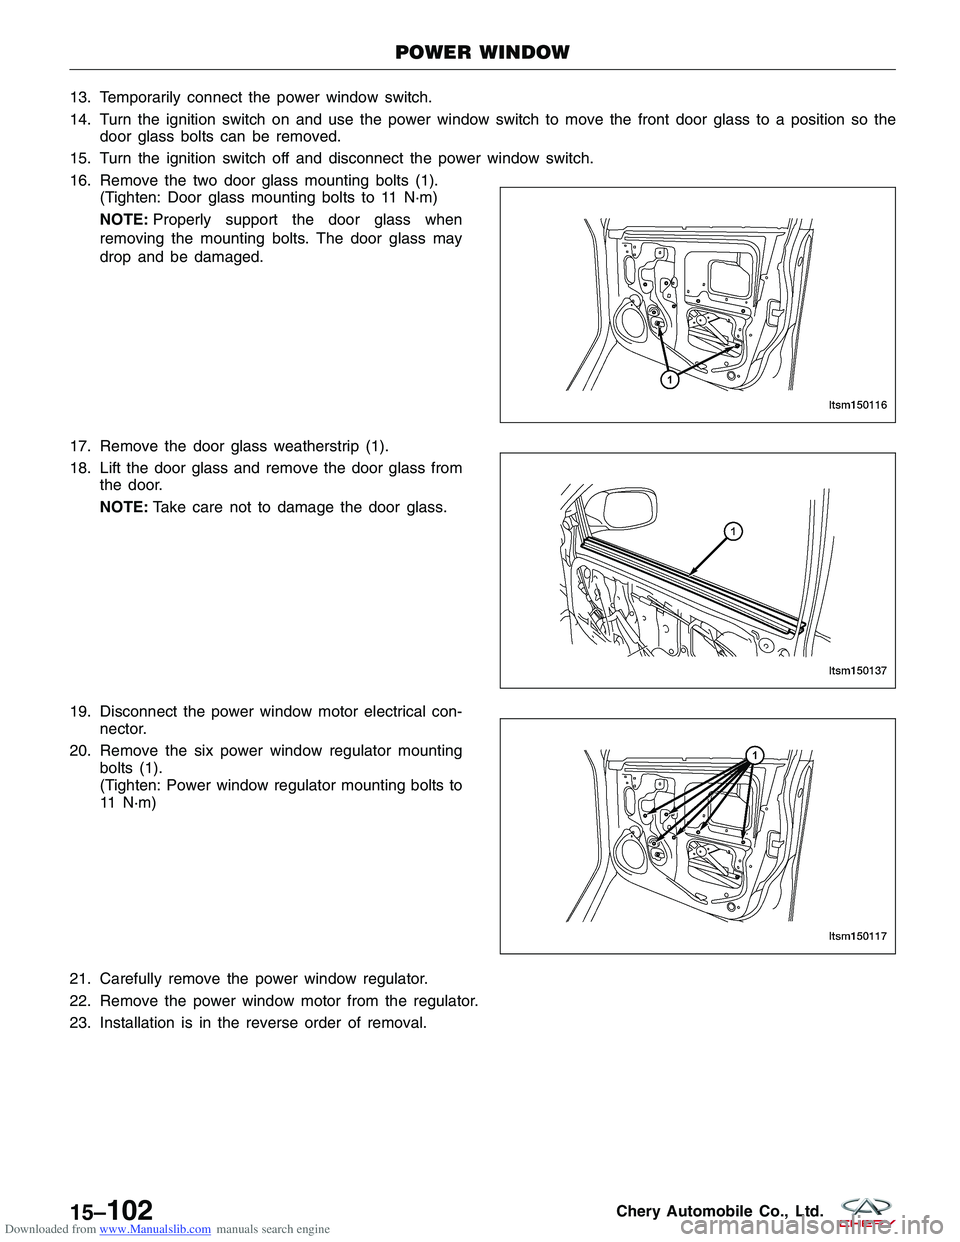
Downloaded from www.Manualslib.com manuals search engine 13. Temporarily connect the power window switch.
14. Turn the ignition switch on and use the power window switch to move the front door glass to a position so thedoor glass bolts can be removed.
15. Turn the ignition switch off and disconnect the power window switch.
16. Remove the two door glass mounting bolts (1). (Tighten: Door glass mounting bolts to 11 N·m)
NOTE: Properly support the door glass when
removing the mounting bolts. The door glass may
drop and be damaged.
17. Remove the door glass weatherstrip (1).
18. Lift the door glass and remove the door glass from the door.
NOTE: Take care not to damage the door glass.
19. Disconnect the power window motor electrical con- nector.
20. Remove the six power window regulator mounting bolts (1).
(Tighten: Power window regulator mounting bolts to
11 N·m)
21. Carefully remove the power window regulator.
22. Remove the power window motor from the regulator.
23. Installation is in the reverse order of removal.
POWER WINDOW
LTSM150116
LTSM150137 LTSM150117
15–102Chery Automobile Co., Ltd.
Page 1687 of 1903
Downloaded from www.Manualslib.com manuals search engine Power Window Motor Inspection
1. Using the following table, apply battery voltage to the specified connector terminals.
2. Verify that the motor operates smoothly when voltage is applied in each direction.
3. If the test results are not as specified, replace the motor.
MEASURING CONDITIONOPERATIONAL
DIRECTION INSPECTION DIAGRAM
Battery positive (+) to terminal – 1
Battery negative (-) to terminal – 2 Clockwise rotation
Battery positive (+) to
terminal – 2
Battery negative (-) to terminal – 1 Counterclockwise rotation
POWER WINDOW
15
15–103Chery Automobile Co., Ltd.
Page 1730 of 1903

Downloaded from www.Manualslib.com manuals search engine MIRRORS15-209
Description 15-209
Operation 15-209
Electrical Schematics 15-210
Outside Mirror 15-214
Removal & Installation 15-214
PAINT15-215
Paint Codes 15-215
Paint Codes 15-215
RADIATOR SUPPORT15-216
Radiator Support 15-216
Removal & Installation 15-216
STATIONARY GLASS15-217
Description 15-217
Electrical Schematics 15-218
Front Windshield 15-219
Removal 15-219
Installation 15-219
Rear Window 15-221
Removal 15-221
Installation 15-221
SUNROOF15-224
Description 15-224
Operation 15-225
Electrical Schematics 15-226
DIAGNOSIS & TESTING15-228
Sunroof Memory Relearn 15-228
ON-VEHICLE SERVICE15-229
Sunroof Glass 15-229
Removal & Installation 15-229Sunroof Sun Visor
15-229
Removal & Installation 15-229
Sunroof Motor 15-230
Removal & Installation 15-230
Sunroof Control Module 15-230
Removal & Installation 15-230
WEATHERSTRIP15-231
Front Door Weatherstrip 15-231
Removal & Installation 15-231
Rear Door Weatherstrip 15-232
Removal & Installation 15-232
WIPERS AND WASHERS15-233
Description 15-233
Operation 15-233
Electrical Schematics 15-234
Front Wiper Motor 15-238
Removal & Installation 15-238
Rear Wiper Motor 15-239
Removal & Installation 15-239
Front Wiper Arm 15-240
Removal & Installation 15-240
Rear Wiper Arm 15-240
Removal & Installation 15-240
Front Wiper Link 15-241
Removal & Installation 15-241
Washer Bottle 15-241
Removal & Installation 15-241
Washer Pump 15-241
Removal & Installation 15-241
Wiper Switch 15-242
Removal & Installation 15-242
BODY AND ACCESSORIES - BODY EXTERIOR
15–146Chery Automobile Co., Ltd.
Page 1744 of 1903
Downloaded from www.Manualslib.com manuals search engine Cross section B6-B6, requirements for clearance and
levelness.
Cross section B7-B7, requirements for clearance and
levelness.
Cross section B8-B8, requirements for clearance and
levelness.
1 - Front Door2 - Back Door
1 - Back Door 2 - Side Wall
1 - Rear Triangle Window 2 - Back Door
BODY DIMENSIONS
LTSM150017
LTSM150018
LTSM150019
15–160Chery Automobile Co., Ltd.