Page 1753 of 1903
Downloaded from www.Manualslib.com manuals search engine 3. Remove the inner door handle mounting screw (1).
4. Remove the pull handle mounting screws (2).
5. Using a small trim stick, remove the inner doorhandle trim bezel (1).
6. Carefully pry the door trim panel clips from the door.
7. Disconnect the power window switch and the door lamp electrical connector.
8. Remove the door trim panel.
9. Disconnect the speaker connector (1).
10. Remove the inner door handle assembly mounting screw (2).
11. Disconnect the inner door handle cables (3).
12. Remove the protective film (4).
DOORS
LTSM150134
LTSM150140
LTSM150135
15
15–169Chery Automobile Co., Ltd.
Page 1754 of 1903

Downloaded from www.Manualslib.com manuals search engine 13. Temporarily connect the power window switch.
14. Turn the ignition switch on and use the power window switch to move the front door glass to a position so thedoor glass bolts can be removed.
15. Turn the ignition switch off and disconnect the power window switch.
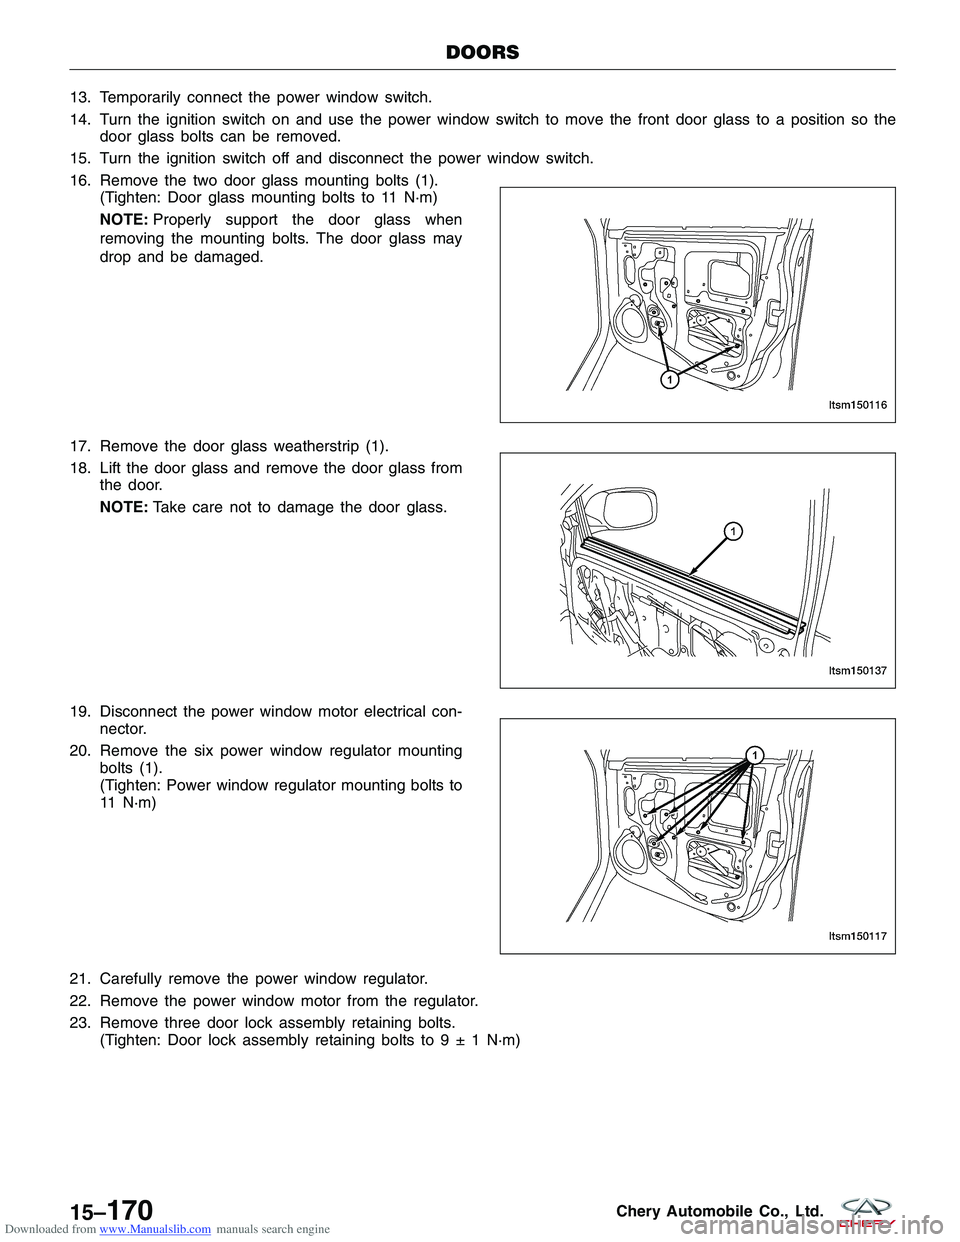
16. Remove the two door glass mounting bolts (1). (Tighten: Door glass mounting bolts to 11 N·m)
NOTE: Properly support the door glass when
removing the mounting bolts. The door glass may
drop and be damaged.
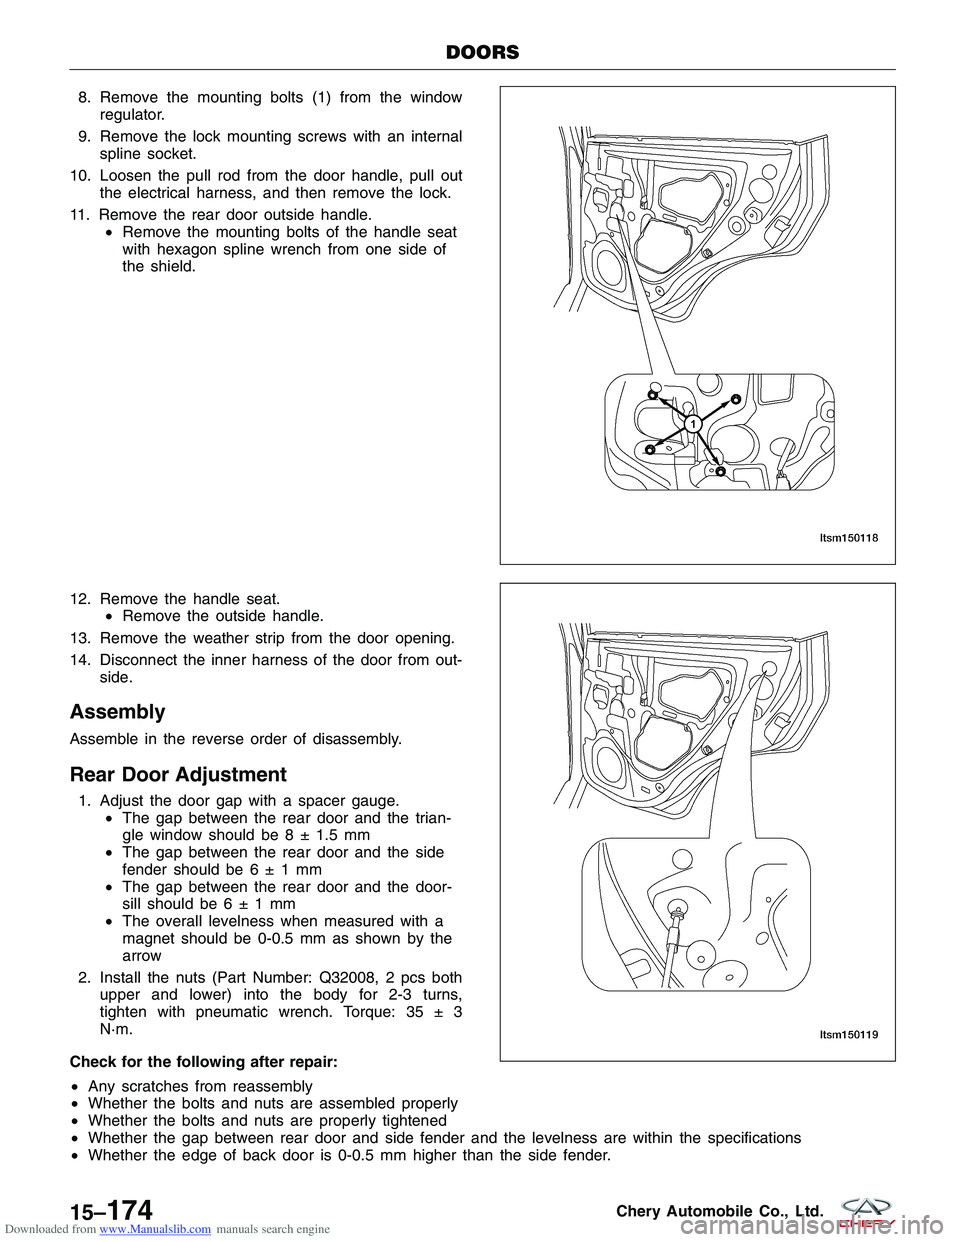
17. Remove the door glass weatherstrip (1).
18. Lift the door glass and remove the door glass from the door.
NOTE: Take care not to damage the door glass.
19. Disconnect the power window motor electrical con- nector.
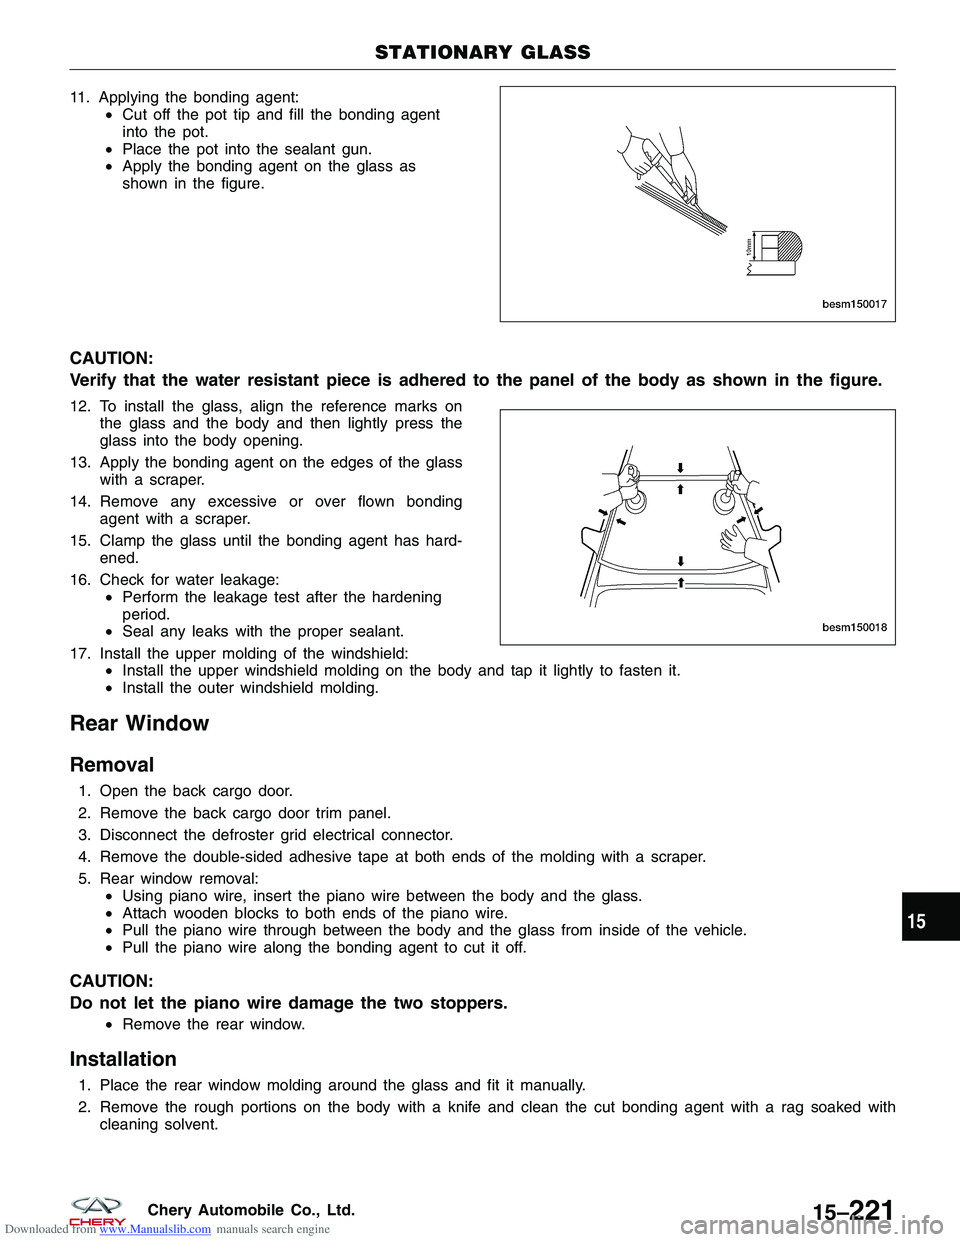
20. Remove the six power window regulator mounting bolts (1).
(Tighten: Power window regulator mounting bolts to
11 N·m)
21. Carefully remove the power window regulator.
22. Remove the power window motor from the regulator.
23. Remove three door lock assembly retaining bolts. (Tighten: Door lock assembly retaining bolts to9±1N·m)
DOORS
LTSM150116
LTSM150137 LTSM150117
15–170Chery Automobile Co., Ltd.
Page 1757 of 1903
Downloaded from www.Manualslib.com manuals search engine Rear Door
Removal & Installation
1. Disconnect the negative battery cable.
2. Disconnect the inner electrical harness connectoron the rear door.
3. Remove the mounting bolts (1) from the rear door hinge.
4. Remove the rear door assembly.
5. Installation is in the reverse order of removal.
Disassembly
1. Remove the bolts to remove the bezel for the inside door handle.
2. Pry out the window regulator switch and pull out the electrical harness.
3. Remove the door trim panel.
4. Remove the mounting bolts for the inside door handle to remove the handle.
5. Remove the protective film from the rear door.
6. Lower the glass to a proper position, remove the set bolts, move the glass to the bottom of the door, and then remove the door glass.
7. Remove the mounting bolts for the glass guide rail.
DOORS
LTSM150112
15
15–173Chery Automobile Co., Ltd.
Page 1758 of 1903

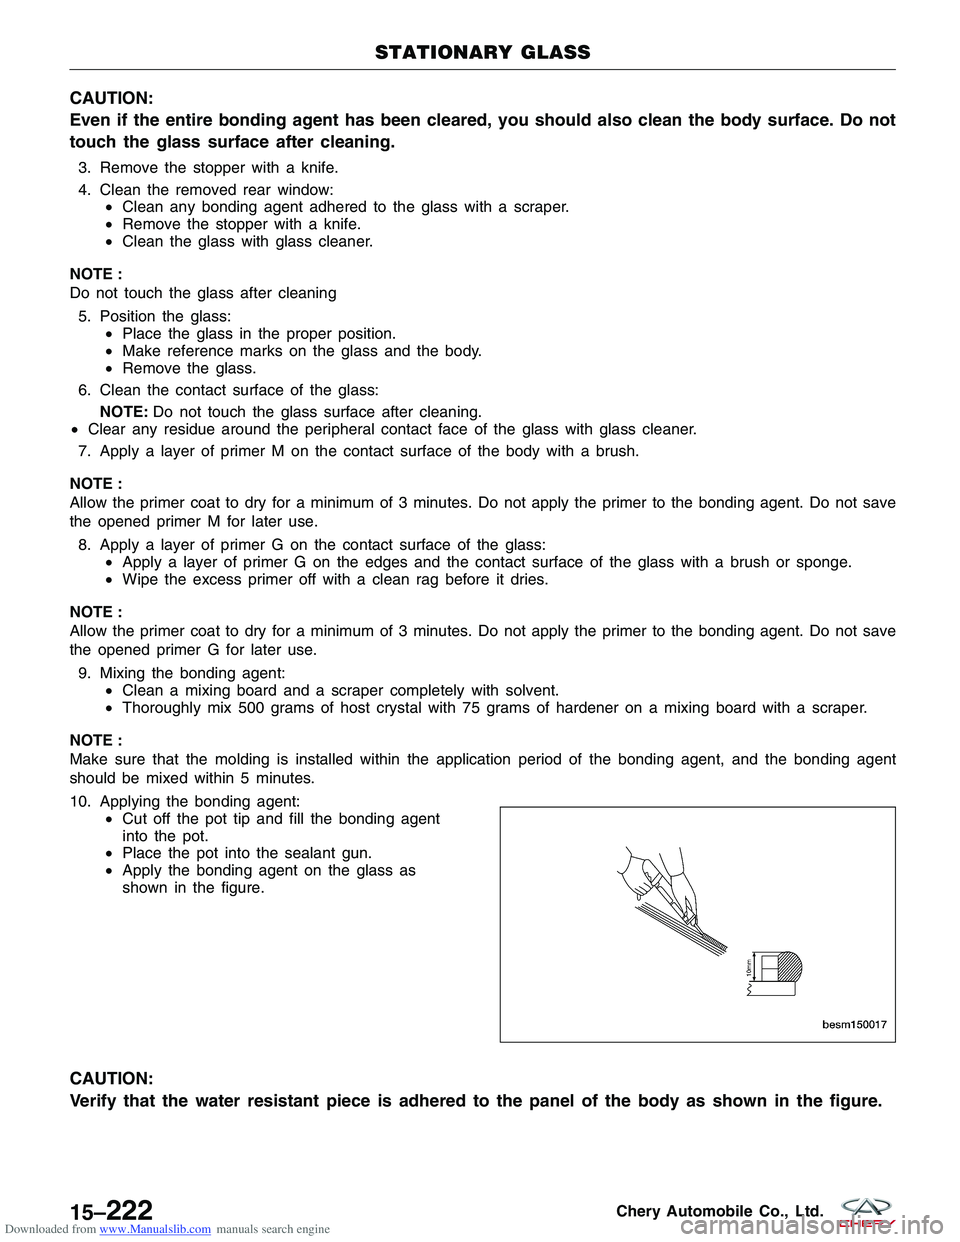
Downloaded from www.Manualslib.com manuals search engine 8. Remove the mounting bolts (1) from the windowregulator.
9. Remove the lock mounting screws with an internal spline socket.
10. Loosen the pull rod from the door handle, pull out the electrical harness, and then remove the lock.
11. Remove the rear door outside handle. •Remove the mounting bolts of the handle seat
with hexagon spline wrench from one side of
the shield.
12. Remove the handle seat. •Remove the outside handle.
13. Remove the weather strip from the door opening.
14. Disconnect the inner harness of the door from out- side.
Assembly
Assemble in the reverse order of disassembly.
Rear Door Adjustment
1. Adjust the door gap with a spacer gauge.•The gap between the rear door and the trian-
gle window should be 8 ± 1.5 mm
• The gap between the rear door and the side
fender should be6±1mm
• The gap between the rear door and the door-
sill should be6±1mm
• The overall levelness when measured with a
magnet should be 0-0.5 mm as shown by the
arrow
2. Install the nuts (Part Number: Q32008, 2 pcs both upper and lower) into the body for 2-3 turns,
tighten with pneumatic wrench. Torque: 35 ± 3
N·m.
Check for the following after repair:
• Any scratches from reassembly
• Whether the bolts and nuts are assembled properly
• Whether the bolts and nuts are properly tightened
• Whether the gap between rear door and side fender and the levelness are within the specifications
• Whether the edge of back door is 0-0.5 mm higher than the side fender.
DOORS
LTSM150118
LTSM150119
15–174Chery Automobile Co., Ltd.
Page 1801 of 1903
Downloaded from www.Manualslib.com manuals search engine STATIONARY GLASS
Description
The stationary glass is comprised of the following:
•Front Windshield
• Rear Window
• Rear Window Defogger
15
15–217Chery Automobile Co., Ltd.
Page 1802 of 1903
Downloaded from www.Manualslib.com manuals search engine Electrical Schematics
Rear Window Defogger (Page 1 of 1)
STATIONARY GLASS
LTSMW150011T
15–218Chery Automobile Co., Ltd.
Page 1805 of 1903

Downloaded from www.Manualslib.com manuals search engine 11. Applying the bonding agent:•Cut off the pot tip and fill the bonding agent
into the pot.
• Place the pot into the sealant gun.
• Apply the bonding agent on the glass as
shown in the figure.
CAUTION:
Verify that the water resistant piece is adhered to the panel of the body as shown in the figure.
12. To install the glass, align the reference marks on
the glass and the body and then lightly press the
glass into the body opening.
13. Apply the bonding agent on the edges of the glass with a scraper.
14. Remove any excessive or over flown bonding agent with a scraper.
15. Clamp the glass until the bonding agent has hard- ened.
16. Check for water leakage: •Perform the leakage test after the hardening
period.
• Seal any leaks with the proper sealant.
17. Install the upper molding of the windshield: •Install the upper windshield molding on the body and tap it lightly to fasten it.
• Install the outer windshield molding.
Rear Window
Removal
1. Open the back cargo door.
2. Remove the back cargo door trim panel.
3. Disconnect the defroster grid electrical connector.
4. Remove the double-sided adhesive tape at both ends of the molding with a scraper.
5. Rear window removal:
•Using piano wire, insert the piano wire between the body and the glass.
• Attach wooden blocks to both ends of the piano wire.
• Pull the piano wire through between the body and the glass from inside of the vehicle.
• Pull the piano wire along the bonding agent to cut it off.
CAUTION:
Do not let the piano wire damage the two stoppers.
•Remove the rear window.
Installation
1. Place the rear window molding around the glass and fit it manually.
2. Remove the rough portions on the body with a knife and clean the cut bonding agent with a rag soaked with
cleaning solvent.
STATIONARY GLASS
BESM150017
BESM150018
15
15–221Chery Automobile Co., Ltd.
Page 1806 of 1903

Downloaded from www.Manualslib.com manuals search engine CAUTION:
Even if the entire bonding agent has been cleared, you should also clean the body surface. Do not
touch the glass surface after cleaning.
3. Remove the stopper with a knife.
4. Clean the removed rear window:•Clean any bonding agent adhered to the glass with a scraper.
• Remove the stopper with a knife.
• Clean the glass with glass cleaner.
NOTE :
Do not touch the glass after cleaning 5. Position the glass: •Place the glass in the proper position.
• Make reference marks on the glass and the body.
• Remove the glass.
6. Clean the contact surface of the glass: NOTE: Do not touch the glass surface after cleaning.
• Clear any residue around the peripheral contact face of the glass with glass cleaner.
7. Apply a layer of primer M on the contact surface of the body with a brush.
NOTE :
Allow the primer coat to dry for a minimum of 3 minutes. Do not apply the primer to the bonding agent. Do not save
the opened primer M for later use. 8. Apply a layer of primer G on the contact surface of the glass: •Apply a layer of primer G on the edges and the contact surface of the glass with a brush or sponge.
• Wipe the excess primer off with a clean rag before it dries.
NOTE :
Allow the primer coat to dry for a minimum of 3 minutes. Do not apply the primer to the bonding agent. Do not save
the opened primer G for later use. 9. Mixing the bonding agent: •Clean a mixing board and a scraper completely with solvent.
• Thoroughly mix 500 grams of host crystal with 75 grams of hardener on a mixing board with a scraper.
NOTE :
Make sure that the molding is installed within the application period of the bonding agent, and the bonding agent
should be mixed within 5 minutes.
10. Applying the bonding agent: •Cut off the pot tip and fill the bonding agent
into the pot.
• Place the pot into the sealant gun.
• Apply the bonding agent on the glass as
shown in the figure.
CAUTION:
Verify that the water resistant piece is adhered to the panel of the body as shown in the figure.
STATIONARY GLASS
BESM150017
15–222Chery Automobile Co., Ltd.