2009 AUDI S6 engine
[x] Cancel search: enginePage 76 of 398
Clear vision
0 Note
Never drive your vehicle when the windshield wiper arms are in the
service position and pulled away from the windshield. When you
drive faster than 4 mph (6 km/h), the wiper arms automatically
return back to the park position and could cause paint damage to
the engine hood!
[ i ] Tips
• You can also turn on the service position, for example, if you
want to protect the windshield from icing, using a cover.
• The service position moves to
off automatically when you
operate the windshield wiper lever, or speed exceeds 4 mph (6
km/h). •
Installing nevv vviper blades
Wiper blades in good condition help keep the windshield
clear.
@
Fig . 67 Removing the
wiper blades
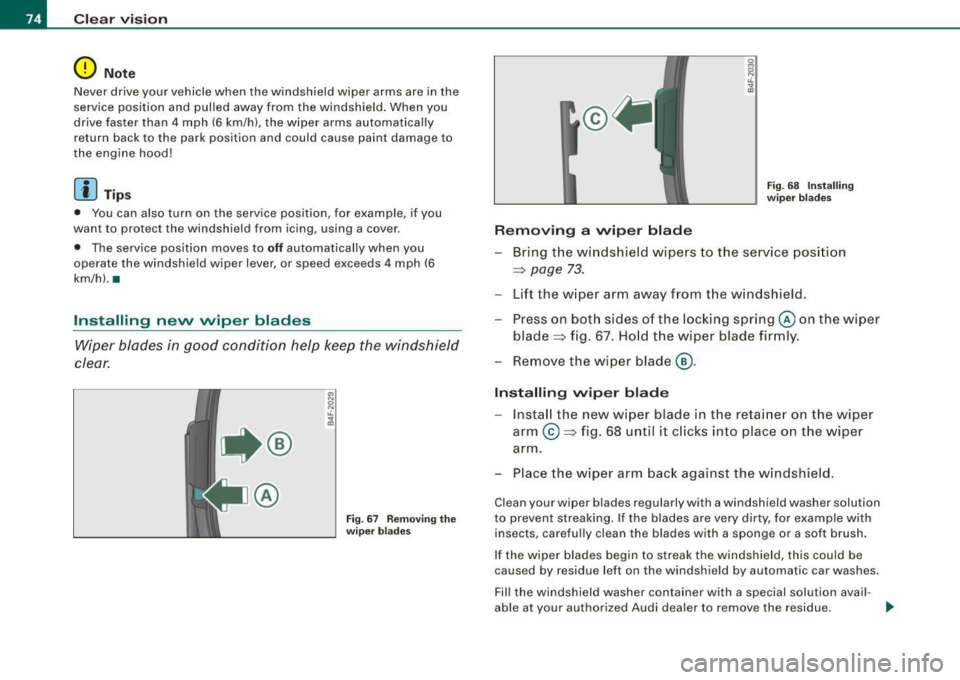
Removing a wiper blade
Fig. 68 Installing
wiper blades
- Bring the windshield wipers to the service position
~ page 73.
-Lift the wiper arm away from the windshield.
- Press on both sides of the locking spring @ on the wiper
blade~ fig. 67. Hold the wiper blade firmly.
- Remove the wiper blade@.
Installing wiper blade
-Install the new wiper blade in the retainer on the wiper
arm @~fig . 68 until it clicks into place on the wiper
arm.
- Place the wiper arm back against the windshield.
Clean your wiper blades regularly with a windshield washer solution
to prevent streaking. If the blades are very dirty, for example with
insects, carefully clean the blades with a sponge or a soft brush.
If the wiper blades begin to streak the windshield, this cou ld be
caused by residue left on the windshield by automatic car washes.
Fill the windshield washer container with a special solution avail -
able at your authorized Audi dealer to remove the residue. _,,.
Page 100 of 398
Seats and storage
The socket of the cigarette lighter may be used for 12 -volt appli
ances with maximum consumption of up to 100 wat ts, such as a
flash light, small vacuum cleaner, etc .
Before you purchase any accessories, always read and fo llow the
information in
=> page 374, "Addit ional accessories and parts
replacement".
& WARNING
Improper use of the cigarette lighter can cause serious injury or
start a fire.
• Be careful when using the cigarette lighter. If you do not pay
attention to what you are doing when you are using the cigarette
lighter you can burn yourself .
• The cigarette lighter and socket remain functional even if the
ignition is switched off or the ignition key is removed . Never leave
children inside the vehicle without supervision.
0 Note
• To avoid damaging the socket, only use p lugs that fit properly.
• Only use the cigarette lighter socket as a power source for elec
trical accessories for short durations . Use the sockets in the vehicle
when a power source is needed for longer durations .
[ i J Tips
When the engine is off and accessories are sti ll plugged in and are
on, the vehicle battery can st ill be drained. •
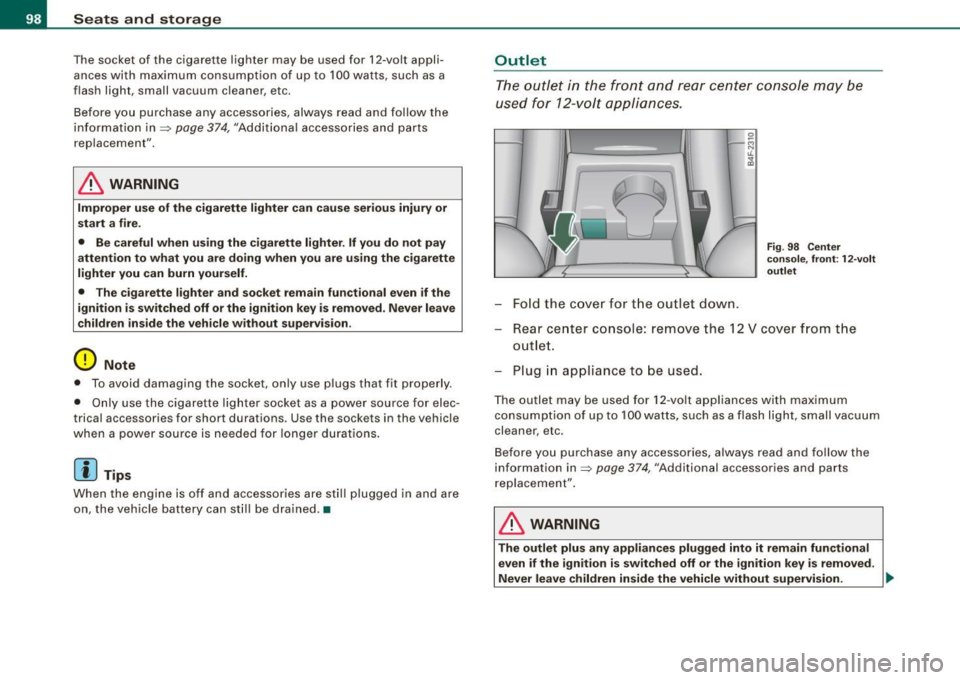
Outlet
The outlet in the front and rear center console may be
used for 12-volt appliances.
-Fold the cover for the outlet down.
Fi g. 98 Center
console, front: 12 -vo lt
outlet
Rear center console: remove the 12 V cover from the
outlet.
Plug in appliance to be used.
The outlet may be used for 12 -volt appliances with maximum
consumption of up to 100 watts, such as a flash light, small vacuum
cleaner, etc .
Before you purchase any accessories, always read and follow the
information in=>
page 374, "Additional accessories and parts
replacement" .
& WARNING
The outlet plus any appliances plugged into it remain functional
even if the ignition is switched off or the ignition key is removed.
Never leave children inside the vehicle without supervision. .,_
Page 101 of 398
![AUDI S6 2009 Owners Manual 0 Note
To avoid damaging the socket, only use plugs that fit properly.
[ i] Tips
When the engine is off and accessories are still plugged in and are
on, the vehicle battery AUDI S6 2009 Owners Manual 0 Note
To avoid damaging the socket, only use plugs that fit properly.
[ i] Tips
When the engine is off and accessories are still plugged in and are
on, the vehicle battery](/manual-img/6/57595/w960_57595-100.png)
0 Note
To avoid damaging the socket, only use plugs that fit properly.
[ i] Tips
When the engine is off and accessories are still plugged in and are
on, the vehicle battery can still be drained. •
Storage
General overview
There are numerous places to store items in your vehicle.
Glove compartment
Storage compartment in roof
Coat hooks
Storage compartment in the trunk
& WARNING
~ page 99
~ page 100
~ page 101
~ page 91
• Always remove objects from the instrument panel. Any items
not stored could slide around inside the vehicle while driving or
when accelerating or when applying the brakes or when driving
around a corner.
• When you are driving make sure that anything you may have
placed in the center console or other storage locations cannot fall
out into the footwells. In case of sudden braking you would not be
able to brake or accelerate.
• Any articles of clothing that you have hung up must not inter
fere with the driver's view. The coat hooks are designed only for
lightweight clothing. Never hang any clothing with hard, pointed
or heavy objects in the pockets on the coat hooks. During sudden
Con tro ls and eq uip
ment
Seats and storage
& WARNING !continued)
braking or in an accident -especially if the airbag is deployed -
these objects could injure any passengers inside the vehicle. •
Glove compartment
The media player is in the glove compartment.
To open glove compartment
Fig. 99 Unlocking
button for glove
compartment
Press the button ::V => fig. 99 (arrow) - the lid opens auto
matically.
To close glove compartment
Push the glove compartment lid up unt il the lock
engages.
In the glove compartmen t lid you will find a place to store a pen and
a pad of paper.
CD changer*
The CD changer for the radio system and the Navigation drive* is located in the glove compartment . How to change CDs is described
in the pertinent Owner's Manual.
tJ,,,
Vehicle care I I irechnical data
Page 104 of 398

• .___w_ a_ rm __ a_ n_ d_ c_o _l_d ________________________________________________ _
Warm and cold
Climate control
Description
The air conditioner is fully automatic and is designed to
maintain a comfortable and uniform climate inside the
vehicle.
We recommend the follow ing settings:
- Set the temperature to 75 °F (+23 °C).
- Press the !AUTO
I button.
With this setting, you attain maximum comfort in the least amount
of time. Change this setting, as desired, to meet your personal needs.
The climate controls are a combination of heating, ventilation and cooling systems, which automatically reduce humidity and cool the
air inside your vehicle.
The air temperature, air flow and air distribution are automatically
regulated to achieve and maintain the desired passenger compart
ment temperature as quickly as possible.
The system automatically compensates for changes in outside
temperature and for the intensity of the sunlight entering the
vehicle. We recommend you use the
Automatic mode=> page 105
for year-round comfort.
Please note the following:
Turn on the air conditioner to reduce humidity in the vehicle. This also prevents the windows from fogging up.
When the outside temperature is high and the air is very humid,
condensation from the evaporator may drip under the vehicle. This
is normal and does not indicate a leak. If the outside temperature is low,
the fan normally only switches to
a higher speed once the engine coolant has warmed up sufficiently.
The air conditioner temporarily switches off when you drive off from
a standstill using full throttle to save engine power.
The compressor also switches off if the coolant temperature is too
high, so that the engine can be adequately cooled under extreme
loads.
Air pollutants filter
The air pollutants filter (a combined particle filter and activated
charcoal filter) reduces or prevents outside air pollution (dust, or
pollen) from entering the vehicle.
The air pollutants filter must be changed at the intervals specified
in your Warranty
& Maintenance booklet, so that the air conditioner
can properly work.
If you drive your vehicle in an area with high air pollution, the filter
may need to be changed more frequently than specified in your
Audi Warranty
& Maintenance booklet. If in doubt, ask your autho
rized Audi Service Advisor for advice.
Key coded settings
The air conditioner settings selected are automatically stored and
assigned to the key being used. When the vehicle is started, the air
conditioner automatically selects the settings assigned to that key.
This way every driver will maintain his/her own personal settings
and does not have to reset them manually.
If a different driver uses your key and changes the air conditioner
settings, the latest adjustments will erase and replace the settings
you have stored.
Energy management
To prevent the battery from being discharged and to restore the
balance of energy, components which require large amounts of
Page 110 of 398
• ..__w_ a_ r_m _ a_ n_d_ c_ o_ ld __________________________________________________ _
Rear window defogger 4W
Press the QW switch to turn the rear w indow defogger on
and off .
The rear window defogger works only when the engine is running .
The light in the switch will illuminate when the defogger is on .
The rear window defogger wi ll switch off automatically after a short
time. The time the rear window defogger remains on wi ll vary
depending on the outside temperature .
At very low outside temperatures, the rear window defogger can switched on continuously by pushing the
QlP button for more than 2
seconds. This remains stored unti l the ignition is switched off .
A rear window defogger that was switched on also remains stored
fo r 15 minutes after the ignition is switched off . If the engi ne is
restarted within these 15 minutes, the rear window defogger is also
ac tiva ted, depend ing on outside temperature . With a veh ic le that is
parked for a short time, the rear window defogger does not need to
be manually activated again.
<£> For the sake of the environment
Turn the defogger off when the rear window is clear. When you save electricity, you save fuel. •
Air outlets
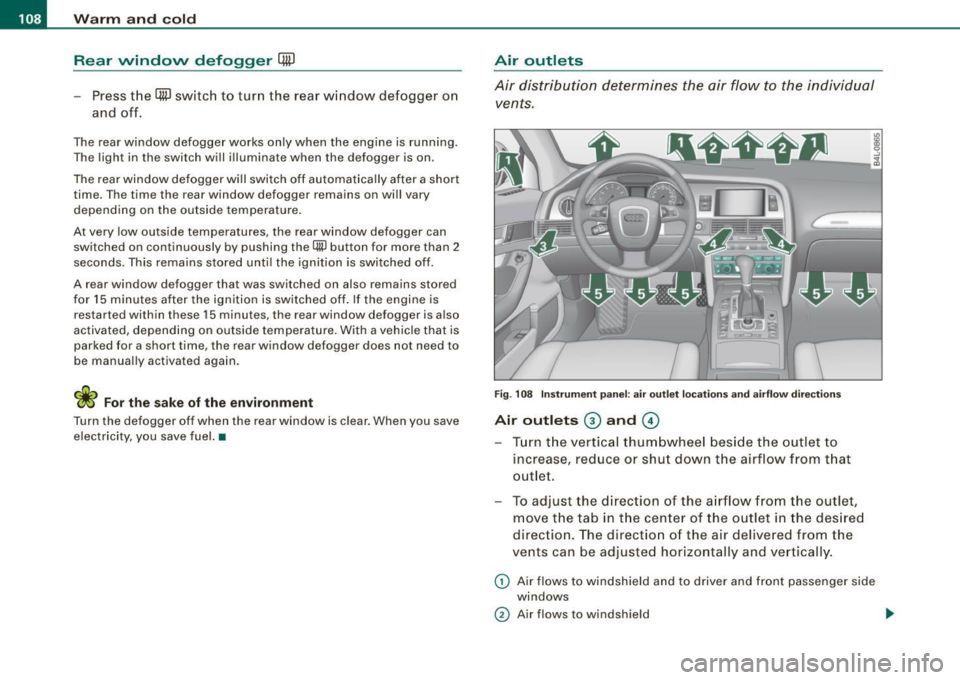
Air distribution determines the air flow to the individual
vents.
F ig . 10 8 Instrument p anel: a ir outl et locations and airflow dire ctio ns
Air outlets @ and G)
Tu rn t he vertica l thum bwhee l beside the outlet to
increase, reduce or shu t down the airflow from t hat
out let .
To adjust th e direction of the a irflow fro m the ou tle t,
move the ta b i n t he cen ter of the ou tlet in the des ired
direction. The direct ion o f the air delivered from the
vents can be adjusted horizontally and vertica lly .
G) Air flows to wind shield and to driver and front pas senger side
windows
0 Air flows to windshield .,_
Page 111 of 398
_________________________________________________ w_ a_ r_ m __ a_n_ d_ c_ o_ld __ llfflll
© Air flows to driver/front passenger
© Air flows to driver/front passenger
© Air fl ows to footwell
The air outlets are actuated either automatically or manually depending on the operating mode selected.
[ i J Tip s
• When climate control is working, cooled air wi ll flow primarily
from out lets
G) and @. To assure adequate coo ling, outlets G) and
© should never be completely closed.
• The air flow coming from the vents © can be adjusted to be
colder or warmer than the selected set temperature. •
Air outlets in the rear
Outlets in the center console
- Rotate the thumb whee l located next to the outlet to
open or close it.
- To adjust the direction o f the airflow from the o utlet,
move the tab in the center of the outlet in the desired
direction. The direction of the air delive red from the
vents can be adjusted hor izontally and vertically.
Outl ets in the door pill ars
- Rotate the t humb whee l located next to the outlet to
open or close i t.
- To adjust the direction o f the air flow from the o utlet,
move the tab in t he cen ter of the o utlet in the desi red
direction . The direction of the air delive red from the
vents can be adjusted hor izonta lly and vertically .
Controls and equip
ment
The air outlets are actuated either automatically or manual ly
depending on the operati ng mode selected. Heated o r unheated
fresh air, or cooled air f lows from the vents .
The air outlets to heat the rear footwell are located under the front seats .
[ i J Tip s
If the climate control system is opera ting in cooling mode, air flows
primari ly from the out lets in the center console and in the door
pillars. To achieve adequate cooling, you should never close the
out lets comp letely. •
Using climate control economically
Using the climate controls prudently can hel p save fuel.
When you use the air condi tioner, engine power is reduced
and fuel c onsum ption increases. T o save fuel, you should
use the a ir condit io ner onl y when necessa ry. Also please
note the fo llow ing po ints:
If you want to save fuel, activate ECON.
- If you are going to drive with the windows open, use
ECO N.
- If the ve hicle is ext remely hot due to the heat of the sun,
brie fly open doors and windows.
'£> For the sake of the environment
By reducing the amount of fuel you use, you a lso reduce the amount
of pollutants emitted into the a ir. •
I • •
Page 118 of 398
• ..__O_ n_ t_ h _e _ ro_ a_d __________________________________________________ _
Easy entry feature
The easy entry feature makes it easier to enter and exit the
vehicle by automatically adjusting the steering wheel.
Press the button @~ page 115, fig. 115 to turn the easy
entry feature on or off.
When the easy entry feature is turned on (button depressed), the
steering wheel moves up to the parked position when the ignition is
turned off. After you enter the vehicle, the steering wheel moves to
the stored position as soon as you turn on the ignition .
Easy entry feature on vehicles with memory seat*
For the stored steering wheel position to be recalled, the driver's
seat memory must be switched on
(I ON OFF I switch in depressed
position).
If the easy entry feature is switched off, the steering wheel moves to
the stored position as soon as you press the seat memory button. •
Ignition lock and ignition switch
Ignition key positions
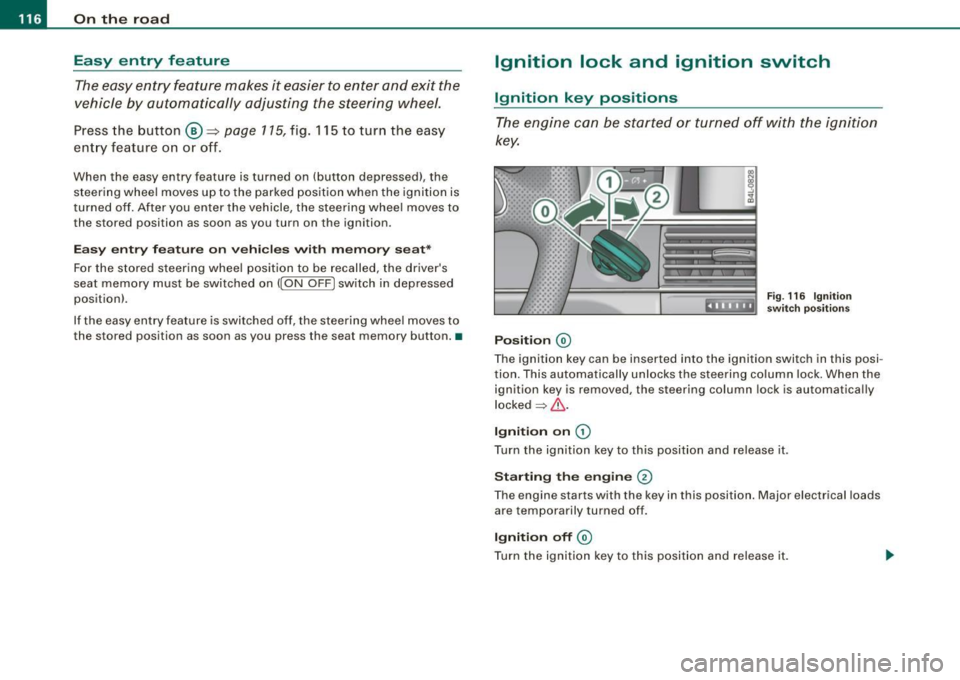
The engine can be started or turned off with the ignition
key.
Position @
Fig. 116 Ignition
switch positions
The ignition key can be inserted into the ignition switch in this posi
tion. This automatically unlocks the steering column lock. When the
ignition key is removed, the steering column lock is automatically
locked
~ & .
Ignition on 0
Turn the ignition key to this position and release it .
Starting the engine 0
The engine starts with the key in this position. Major electrical loads
are temporarily turned off.
Ignition off @
Turn the ignition key to this position and release it.
Page 119 of 398

_________________________________________________ O_ n_ t_h _e _ ro_ a_d _ __._
& WARNING
• Ne ver re m ove the ke y from the ignition lo ck wh ile th e ve hicl e is
movin g. The steering wh eel will l ock , cau sing l oss of contr ol.
• I f yo u have t o le ave y our veh icle, e ven for ju st a mi nute , always
r e m ove the ign ition ke y and t ake it with you. T his is es pe ciall y
import ant if y ou are going t o leave c hildren unatt end ed in the
vehic le. The children could start the engin e or use other ve hicle
c ontr ols. Un sup erv is ed u se of veh icle c ontrol s (for e xam ple, pow er
w indow s) can cause se rious per sonal injurie s.
0 Note
• I f the ~ symbol in the display blinks, there is a malfunction in the
e lectronic steering column lock . Follow the instructions in
~ page 32 , "Steering malfunction i".
• If the ~ symbol in the display blinks , there is a malfunction in
the electronic ignition lock . Follow the instructions in~ page
33,
"Ignition lock malfunction ~"-
[ i ] Tip s
• If you release the ignition key in posit ion @, the key automati
cally r eturns to posit ion
G) .
• If you open the driver's door when the ignition is swi tched on , a
buzzer sounds and the message Ignition is on appears in the instru
ment cluster display. P lease switch the ignition off. •
Ignition key safety lock
The ignition key can only be removed when the selector
lever is in the "P" (Park) position.
After turning off the ignition, the ignition key can only be removed
from the ignition lock when the selec tor lever is in the "P" (Park)
Con tro ls and eq uip
ment position. Af
ter you have removed the key , the sele ctor lever is locked
and cannot be moved. •
Starting and stopping the engine
Starting the engine
The engine can only be started with your original Audi
key.
.... _:::::•:
Step on t he brake.
Fig . 117 Ig ni tio n k ey
posit io n s
Move the selector lever into P or N => &,.
Tu rn the ignition key to pos ition 0 => fig . 117 - do not
depress the gas peda l when start ing the engine.
A co ld engine may sound loud after it has been started . This is due
to the hydrau lic valves building up oi l pressure. This is normal and
is not a n eed for concern .
If the engine does not start immediately, stop trying after 10
seconds and th en try to restart the engine about 30 seconds later . _.,
Vehicle care
I I irechnical data