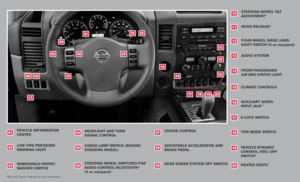
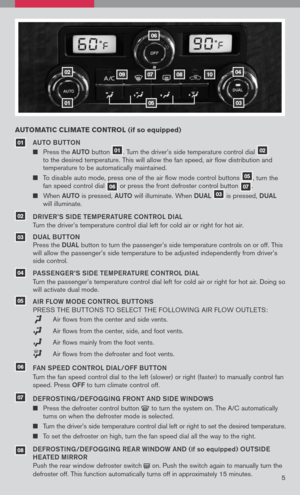
Page 25 of 36
23
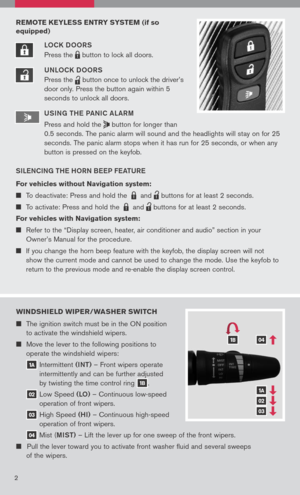
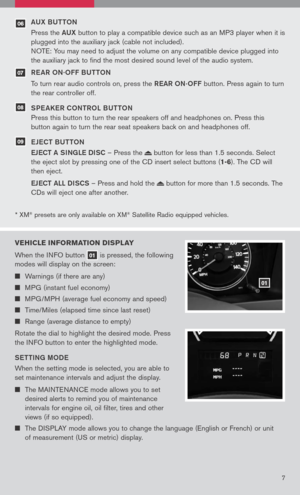
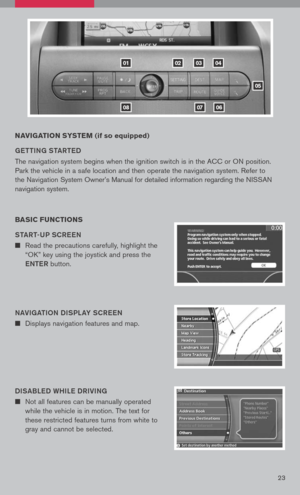
NAVIgATION sY s TEM (if so equipped)
ge TTIN g ST aRT eD
The navigation system begins when the ignition switch is in the ACC or ON position.
Park the vehicle in a safe location and then operate the navigation system. Refer to
the Navigation System Owner’s Manual for detailed information regarding the NISSAN
navigation system.
BA sIC F uNCTION s
ST aRT-UP SCR eeN
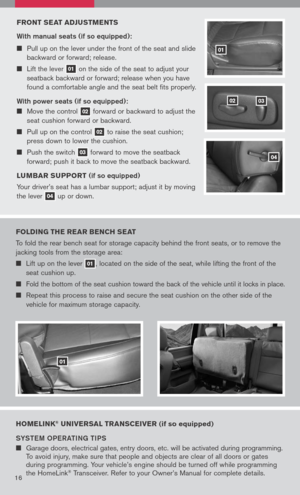
n Read the precautions carefully, highlight the
“OK” key using the joystick and press the
e NTe R button.
N aVI ga TION DISPL aY SCR eeN
n Displays navigation features and map.
DIS aBL eD WHIL e DRIVIN g
n Not all features can be manually operated
while the vehicle is in motion. The text for
these restricted features turns from white to
gray and cannot be selected.
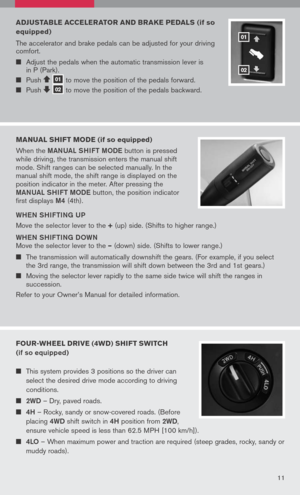
01
0806
020304
05
07
Page 26 of 36
24
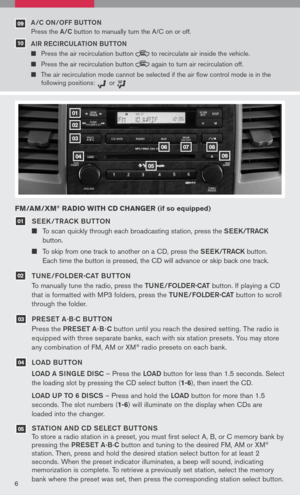
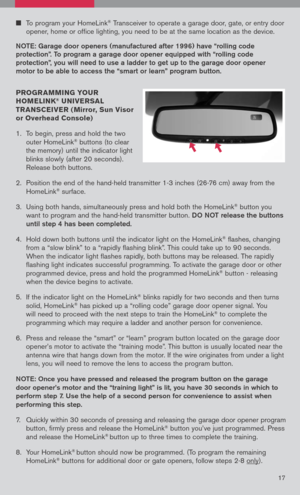
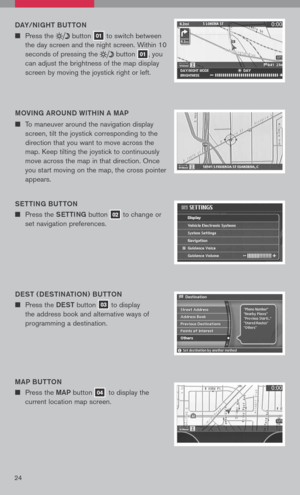
DaY/NI gHT BUTTON
n Press the button 01 to
switch between
the day screen and the night screen. Within 10
seconds of pressing the
button 01, you
can adjust the brightness of the map display
screen by moving the joystick right or left.
MOVIN g aROUND WITHIN a MaP
n To maneuver around the navigation display
screen, tilt the joystick corresponding to the
direction that you want to move across the
map. Keep tilting the joystick to continuously
move across the map in that direction. Once
you start moving on the map, the cross pointer
appears.
S eTTIN g BUTTON
n Press the SeTTINg button 02 to change or
set navigation preferences.
D eST ( D eSTIN aTION ) BUTTON
n Press the DeST button 03 to display
the address book and alternative ways of
programming a destination.
M aP BUTTON
n Press the MaP button 04 to display the
current location map screen.
Page 27 of 36
25
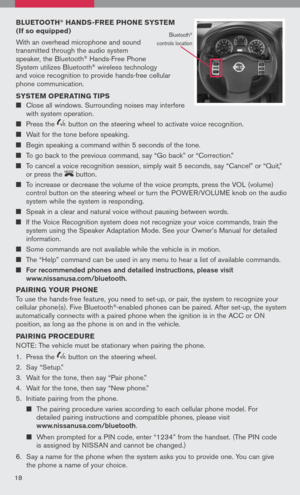
gUIDe VOIC e BUTTON
n Press the gUIDe VOICe button 06 to hear the current navigation situation.
ROUT
e B UTTON
n Press the ROUTe button 07 to display
various ways to modify the route to a
destination.
B aCK B UTTON
n Press the BaCK button 08 to return to the previous function shown on the
navigation display.
ZOOM OUT/IN BUTTONS
n Press the button 05 or the button 05
to increase or decrease the scale of the map
display.
sw ITCHIN g THE MAP VIEw
n Press the MaP button 04. The current
location map screen is displayed.
n Press the eNTe R button.
n Highlight the “Map View” key and press the
e NTe R button.
n Highlight either one of the “Plan View” keys
or one of the “Birdview” keys and press the
e NTe R button to select the map view. Press
the MaP button
04 or the “Back” key to
accept the changes.
Page 28 of 36
” key and
press the eNTe R button, a confirmation
message is displayed. Highlight the “YES” key
and press the eNTe R button.
s
ELEC TIN g A MEN")
26
n Highlight the “Home (Add New)” key and
press the eNTe R button, a confirmation
message is displayed. Highlight the “YES” key
and press the eNTe R button.
s
ELEC TIN g A MEN u s CREEN
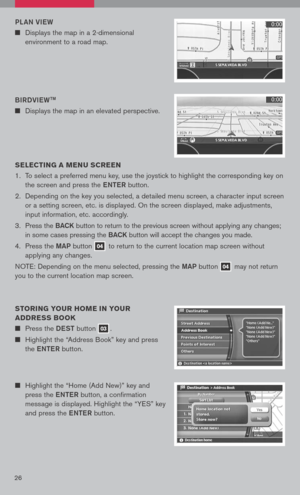
1. To select a preferred menu key, use the joystick to highlight the corresponding key on
the screen and press the eNTe R button.
2. Depending on the key you selected, a detailed menu screen, a character input screen
or a setting screen, etc. is displayed. On the screen displayed, make adjustments,
input information, etc. accordingly.
3. Press the B aCK button to return to the previous screen without applying any changes;
in some cases pressing the B aCK button will accept the changes you made.
4. Press the MaP button
04 to return to the current location map screen without
applying any changes.
NOTE: Depending on the menu selected, pressing the MaP button
04 may
not return
you to the current location map screen.
s TORIN g YO uR HOME IN YO uR
ADDRE ss BOOK
n Press the DeST button 03.
n Highlight the “Address Book” key and press
the eNTe R button.
BIRDVI
eW
TM
n Displays the map in an elevated perspective.
PL
aN VI eW
n Displays the map in a 2-dimensional
environment to a road map.
Page 29 of 36
27
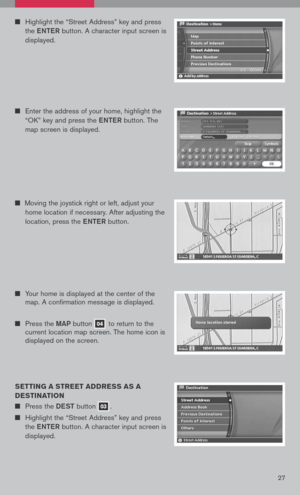
sETTIN g A sTREET ADDRE ss As A
DE sTINATION
n Press the DeST button 03.
n Highlight the “Street Address” key and press
the eNTe R button. A character input screen is
displayed.
n Highlight the “Street Address” key and press
the eNTe R button. A character input screen is
displayed.
n Enter the address of your home, highlight the
“OK” key and press the eNTe R button. The
map screen is displayed.
n Your home is displayed at the center of the
map. A confirmation message is displayed.
n Press the MaP button 04 to return to the
current location map screen. The home icon is
displayed on the screen.
n
Moving the joystick right or left, adjust your
home location if necessary. After adjusting the
location, press the eNTe R button.
Page 30 of 36
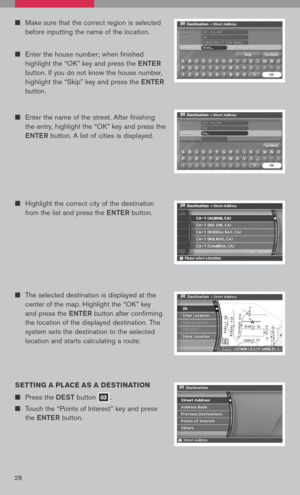
n Make sure that the correct region is selected
before inputting the name of the location.
n Enter the house number; when finished
highlight the “OK” key and press the eNTe R
button. If you do not know the house number,
highlight the “Skip” key and press the eNTe R
button.
n Enter the name of the street. After finishing
the entry, highlight the “OK” key and press the
e NTe R button. A list of cities is displayed.
n Highlight the correct city of the destination
from the list and press the eNTe R button.
s ETTIN g A PLACE As A DE sTINATION
n Press the DeST button 03.
n Touch the “Points of Interest” key and press
the eNTe R button.
n The selected destination is displayed at the
center of the map. Highlight the “OK” key
and press the eNTe R button after confirming
the location of the displayed destination. The
system sets the destination to the selected
location and starts calculating a route.
28
Page 31 of 36
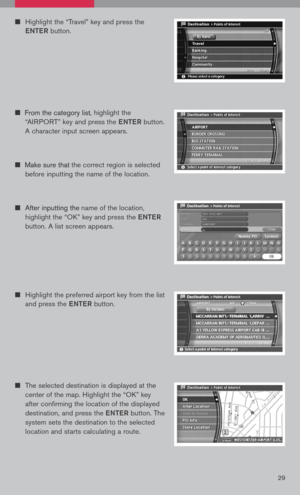
n
The selected destination is displayed at the
center of the map. Highlight the “OK” key
after confirming the location of the displayed
destination, and press the eNTe R button. The
system sets the destination to the selected
location and starts calculating a route.
n Highlight the preferred airport key from the list
and press the eNTe R button.
n Highlight the “Travel” key and press the
e NTe R button.
n
, highlight the
“AIRPORT” key and press the eNTe R button.
A character input screen appears.
n
the correct region is selected
before inputting the name of the location.
n
name of the location,
highlight the “OK” key and press the eNTe R
button. A list screen appears.
29
Page 32 of 36
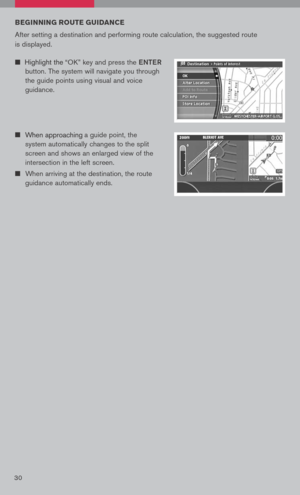
BEgINNIN g ROuTE gu IDANCE
After setting a destination and performing route calculation, the suggested route
is displayed.
n
a guide point, the
system automatically changes to the split
screen and shows an enlarged view of the
intersection in the left screen.
n When arriving at the destination, the route
guidance automatically ends.
n
“OK” key and press the eNTe R
button. The system will navigate you through
the guide points using visual and voice
guidance.
30


ge TTIN g ST aRT eD
The navigation system begins when the ignition switch is in the ACC or ON position.
Park the vehicle in a safe location and th")


