Page 17 of 36
HIg H uTILITY BED AND uTILI -TRACK™
CHANNEL sYs TEM
(if so equipped)
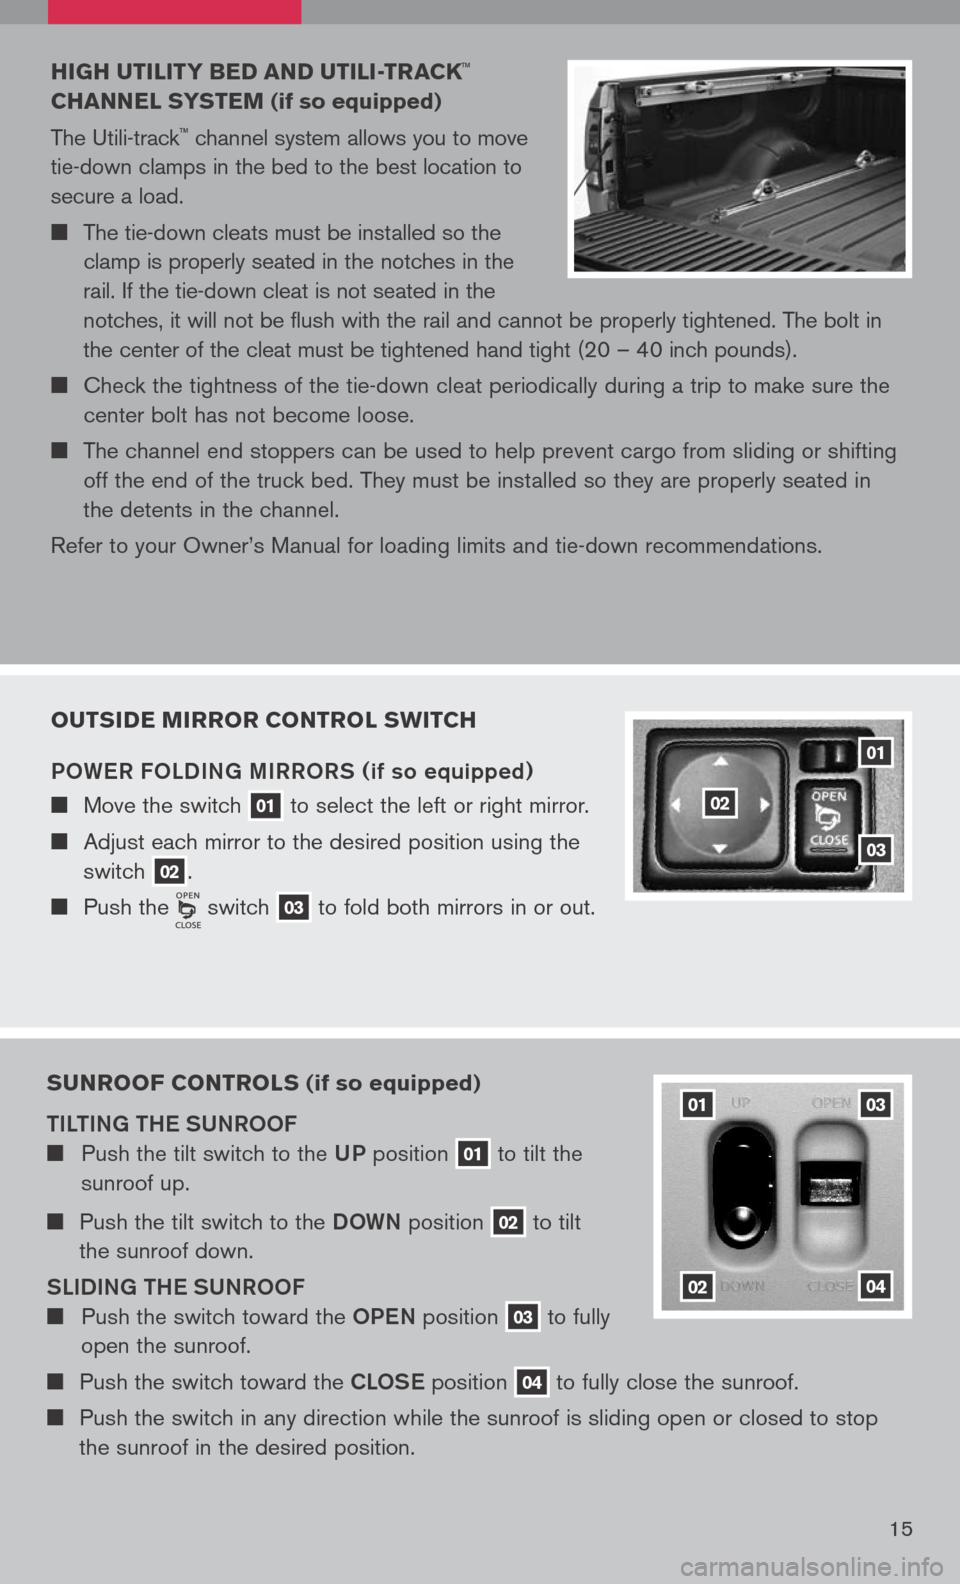
The Utili-track
™ channel system allows you to move
tie-down clamps in the bed to the best location to
secure a load.
The tie-down cleats must be installed so the
clamp is properly seated in the notches in the
rail. If the tie-down cleat is not seated in the
notches, it will not be flush with the rail and cannot be properly tightened. The bolt in
the center of the cleat must be tightened hand tight (20 – 40 inch pounds).
Check the tightness of the tie-down cleat periodically during a trip to make sure the
center bolt has not become loose.
The channel end stoppers can be used to help prevent cargo from sliding or shifting
off the end of the truck bed. They must be installed so they are properly seated in
the detents in the channel.
Refer to your Owner’s Manual for loading limits and tie-down recommendations.
15
OuTs IDE MIRROR CONTROL swITCH
POW eR FOLDIN g MIRRORS
(if so equipped)
Move the switch 01 to
select the left or right mirror.
Adjust each mirror to the desired position using the
switch 02.
Push the switch 03 to
fold both mirrors in or out.
01
02
03
su NROOF CONTROL s (if so equipped)
TILTIN g TH e SUNROOF
Push the tilt switch to the UP position 01 to
tilt the
sunroof up.
Push the tilt switch to the DOWN position 02 to
tilt
the sunroof down.
SLIDIN g TH e SUNROOF
Push the switch toward the OPeN position 03 to
fully
open the sunroof.
Push the switch toward the CLOS e position 04 to
fully close the sunroof.
Push the switch in any direction while the sunroof is sliding open or closed to stop
the sunroof in the desired position.
01
02
03
04
Page 18 of 36
FRONT sEAT ADJ usTMENT s
With manual seats (if so equipped):
Pull up on the lever under the front of the seat and slide
backward or forward; release.
Lift the lever 01 on
the side of the seat to adjust your
seatback backward or forward; release when you have
found a comfortable angle and the seat belt fits properly.
With power seats (if so equipped):
Move the control 02 forward
or backward to adjust the
seat cushion forward or backward.
Pull up on the control 02 to
raise the seat cushion;
press down to lower the cushion.
Push the switch 03 forward
to move the seatback
forward; push it back to move the seatback backward.
L u MBAR suPPORT
(if so equipped)
Your driver’s seat has a lumbar support; adjust it by moving
the lever
04 up
or down.
0302
01
04
FOLDIN g THE REAR BENCH sEAT
To fold the rear bench seat for storage capacity behind the front seats, or to remove the
jacking tools from the storage area:
Lift up on the lever 01, located on the side of the seat, while lifting the front of the
seat cushion up.
Fold the bottom of the seat cushion toward the back of the vehicle until it locks in place.
Repeat this process to raise and secure the seat cushion on the other side of the
vehicle for maximum storage capacity.
01
HOMELINK® u NIVER sAL TRAN sCEIVER (if so equipped)
SYST eM OP eR aTIN g TIPS
Garage doors, electrical gates, entry doors, etc. will be activated during programming.
To avoid injury, make sure that people and objects are clear of all doors or gates
during programming. Your vehicle’s engine should be turned off while programming
the HomeLink
® Transceiver. Refer to your Owner’s Manual for complete details.16
Page 19 of 36
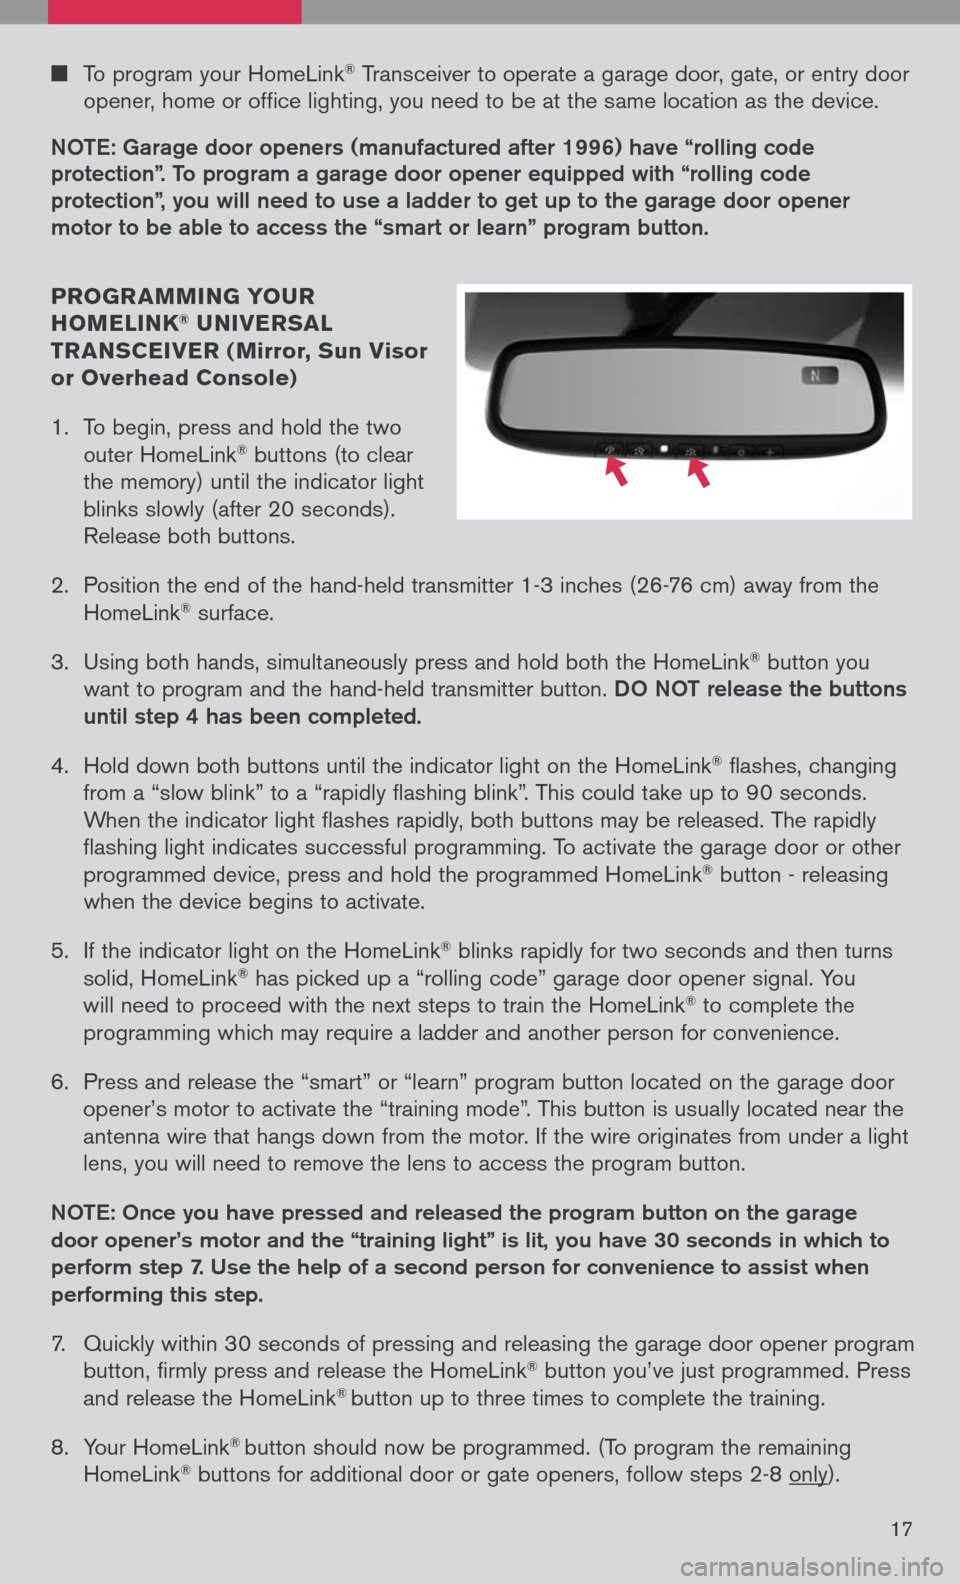
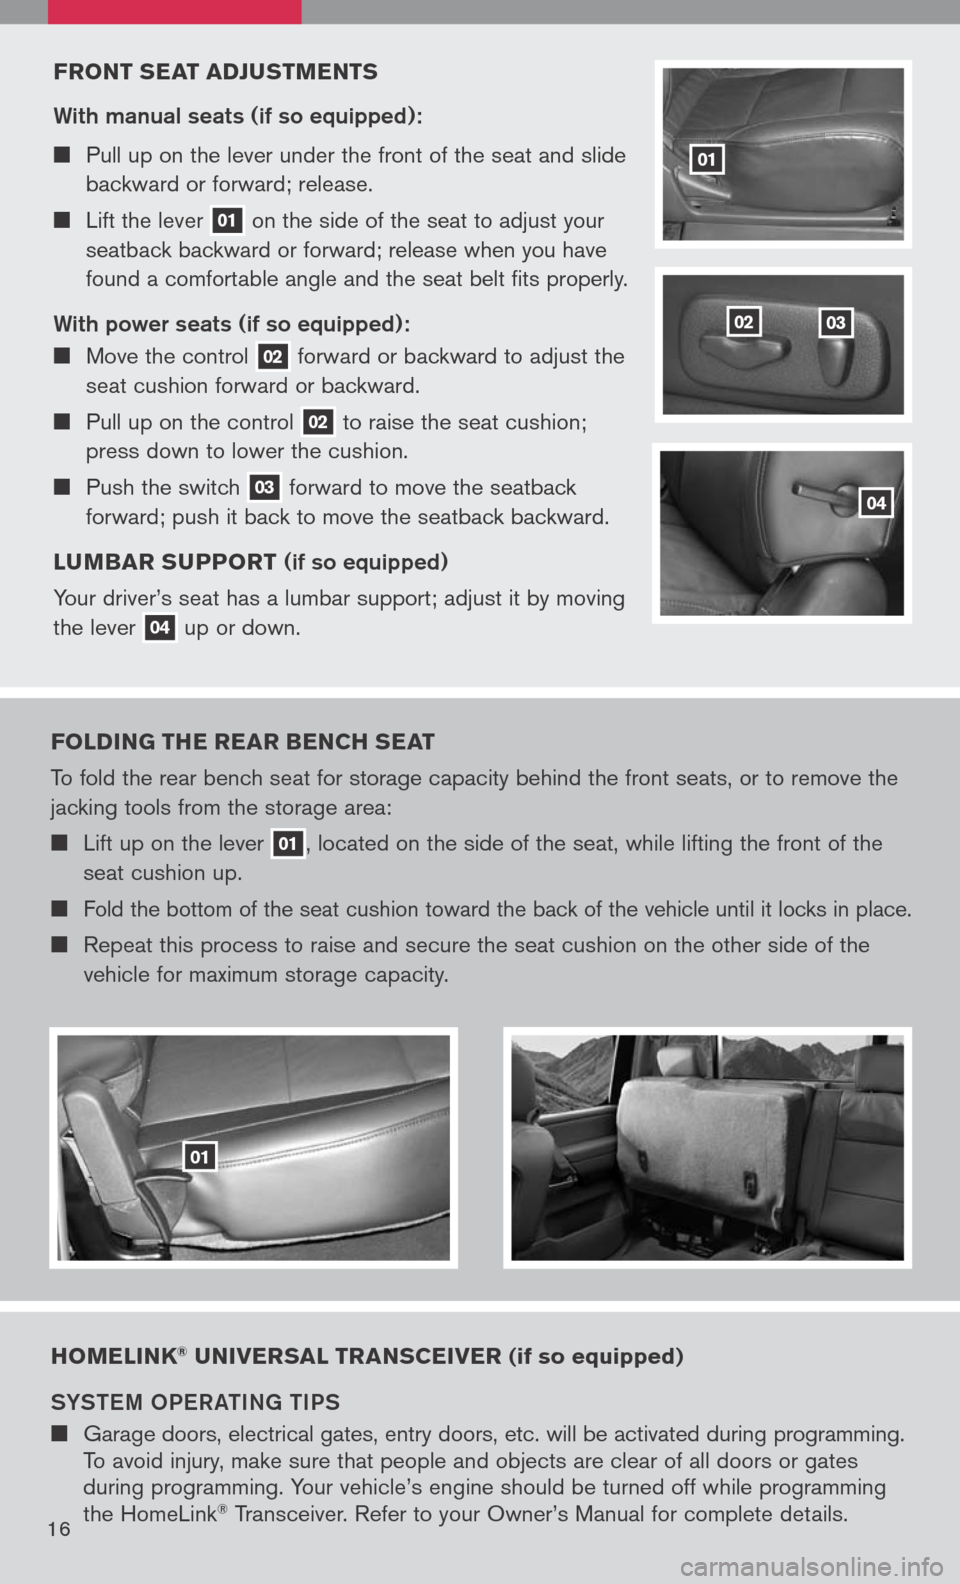
To program your HomeLink® Transceiver to operate a garage door, gate, or entry door
opener, home or office lighting, you need to be at the same location as the device.
NOTe: garage door openers (manufactured after 1996) have “rolling code
protection”. To program a garage door opener equipped with “rolling code protection”, you will need to use a ladder to get up to the garage door opener motor to be able to access the “smart or learn” program button.
PROgR AMMIN g YO uR
HOMELINK® u NIVER sAL
TR AN sCEIVER ( Mirror, sun Visor
or Overhead Console)
1. To begin, press and hold the two
outer HomeLink
® buttons (to clear
the memory) until the indicator light
blinks slowly (after 20 seconds).
Release both buttons.
2. Position the end of the hand-held transmitter 1-3 inches (26-76 cm) away from the
HomeLink® surface.
3. Using both hands, simultaneously press and hold both the HomeLink
® button you
want to program and the hand-held transmitter button.
DO NOT release the buttons
until step 4 has been completed.
4. Hold down both buttons until the indicator light on the HomeLink
® flashes, changing
from a “slow blink” to a “rapidly flashing blink”. This could take up to 90 seconds.
When the indicator light flashes rapidly, both buttons may be released. The rapidly
flashing light indicates successful programming. To activate the garage door or other
programmed device, press and hold the programmed HomeLink
® button - releasing
when the device begins to activate.
5. If the indicator light on the HomeLink
® blinks rapidly for two seconds and then turns
solid, HomeLink® has picked up a “rolling code” garage door opener signal. You
will need to proceed with the next steps to train the HomeLink® to complete the
programming which may require a ladder and another person for convenience.
6. Press and release the “smart” or “learn” program button located on the garage door
opener’s motor to activate the “training mode”. This button is usually located near the
antenna wire that hangs down from the motor. If the wire originates from under a light
lens, you will need to remove the lens to access the program button.
NOTe: Once you have pressed and released the program button on the garage
door opener’s motor and the “training light” is lit, you have 30 seconds in which to
perform step 7. Use the help of a second person for convenience to assist when
performing this step.
7. Quickly within 30 seconds of pressing and releasing the garage door opener program
button, firmly press and release the HomeLink® button you’ve just programmed. Press
and release the HomeLink® button up to three times to complete the training.
8. Your HomeLink
® button should now be programmed. (To program the remaining
HomeLink® buttons for additional door or gate openers, follow steps 2-8 only).
17
Page 20 of 36
BLuETOOTH® HAND s-FREE PHONE sY s TEM (If so equipped)
With an overhead microphone and sound
transmitted through the audio system
speaker, the Bluetooth® Hands-Free Phone
System utilizes Bluetooth® wireless technology
and voice recognition to provide hands-free cellular
phone communication.
s Y s TEM OPERATIN g TIPs
Close all windows. Surrounding noises may interfere
with system operation.
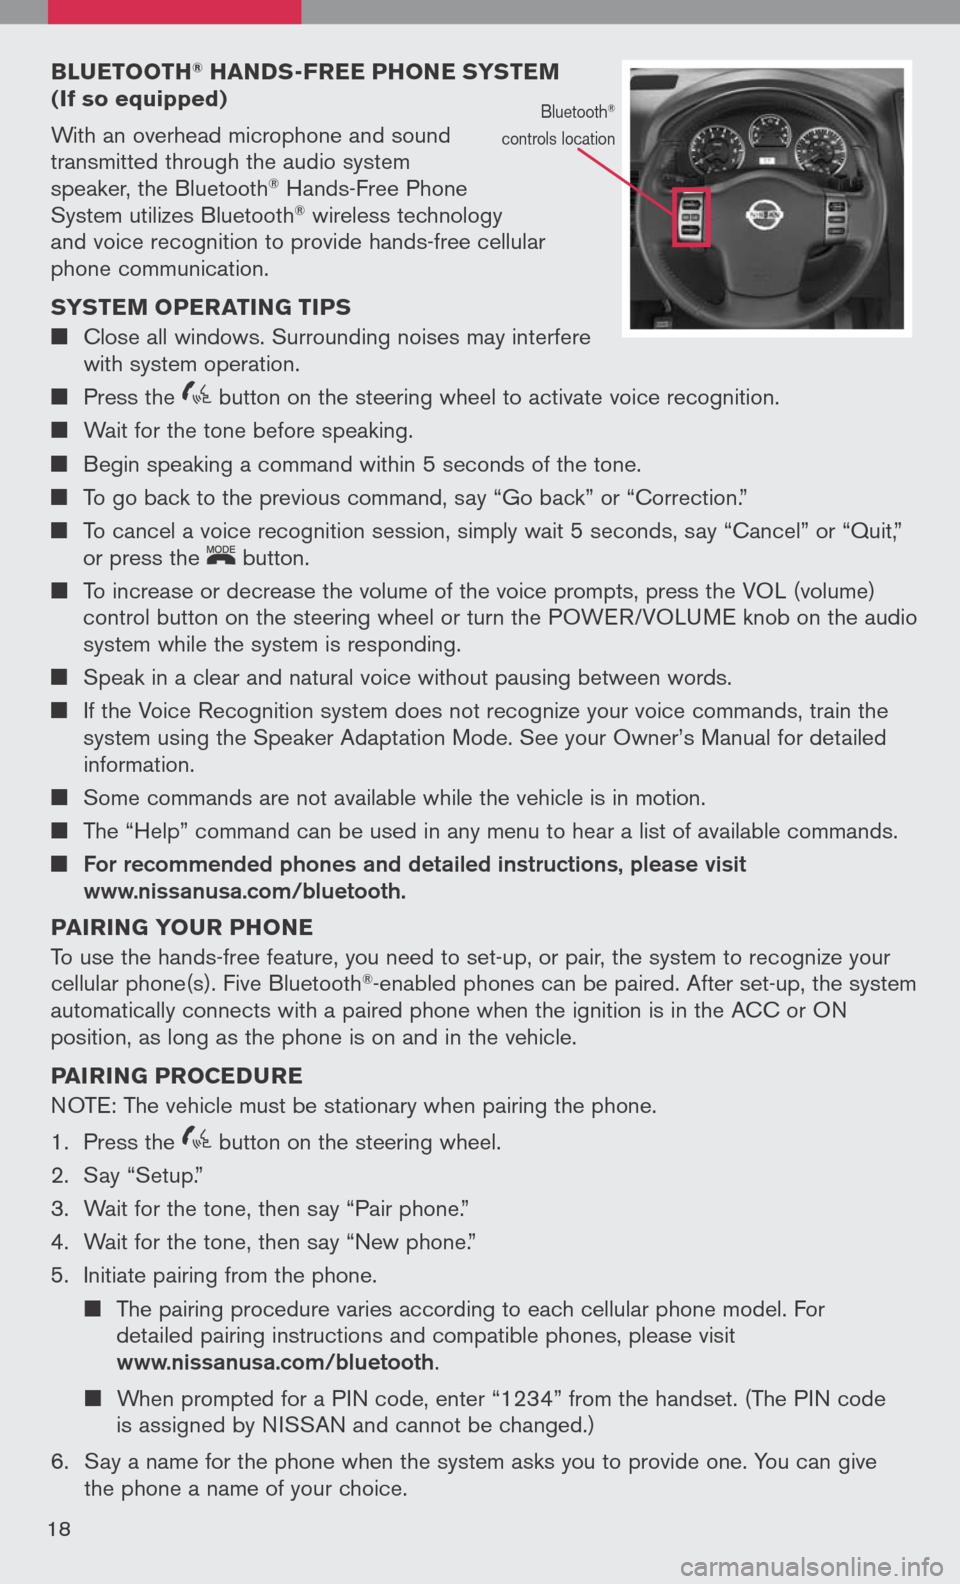
Press the
icon C button on the steering wheel to activate voice recognition.
Wait for the tone before speaking.
Begin speaking a command within 5 seconds of the tone.
To go back to the previous command, say “Go back” or “Correction.”
To cancel a voice recognition session, simply wait 5 seconds, say “Cancel” or “Quit,”
or press the
LCN0090
button.
To increase or decrease the volume of the voice prompts, press the VOL (volume)
control button on the steering wheel or turn the POWER/VOLUME knob on the audio
system while the system is responding.
Speak in a clear and natural voice without pausing between words.
If the Voice Recognition system does not recognize your voice commands, train the
system using the Speaker Adaptation Mode. See your Owner’s Manual for detailed
information.
Some commands are not available while the vehicle is in motion.
The “Help” command can be used in any menu to hear a list of available commands.
For recommended phones and detailed instructions, please visit www.nissanusa.com/bluetooth.
PAIRIN g YOuR PHONE
To use the hands-free feature, you need to set-up, or pair, the system to recognize your
cellular phone(s). Five Bluetooth
®-enabled phones can be paired. After set-up, the system
automatically connects with a paired phone when the ignition is in the ACC or ON
position, as long as the phone is on and in the vehicle.
PAIRIN g PROCED uRE
NOTE: The vehicle must be stationary when pairing the phone.
1. Press the
icon C button on the steering wheel.
2. Say “Setup.”
3. Wait for the tone, then say “Pair phone.”
4. Wait for the tone, then say “New phone.”
5. Initiate pairing from the phone.
The pairing procedure varies according to each cellular phone model. For
detailed pairing instructions and compatible phones, please visit
www.nissanusa.com/bluetooth.
When prompted for a PIN code, enter “1234” from the handset. (The PIN code
is assigned by NISSAN and cannot be changed.)
6. Say a name for the phone when the system asks you to provide one. You can give
the phone a name of your choice.
18
Bluetooth®
controls location
Page 21 of 36
7. Say a number between 1 and 5 when the system asks you for a priority level. The
priority level determines which phone interacts with the system when two or more
paired phones are active in the vehicle at the same time. Choose 1 if this is the only
phone or the primary phone.
8. Say “Yes” or “No” when the system asks if you would like to select a custom ring
tone. Follow the instructions provided by the system to choose a ring tone.
s ETTIN g uP YO uR PHONE BOOK - ADDIN g NEw ENTRIE s
Each paired phone has its own dedicated phone book. Each phone book can store up to
40 names. Each name can have up to 4 locations/numbers: Home, Office, Mobile, and
Other.
1. Press the
icon C button.
2. Say “Phone book.”
3. Wait for the tone, then say “New entry.”
4. When prompted, say the name for the new entry. For example, say “Michelle.” If the
name is too short or too long, or if it sounds too much like a name that is already
stored in the phone book, the system tells you and prompts you to say a name
again. Choose a new name.
5. Say “Yes” or “No” when the system asks you to confirm the name is correct.
6. Say a location (“Home,” “Office,” “Mobile” or “Other”) when the system asks you to
provide one. The system acknowledges the location.
7. When prompted, say a phone number for the location. For example, say “five five five
one two one two.” The system repeats the number and prompts you for the next command.
8. Say “Store” when you are finished entering numbers. The system confirms the
name, location, and number.
9. Say “Yes” or “No” when the system asks if you would like to store another location
for the same name. If you do not respond to the system prompt, the system ends
the New Entry session.
MAKIN g A PHONE CALL
1. Press the
icon C button.
2. After the tone, do one of the following:
Say “Call [name] [location].” For example, say “Call Michelle Home.”
Say “Call [number].” For example, say “Call 123-456-7891.”
Say “Redial” to redial the previous phone number called by the system.
RECEIVIN g/ENDIN g A PHONE CALL
When you receive a phone call, a ring tone sounds through the audio system.
To accept the call, press the icon C button. To reject the call, press the
LCN0090
button.
To hang up the phone at the end of a call or to disconnect during call placement,
press the
LCN0090
button.
HO w TO sAY N uMBER s
NISSAN voice recognition permits numbers to be spoken in a variety of ways.
Say “zero” or “oh” for “0.” Example: 1-800-662-6200 – Say “one eight zero zero six
six two six two oh oh.”
Say “pound” for “#”. Say “star” for “*”. Example: 1-555-1212*123 – Say “one five five
five one two one two star one two three.”
Please refer to the NISSAN Owner’s Manual and cellular phone manufacturer owner’s
manual for detailed information regarding the Bluetooth® Hands-Free Phone System.
19
Page 22 of 36
18
0201
10
080706040503
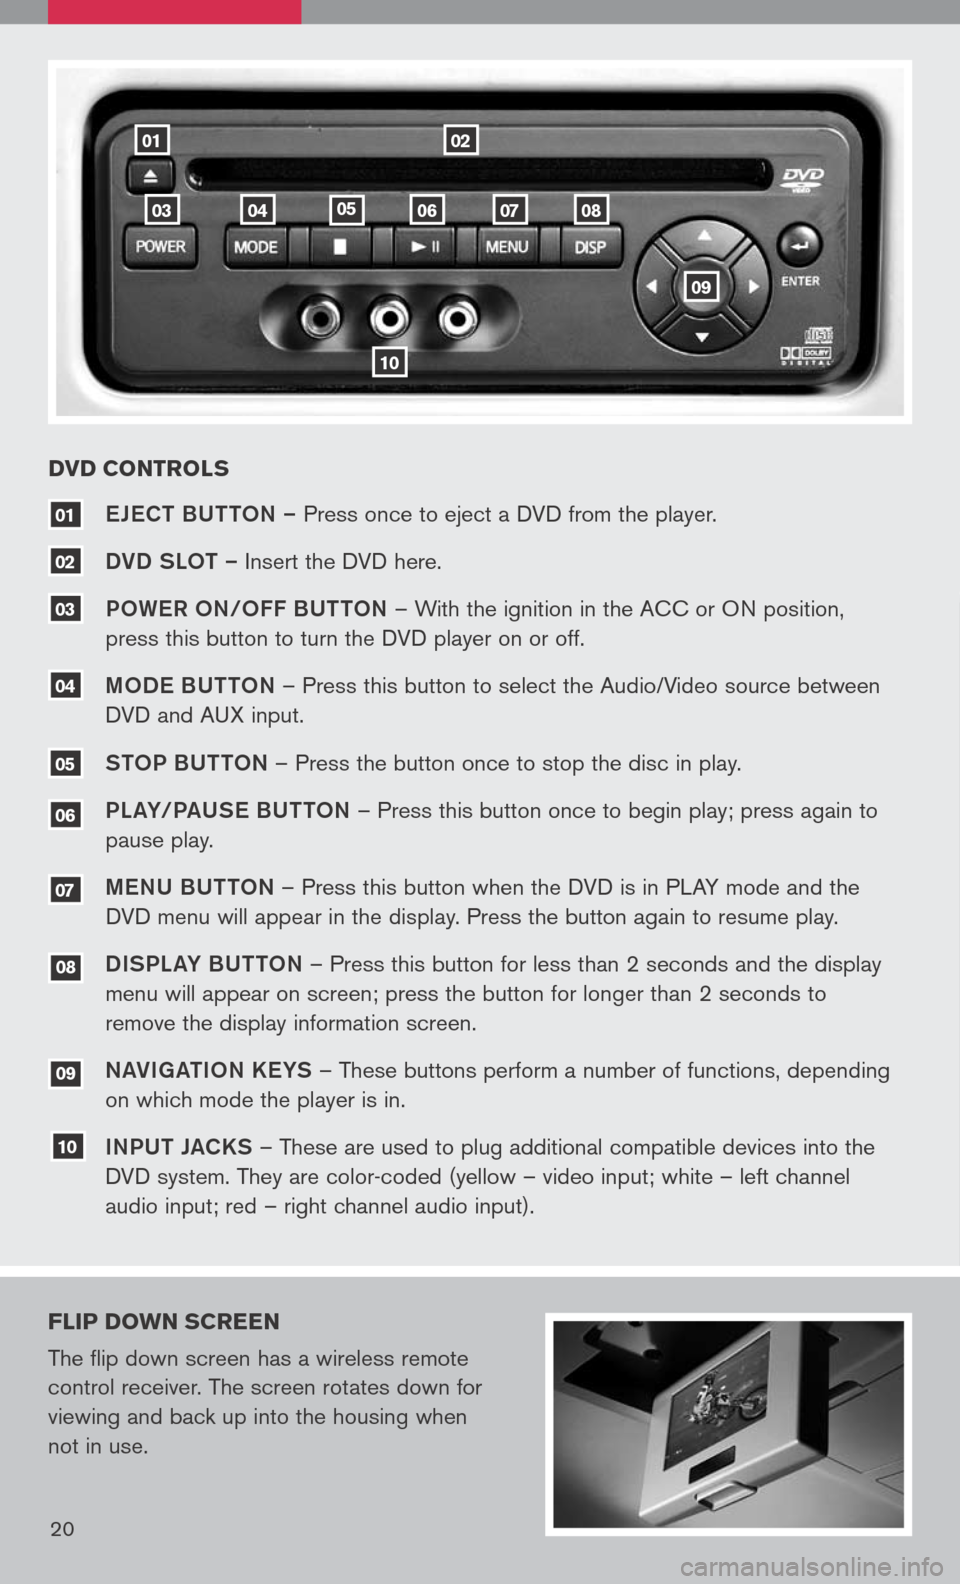
eJe CT BUTTON – Press once to eject a DVD from the player.
DVD SLOT – Insert the DVD here.
P OW eR O N/O FF BUTTON – With the ignition in the ACC or ON position,
press this button to turn the DVD player on or off.
M OD e BUTTON – Press this button to select the Audio/Video source between
DVD and AUX input.
S TOP BUTTON – Press the button once to stop the disc in play.
P La Y/Pa USe B UTTON – Press this button once to begin play; press again to
pause play.
Me NU BUTTON – Press this button when the DVD is in PLAY mode and the
DVD menu will appear in the display. Press the button again to resume play.
D ISPL aY B UTTON – Press this button for less than 2 seconds and the display
menu will appear on screen; press the button for longer than 2 seconds to
remove the display information screen.
Na VIga TION K eYS – These buttons perform a number of functions, depending
on which mode the player is in.
I NPUT JaCKS – These are used to plug additional compatible devices into the
DVD system. They are color-coded (yellow – video input; white – left channel
audio input; red – right channel audio input).
10
09
08
07
06
04
03
02
01
DVD CONTROL s
FLIP DO wN sCREEN
The flip down screen has a wireless remote
control receiver. The screen rotates down for
viewing and back up into the housing when
not in use.
20
09
05
Page 23 of 36
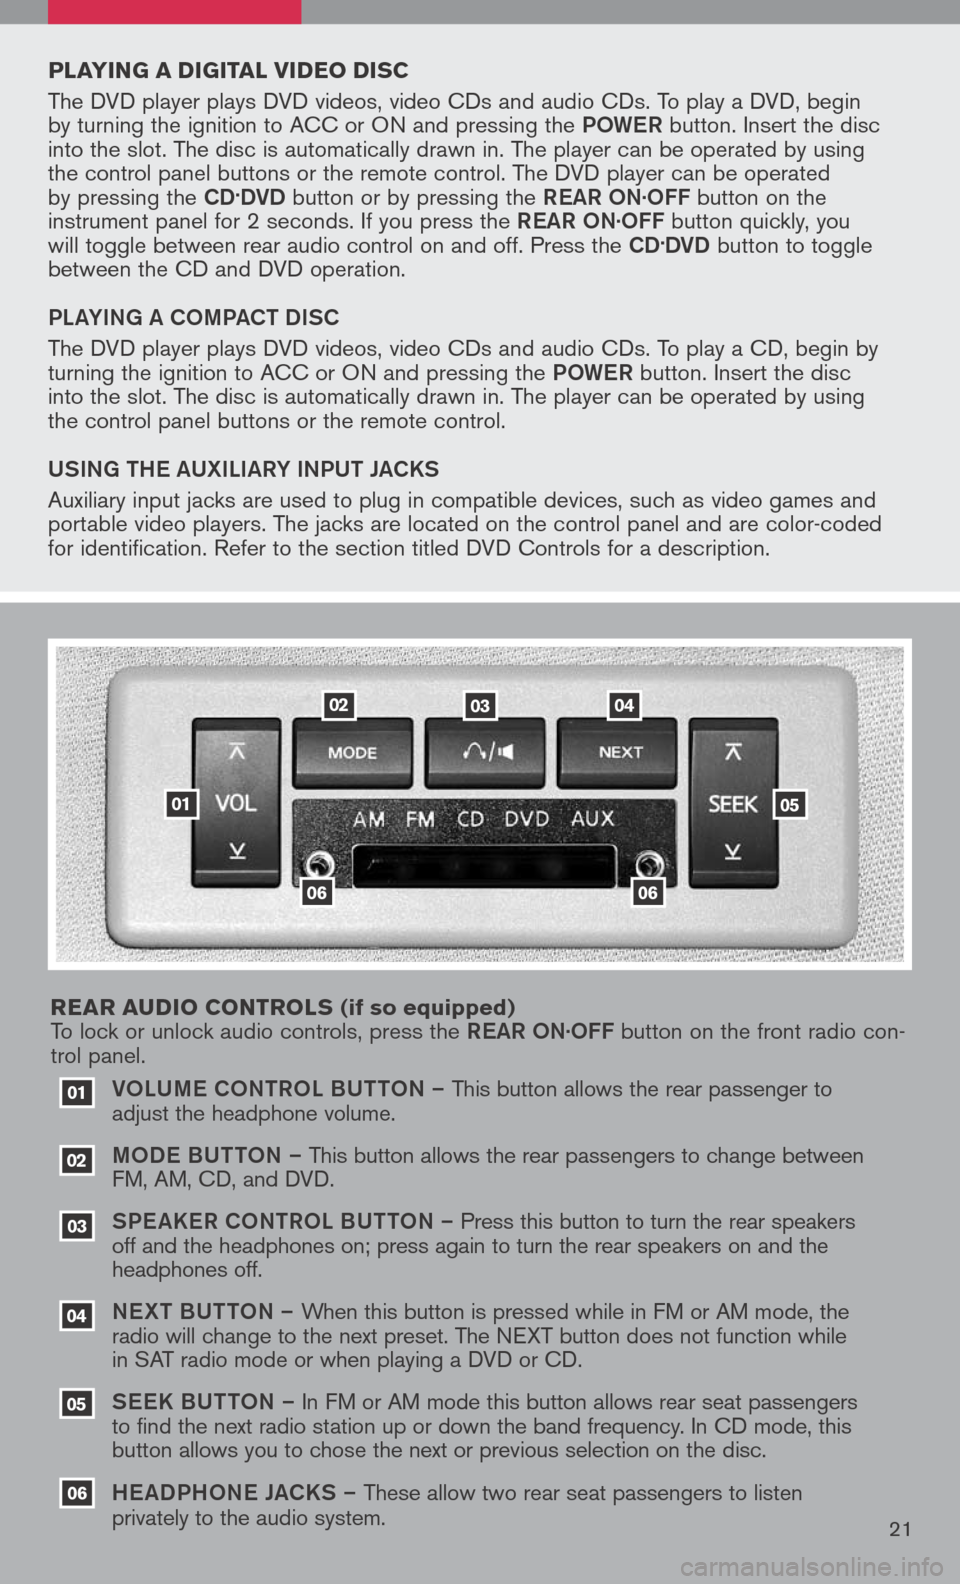
VOLUM e CONTROL BUTTON – This button allows the rear passenger to
adjust the headphone volume.
MOD e B UTTON – This button allows the rear passengers to change between
FM, AM, CD, and DVD.
SPe a KeR C ONTROL BUTTON – Press this button to turn the rear speakers
off and the headphones on; press again to turn the rear speakers on and the
headphones off.
NeXT BUTTON – When this button is pressed while in FM or AM mode, the
radio will change to the next preset. The NEXT button does not function while
in SAT radio mode or when playing a DVD or CD.
SeeK B UTTON – In FM or AM mode this button allows rear seat passengers
to find the next radio station up or down the band frequency. In CD mode, this
button allows you to chose the next or previous selection on the disc.
He aDPHON e JaCKS – These allow two rear seat passengers to listen
privately to the audio system.
03
02
01
06
06
05
04
020304
05
06
01
PLAYIN g A DI gITAL VIDEO DI sC
The DVD player plays DVD videos, video CDs and audio CDs. To play a DVD, begin
by turning the ignition to ACC or ON and pressing the POW eR button. Insert the disc
into the slot. The disc is automatically drawn in. The player can be operated by using
the control panel buttons or the remote control. The DVD player can be operated
by pressing the
CD.DVD button or by pressing the ReaR ON·OFF button on the
instrument panel for 2 seconds. If you press the ReaR ON·OFF button quickly, you
will toggle between rear audio control on and off. Press the
CD.DVD button to toggle
between the CD and DVD operation.
PL aYIN g a COMP aCT DISC
The DVD player plays DVD videos, video CDs and audio CDs. To play a CD, begin by
turning the ignition to ACC or ON and pressing the POW eR button. Insert the disc
into the slot. The disc is automatically drawn in. The player can be operated by using
the control panel buttons or the remote control.
USIN g TH e a UXILI aRY INPUT J aCKS
Auxiliary input jacks are used to plug in compatible devices, such as video games and
portable video players. The jacks are located on the control panel and are color-coded
for identification. Refer to the section titled DVD Controls for a description.
REAR A uDIO CONTROL s
(if so equipped)
To lock or unlock audio controls, press the ReaR ON·OFF button on the front radio con-
trol panel.
21
Page 24 of 36
20
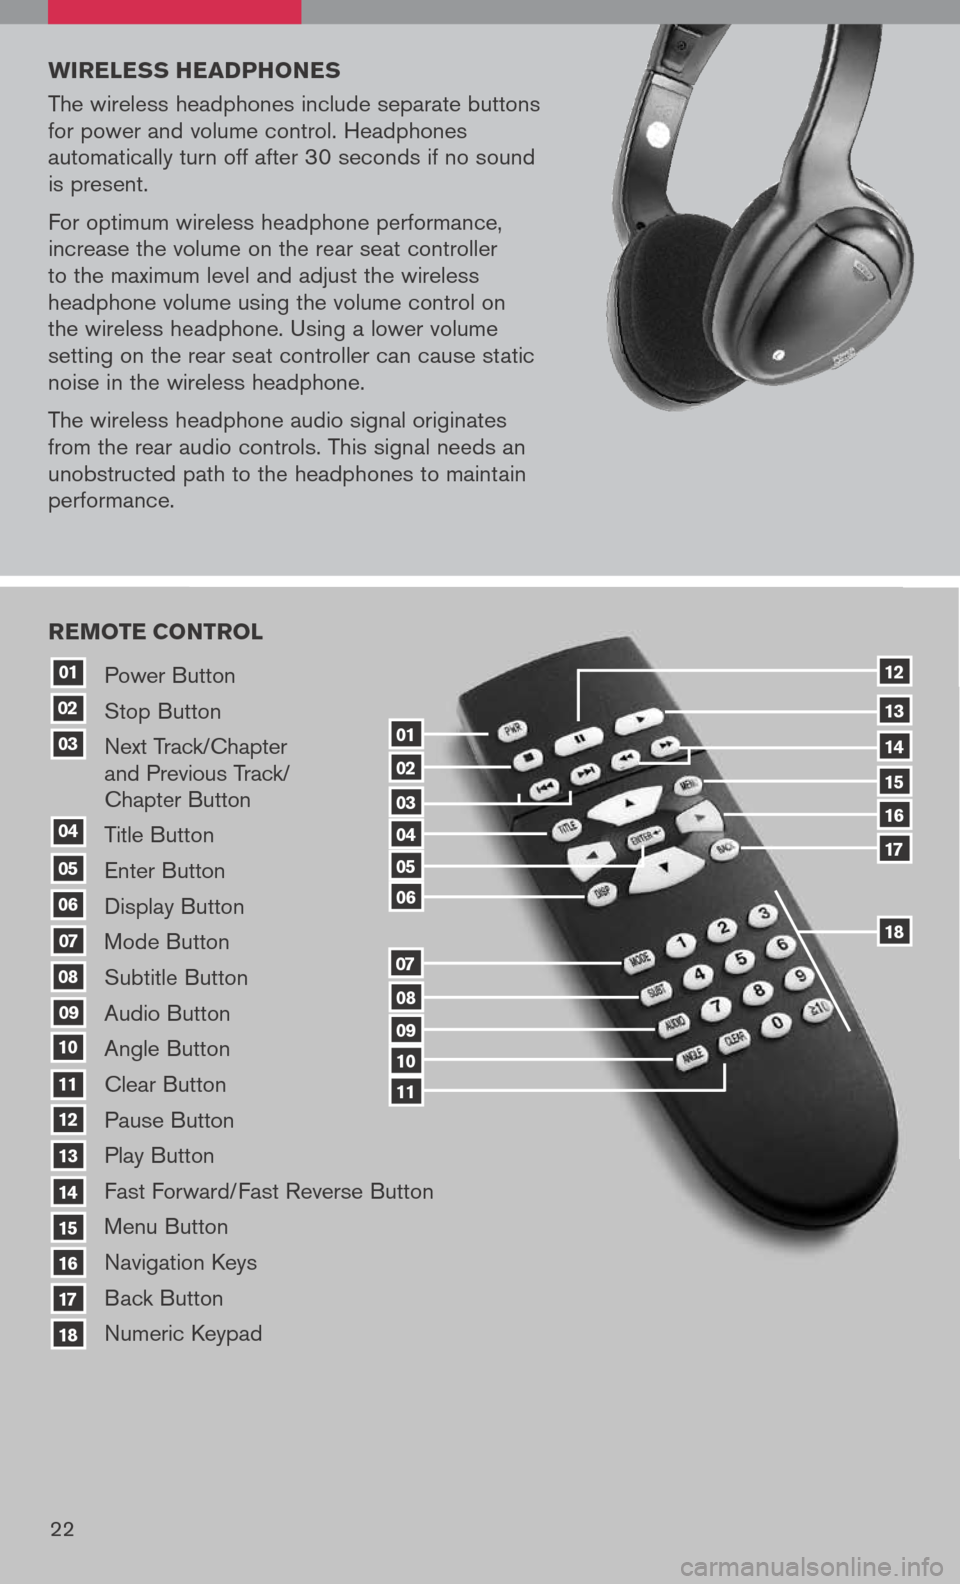
Power Button
Stop Button
Next Track/Chapter
and Previous Track/
Chapter Button
Title Button
Enter Button
Display Button
Mode Button
Subtitle Button
Audio Button
Angle Button
Clear Button
Pause Button
Play Button
Fast Forward/Fast Reverse Button
Menu Button
Navigation Keys
Back Button
Numeric Keypad
10
09
01
08
18
17
07
16
03
02
04
05
06
07
15
14
08
13
12
09
1110
11
06
05
04
03
02
18
17
16
15
14
13
12
REMOTE CONTROL
01
w IRELE ss HEADPHONE s
The wireless headphones include separate buttons
for power and volume control. Headphones
automatically turn off after 30 seconds if no sound
is present.
For optimum wireless headphone performance,
increase the volume on the rear seat controller
to the maximum level and adjust the wireless
headphone volume using the volume control on
the wireless headphone. Using a lower volume
setting on the rear seat controller can cause static
noise in the wireless headphone.
The wireless headphone audio signal originates
from the rear audio controls. This signal needs an
unobstructed path to the headphones to maintain
performance.
22