2008 NISSAN TIIDA disassembly
[x] Cancel search: disassemblyPage 1743 of 2771
EM-66
< SERVICE INFORMATION >
CYLINDER HEAD
Disassembly and Assembly
INFOID:0000000001702505
DISASSEMBLY
1. Remove spark plug using suitable tool.
2. Remove valve lifter.
• Identify installation positions, and store them without mixing them up.
3. Remove valve collet.
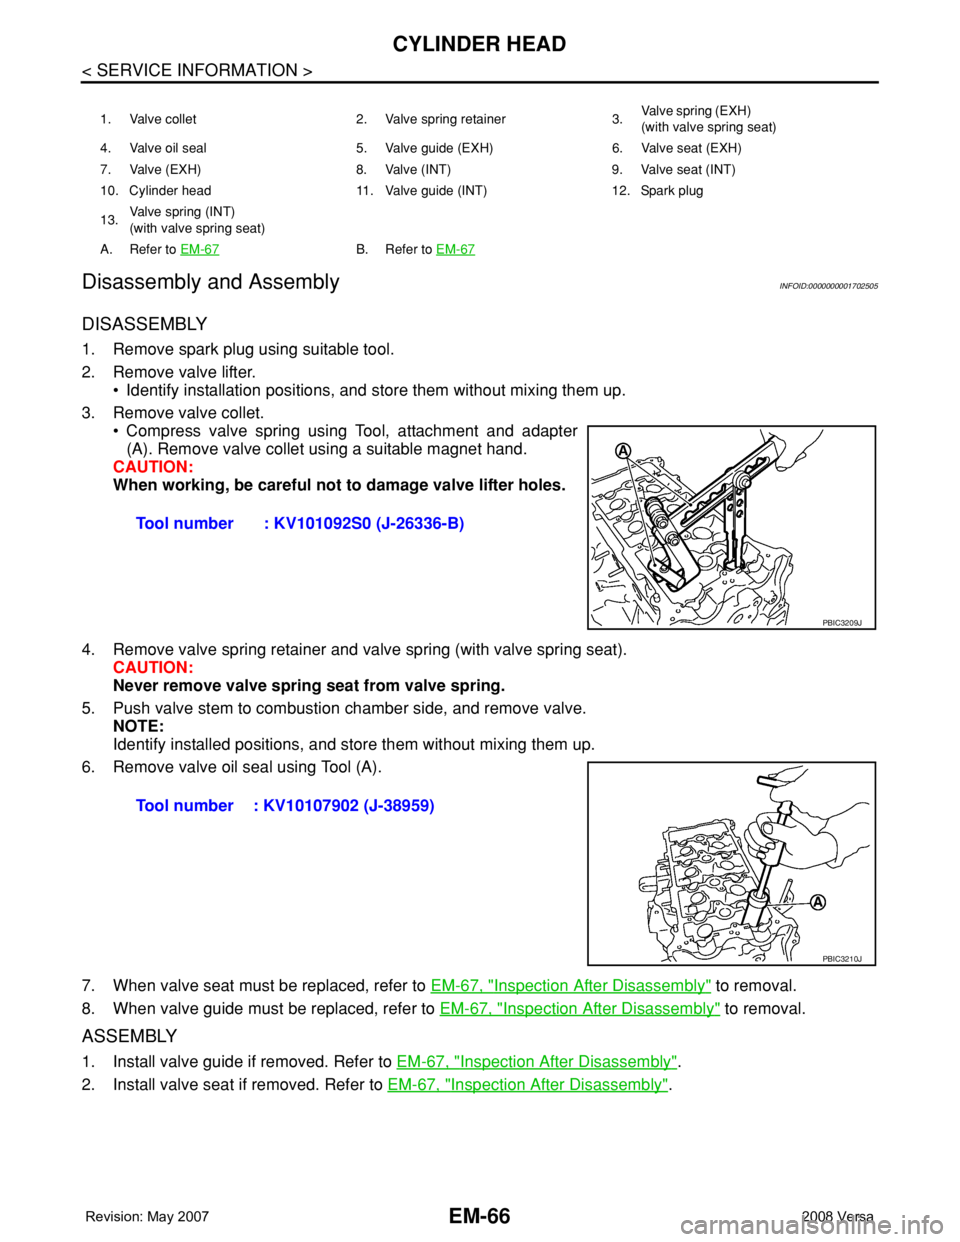
• Compress valve spring using Tool, attachment and adapter
(A). Remove valve collet using a suitable magnet hand.
CAUTION:
When working, be careful not to damage valve lifter holes.
4. Remove valve spring retainer and valve spring (with valve spring seat).
CAUTION:
Never remove valve spring seat from valve spring.
5. Push valve stem to combustion chamber side, and remove valve.
NOTE:
Identify installed positions, and store them without mixing them up.
6. Remove valve oil seal using Tool (A).
7. When valve seat must be replaced, refer to EM-67, "
Inspection After Disassembly" to removal.
8. When valve guide must be replaced, refer to EM-67, "
Inspection After Disassembly" to removal.
ASSEMBLY
1. Install valve guide if removed. Refer to EM-67, "Inspection After Disassembly".
2. Install valve seat if removed. Refer to EM-67, "
Inspection After Disassembly".
1. Valve collet 2. Valve spring retainer 3.Va l v e s p r i n g ( E X H )
(with valve spring seat)
4. Valve oil seal 5. Valve guide (EXH) 6. Valve seat (EXH)
7. Valve (EXH) 8. Valve (INT) 9. Valve seat (INT)
10. Cylinder head 11. Valve guide (INT) 12. Spark plug
13.Valve spring (INT)
(with valve spring seat)
A. Refer to EM-67
B. Refer to EM-67
Tool number : KV101092S0 (J-26336-B)
PBIC3209J
Tool number : KV10107902 (J-38959)
PBIC3210J
Page 1744 of 2771
CYLINDER HEAD
EM-67
< SERVICE INFORMATION >
C
D
E
F
G
H
I
J
K
L
MA
EM
N
P O
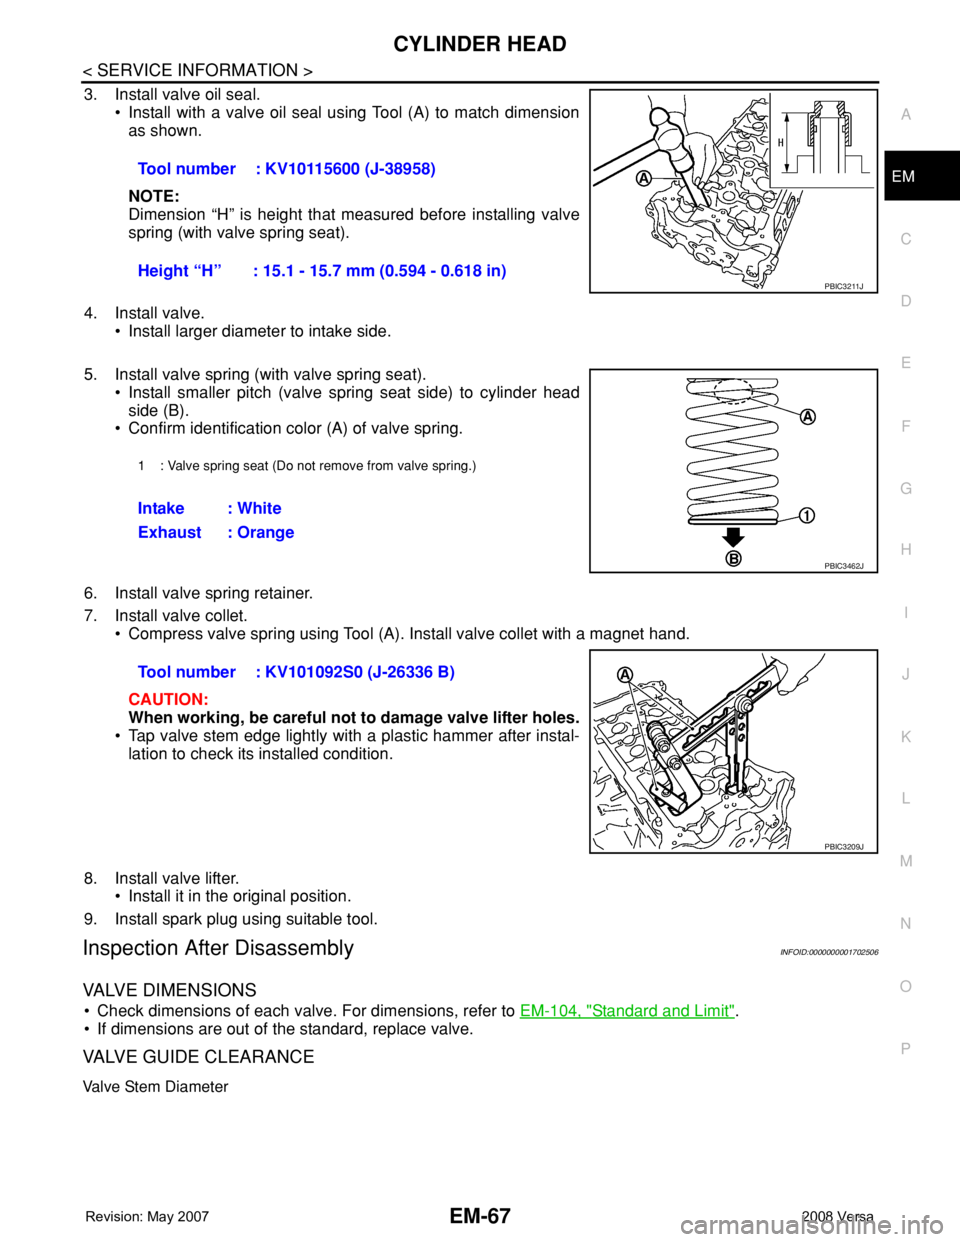
3. Install valve oil seal.
• Install with a valve oil seal using Tool (A) to match dimension
as shown.
NOTE:
Dimension “H” is height that measured before installing valve
spring (with valve spring seat).
4. Install valve.
• Install larger diameter to intake side.
5. Install valve spring (with valve spring seat).
• Install smaller pitch (valve spring seat side) to cylinder head
side (B).
• Confirm identification color (A) of valve spring.
6. Install valve spring retainer.
7. Install valve collet.
• Compress valve spring using Tool (A). Install valve collet with a magnet hand.
CAUTION:
When working, be careful not to damage valve lifter holes.
• Tap valve stem edge lightly with a plastic hammer after instal-
lation to check its installed condition.
8. Install valve lifter.
• Install it in the original position.
9. Install spark plug using suitable tool.
Inspection After DisassemblyINFOID:0000000001702506
VALVE DIMENSIONS
• Check dimensions of each valve. For dimensions, refer to EM-104, "Standard and Limit".
• If dimensions are out of the standard, replace valve.
VALVE GUIDE CLEARANCE
Valve Stem Diameter
Tool number : KV10115600 (J-38958)
Height “H” : 15.1 - 15.7 mm (0.594 - 0.618 in)
PBIC3211J
1 : Valve spring seat (Do not remove from valve spring.)
Intake : White
Exhaust : Orange
PBIC3462J
Tool number : KV101092S0 (J-26336 B)
PBIC3209J
Page 1754 of 2771
CYLINDER BLOCK
EM-77
< SERVICE INFORMATION >
C
D
E
F
G
H
I
J
K
L
MA
EM
N
P O
Disassembly and AssemblyINFOID:0000000001702510
DISASSEMBLY
1. Remove engine and transaxle assembly from vehicle, separate transaxle from engine. Refer to EM-72.
2. Install engine to engine stand as follows;
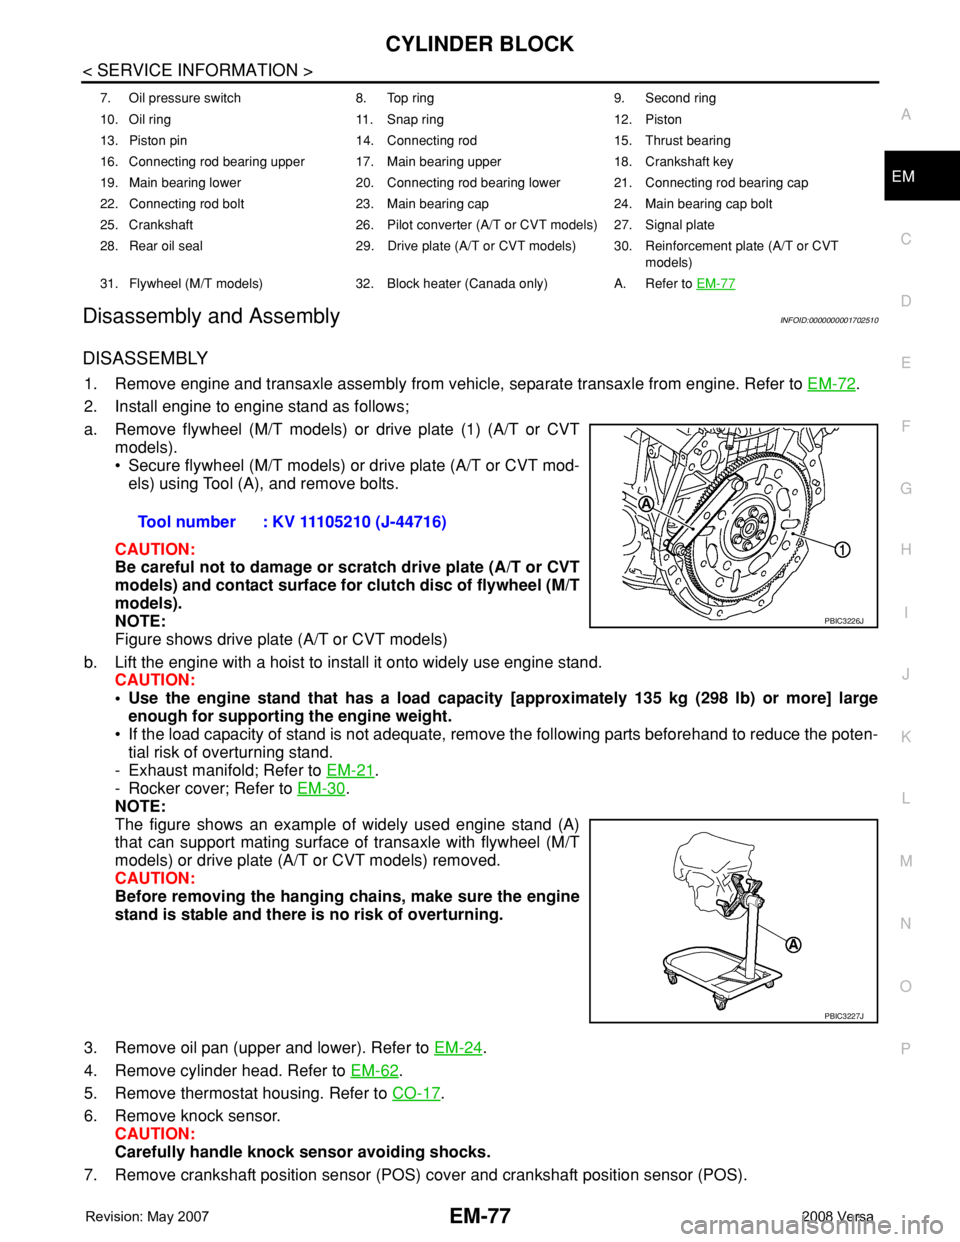
a. Remove flywheel (M/T models) or drive plate (1) (A/T or CVT
models).
• Secure flywheel (M/T models) or drive plate (A/T or CVT mod-
els) using Tool (A), and remove bolts.
CAUTION:
Be careful not to damage or scratch drive plate (A/T or CVT
models) and contact surface for clutch disc of flywheel (M/T
models).
NOTE:
Figure shows drive plate (A/T or CVT models)
b. Lift the engine with a hoist to install it onto widely use engine stand.
CAUTION:
• Use the engine stand that has a load capacity [approximately 135 kg (298 lb) or more] large
enough for supporting the engine weight.
• If the load capacity of stand is not adequate, remove the following parts beforehand to reduce the poten-
tial risk of overturning stand.
- Exhaust manifold; Refer to EM-21
.
- Rocker cover; Refer to EM-30
.
NOTE:
The figure shows an example of widely used engine stand (A)
that can support mating surface of transaxle with flywheel (M/T
models) or drive plate (A/T or CVT models) removed.
CAUTION:
Before removing the hanging chains, make sure the engine
stand is stable and there is no risk of overturning.
3. Remove oil pan (upper and lower). Refer to EM-24
.
4. Remove cylinder head. Refer to EM-62
.
5. Remove thermostat housing. Refer to CO-17
.
6. Remove knock sensor.
CAUTION:
Carefully handle knock sensor avoiding shocks.
7. Remove crankshaft position sensor (POS) cover and crankshaft position sensor (POS).
7. Oil pressure switch 8. Top ring 9. Second ring
10. Oil ring 11. Snap ring 12. Piston
13. Piston pin 14. Connecting rod 15. Thrust bearing
16. Connecting rod bearing upper 17. Main bearing upper 18. Crankshaft key
19. Main bearing lower 20. Connecting rod bearing lower 21. Connecting rod bearing cap
22. Connecting rod bolt 23. Main bearing cap 24. Main bearing cap bolt
25. Crankshaft 26. Pilot converter (A/T or CVT models) 27. Signal plate
28. Rear oil seal 29. Drive plate (A/T or CVT models) 30. Reinforcement plate (A/T or CVT
models)
31. Flywheel (M/T models) 32. Block heater (Canada only) A. Refer to EM-77
Tool number : KV 11105210 (J-44716)
PBIC3226J
PBIC3227J
Page 1755 of 2771
EM-78
< SERVICE INFORMATION >
CYLINDER BLOCK
CAUTION:
• Avoid impacts such as a dropping.
• Never disassemble.
• Keep it away from metal particles.
• Never place sensor in a location where it is exposed to magnetism.
8. Remove oil filter (for intake valve timing control).
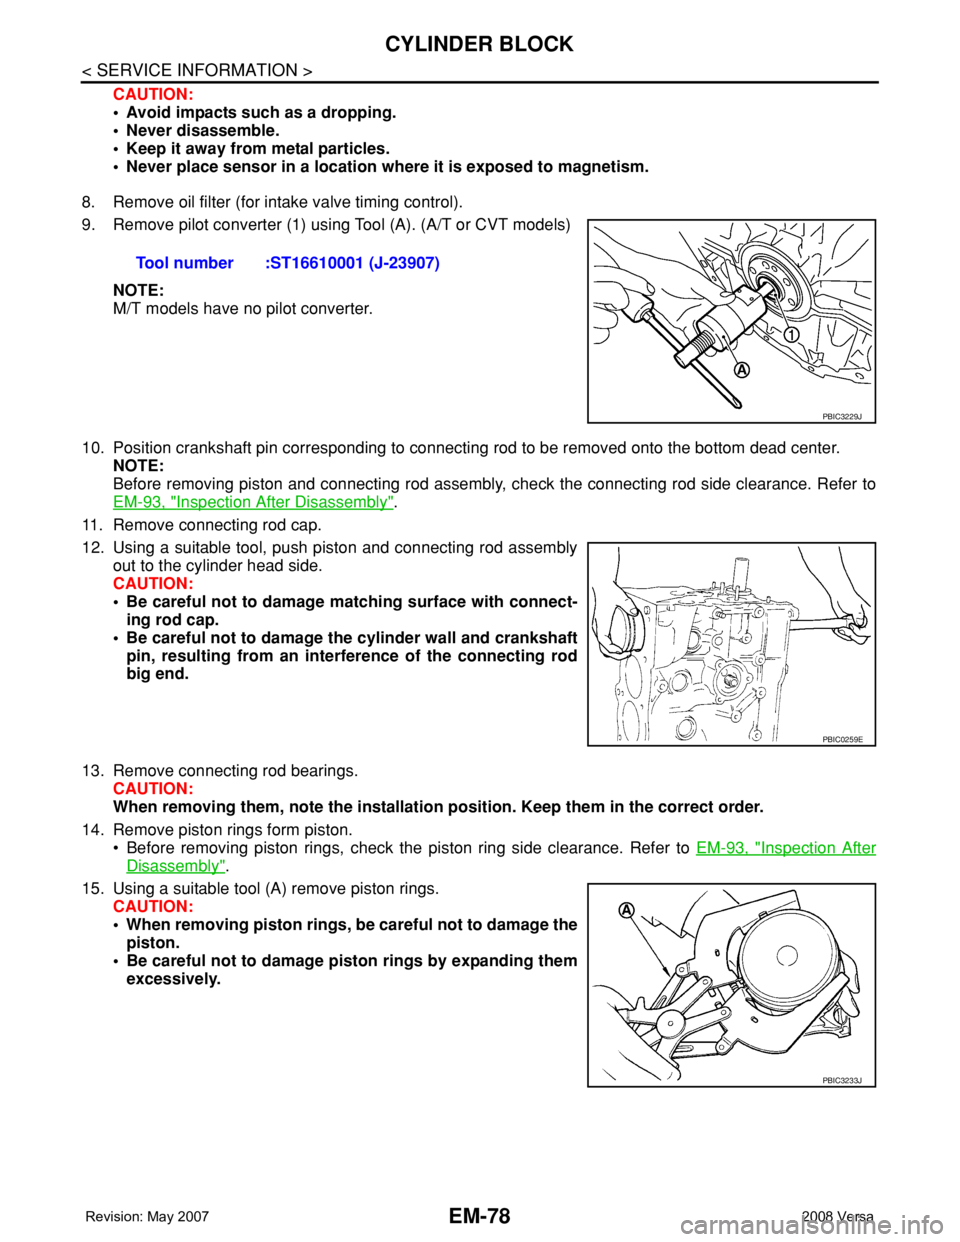
9. Remove pilot converter (1) using Tool (A). (A/T or CVT models)
NOTE:
M/T models have no pilot converter.
10. Position crankshaft pin corresponding to connecting rod to be removed onto the bottom dead center.
NOTE:
Before removing piston and connecting rod assembly, check the connecting rod side clearance. Refer to
EM-93, "
Inspection After Disassembly".
11. Remove connecting rod cap.
12. Using a suitable tool, push piston and connecting rod assembly
out to the cylinder head side.
CAUTION:
• Be careful not to damage matching surface with connect-
ing rod cap.
• Be careful not to damage the cylinder wall and crankshaft
pin, resulting from an interference of the connecting rod
big end.
13. Remove connecting rod bearings.
CAUTION:
When removing them, note the installation position. Keep them in the correct order.
14. Remove piston rings form piston.
• Before removing piston rings, check the piston ring side clearance. Refer to EM-93, "
Inspection After
Disassembly".
15. Using a suitable tool (A) remove piston rings.
CAUTION:
• When removing piston rings, be careful not to damage the
piston.
• Be careful not to damage piston rings by expanding them
excessively.Tool number :ST16610001 (J-23907)
PBIC3229J
PBIC0259E
PBIC3233J
Page 1756 of 2771
CYLINDER BLOCK
EM-79
< SERVICE INFORMATION >
C
D
E
F
G
H
I
J
K
L
MA
EM
N
P O
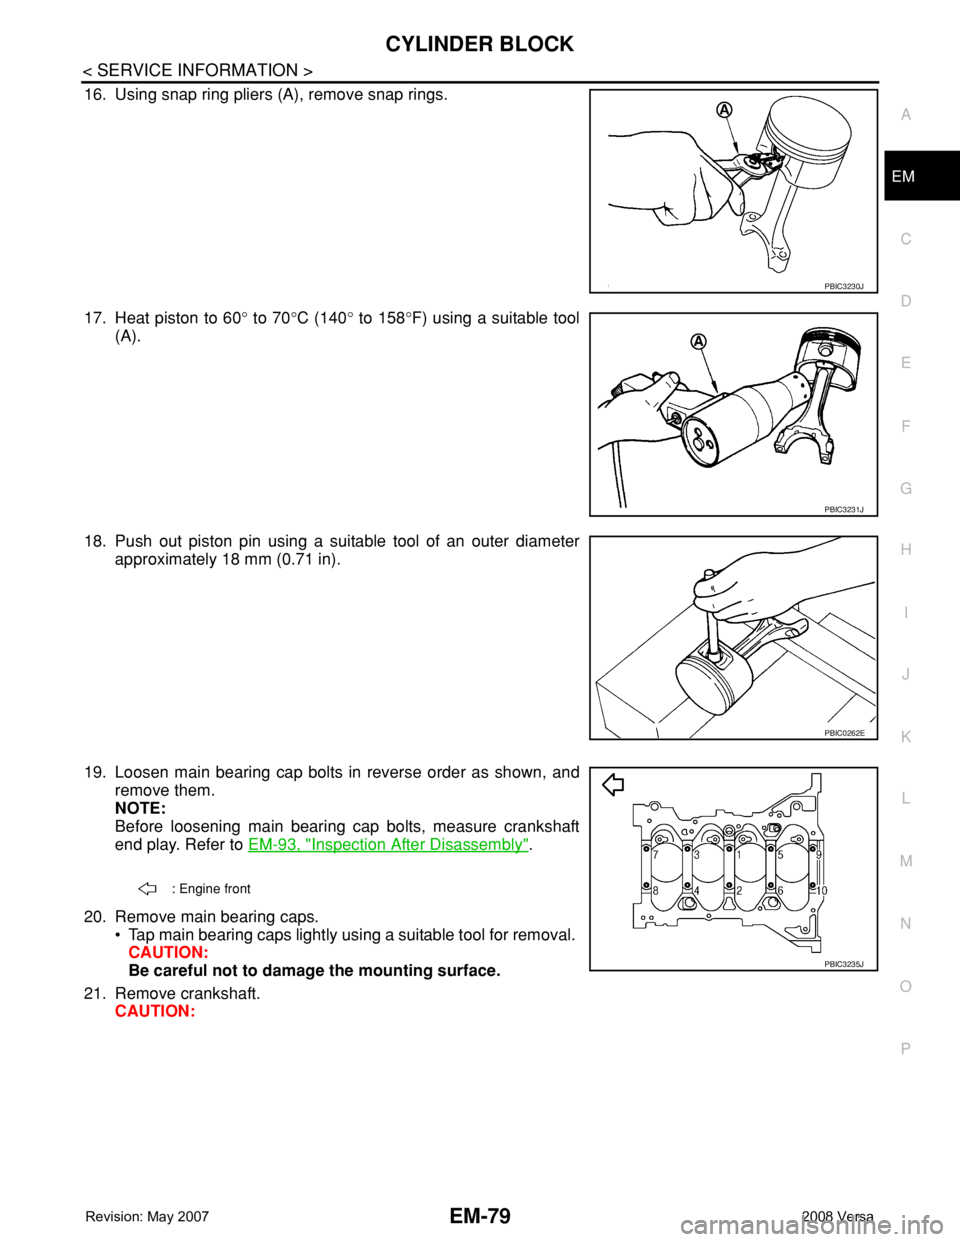
16. Using snap ring pliers (A), remove snap rings.
17. Heat piston to 60° to 70°C (140° to 158°F) using a suitable tool
(A).
18. Push out piston pin using a suitable tool of an outer diameter
approximately 18 mm (0.71 in).
19. Loosen main bearing cap bolts in reverse order as shown, and
remove them.
NOTE:
Before loosening main bearing cap bolts, measure crankshaft
end play. Refer to EM-93, "
Inspection After Disassembly".
20. Remove main bearing caps.
• Tap main bearing caps lightly using a suitable tool for removal.
CAUTION:
Be careful not to damage the mounting surface.
21. Remove crankshaft.
CAUTION:
PBIC3230J
PBIC3231J
PBIC0262E
: Engine front
PBIC3235J
Page 1759 of 2771
EM-82
< SERVICE INFORMATION >
CYLINDER BLOCK
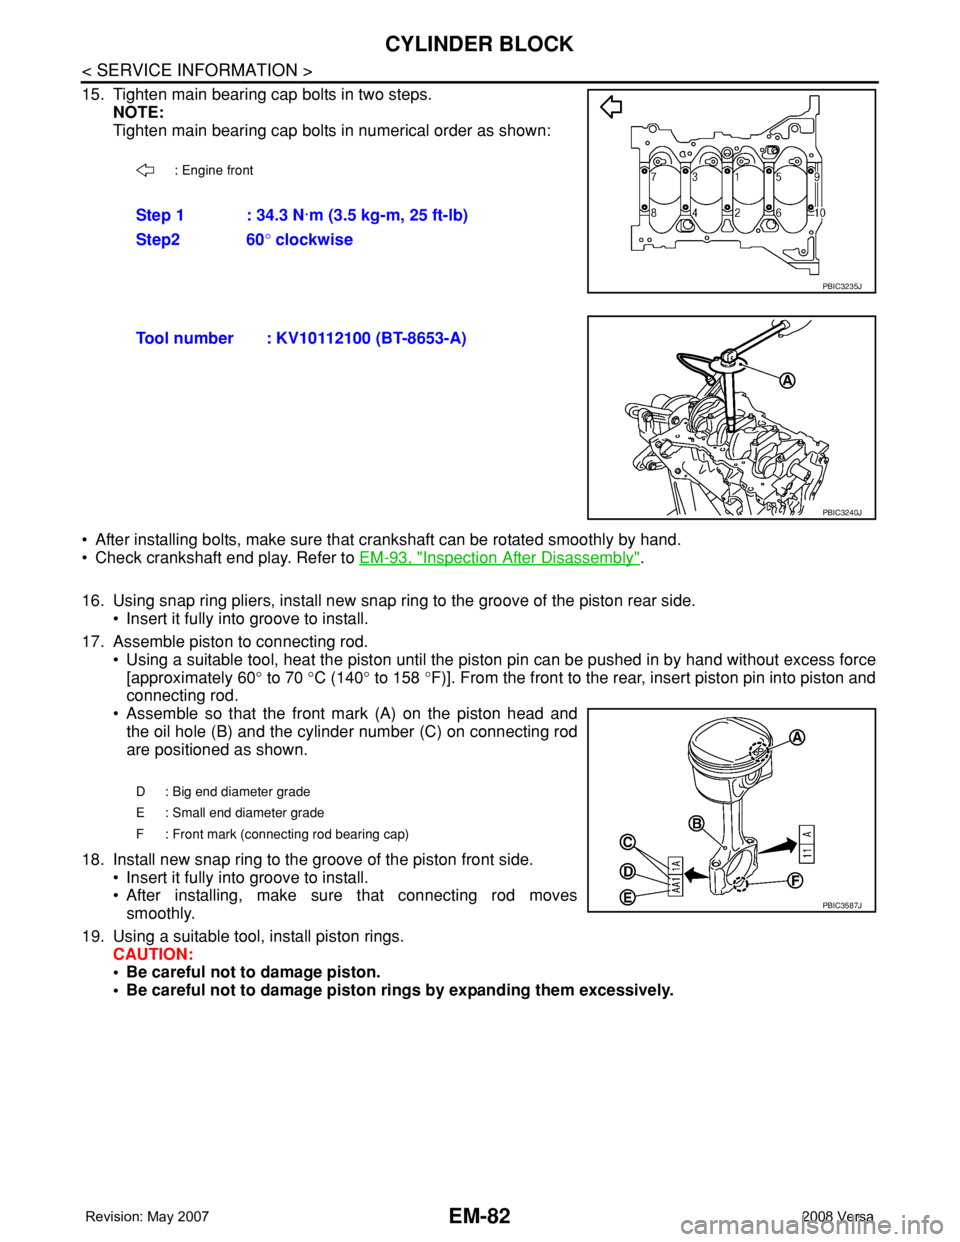
15. Tighten main bearing cap bolts in two steps.
NOTE:
Tighten main bearing cap bolts in numerical order as shown:
• After installing bolts, make sure that crankshaft can be rotated smoothly by hand.
• Check crankshaft end play. Refer to EM-93, "
Inspection After Disassembly".
16. Using snap ring pliers, install new snap ring to the groove of the piston rear side.
• Insert it fully into groove to install.
17. Assemble piston to connecting rod.
• Using a suitable tool, heat the piston until the piston pin can be pushed in by hand without excess force
[approximately 60° to 70 °C (140° to 158 °F)]. From the front to the rear, insert piston pin into piston and
connecting rod.
• Assemble so that the front mark (A) on the piston head and
the oil hole (B) and the cylinder number (C) on connecting rod
are positioned as shown.
18. Install new snap ring to the groove of the piston front side.
• Insert it fully into groove to install.
• After installing, make sure that connecting rod moves
smoothly.
19. Using a suitable tool, install piston rings.
CAUTION:
• Be careful not to damage piston.
• Be careful not to damage piston rings by expanding them excessively.
: Engine front
Step 1 : 34.3 N·m (3.5 kg-m, 25 ft-lb)
Step2 60° clockwise
PBIC3235J
Tool number : KV10112100 (BT-8653-A)
PBIC3240J
D : Big end diameter grade
E : Small end diameter grade
F : Front mark (connecting rod bearing cap)
PBIC3587J
Page 1761 of 2771
![NISSAN TIIDA 2008 Service Repair Manual EM-84
< SERVICE INFORMATION >
CYLINDER BLOCK
• Using a piston ring compressor [SST: EM03470000 (J-8037)]
(A) or suitable tool, install piston with the front mark on the pis-
ton head facing the fron NISSAN TIIDA 2008 Service Repair Manual EM-84
< SERVICE INFORMATION >
CYLINDER BLOCK
• Using a piston ring compressor [SST: EM03470000 (J-8037)]
(A) or suitable tool, install piston with the front mark on the pis-
ton head facing the fron](/manual-img/5/57399/w960_57399-1760.png)
EM-84
< SERVICE INFORMATION >
CYLINDER BLOCK
• Using a piston ring compressor [SST: EM03470000 (J-8037)]
(A) or suitable tool, install piston with the front mark on the pis-
ton head facing the front of the engine.
CAUTION:
Be careful not to damage the cylinder wall and crankshaft
pin, resulting from an interference of the connecting rod
big end.
22. Install connecting rod cap.
• Match the stamped cylinder number marks (C) on connecting
rod with those on connecting rod cap to install.
23. Tighten connecting rod bolt with the following procedure:
CAUTION:
• Make sure that there is no gap in the thrust surface (A) of
the joint between connecting rod (1) and connecting rod
bearing cap (2) and that these parts are in the correct
position. And then, tighten the connecting rod bolts.
• If the connecting rod bolts are reused, measure the outer
diameter. Refer to EM-93, "
Inspection After Disassembly".
24. Apply new engine oil to the threads and seats of connecting rod
bolts.
25. Tighten bolts in three steps
• After tightening connecting rod bolt, make sure that crankshaft rotates smoothly.
• Check the connecting rod side clearance. Refer to EM-93, "
Inspection After Disassembly".
26. Install oil pan (upper). Refer to EM-24
.
NOTE:
Install the rear oil seal after installing the oil pan (upper).
27. Install rear oil seal. Refer to EM-24
.
28. Install flywheel (M/T models) or drive plate (1) (A/T or CVT mod-
els).
• Secure crankshaft using Tool. (A), and tighten bolts crosswise
over several times.
NOTE:
A/T model shown CVT and M/T similar.
PBIC3244J
A : Front mark (piston)
B : Oil hole
D : Big end diameter grade
E : Small end diameter grade
F : Front mark (connecting rod bearing cap)
PBIC3587J
Step 1 : 27.4 N·m (2.8 kg-m, 20 ft-lb)
Step 2 : 0 N·m (0 kg-m, 0 ft-lb)
Step 3 : 19.6 N·m (2.0 kg-m, 14 ft-lb)
Tool number : KV11105210 (J-44716)PBIC3510J
PBIC3998E
Page 1762 of 2771
CYLINDER BLOCK
EM-85
< SERVICE INFORMATION >
C
D
E
F
G
H
I
J
K
L
MA
EM
N
P O
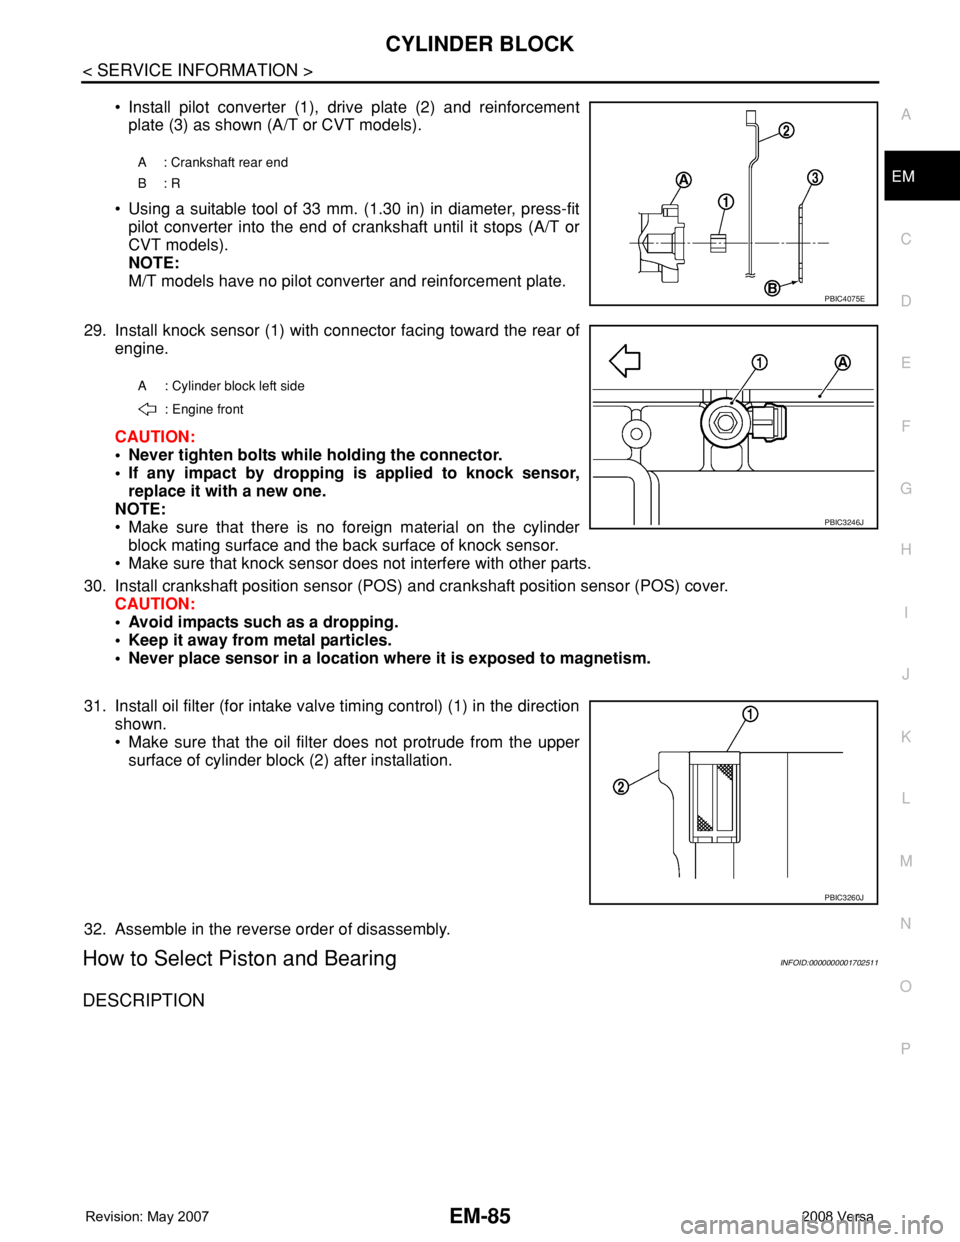
• Install pilot converter (1), drive plate (2) and reinforcement
plate (3) as shown (A/T or CVT models).
• Using a suitable tool of 33 mm. (1.30 in) in diameter, press-fit
pilot converter into the end of crankshaft until it stops (A/T or
CVT models).
NOTE:
M/T models have no pilot converter and reinforcement plate.
29. Install knock sensor (1) with connector facing toward the rear of
engine.
CAUTION:
• Never tighten bolts while holding the connector.
• If any impact by dropping is applied to knock sensor,
replace it with a new one.
NOTE:
• Make sure that there is no foreign material on the cylinder
block mating surface and the back surface of knock sensor.
• Make sure that knock sensor does not interfere with other parts.
30. Install crankshaft position sensor (POS) and crankshaft position sensor (POS) cover.
CAUTION:
• Avoid impacts such as a dropping.
• Keep it away from metal particles.
• Never place sensor in a location where it is exposed to magnetism.
31. Install oil filter (for intake valve timing control) (1) in the direction
shown.
• Make sure that the oil filter does not protrude from the upper
surface of cylinder block (2) after installation.
32. Assemble in the reverse order of disassembly.
How to Select Piston and BearingINFOID:0000000001702511
DESCRIPTION
A : Crankshaft rear end
B: R
PBIC4075E
A : Cylinder block left side
: Engine front
PBIC3246J
PBIC3260J