2008 NISSAN TIIDA disassembly
[x] Cancel search: disassemblyPage 1763 of 2771
EM-86
< SERVICE INFORMATION >
CYLINDER BLOCK
• The identification grade stamped on each part is the grade for the dimension measured in new condition.
This grade cannot apply to reused parts.
• For reused or repaired parts, measure the dimension accurately. Determine the grade by comparing the
measurement with the values of each selection table.
• For details of the measurement method of each part, the reuse standards and the selection method of the
selective fitting parts, follow the applicable procedures.
HOW TO SELECT PISTON
When New Cylinder Block is Used
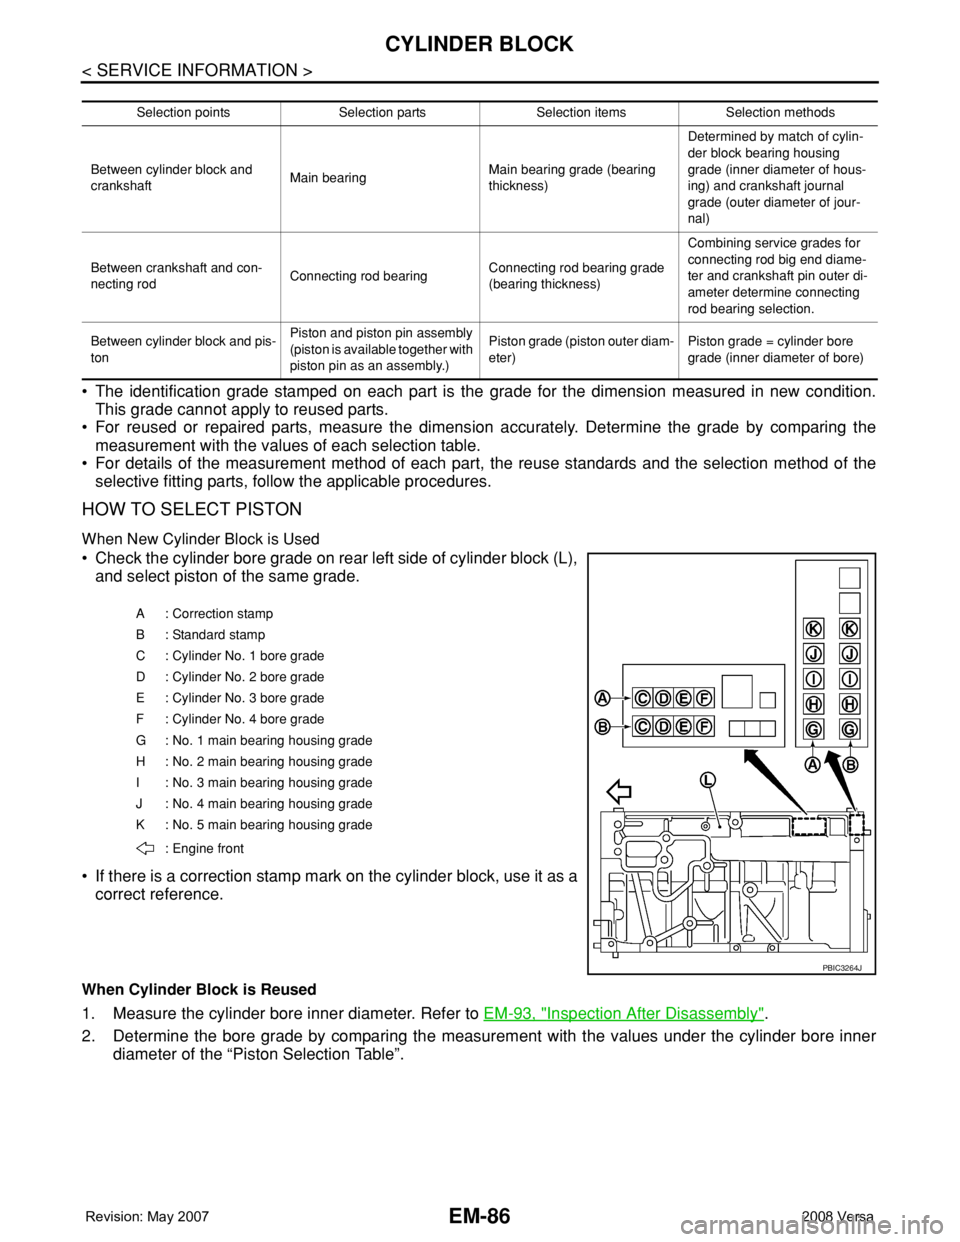
• Check the cylinder bore grade on rear left side of cylinder block (L),
and select piston of the same grade.
• If there is a correction stamp mark on the cylinder block, use it as a
correct reference.
When Cylinder Block is Reused
1. Measure the cylinder bore inner diameter. Refer to EM-93, "Inspection After Disassembly".
2. Determine the bore grade by comparing the measurement with the values under the cylinder bore inner
diameter of the “Piston Selection Table”.
Selection points Selection parts Selection items Selection methods
Between cylinder block and
crankshaftMain bearingMain bearing grade (bearing
thickness)Determined by match of cylin-
der block bearing housing
grade (inner diameter of hous-
ing) and crankshaft journal
grade (outer diameter of jour-
nal)
Between crankshaft and con-
necting rodConnecting rod bearingConnecting rod bearing grade
(bearing thickness)Combining service grades for
connecting rod big end diame-
ter and crankshaft pin outer di-
ameter determine connecting
rod bearing selection.
Between cylinder block and pis-
tonPiston and piston pin assembly
(piston is available together with
piston pin as an assembly.)Piston grade (piston outer diam-
eter)Piston grade = cylinder bore
grade (inner diameter of bore)
A : Correction stamp
B : Standard stamp
C : Cylinder No. 1 bore grade
D : Cylinder No. 2 bore grade
E : Cylinder No. 3 bore grade
F : Cylinder No. 4 bore grade
G : No. 1 main bearing housing grade
H : No. 2 main bearing housing grade
I : No. 3 main bearing housing grade
J : No. 4 main bearing housing grade
K : No. 5 main bearing housing grade
: Engine front
PBIC3264J
Page 1764 of 2771
CYLINDER BLOCK
EM-87
< SERVICE INFORMATION >
C
D
E
F
G
H
I
J
K
L
MA
EM
N
P O
3. Select piston of the same grade.
Piston Selection Table
Unit: mm (in)
NOTE:
• Piston is available together with piston pin as an assembly.
• There is no piston pin (piston pin hole) grade.
HOW TO SELECT CONNECTING ROD BEARING
When New Connecting Rod and Crankshaft are Used
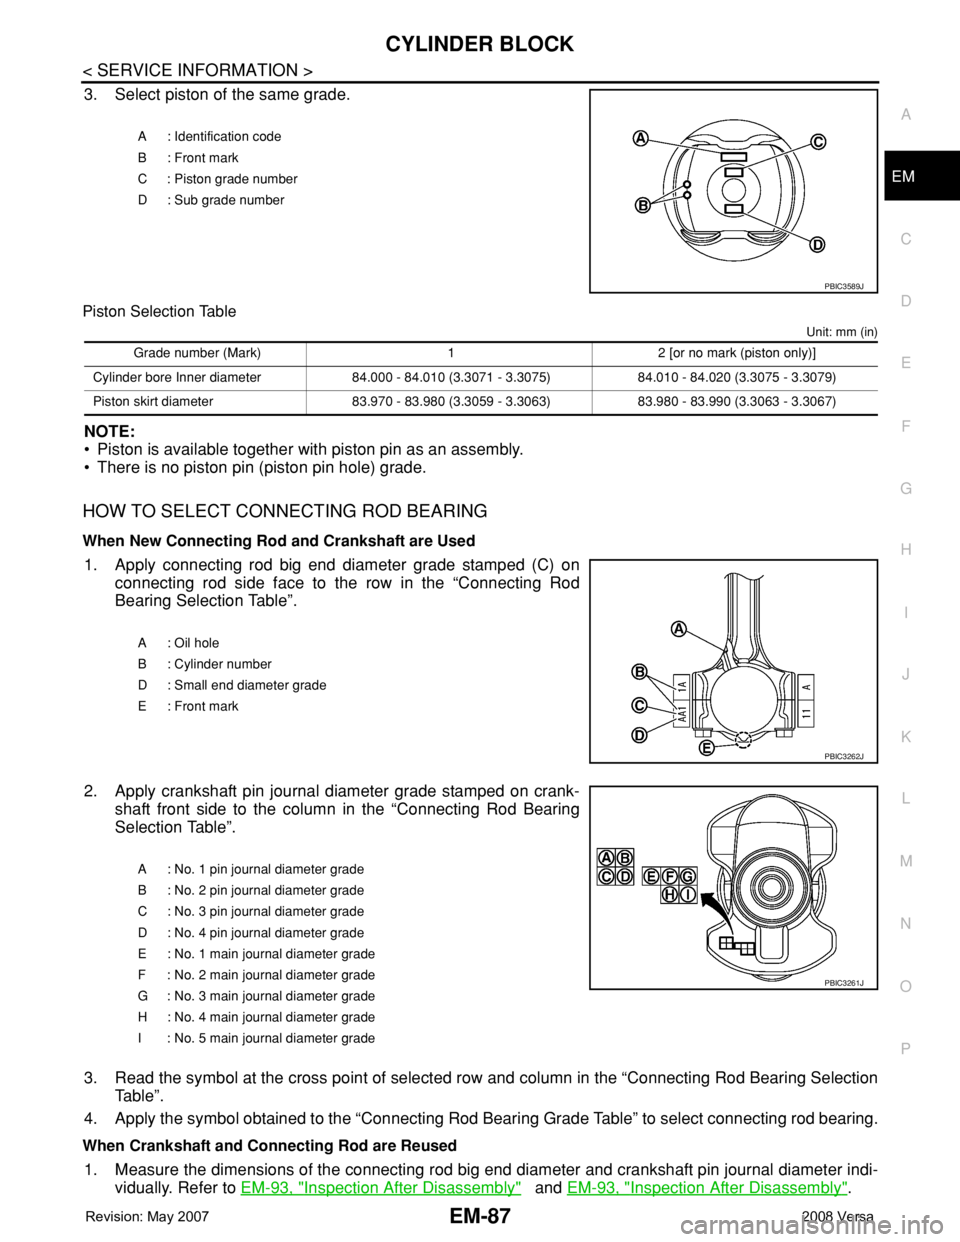
1. Apply connecting rod big end diameter grade stamped (C) on
connecting rod side face to the row in the “Connecting Rod
Bearing Selection Table”.
2. Apply crankshaft pin journal diameter grade stamped on crank-
shaft front side to the column in the “Connecting Rod Bearing
Selection Table”.
3. Read the symbol at the cross point of selected row and column in the “Connecting Rod Bearing Selection
Table”.
4. Apply the symbol obtained to the “Connecting Rod Bearing Grade Table” to select connecting rod bearing.
When Crankshaft and Connecting Rod are Reused
1. Measure the dimensions of the connecting rod big end diameter and crankshaft pin journal diameter indi-
vidually. Refer to EM-93, "
Inspection After Disassembly" and EM-93, "Inspection After Disassembly".
A : Identification code
B : Front mark
C : Piston grade number
D : Sub grade number
PBIC3589J
Grade number (Mark) 1 2 [or no mark (piston only)]
Cylinder bore Inner diameter 84.000 - 84.010 (3.3071 - 3.3075) 84.010 - 84.020 (3.3075 - 3.3079)
Piston skirt diameter 83.970 - 83.980 (3.3059 - 3.3063) 83.980 - 83.990 (3.3063 - 3.3067)
A : Oil hole
B : Cylinder number
D : Small end diameter grade
E : Front mark
PBIC3262J
A : No. 1 pin journal diameter grade
B : No. 2 pin journal diameter grade
C : No. 3 pin journal diameter grade
D : No. 4 pin journal diameter grade
E : No. 1 main journal diameter grade
F : No. 2 main journal diameter grade
G : No. 3 main journal diameter grade
H : No. 4 main journal diameter grade
I : No. 5 main journal diameter grade
PBIC3261J
Page 1767 of 2771
EM-90
< SERVICE INFORMATION >
CYLINDER BLOCK
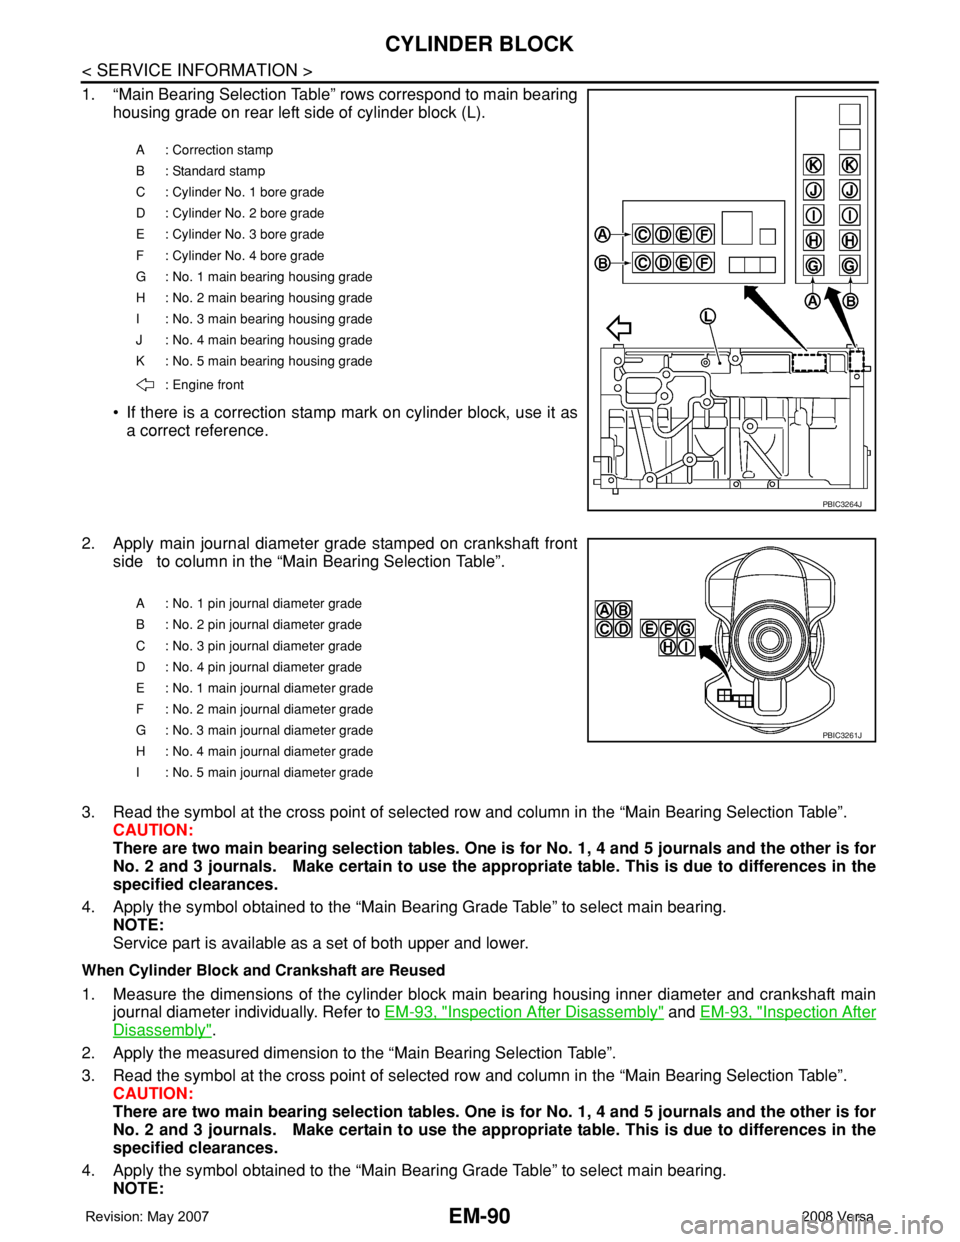
1. “Main Bearing Selection Table” rows correspond to main bearing
housing grade on rear left side of cylinder block (L).
• If there is a correction stamp mark on cylinder block, use it as
a correct reference.
2. Apply main journal diameter grade stamped on crankshaft front
side to column in the “Main Bearing Selection Table”.
3. Read the symbol at the cross point of selected row and column in the “Main Bearing Selection Table”.
CAUTION:
There are two main bearing selection tables. One is for No. 1, 4 and 5 journals and the other is for
No. 2 and 3 journals. Make certain to use the appropriate table. This is due to differences in the
specified clearances.
4. Apply the symbol obtained to the “Main Bearing Grade Table” to select main bearing.
NOTE:
Service part is available as a set of both upper and lower.
When Cylinder Block and Crankshaft are Reused
1. Measure the dimensions of the cylinder block main bearing housing inner diameter and crankshaft main
journal diameter individually. Refer to EM-93, "
Inspection After Disassembly" and EM-93, "Inspection After
Disassembly".
2. Apply the measured dimension to the “Main Bearing Selection Table”.
3. Read the symbol at the cross point of selected row and column in the “Main Bearing Selection Table”.
CAUTION:
There are two main bearing selection tables. One is for No. 1, 4 and 5 journals and the other is for
No. 2 and 3 journals. Make certain to use the appropriate table. This is due to differences in the
specified clearances.
4. Apply the symbol obtained to the “Main Bearing Grade Table” to select main bearing.
NOTE:
A : Correction stamp
B : Standard stamp
C : Cylinder No. 1 bore grade
D : Cylinder No. 2 bore grade
E : Cylinder No. 3 bore grade
F : Cylinder No. 4 bore grade
G : No. 1 main bearing housing grade
H : No. 2 main bearing housing grade
I : No. 3 main bearing housing grade
J : No. 4 main bearing housing grade
K : No. 5 main bearing housing grade
: Engine front
PBIC3264J
A : No. 1 pin journal diameter grade
B : No. 2 pin journal diameter grade
C : No. 3 pin journal diameter grade
D : No. 4 pin journal diameter grade
E : No. 1 main journal diameter grade
F : No. 2 main journal diameter grade
G : No. 3 main journal diameter grade
H : No. 4 main journal diameter grade
I : No. 5 main journal diameter grade
PBIC3261J
Page 1770 of 2771
CYLINDER BLOCK
EM-93
< SERVICE INFORMATION >
C
D
E
F
G
H
I
J
K
L
MA
EM
N
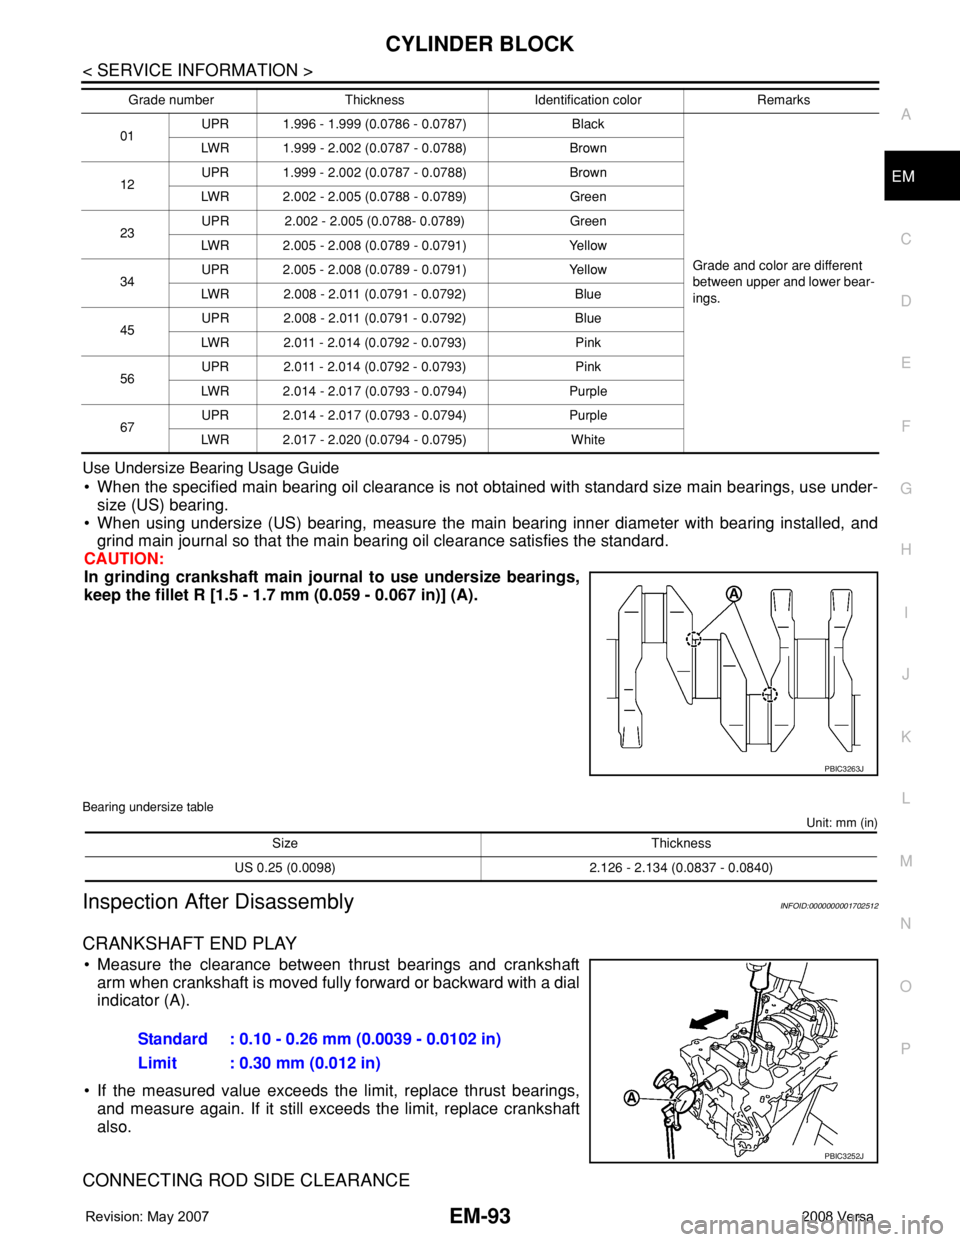
P O Use Undersize Bearing Usage Guide
• When the specified main bearing oil clearance is not obtained with standard size main bearings, use under-
size (US) bearing.
• When using undersize (US) bearing, measure the main bearing inner diameter with bearing installed, and
grind main journal so that the main bearing oil clearance satisfies the standard.
CAUTION:
In grinding crankshaft main journal to use undersize bearings,
keep the fillet R [1.5 - 1.7 mm (0.059 - 0.067 in)] (A).
Bearing undersize table
Unit: mm (in)
Inspection After DisassemblyINFOID:0000000001702512
CRANKSHAFT END PLAY
• Measure the clearance between thrust bearings and crankshaft
arm when crankshaft is moved fully forward or backward with a dial
indicator (A).
• If the measured value exceeds the limit, replace thrust bearings,
and measure again. If it still exceeds the limit, replace crankshaft
also.
CONNECTING ROD SIDE CLEARANCE
01UPR 1.996 - 1.999 (0.0786 - 0.0787) Black
Grade and color are different
between upper and lower bear-
ings. LWR 1.999 - 2.002 (0.0787 - 0.0788) Brown
12UPR 1.999 - 2.002 (0.0787 - 0.0788) Brown
LWR 2.002 - 2.005 (0.0788 - 0.0789) Green
23UPR 2.002 - 2.005 (0.0788- 0.0789) Green
LWR 2.005 - 2.008 (0.0789 - 0.0791) Yellow
34UPR 2.005 - 2.008 (0.0789 - 0.0791) Yellow
LWR 2.008 - 2.011 (0.0791 - 0.0792) Blue
45UPR 2.008 - 2.011 (0.0791 - 0.0792) Blue
LWR 2.011 - 2.014 (0.0792 - 0.0793) Pink
56UPR 2.011 - 2.014 (0.0792 - 0.0793) Pink
LWR 2.014 - 2.017 (0.0793 - 0.0794) Purple
67UPR 2.014 - 2.017 (0.0793 - 0.0794) Purple
LWR 2.017 - 2.020 (0.0794 - 0.0795) White Grade number Thickness Identification color Remarks
PBIC3263J
Size Thickness
US 0.25 (0.0098) 2.126 - 2.134 (0.0837 - 0.0840)
Standard : 0.10 - 0.26 mm (0.0039 - 0.0102 in)
Limit : 0.30 mm (0.012 in)
PBIC3252J
Page 1773 of 2771
EM-96
< SERVICE INFORMATION >
CYLINDER BLOCK
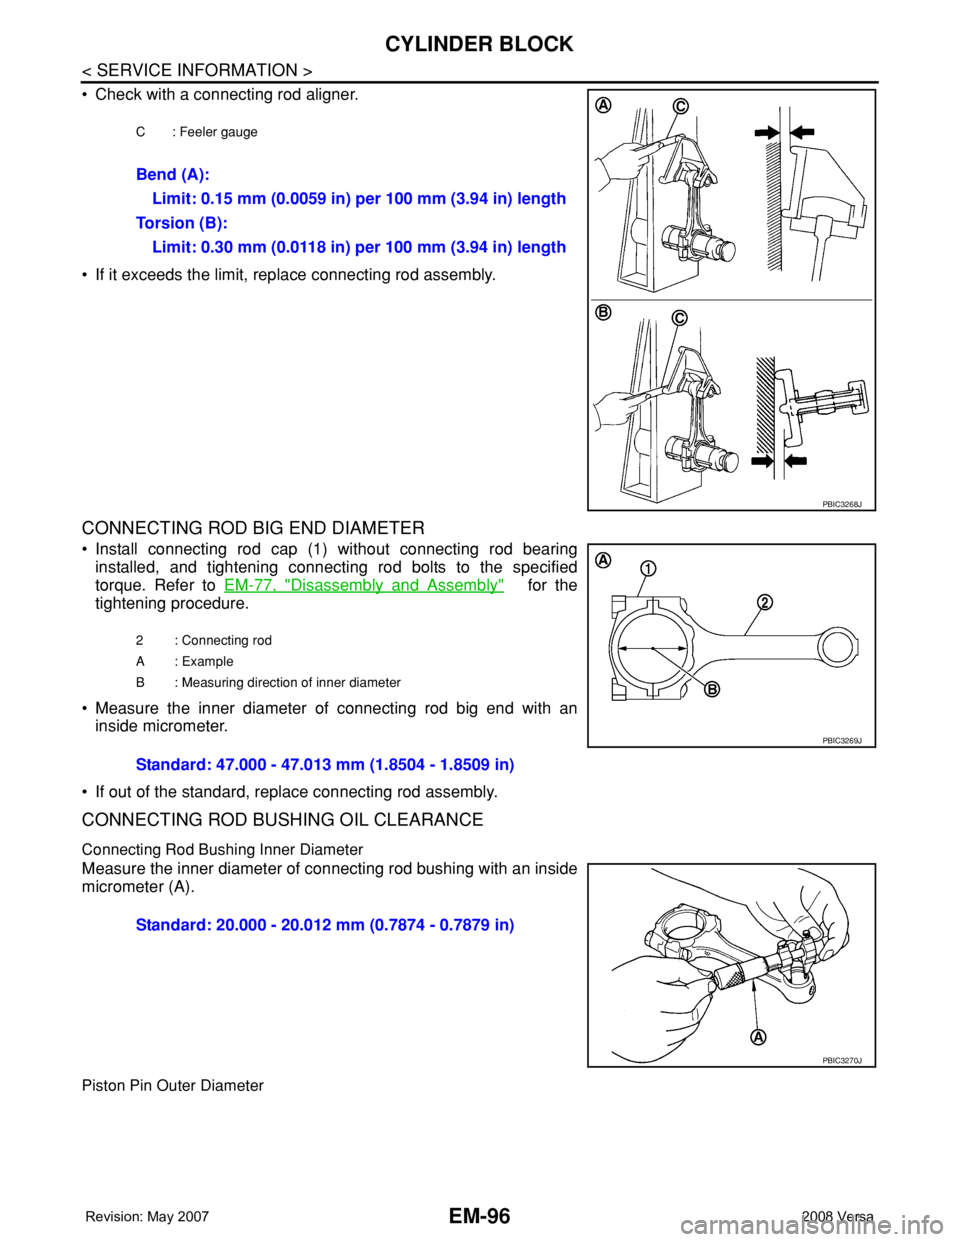
• Check with a connecting rod aligner.
• If it exceeds the limit, replace connecting rod assembly.
CONNECTING ROD BIG END DIAMETER
• Install connecting rod cap (1) without connecting rod bearing
installed, and tightening connecting rod bolts to the specified
torque. Refer to EM-77, "
Disassembly and Assembly" for the
tightening procedure.
• Measure the inner diameter of connecting rod big end with an
inside micrometer.
• If out of the standard, replace connecting rod assembly.
CONNECTING ROD BUSHING OIL CLEARANCE
Connecting Rod Bushing Inner Diameter
Measure the inner diameter of connecting rod bushing with an inside
micrometer (A).
Piston Pin Outer Diameter
C : Feeler gauge
Bend (A):
Limit: 0.15 mm (0.0059 in) per 100 mm (3.94 in) length
To r s i o n ( B ) :
Limit: 0.30 mm (0.0118 in) per 100 mm (3.94 in) length
PBIC3268J
2 : Connecting rod
A : Example
B : Measuring direction of inner diameter
Standard: 47.000 - 47.013 mm (1.8504 - 1.8509 in)
PBIC3269J
Standard: 20.000 - 20.012 mm (0.7874 - 0.7879 in)
PBIC3270J
Page 1774 of 2771
CYLINDER BLOCK
EM-97
< SERVICE INFORMATION >
C
D
E
F
G
H
I
J
K
L
MA
EM
N
P O
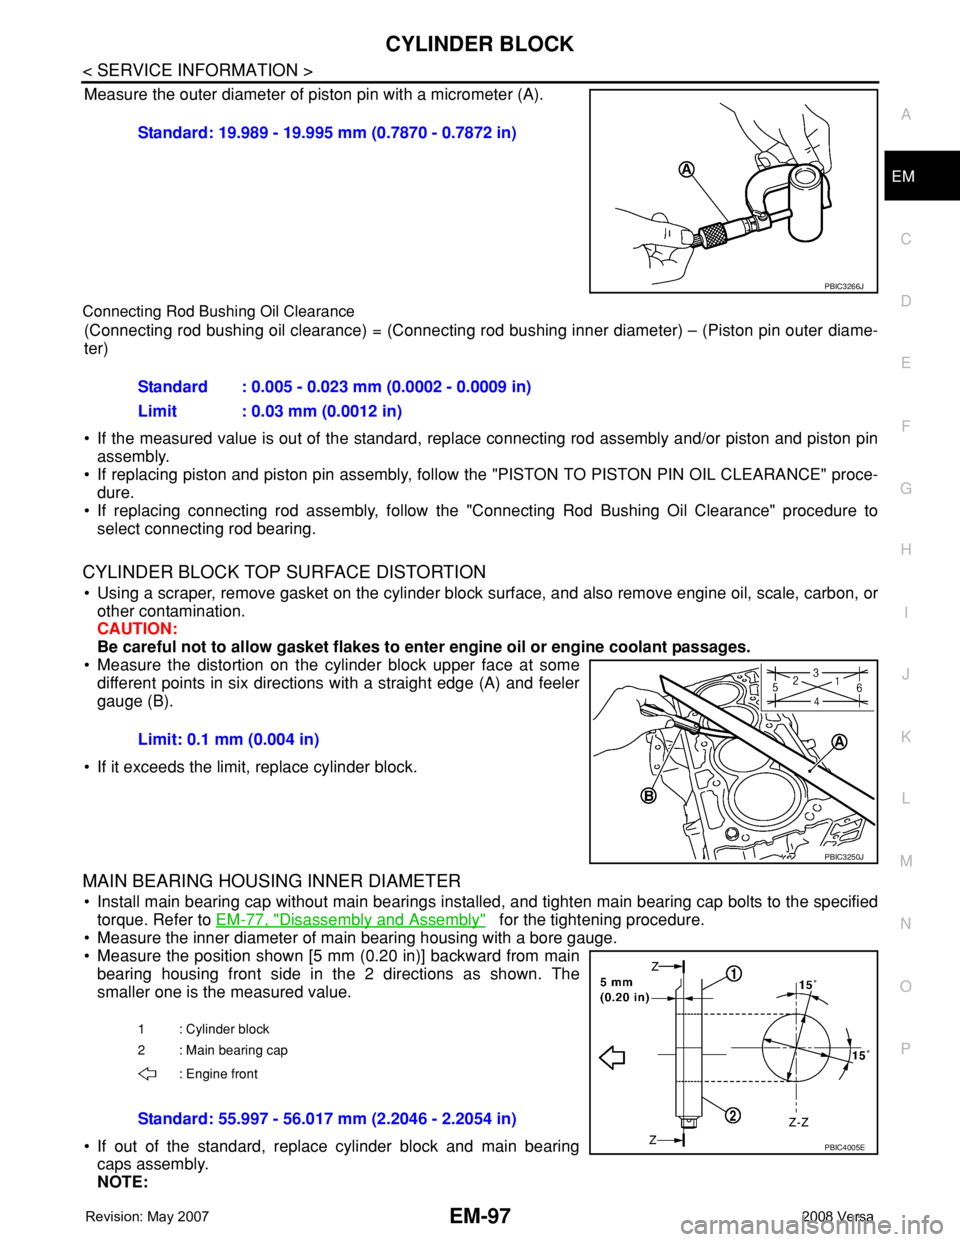
Measure the outer diameter of piston pin with a micrometer (A).
Connecting Rod Bushing Oil Clearance
(Connecting rod bushing oil clearance) = (Connecting rod bushing inner diameter) – (Piston pin outer diame-
ter)
• If the measured value is out of the standard, replace connecting rod assembly and/or piston and piston pin
assembly.
• If replacing piston and piston pin assembly, follow the "PISTON TO PISTON PIN OIL CLEARANCE" proce-
dure.
• If replacing connecting rod assembly, follow the "Connecting Rod Bushing Oil Clearance" procedure to
select connecting rod bearing.
CYLINDER BLOCK TOP SURFACE DISTORTION
• Using a scraper, remove gasket on the cylinder block surface, and also remove engine oil, scale, carbon, or
other contamination.
CAUTION:
Be careful not to allow gasket flakes to enter engine oil or engine coolant passages.
• Measure the distortion on the cylinder block upper face at some
different points in six directions with a straight edge (A) and feeler
gauge (B).
• If it exceeds the limit, replace cylinder block.
MAIN BEARING HOUSING INNER DIAMETER
• Install main bearing cap without main bearings installed, and tighten main bearing cap bolts to the specified
torque. Refer to EM-77, "
Disassembly and Assembly" for the tightening procedure.
• Measure the inner diameter of main bearing housing with a bore gauge.
• Measure the position shown [5 mm (0.20 in)] backward from main
bearing housing front side in the 2 directions as shown. The
smaller one is the measured value.
• If out of the standard, replace cylinder block and main bearing
caps assembly.
NOTE:Standard: 19.989 - 19.995 mm (0.7870 - 0.7872 in)
PBIC3266J
Standard : 0.005 - 0.023 mm (0.0002 - 0.0009 in)
Limit : 0.03 mm (0.0012 in)
Limit: 0.1 mm (0.004 in)
PBIC3250J
1 : Cylinder block
2 : Main bearing cap
: Engine front
Standard: 55.997 - 56.017 mm (2.2046 - 2.2054 in)
PBIC4005E
Page 1777 of 2771
EM-100
< SERVICE INFORMATION >
CYLINDER BLOCK
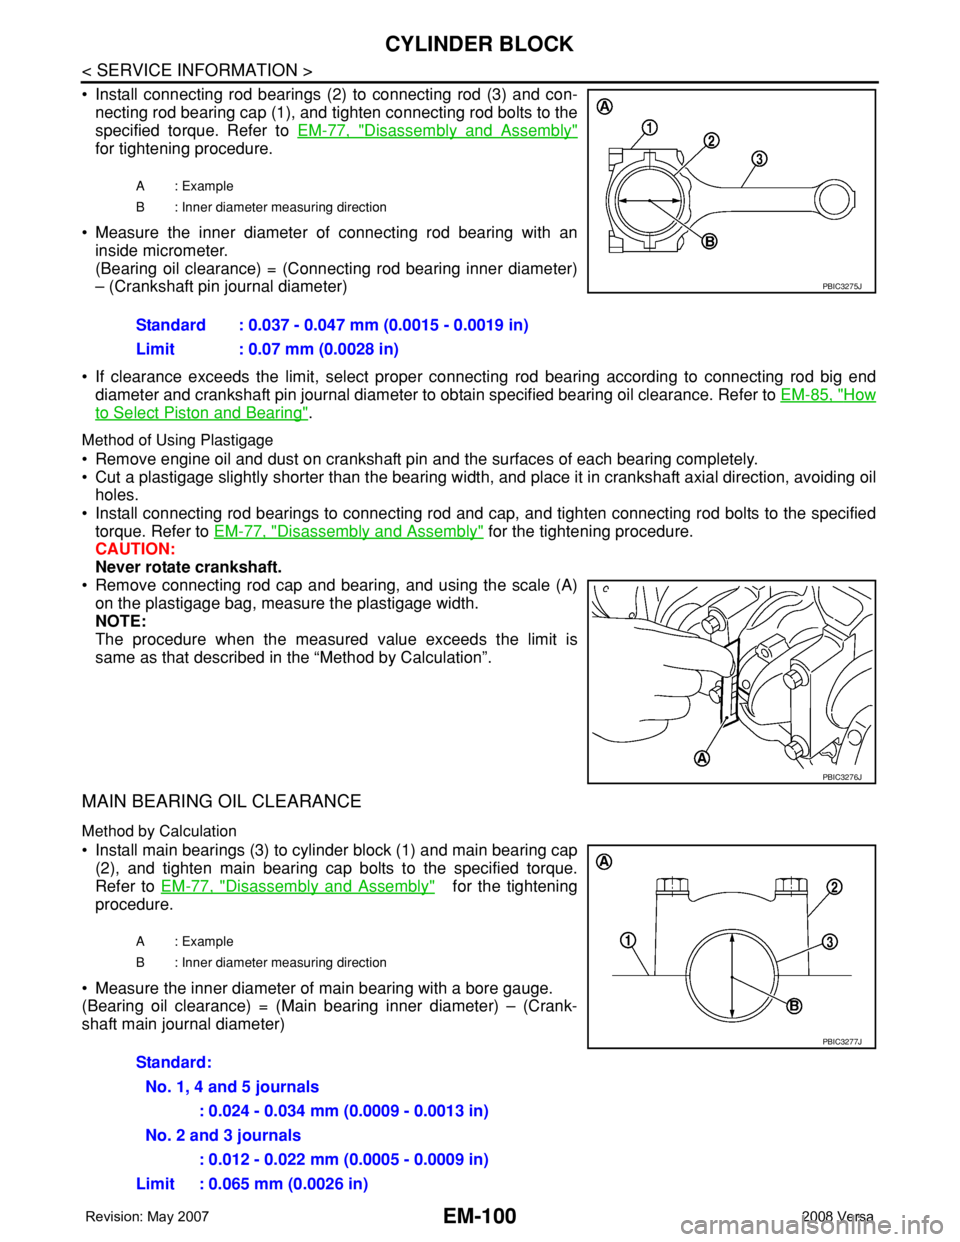
• Install connecting rod bearings (2) to connecting rod (3) and con-
necting rod bearing cap (1), and tighten connecting rod bolts to the
specified torque. Refer to EM-77, "
Disassembly and Assembly"
for tightening procedure.
• Measure the inner diameter of connecting rod bearing with an
inside micrometer.
(Bearing oil clearance) = (Connecting rod bearing inner diameter)
– (Crankshaft pin journal diameter)
• If clearance exceeds the limit, select proper connecting rod bearing according to connecting rod big end
diameter and crankshaft pin journal diameter to obtain specified bearing oil clearance. Refer to EM-85, "
How
to Select Piston and Bearing".
Method of Using Plastigage
• Remove engine oil and dust on crankshaft pin and the surfaces of each bearing completely.
• Cut a plastigage slightly shorter than the bearing width, and place it in crankshaft axial direction, avoiding oil
holes.
• Install connecting rod bearings to connecting rod and cap, and tighten connecting rod bolts to the specified
torque. Refer to EM-77, "
Disassembly and Assembly" for the tightening procedure.
CAUTION:
Never rotate crankshaft.
• Remove connecting rod cap and bearing, and using the scale (A)
on the plastigage bag, measure the plastigage width.
NOTE:
The procedure when the measured value exceeds the limit is
same as that described in the “Method by Calculation”.
MAIN BEARING OIL CLEARANCE
Method by Calculation
• Install main bearings (3) to cylinder block (1) and main bearing cap
(2), and tighten main bearing cap bolts to the specified torque.
Refer to EM-77, "
Disassembly and Assembly" for the tightening
procedure.
• Measure the inner diameter of main bearing with a bore gauge.
(Bearing oil clearance) = (Main bearing inner diameter) – (Crank-
shaft main journal diameter)
A : Example
B : Inner diameter measuring direction
Standard : 0.037 - 0.047 mm (0.0015 - 0.0019 in)
Limit : 0.07 mm (0.0028 in)
PBIC3275J
PBIC3276J
A : Example
B : Inner diameter measuring direction
Standard:
No. 1, 4 and 5 journals
: 0.024 - 0.034 mm (0.0009 - 0.0013 in)
No. 2 and 3 journals
: 0.012 - 0.022 mm (0.0005 - 0.0009 in)
Limit : 0.065 mm (0.0026 in)
PBIC3277J
Page 1778 of 2771
CYLINDER BLOCK
EM-101
< SERVICE INFORMATION >
C
D
E
F
G
H
I
J
K
L
MA
EM
N
P O
• If clearance exceeds the limit, select proper main bearing according to main bearing inner diameter and
crankshaft main journal diameter to obtain specified bearing oil clearance. Refer to EM-85, "
How to Select
Piston and Bearing".
Method of Using Plastigage
• Remove engine oil and dust on crankshaft main journal and the surfaces of each bearing completely.
• Cut a plastigage slightly shorter than the bearing width, and place it in crankshaft axial direction, avoiding oil
holes.
• Install main bearings to cylinder block and main bearing cap, and tighten main bearing cap bolts to the spec-
ified torque. Refer to EM-77, "
Disassembly and Assembly" for the tightening procedure.
CAUTION:
Never rotate crankshaft.
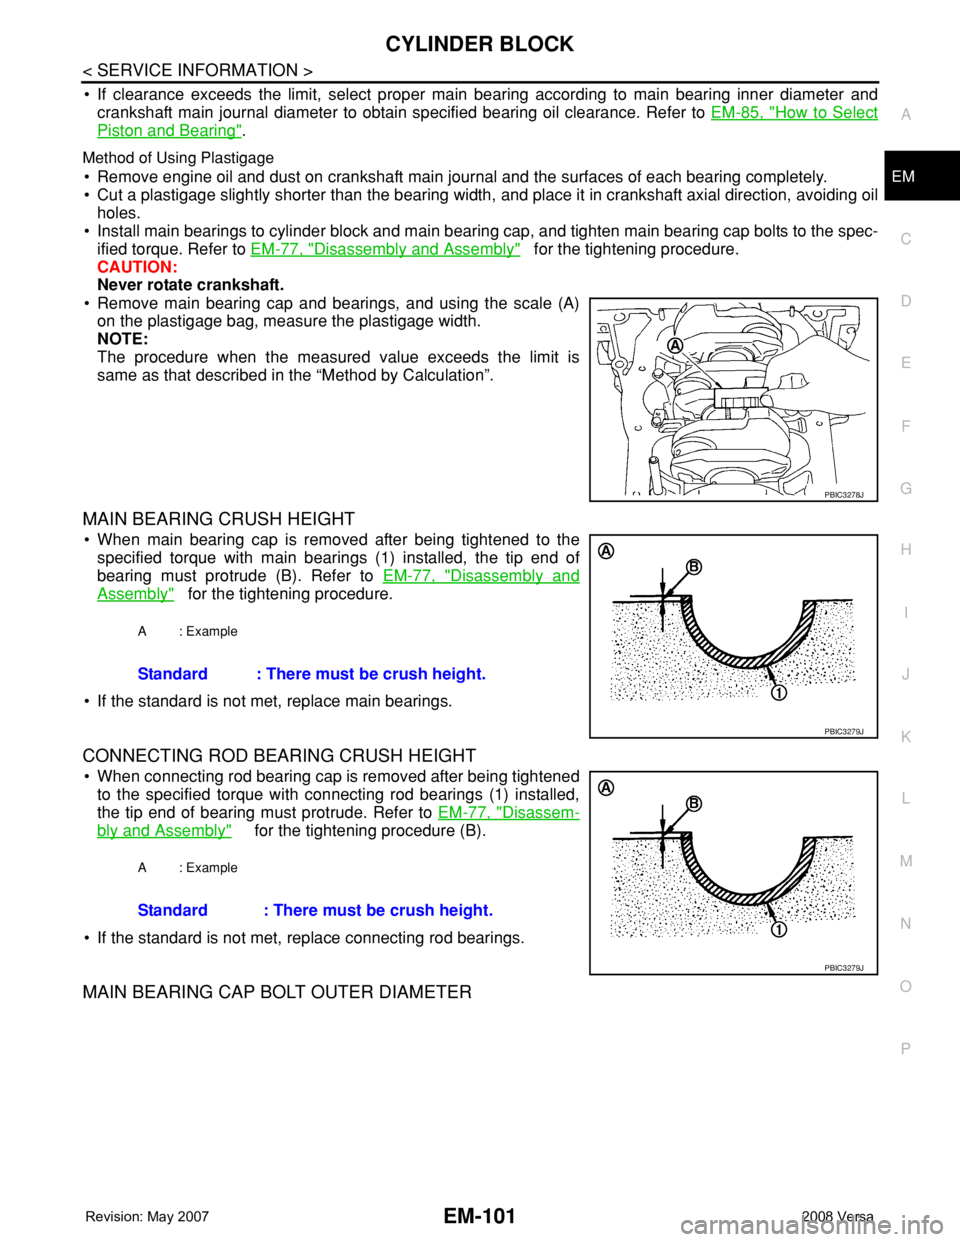
• Remove main bearing cap and bearings, and using the scale (A)
on the plastigage bag, measure the plastigage width.
NOTE:
The procedure when the measured value exceeds the limit is
same as that described in the “Method by Calculation”.
MAIN BEARING CRUSH HEIGHT
• When main bearing cap is removed after being tightened to the
specified torque with main bearings (1) installed, the tip end of
bearing must protrude (B). Refer to EM-77, "
Disassembly and
Assembly" for the tightening procedure.
• If the standard is not met, replace main bearings.
CONNECTING ROD BEARING CRUSH HEIGHT
• When connecting rod bearing cap is removed after being tightened
to the specified torque with connecting rod bearings (1) installed,
the tip end of bearing must protrude. Refer to EM-77, "
Disassem-
bly and Assembly" for the tightening procedure (B).
• If the standard is not met, replace connecting rod bearings.
MAIN BEARING CAP BOLT OUTER DIAMETER
PBIC3278J
A : Example
Standard : There must be crush height.
PBIC3279J
A : Example
Standard : There must be crush height.
PBIC3279J