Page 797 of 2771
![NISSAN TIIDA 2008 Service Repair Manual BRC-32
< SERVICE INFORMATION >[ABS]
WHEEL SENSORS
WHEEL SENSORS
Removal and InstallationINFOID:0000000001703850
NOTE:
The top portion of the figure (front side) shows view from LH side of vehicle. RH NISSAN TIIDA 2008 Service Repair Manual BRC-32
< SERVICE INFORMATION >[ABS]
WHEEL SENSORS
WHEEL SENSORS
Removal and InstallationINFOID:0000000001703850
NOTE:
The top portion of the figure (front side) shows view from LH side of vehicle. RH](/manual-img/5/57399/w960_57399-796.png)
BRC-32
< SERVICE INFORMATION >[ABS]
WHEEL SENSORS
WHEEL SENSORS
Removal and InstallationINFOID:0000000001703850
NOTE:
The top portion of the figure (front side) shows view from LH side of vehicle. RH side is the mirror image.
REMOVAL
Pay attention to the following when removing wheel sensor.
CAUTION:
• As much as possible, avoid rotating wheel sensor when removing it. Pull wheel sensors out without
pulling on sensor harness.
• Take care to avoid damaging wheel sensor edges or rotor teeth. Remove wheel sensor first before
removing front or rear wheel hub. This is to avoid damage to wheel sensor wiring and loss of sensor
function.
INSTALLATION
Pay attention to the following when installing wheel sensor. Tighten installation bolts and nuts to the specified
torques.
• When installing, make sure there is no foreign material such as iron chips on and in the mounting hole of the
wheel sensor. Make sure no foreign material has been caught in the sensor rotor. Remove any foreign mate-
rial and clean the mount.
• When installing front wheel sensor, press rubber grommets of strut bracket and body all the way in until they
get locked, and be careful not to apply a twist to harness. Harness should not be twisted after installation.
(Install it with harness paint mark on body side grommet facing front of vehicle, and the strut side grommet
facing outside of vehicle.)
A. Front B. Rear 1. Front wheel sensor connector (LH)
2. Front wheel sensor (LH) 3. Rear wheel sensor (LH) 4. Rear wheel sensor connector (LH)
5. Rear wheel sensor connector (RH) 6. Rear wheel sensor (RH) 7. Side member
8. Left 9. Right : Front
Refer to GI section for symbol marks in the figure.
SFIA3090E
Page 800 of 2771
![NISSAN TIIDA 2008 Service Repair Manual ACTUATOR AND ELECTRIC UNIT (ASSEMBLY)
BRC-35
< SERVICE INFORMATION >[ABS]
C
D
E
G
H
I
J
K
L
MA
B
BRC
N
O
P
ACTUATOR AND ELECTRIC UNIT (ASSEMBLY)
Removal and InstallationINFOID:0000000001703852
CAUTION NISSAN TIIDA 2008 Service Repair Manual ACTUATOR AND ELECTRIC UNIT (ASSEMBLY)
BRC-35
< SERVICE INFORMATION >[ABS]
C
D
E
G
H
I
J
K
L
MA
B
BRC
N
O
P
ACTUATOR AND ELECTRIC UNIT (ASSEMBLY)
Removal and InstallationINFOID:0000000001703852
CAUTION](/manual-img/5/57399/w960_57399-799.png)
ACTUATOR AND ELECTRIC UNIT (ASSEMBLY)
BRC-35
< SERVICE INFORMATION >[ABS]
C
D
E
G
H
I
J
K
L
MA
B
BRC
N
O
P
ACTUATOR AND ELECTRIC UNIT (ASSEMBLY)
Removal and InstallationINFOID:0000000001703852
CAUTION:
• Before servicing, disconnect battery cables.
• To remove brake tube, use flare nut wrench to prevent flare nuts and brake tube from being dam-
aged. To install, use flare nut torque wrench, tighten flare nut to the specified torque. Refer to BR-10,
"Hydraulic Circuit" .
• Do not apply excessive impact to ABS actuator and electric unit (control unit), such as dropping it.
• Do not remove and install actuator by holding harness.
• After work is completed, bleed air from brake tube and hose. Refer to BR-8, "
Bleeding Brake Sys-
tem" .
REMOVAL
1. Disconnect ABS actuator and electric unit (control unit) connector.
2. Loosen brake tube flare nuts, then remove brake tubes from ABS actuator and electric unit (control unit).
3. Remove brake booster hose from engine. Refer to BR-21, "
Removal and Installation" .
4. Remove ABS actuator and electric unit (control unit) bracket mounting bolts.
5. Remove ABS actuator and electric unit (control unit) from vehicle.
INSTALLATION
1. To front right 2. To rear left 3. To rear right
4. To front left 5. From master cylinder primary side 6. From master cylinder secondary
side
7. ABS actuator and electric unit (con-
trol unit)8. Harness connector : Front
Refer to GI section for symbol marks in the figure.
WFIA0506E
Page 801 of 2771
BRC-36
< SERVICE INFORMATION >[ABS]
ACTUATOR AND ELECTRIC UNIT (ASSEMBLY)
Installation is the reverse order of removal.
CAUTION:
After installing harness connector in the ABS actuator and electric unit (control unit), make sure con-
nector is securely locked.
Page 803 of 2771

CL-2
< SERVICE INFORMATION >
PRECAUTIONS
SERVICE INFORMATION
PRECAUTIONS
Precaution for Supplemental Restraint System (SRS) "AIR BAG" and "SEAT BELT
PRE-TENSIONER"
INFOID:0000000001703112
The Supplemental Restraint System such as “AIR BAG” and “SEAT BELT PRE-TENSIONER”, used along
with a front seat belt, helps to reduce the risk or severity of injury to the driver and front passenger for certain
types of collision. This system includes seat belt switch inputs and dual stage front air bag modules. The SRS
system uses the seat belt switches to determine the front air bag deployment, and may only deploy one front
air bag, depending on the severity of a collision and whether the front occupants are belted or unbelted.
Information necessary to service the system safely is included in the SRS and SB section of this Service Man-
ual.
WARNING:
• To avoid rendering the SRS inoperative, which could increase the risk of personal injury or death in
the event of a collision which would result in air bag inflation, all maintenance must be performed by
an authorized NISSAN/INFINITI dealer.
• Improper maintenance, including incorrect removal and installation of the SRS, can lead to personal
injury caused by unintentional activation of the system. For removal of Spiral Cable and Air Bag
Module, see the SRS section.
• Do not use electrical test equipment on any circuit related to the SRS unless instructed to in this
Service Manual. SRS wiring harnesses can be identified by yellow and/or orange harnesses or har-
ness connectors.
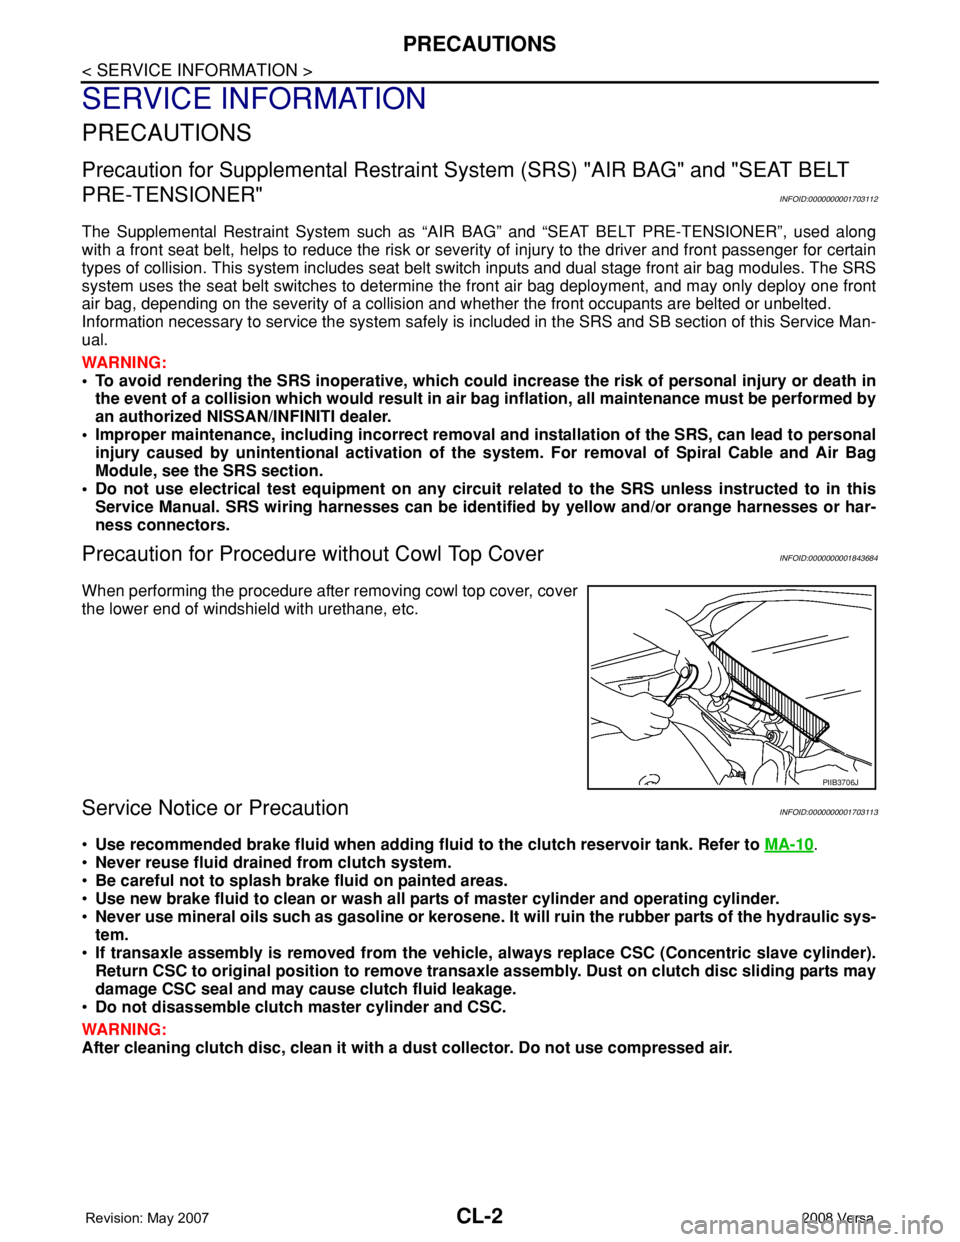
Precaution for Procedure without Cowl Top CoverINFOID:0000000001843684
When performing the procedure after removing cowl top cover, cover
the lower end of windshield with urethane, etc.
Service Notice or PrecautionINFOID:0000000001703113
•Use recommended brake fluid when adding fluid to the clutch reservoir tank. Refer to MA-10.
•Never reuse fluid drained from clutch system.
•Be careful not to splash brake fluid on painted areas.
•Use new brake fluid to clean or wash all parts of master cylinder and operating cylinder.
•Never use mineral oils such as gasoline or kerosene. It will ruin the rubber parts of the hydraulic sys-
tem.
•If transaxle assembly is removed from the vehicle, always replace CSC (Concentric slave cylinder).
Return CSC to original position to remove transaxle assembly. Dust on clutch disc sliding parts may
damage CSC seal and may cause clutch fluid leakage.
•Do not disassemble clutch master cylinder and CSC.
WARNING:
After cleaning clutch disc, clean it with a dust collector. Do not use compressed air.
PIIB3706J
Page 806 of 2771

CLUTCH PEDAL
CL-5
< SERVICE INFORMATION >
D
E
F
G
H
I
J
K
L
MA
B
CL
N
O
P
CLUTCH PEDAL
On-vehicle Inspection and AdjustmentINFOID:0000000001703117
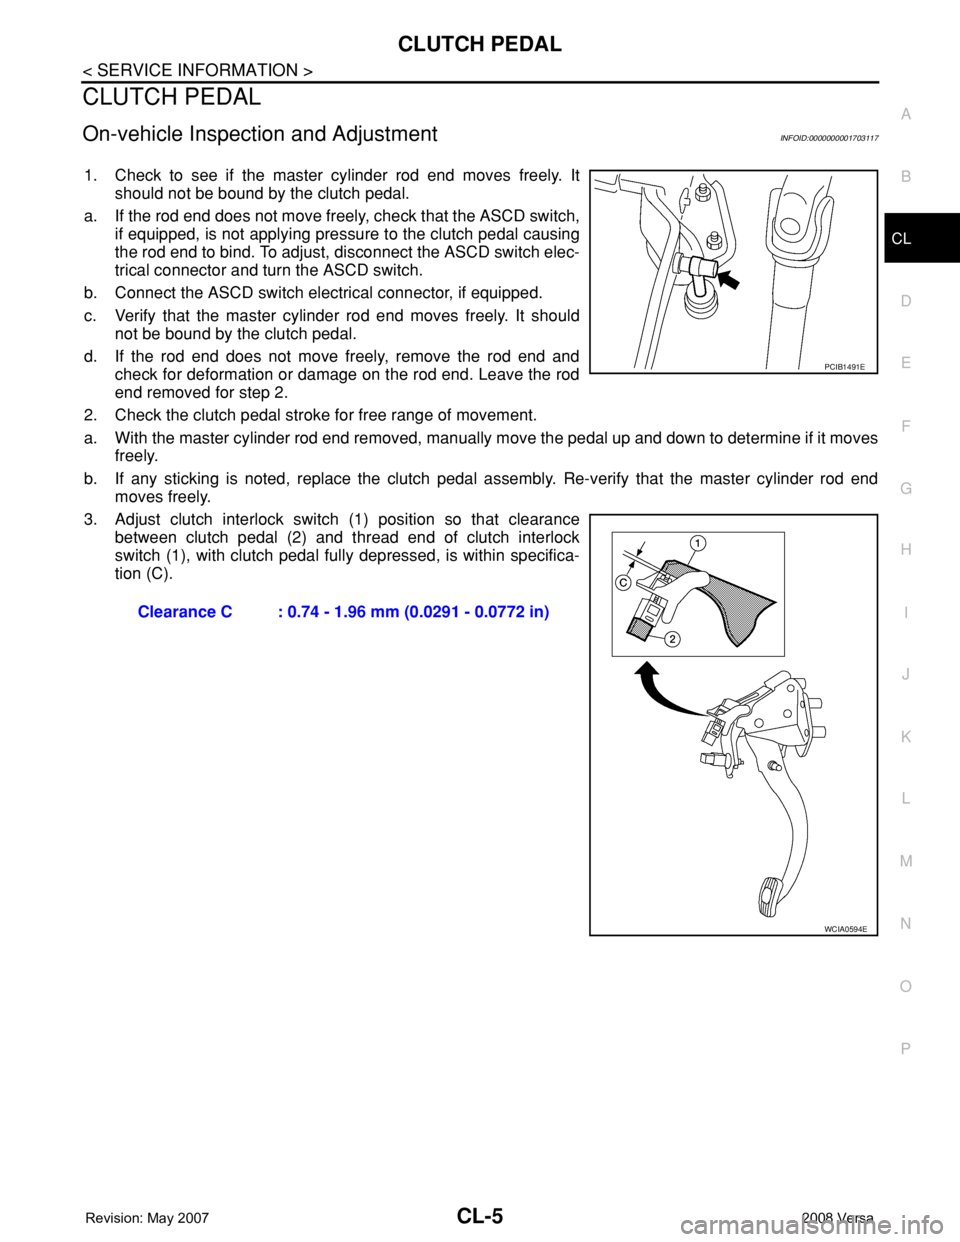
1. Check to see if the master cylinder rod end moves freely. It
should not be bound by the clutch pedal.
a. If the rod end does not move freely, check that the ASCD switch,
if equipped, is not applying pressure to the clutch pedal causing
the rod end to bind. To adjust, disconnect the ASCD switch elec-
trical connector and turn the ASCD switch.
b. Connect the ASCD switch electrical connector, if equipped.
c. Verify that the master cylinder rod end moves freely. It should
not be bound by the clutch pedal.
d. If the rod end does not move freely, remove the rod end and
check for deformation or damage on the rod end. Leave the rod
end removed for step 2.
2. Check the clutch pedal stroke for free range of movement.
a. With the master cylinder rod end removed, manually move the pedal up and down to determine if it moves
freely.
b. If any sticking is noted, replace the clutch pedal assembly. Re-verify that the master cylinder rod end
moves freely.
3. Adjust clutch interlock switch (1) position so that clearance
between clutch pedal (2) and thread end of clutch interlock
switch (1), with clutch pedal fully depressed, is within specifica-
tion (C).
Clearance C : 0.74 - 1.96 mm (0.0291 - 0.0772 in)
PCIB1491E
WCIA0594E
Page 808 of 2771
CLUTCH PEDAL
CL-7
< SERVICE INFORMATION >
D
E
F
G
H
I
J
K
L
MA
B
CL
N
O
P
REMOVAL
1. Remove instrument lower finisher. Refer to IP-11, "Removal and Installation".
2. Disconnect clutch interlock switch and ASCD clutch switch harness connectors, if equipped.
3. Remove clutch switch harness clamp from clutch pedal assembly.
4. Disconnect master cylinder rod end from clutch pedal lever.
5. Remove clutch pedal assembly nuts, and then remove clutch
pedal assembly.
INSPECTION AFTER REMOVAL
Check clutch pedal for bend, damage or a cracked weld. If bend, damage or a cracked weld is found, replace
clutch pedal assembly.
INSTALLATION
Installation is in the reverse order of removal.
• After installing the clutch switches, adjust the switch positions. Refer to CL-5, "
On-vehicle Inspection and
Adjustment".
1. Clutch pedal assembly 2. Lock nut 3. Clutch interlock switch
4. ASCD clutch switch 5. Lock nut
WCIA0596E
PCIB1491E
Page 809 of 2771

CL-8
< SERVICE INFORMATION >
CLUTCH FLUID
CLUTCH FLUID
Air Bleeding ProcedureINFOID:0000000001703119
CAUTION:
Do not spill clutch fluid onto painted surfaces. If it spills, wipe up immediately and wash the affected
area with water.
NOTE:
• Do not use a vacuum assist or any other type of power bleeder on this system. Use of a vacuum assist or
power bleeder will not purge all the air from the system.
• Carefully monitor fluid level in reservoir tank during bleeding operation.
1. Fill master cylinder reservoir tank with new clutch fluid.
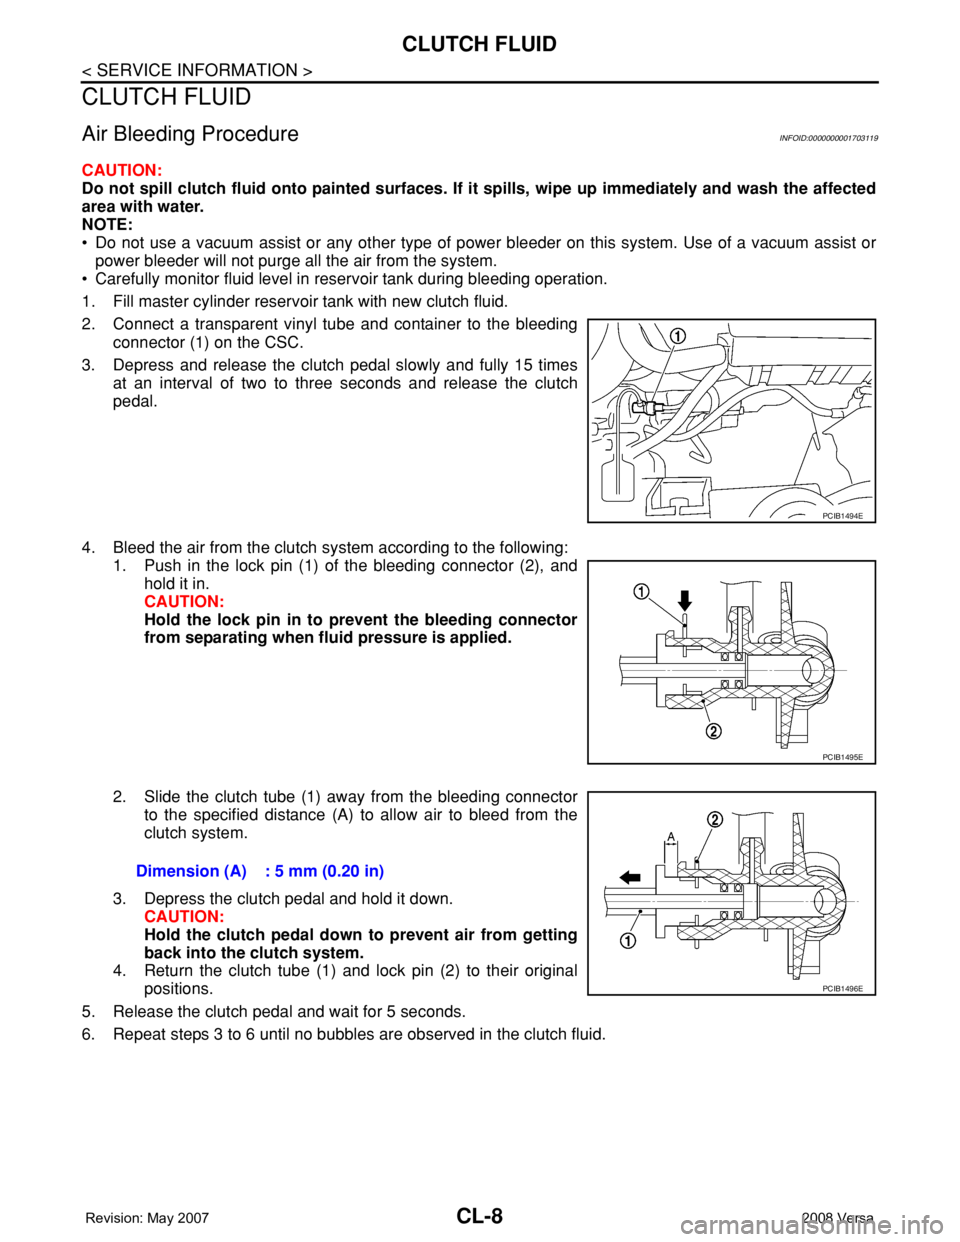
2. Connect a transparent vinyl tube and container to the bleeding
connector (1) on the CSC.
3. Depress and release the clutch pedal slowly and fully 15 times
at an interval of two to three seconds and release the clutch
pedal.
4. Bleed the air from the clutch system according to the following:
1. Push in the lock pin (1) of the bleeding connector (2), and
hold it in.
CAUTION:
Hold the lock pin in to prevent the bleeding connector
from separating when fluid pressure is applied.
2. Slide the clutch tube (1) away from the bleeding connector
to the specified distance (A) to allow air to bleed from the
clutch system.
3. Depress the clutch pedal and hold it down.
CAUTION:
Hold the clutch pedal down to prevent air from getting
back into the clutch system.
4. Return the clutch tube (1) and lock pin (2) to their original
positions.
5. Release the clutch pedal and wait for 5 seconds.
6. Repeat steps 3 to 6 until no bubbles are observed in the clutch fluid.
PCIB1494E
PCIB1495E
Dimension (A) : 5 mm (0.20 in)
PCIB1496E
Page 810 of 2771

CLUTCH MASTER CYLINDER
CL-9
< SERVICE INFORMATION >
D
E
F
G
H
I
J
K
L
MA
B
CL
N
O
P
CLUTCH MASTER CYLINDER
Removal and InstallationINFOID:0000000001703120
REMOVAL
1. Remove the battery, battery tray and brackets. Refer to SC-4.
2. Remove the air cleaner and air duct. Refer to EM-16
.
3. Use one of the following methods to remove hose from master cylinder.
• Drain clutch fluid from reservoir tank and remove hose.
• Remove hose from master cylinder. Immediately plug hose and reservoir tank to prevent clutch fluid
from dripping.
CAUTION:
Do not spill clutch fluid onto painted surfaces. If it spills, wipe up immediately and wash the
affected area with water.
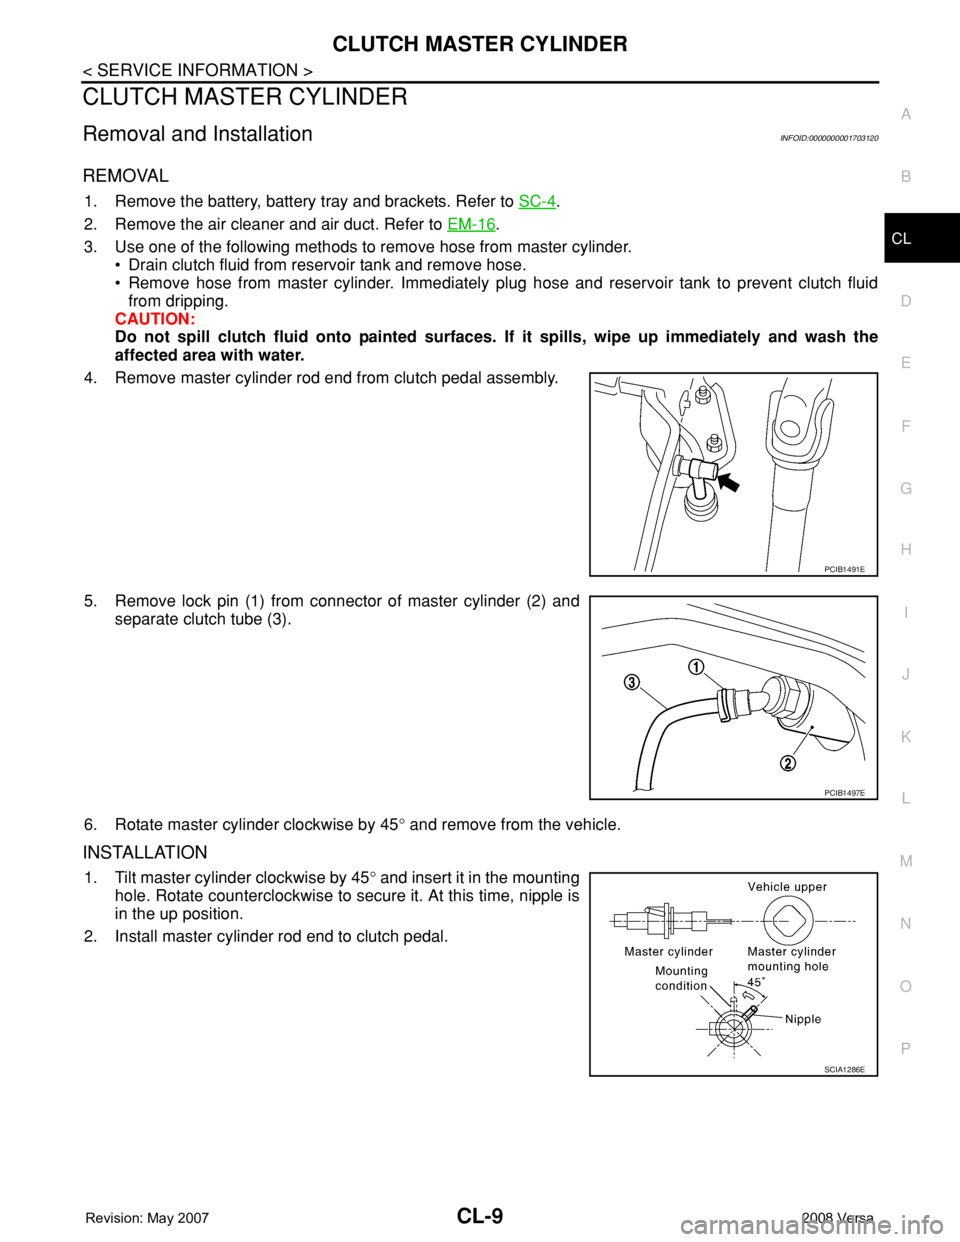
4. Remove master cylinder rod end from clutch pedal assembly.
5. Remove lock pin (1) from connector of master cylinder (2) and
separate clutch tube (3).
6. Rotate master cylinder clockwise by 45° and remove from the vehicle.
INSTALLATION
1. Tilt master cylinder clockwise by 45° and insert it in the mounting
hole. Rotate counterclockwise to secure it. At this time, nipple is
in the up position.
2. Install master cylinder rod end to clutch pedal.
PCIB1491E
PCIB1497E
SCIA1286E