2008 MERCEDES-BENZ GLK SUV tow
[x] Cancel search: towPage 139 of 261
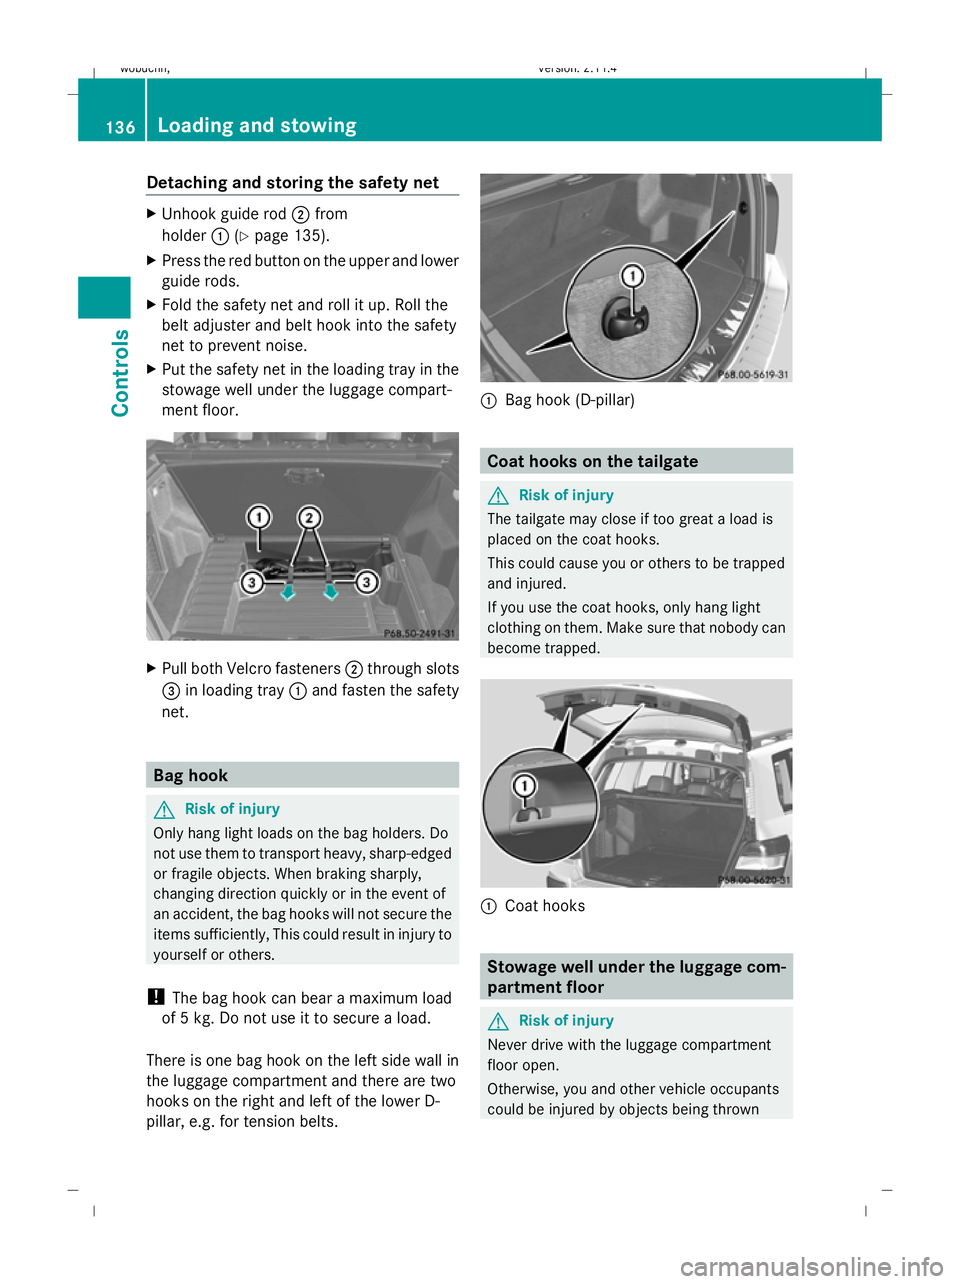
Detaching and storing the safety net
X
Unhook guide rod ;from
holder :(Ypage 135).
X Press the red button on the upper and lower
guide rods.
X Fold the safety net and roll it up. Roll the
belt adjuster and belt hook into the safety
net to prevent noise.
X Put the safety net in the loading tray in the
stowage well under the luggage compart-
ment floor. X
Pull both Velcro fasteners ;through slots
= in loading tray :and fasten the safety
net. Bag hook
G
Risk of injury
Only hang light loads on the bag holders. Do
not use them to transport heavy, sharp-edged
or fragile objects. When braking sharply,
changing direction quickly or in the event of
an accident, the bag hooks will not secure the
items sufficiently, This could result in injury to
yourself or others.
! The bag hook can bear a maximum load
of 5 kg. Do not use it to secure a load.
There is one bag hook on the left side wall in
the luggage compartment and there are two
hooks on the right and left of the lower D-
pillar, e.g. for tension belts. :
Bag hook (D-pillar) Coat hooks on the tailgate
G
Risk of injury
The tailgate may close if too great a load is
placed on the coat hooks.
This could cause you or others to be trapped
and injured.
If you use the coat hooks, only hang light
clothing on them. Make sure that nobody can
become trapped. :
Coat hooks Stowage well under the luggage com-
partment floor
G
Risk of injury
Never drive with the luggage compartment
floor open.
Otherwise, you and other vehicle occupants
could be injured by objects being thrown 136 Loading and stowingCont
rols
X204_AKB; 1; 5, en-GB
wobuchh, Version: 2.11.4 2008-10-15T13:20:56+02:00 - Seite 136Dateiname: 6515_0671_02_buchblock.pdf; preflight
Page 140 of 261
around the vehicle in the event of sharp brak-
ing, a sudden change in direction or an acci-
dent.
The safety net*, the ball coupling *, the col-
lapsible spare tyre* etc. are stowed beneath
the luggage compartment floor. X
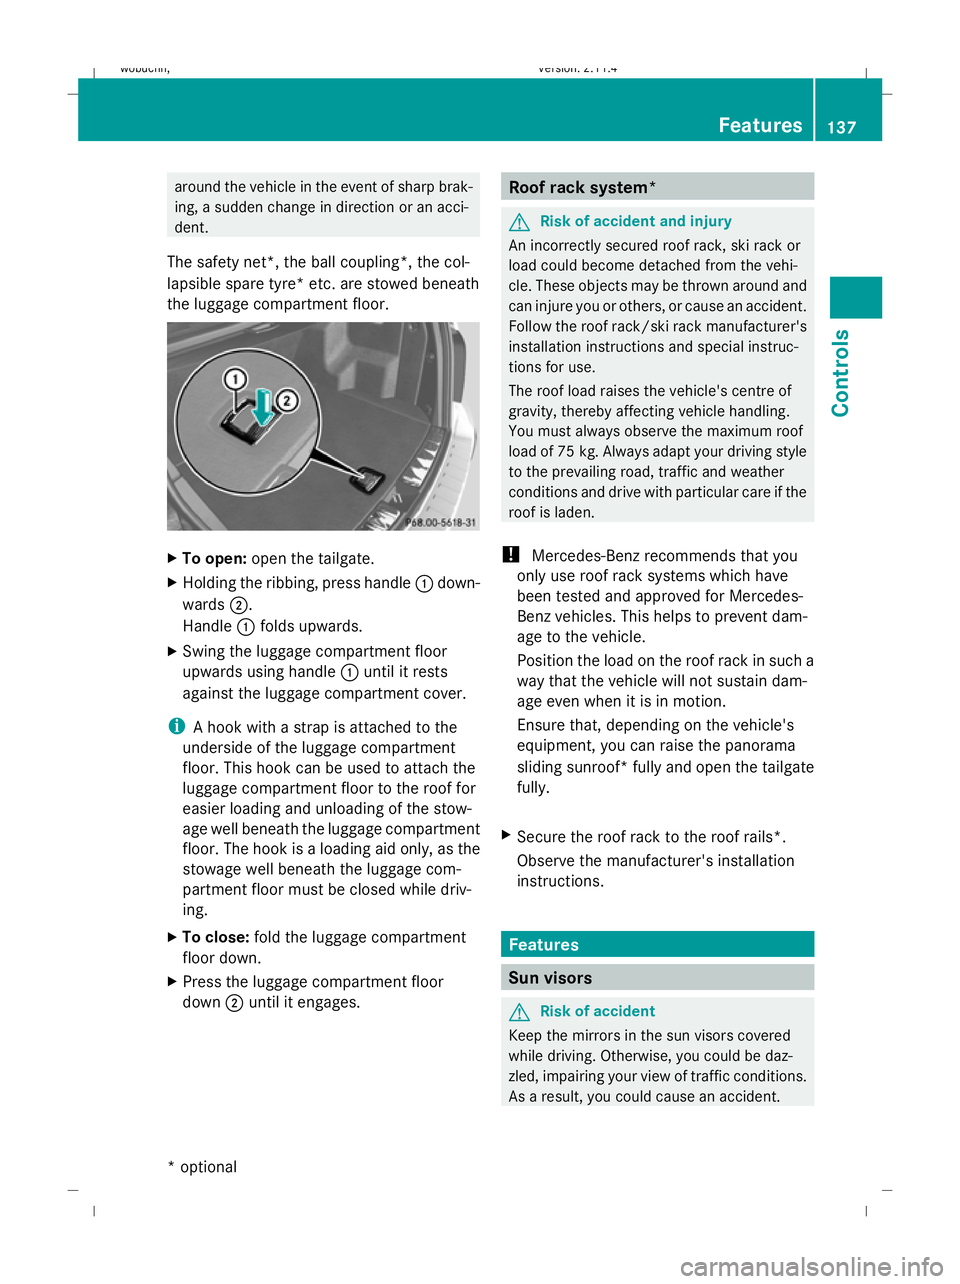
To open: open the tailgate.
X Holding the ribbing, press handle :down-
wards ;.
Handle :folds upwards.
X Swing the luggage compartment floor
upwards using handle :until it rests
against the luggage compartment cover.
i A hook with a strap is attached to the
underside of the luggage compartment
floor. This hook can be used to attach the
luggage compartment floor to the roof for
easier loading and unloading of the stow-
age well beneath the luggage compartment
floor. The hook is a loading aid only, as the
stowage well beneath the luggage com-
partment floor must be closed while driv-
ing.
X To close: fold the luggage compartment
floor down.
X Press the luggage compartment floor
down ;until it engages. Roof rack system*
G
Risk of accident and injury
An incorrectly secured roof rack, ski rack or
load could become detached from the vehi-
cle. These objects may be thrown around and
can injure you or others, or cause an accident.
Follow the roof rack/ski rack manufacturer's
installation instructions and special instruc-
tions for use.
The roof load raises the vehicle's centre of
gravity, thereby affecting vehicle handling.
You must always observe the maximum roof
load of 75 kg. Always adapt your driving style
to the prevailing road, traffic and weather
conditions and drive with particular care if the
roof is laden.
! Mercedes-Benz recommends that you
only use roof rack systems which have
been tested and approved for Mercedes-
Benz vehicles. This helps to prevent dam-
age to the vehicle.
Position the load on the roof rack in such a
way that the vehicle will not sustain dam-
age even when it is in motion.
Ensure that, depending on the vehicle's
equipment, you can raise the panorama
sliding sunroof* fully and open the tailgate
fully.
X Secure the roof rack to the roof rails*.
Observe the manufacturer's installation
instructions. Features
Sun visors
G
Risk of accident
Keep the mirrors in the sun visors covered
while driving. Otherwise, you could be daz-
zled, impairing your view of traffic conditions.
As a result, you could cause an accident. Features
137Controls
* optional
X204_AKB; 1; 5, en-GB
wobuchh, Version: 2.11.4 2008-10-15T13:20:56+02:00 - Seite 137 ZDateiname: 6515_0671_02_buchblock.pdf; preflight
Page 146 of 261
Running-in notes............................... 144
Refuelling ........................................... 144
Engine compartment ........................146
Tyres and wheels .............................. 150
Winter driving ................................... 155
Driving tips ........................................ 156
Off-road driving ................................. 158
Driving abroad ................................... 162
Trailer towing* .................................. 162
Service ............................................... 167
Care .................................................... 167
143
Operation
X204_AKB; 1; 5, en-GB
wobuchh, Version: 2.11.4
2008-10-15T13:20:56+02:00 - Seite 143 Dateiname: 6515_0671_02_buchblock.pdf; preflight
Page 156 of 261
H
Environmental note
Check the tyre pressure regularly, at least
every 14 days. Tyre pressure loss warning
While the vehicle is in motion, the tyre pres-
sure loss warning system monitors the set
tyre pressure using the rotational speed of
the wheels. This enables the system to detect
significant pressure loss in a tyre. If the speed
of rotation of a wheel changes as a result of
a loss of pressure, a corresponding warning
message will appear in the multi-function dis-
play. G
Risk of accident
The tyre pressure loss warning system does
not warn you of an incorrectly set tyre pres-
sure. The table on the inside of the fuel filler
flap will help you decide whether the tyre
pressures should be corrected.
The tyre pressure loss warning system does
not replace the need to regularly check your
vehicle's tyre pressures, since an even loss of
pressure on several tyres at the same time
cannot be detected by the tyre pressure loss
warning system.
The tyre pressure monitor is not able to warn
you of a sudden loss of pressure, e.g. if the
tyre is penetrated by a foreign object.
In the event of a sudden loss of pressure, bring
the vehicle to a halt by braking carefully. Do
not make any sudden steering movements
when doing so.
The function of the tyre pressure loss warning
system is limited or delayed if:
R snow chains are fitted to your vehicle's
tyres
R road conditions are wintry
R you are driving on sand or gravel R
you adopt a very sporty driving style (cor-
nering at high speeds or driving with high
rates of acceleration)
R you are towing a very heavy or large trailer
R you are driving with a heavy load (in the
vehicle or on the roof)
Restarting the tyre pressure loss warn-
ing system Restart the tyre pressure loss warning system
if you have:
R
changed the tyre pressure
R changed the wheels or tyres
R fitted new wheels or tyres
X Before restarting, consult the table of tyre
pressures on the inside of the fuel filler flap
to ensure that the tyre pressure in all four
tyres is set correctly for the operating con-
ditions concerned.
X Also observe the notes in the section on
tyre pressures ( Ypage 152). G
Risk of accident
The tyre pressure loss warning system can
only give reliable warnings if you have set the
correct tyre pressure.
If an incorrect tyre pressure is set, these
incorrect values will be monitored.
A tyre with insufficient pressure results in
vehicle instability when driving, thus increas-
ing the risk of an accident.
Configuring using the multi-function
steering wheel
X Make sure that the key is in position 2in
the ignition lock.
X Press èto select Tyre pressure
menu: R.
X Press the íbutton.
The following appears in the multi-function
display: RFI active Reactivate: R
X Press the íbutton.
The following appears in the multi-function
display: Tyre press. OK? Tyres and wheels
153Operation
X204_AKB; 1; 5, en-GB
wobuchh, Version: 2.11.4 2008-10-15T13:20:56+02:00 - Seite 153 ZDateiname: 6515_0671_02_buchblock.pdf; preflight
Page 159 of 261
wheels to spin in a controlled manner, ach-
ieving an increased driving force (cutting
action). Winter driving
G
Risk of accident
Do not shift down for additional engine brak-
ing on a slippery road surface. This could
cause the drive wheels to lose their grip and
the vehicle could skid.
You should drive particularly carefully on slip-
pery road surfaces. Avoid sudden accelera-
tion, steering and braking manoeuvres.
If the vehicle threatens to skid or cannot be
stopped when moving at low speed:
X Shift the selector lever to N.
X Try to bring the vehicle under control by
using corrective steering. Driving tips
Rolling with the engine switched off
G
Risk of accident
Never switch the engine off while the vehicle
is in motion.
There is no power assistance for the steering
and the service brake when the engine is not
running.
You will require considerably more effort to
steer and brake and you could therefore lose
control of the vehicle and cause an accident. Braking
G
Risk of accident
Do not change down for additional engine
braking on a slippery road surface. This could
cause the drive wheels to lose their grip and
the vehicle could skid. G
Risk of accident
Make sure that other road users are not
endangered by your braking.
Downhill gradients On long and steep downhill gradients, espe-
cially if the vehicle is laden or towing a trailer,
you must select shift range
1,2or3 in good
time.
i This also applies if you have activated
cruise control* or Speedtronic*.
This will use the braking effect of the engine,
so less braking will be required to maintain
the speed. This relieves the load on the brake
system and prevents the brakes from over-
heating and wearing too quickly. If you need
additional braking, depress the brake pedal
repeatedly rather than continuously.
Heavy and light loads If the brakes have been subjected to a heavy
load, do not stop the vehicle immediately, but
drive on for a short while. This allows the air-
flow to cool the brakes more quickly.
G
Risk of accident
Never depress the brake pedal continuously
while the vehicle is in motion, e.g. never cause
the brakes to rub by applying constant slight
pedal pressure. This causes the brake system
to overheat, increases the braking distance
and can lead to the brakes failing completely.
If the brakes have been used only moderately,
you should occasionally test their effective-
ness. To do this, brake more firmly from a
higher speed. This improves the grip of the
brakes.
Wet roads If driving in heavy rain for a prolonged period
of time without braking, there may be a
delayed reaction from the brakes when brak-
ing for the first time. You must brake harder. 156 Driving tipsOperation
* optional
X204_AKB; 1; 5, en-GB
wobuchh,
Version: 2.11.4 2008-10-15T13:20:56+02:00 - Seite 156Dateiname: 6515_0671_02_buchblock.pdf; preflight
Page 161 of 261
waves. This may cause the maximum per-
missible water depth to be exceeded.
Failure to observe these notes may result
in damage to the engine, electrical systems
and transmission. Off-road driving
Points to remember
Off-road driving is only possible when the off-
road engineering package* ( Ypage 107) is
fitted. G
Risk of accident
Drive slowly in rough terrain with which you
are unfamiliar. This will allow you to detect
unexpected obstacles more easily and, there-
fore, to reduce the risk of an accident.
Do not make U-turns on mountain roads. Oth-
erwise, the vehicle could tip over. If a slope is
too steep for the vehicle, drive back in reverse
gear.
Do not drive at an angle up steep inclines.
Otherwise, the vehicle could tip over. If you
drive up a steep incline at an angle and the
vehicle threatens to overturn, steer into the
line of fall immediately.
Never allow the vehicle to roll backwards. The
braking effect of the engine cannot be utilised
in neutral. If you only use the service brake,
you could lose control of the vehicle. G
Risk of accident
Grains of sand, particles of dirt and other
abrasive materials can enter the brake sys-
tem. This can lead to excessive wear and
unpredictable braking efficiency.
After the brakes have been exposed to dirty
conditions, have them checked and cleaned
at a qualified specialist workshop, e.g. a
Mercedes-Benz Service Centre. Otherwise,
there is a risk that braking power may be
insufficient in the event of an emergency, or
that braking efficiency may be unpredictable. Read this section before driving your vehicle
off-road. Practise by travelling over more gen-
tle off-road terrain first.
The following driving systems are specially
adapted to off-road driving:
R
Off-road drive program* (Y page 107)
R Off-road ABS (Y page 51)
R Off-road 4-ETS (Y page 53)
R Off-road ESP ®
(Y page 54)
R DSR (Downhill Speed Regulation)
(Y page 105) Off-road driving
G
Risk of accident
Damage to the vehicle creates the risk of an
accident for yourself and other road users. If
in doubt, have your vehicle checked at a quali-
fied specialist workshop which has the nec-
essary specialist knowledge and tools to carry
out the work required. Mercedes-Benz rec-
ommends that you use a Mercedes-Benz
Service Centre for this purpose. H
Environmental note
Protection of the environment is of primary
importance. Treat nature with respect.
Observe all prohibiting signs.
General information R
Stop your vehicle and, if necessary, select
the off-road drive program* (Y page 107)
before driving off-road.
R suitable for the off-road terrain. Make sure
there is always sufficient ground clearance
to prevent damage to the vehicle.
R Check that items of luggage and loads are
stowed safely and are well secured
(Y page 133).
R Always keep the engine running and in gear
when driving on a downhill gradient. Acti-
vate DSR. 158 Off-road drivingOperation
* optional
X204_AKB; 1; 5, en-GB
wobuchh,
Version: 2.11.4 2008-10-15T13:20:56+02:00 - Seite 158Dateiname: 6515_0671_02_buchblock.pdf; preflight
Page 162 of 261
R
Drive slowly and evenly, if necessary at a
walking pace.
R Ensure that the wheels are in contact with
the ground at all times.
R Drive with extreme care on unknown off-
road routes where visibility is poor. For
safety reasons, get out of the vehicle first
and survey the off-road route.
R Check the depth of water before fording
rivers and streams.
R Look out for obstacles such as rocks, holes,
tree stumps and furrows.
R Always keep the side windows and the pan-
orama sliding sunroof* closed during the
journey.
R Do not stray from marked routes or paths.
i Information about retrofitting special all-
terrain tyres is available from any
Mercedes-Benz Service Centre.
Checklist before driving off-road X
Engine oil level: check the engine oil and
top it up if necessary.
X Vehicle toolkit: check that the jack is
working and make sure you have the wheel-
brace, a robust tow cable and a folding
spade in the vehicle.
X Wheels and tyres: check the tyre tread
depth and tyre pressure.
X Check for damage and remove foreign
objects, e.g. small stones, from the
wheels/tyres.
X Replace any missing valve caps.
X Replace dented or damaged wheels.
Checklist after driving off-road Driving over rough terrain places greater
demands on your vehicle than driving on nor-
mal roads. After driving off-road, check the
vehicle. This allows you to detect damage
promptly and reduce the risk of an accident
to yourself and other road users. X
Deactivate DSR ( Ypage 105).
X Clean the headlamps and rear lights and
check for damage.
X Clean the front and rear licence plates.
X Clean the wheels/tyres with a water jet and
remove any foreign objects.
X Clean the wheels, wheel arches and the
vehicle underside with a water jet; check
for foreign objects and damage.
X Check whether twigs or other parts of
plants have become trapped. These
increase the risk of fire and can damage
fuel pipes, brake hoses or the rubber bel-
lows of the axle joints and propeller shafts.
X After the trip, examine without fail the
entire undercarriage, wheels, tyres, brakes,
bodywork structure, steering, chassis and
exhaust system for damage.
X After driving for extended periods across
sand, mud, gravel, water or in similarly dirty
conditions, have the brake discs, wheels,
brake pads /linings and axle joints checked
and cleaned.
X If you detect strong vibrations after off-road
travel, check for foreign objects in the
wheels and drive train and remove them if
necessary. Foreign objects can disturb the
balance and cause vibrations. Travelling uphill
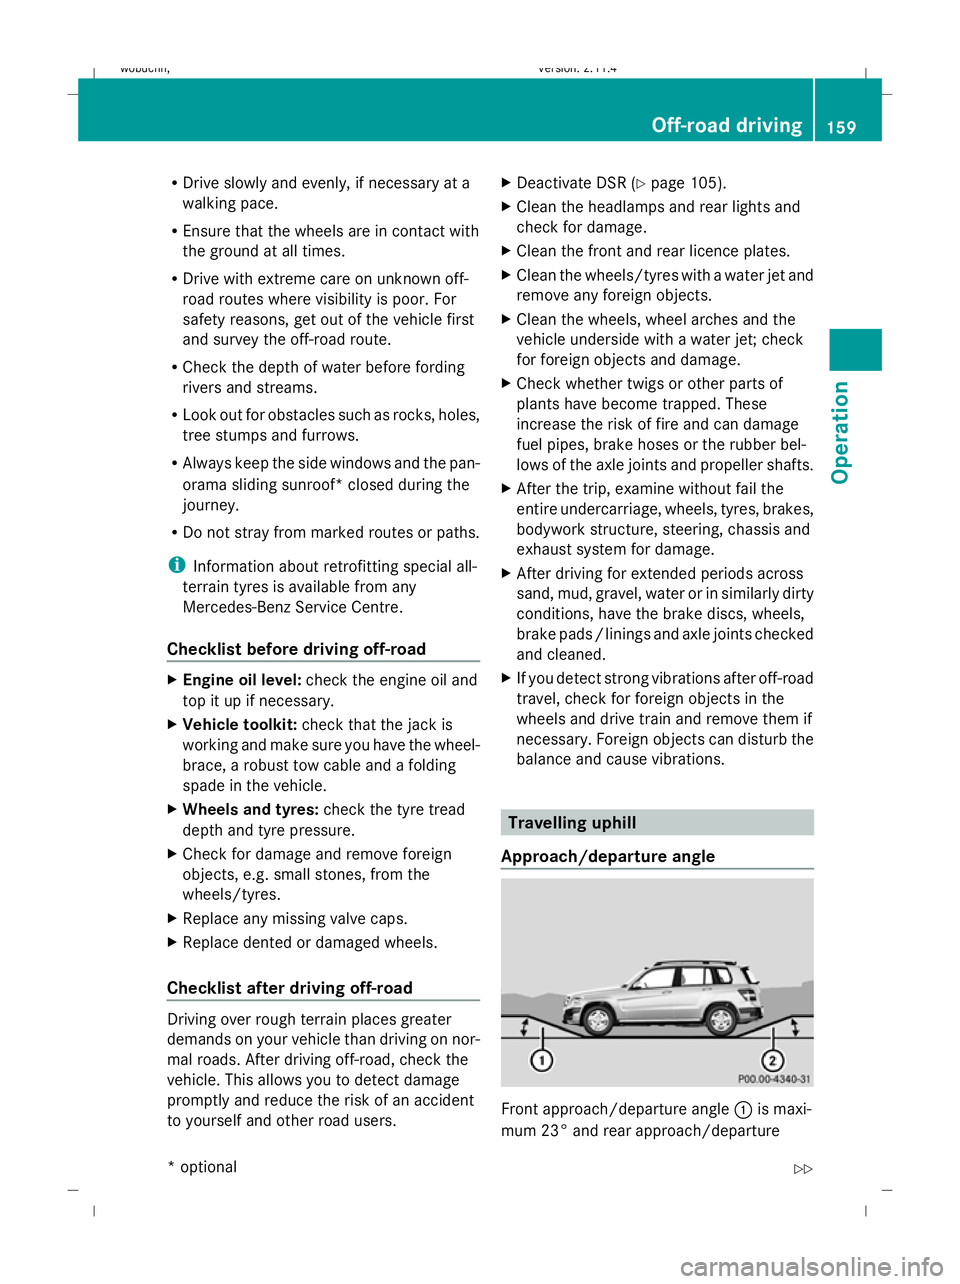
Approach/departure angle Front approach/departure angle
:is maxi-
mum 23° and rear approach/departure Off-road driving
159Operation
* optional
X204_AKB; 1; 5, en-GB
wobuchh,
Version: 2.11.4 2008-10-15T13:20:56+02:00 - Seite 159 ZDateiname: 6515_0671_02_buchblock.pdf; preflight
Page 165 of 261
Ruts
Observe the following rules when driving
along ruts in off-road terrain or on roads with
loose gravel:
! Check that the ruts are not too deep and
that your vehicle has sufficient clearance.
Otherwise, your vehicle could be damaged
or bottom out and get stuck.
R Select the off-road drive program*
(Y page 107).
R Avoid high engine speeds.
R Select shift range 1.
R Drive slowly.
R Where ruts are too deep, drive with the
wheels on one side on the middle section
of turf if possible. Driving abroad
Points to remember
An extensive Mercedes-Benz Service network
is also available in other countries. The
Service Hotline's current telephone numbers
for use when you are abroad are to be found
in the "Service24h" chapter of the Service
Booklet.
Only low-octane fuel is available in certain
countries.
You can find further information about fuel
grades on (Y page 144). Symmetrical dipped beam
If your journey takes you to countries where
vehicles are driven on sides of the road oppo-
site to the country in which the vehicle is reg-
istered, your headlamps must be switched to
symmetrical dipped beam. Oncoming traffic
will be dazzled less.
X Have the headlamps switched over at a
qualified specialist workshop, e. g. a
Mercedes-Benz Service Centre. G
Risk of accident
Remember to set the headlamps back to
asymmetrical dipped beam when you return
to driving on the same side of the road as that
of the country in which your vehicle was reg-
istered. You may otherwise dazzle the oncom-
ing traffic and could cause an accident. Trailer towing*
Fitting the ball coupling
X Make a note of the ball coupling key num-
ber.
i You can use this number to obtain a
replacement key from a Mercedes-Benz
Service Centre. G
Risk of injury
If the ball coupling does not engage correctly
when it is mounted, the vehicle/trailer com-
bination is not secured and the trailer could
come loose. This could cause an accident. Fit
the ball coupling carefully and make sure that
it engages in position correctly.
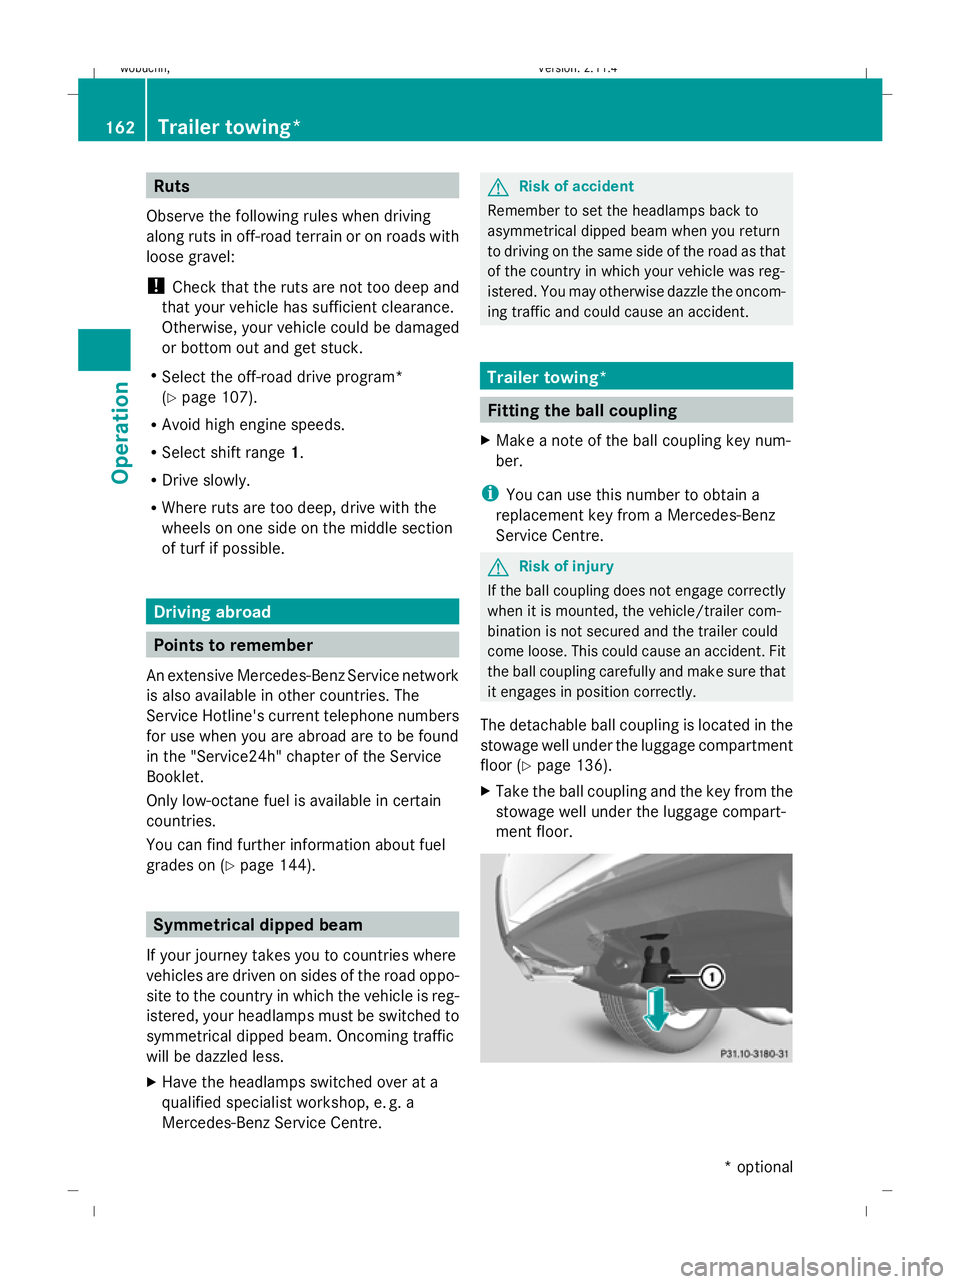
The detachable ball coupling is located in the
stowage well under the luggage compartment
floor (Y page 136).
X Take the ball coupling and the key from the
stowage well under the luggage compart-
ment floor. 162
Trailer towing*Operation
* optional
X204_AKB; 1; 5, en-GB
wobuchh,
Version: 2.11.4 2008-10-15T13:20:56+02:00 - Seite 162Dateiname: 6515_0671_02_buchblock.pdf; preflight