2008 MERCEDES-BENZ GLK SUV tow
[x] Cancel search: towPage 117 of 261
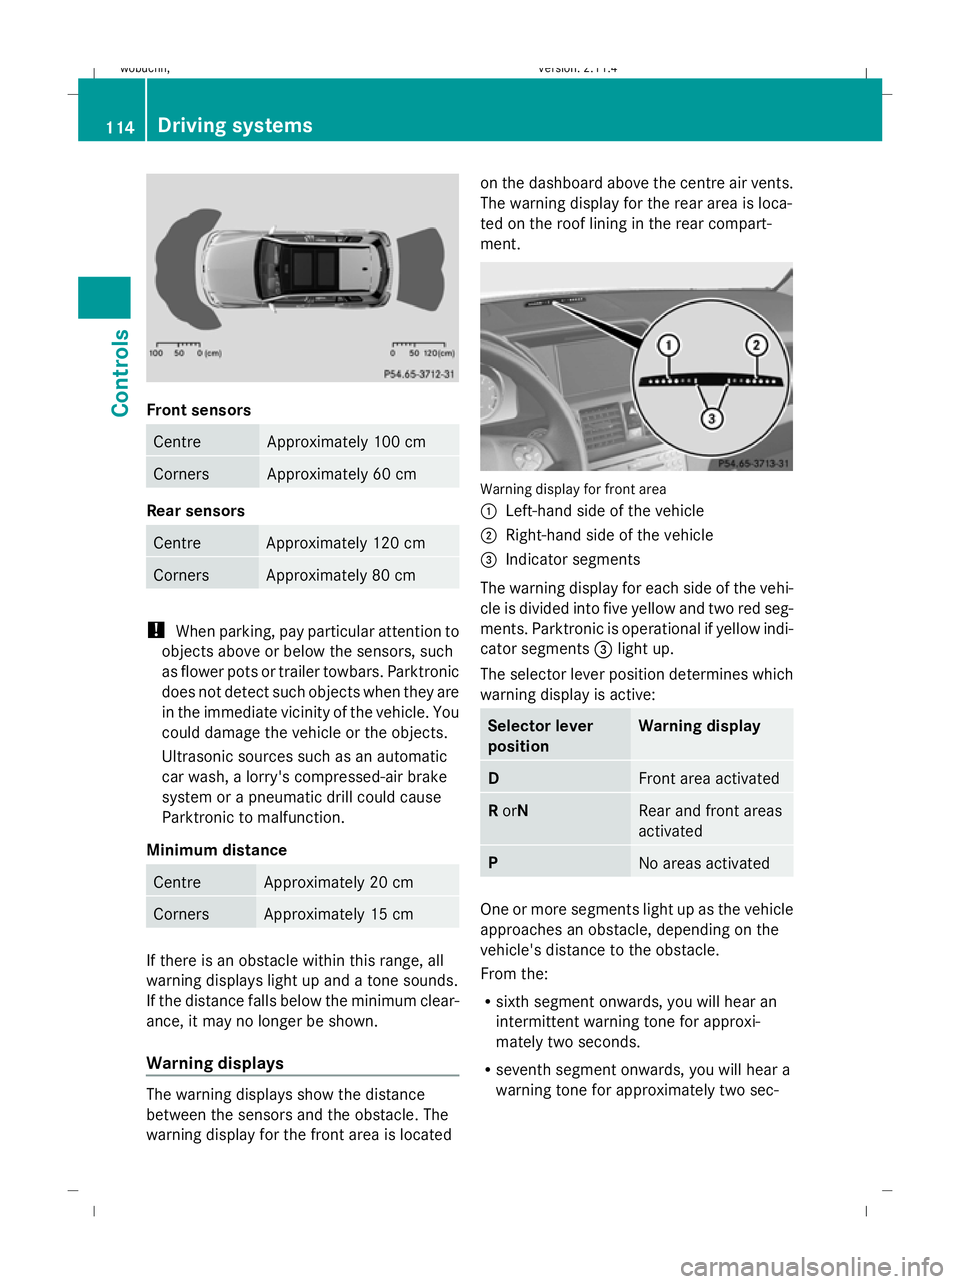
Front sensors
Centre Approximately 100 cm
Corners Approximately 60 cm
Rear sensors
Centre Approximately 120 cm
Corners Approximately 80 cm
!
When parking, pay particular attention to
objects above or below the sensors, such
as flower pots or trailer towbars. Parktronic
does not detect such objects when they are
in the immediate vicinity of the vehicle. You
could damage the vehicle or the objects.
Ultrasonic sources such as an automatic
car wash, a lorry's compressed-air brake
system or a pneumatic drill could cause
Parktronic to malfunction.
Minimum distance Centre Approximately 20 cm
Corners Approximately 15 cm
If there is an obstacle within this range, all
warning displays light up and a tone sounds.
If the distance falls below the minimum clear-
ance, it may no longer be shown.
Warning displays The warning displays show the distance
between the sensors and the obstacle. The
warning display for the front area is located on the dashboard above the centre air vents.
The warning display for the rear area is loca-
ted on the roof lining in the rear compart-
ment.
Warning display for front area
:
Left-hand side of the vehicle
; Right-hand side of the vehicle
= Indicator segments
The warning display for each side of the vehi-
cle is divided into five yellow and two red seg-
ments. Parktronic is operational if yellow indi-
cator segments =light up.
The selector lever position determines which
warning display is active: Selector lever
position Warning display
D
Front area activated
R
orN Rear and front areas
activated
P
No areas activated
One or more segments light up as the vehicle
approaches an obstacle, depending on the
vehicle's distance to the obstacle.
From the:
R
sixth segment onwards, you will hear an
intermittent warning tone for approxi-
mately two seconds.
R seventh segment onwards, you will hear a
warning tone for approximately two sec- 114 Driving systemsControls
X204_AKB; 1; 5, en-GB
wobuchh,
Version: 2.11.4 2008-10-15T13:20:56+02:00 - Seite 114Dateiname: 6515_0671_02_buchblock.pdf; preflight
Page 118 of 261
onds. You have reached the minimum dis-
tance.
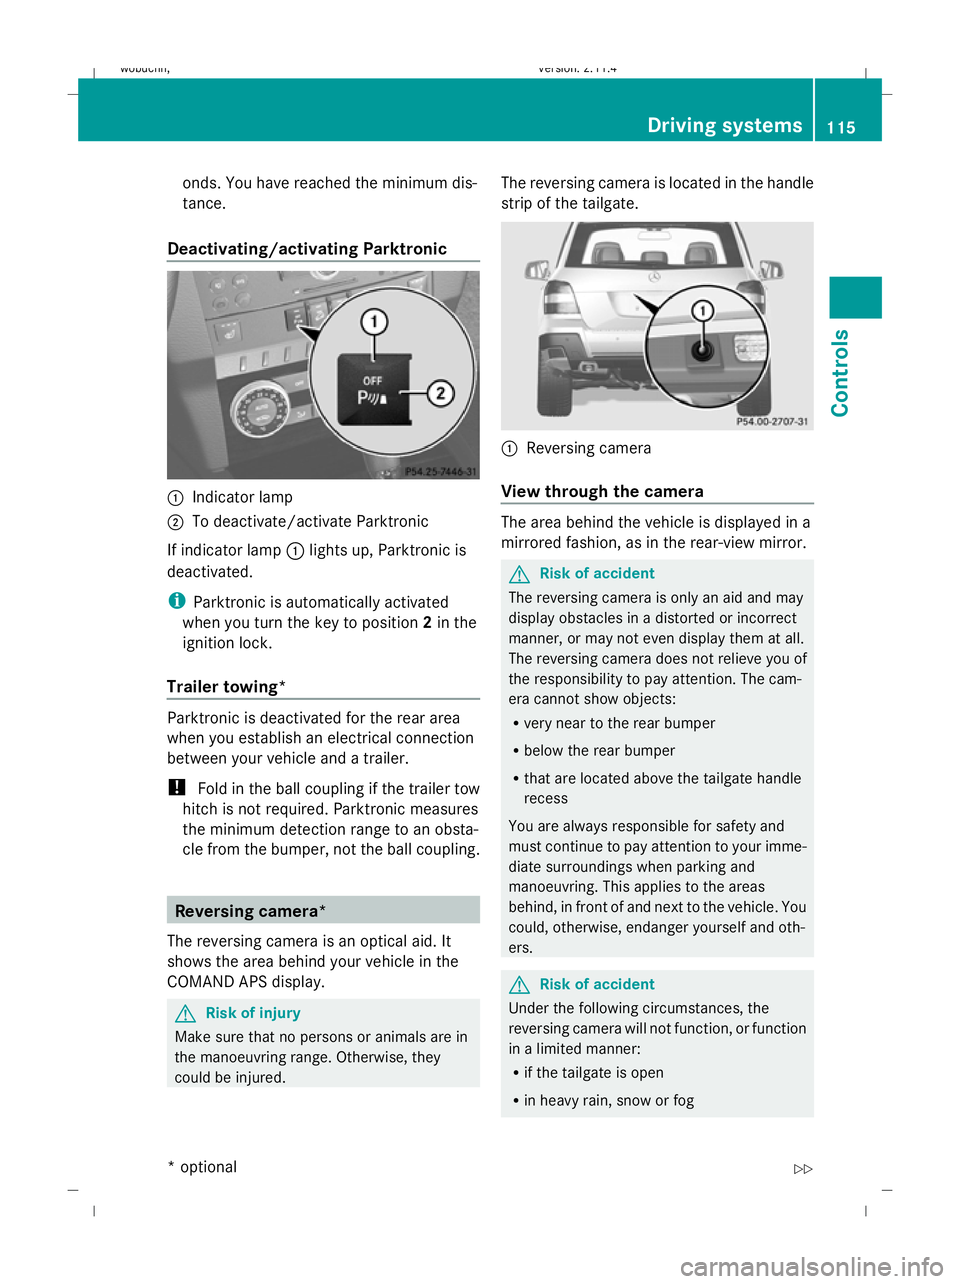
Deactivating/activating Parktronic :
Indicator lamp
; To deactivate/activate Parktronic
If indicator lamp :lights up, Parktronic is
deactivated.
i Parktronic is automatically activated
when you turn the key to position 2in the
ignition lock.
Trailer towing* Parktronic is deactivated for the rear area
when you establish an electrical connection
between your vehicle and a trailer.
! Fold in the ball coupling if the trailer tow
hitch is not required. Parktronic measures
the minimum detection range to an obsta-
cle from the bumper, not the ball coupling. Reversing camera*
The reversing camera is an optical aid. It
shows the area behind your vehicle in the
COMAND APS display. G
Risk of injury
Make sure that no persons or animals are in
the manoeuvring range. Otherwise, they
could be injured. The reversing camera is located in the handle
strip of the tailgate. :
Reversing camera
View through the camera The area behind the vehicle is displayed in a
mirrored fashion, as in the rear-view mirror.
G
Risk of accident
The reversing camera is only an aid and may
display obstacles in a distorted or incorrect
manner, or may not even display them at all.
The reversing camera does not relieve you of
the responsibility to pay attention. The cam-
era cannot show objects:
R very near to the rear bumper
R below the rear bumper
R that are located above the tailgate handle
recess
You are always responsible for safety and
must continue to pay attention to your imme-
diate surroundings when parking and
manoeuvring. This applies to the areas
behind, in front of and next to the vehicle. You
could, otherwise, endanger yourself and oth-
ers. G
Risk of accident
Under the following circumstances, the
reversing camera will not function, or function
in a limited manner:
R if the tailgate is open
R in heavy rain, snow or fog Driving systems
115Controls
* optional
X204_AKB; 1; 5, en-GB
wobuchh,
Version: 2.11.4 2008-10-15T13:20:56+02:00 - Seite 115 ZDateiname: 6515_0671_02_buchblock.pdf; preflight
Page 132 of 261
ing process is started in the corresponding
direction. You can stop automatic opera-
tion by pressing again.
Resetting the panorama sliding sunroof
and the roller sunblinds Reset the panorama sliding sunroof and the
roller sunblinds if the panorama sliding sun-
roof or the roller sunblinds do not open
smoothly.
X Turn the key to position 1or 2in the ignition
lock.
X Pull the switch to the point of resistance in
the direction of arrow ;until the roller
sunblinds are fully closed.
X Keep the switch pulled for an additional
second.
X Press the switch to the point of resistance
in the direction of arrow :and hold it until
the roller sunblinds are fully open.
X Press the switch to the point of resistance
in the direction of arrow :and hold it until
the panorama sliding sunroof has opened
about 10 cm.
X Pull the switch repeatedly to the point of
resistance in the direction of arrow ;until
the panorama sliding sunroof is fully
closed.
X Keep the switch pulled for an additional
second.
X Check whether the panorama sliding sun-
roof can be opened fully again
(Y page 127).
X If this is not the case, consult a qualified
specialist workshop. Loading and stowing
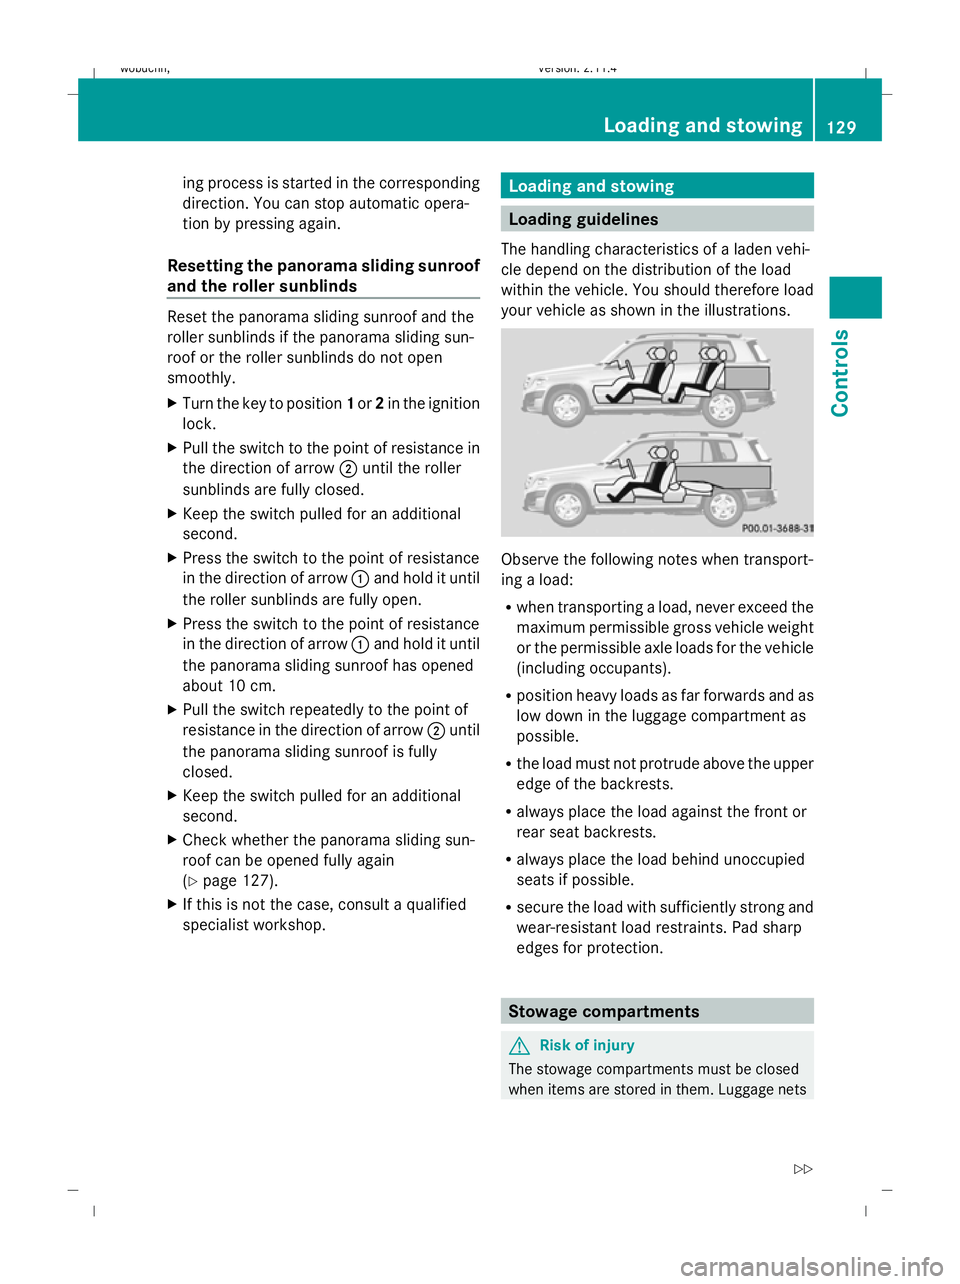
Loading guidelines
The handling characteristics of a laden vehi-
cle depend on the distribution of the load
within the vehicle. You should therefore load
your vehicle as shown in the illustrations. Observe the following notes when transport-
ing a load:
R
when transporting a load, never exceed the
maximum permissible gross vehicle weight
or the permissible axle loads for the vehicle
(including occupants).
R position heavy loads as far forwards and as
low down in the luggage compartment as
possible.
R the load must not protrude above the upper
edge of the backrests.
R always place the load against the front or
rear seat backrests.
R always place the load behind unoccupied
seats if possible.
R secure the load with sufficiently strong and
wear-resistant load restraints. Pad sharp
edges for protection. Stowage compartments
G
Risk of injury
The stowage compartments must be closed
when items are stored in them. Luggage nets Loading and stowing
129Controls
X204_AKB; 1; 5, en-GB
wobuchh, Version: 2.11.4 2008-10-15T13:20:56+02:00 - Seite 129 ZDateiname: 6515_0671_02_buchblock.pdf; preflight
Page 133 of 261
are not designed to secure heavy items of
luggage.
You or other vehicle occupants could be
injured by objects being thrown around if you:
R brake sharply
R change direction suddenly
R are involved in an accident
Sharp-edged and fragile objects must not be
placed in the luggage net.
Do not place hard objects in the map pockets.
Objects must not protrude from the map
pockets.
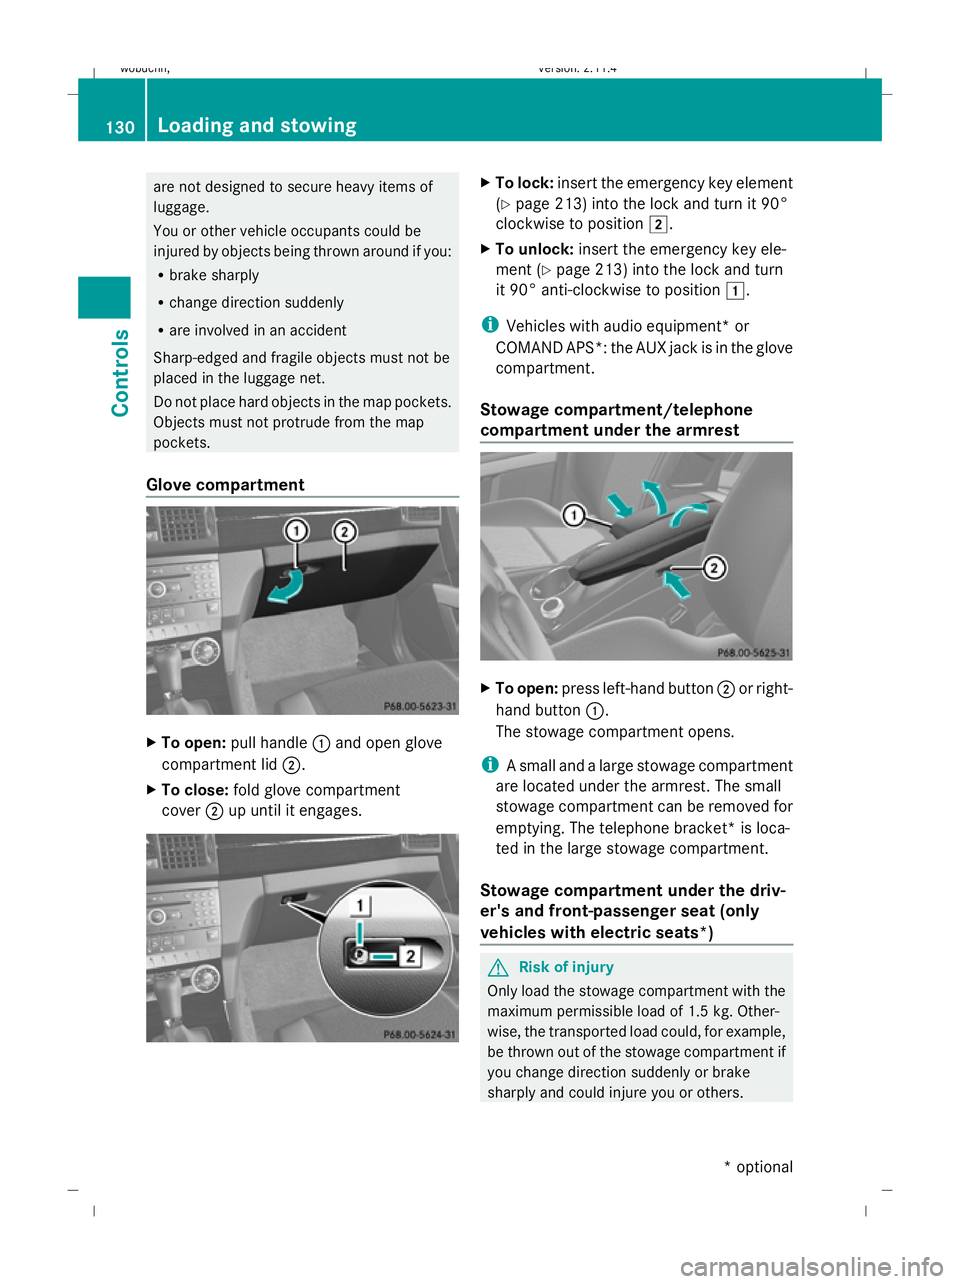
Glove compartment X
To open: pull handle :and open glove
compartment lid ;.
X To close: fold glove compartment
cover ;up until it engages. X
To lock: insert the emergency key element
(Y page 213) into the lock and turn it 90°
clockwise to position 2.
X To unlock: insert the emergency key ele-
ment (Y page 213) into the lock and turn
it 90° anti-clockwise to position 1.
i Vehicles with audio equipment *or
COMAND APS*: the AUX jack is in the glove
compartment.
Stowage compartment/telephone
compartment under the armrest X
To open: press left-hand button ;or right-
hand button :.
The stowage compartment opens.
i A small and a large stowage compartment
are located under the armrest. The small
stowage compartment can be removed for
emptying. The telephone bracket* is loca-
ted in the large stowage compartment.
Stowage compartment under the driv-
er's and front-passenger seat (only
vehicles with electric seats*) G
Risk of injury
Only load the stowage compartment with the
maximum permissible load of 1.5 kg. Other-
wise, the transported load could, for example,
be thrown out of the stowage compartment if
you change direction suddenly or brake
sharply and could injure you or others. 130 Loading and stowingControls
* optional
X204_AKB; 1; 5, en-GB
wobuchh,
Version: 2.11.4 2008-10-15T13:20:56+02:00 - Seite 130Dateiname: 6515_0671_02_buchblock.pdf; preflight
Page 134 of 261
X
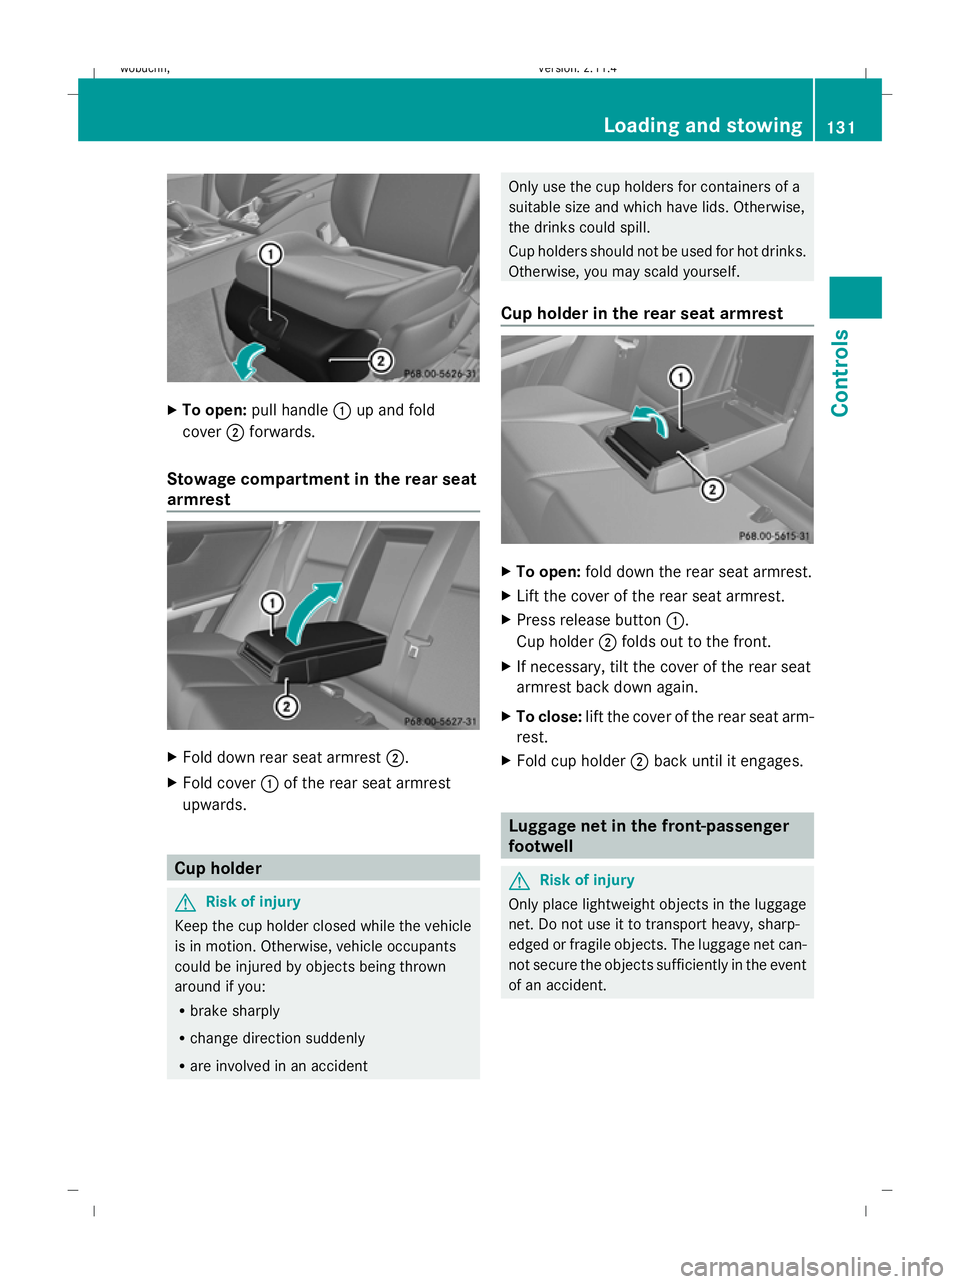
To open: pull handle :up and fold
cover ;forwards.
Stowage compartment in the rear seat
armrest X
Fold down rear seat armrest ;.
X Fold cover :of the rear seat armrest
upwards. Cup holder
G
Risk of injury
Keep the cup holder closed while the vehicle
is in motion. Otherwise, vehicle occupants
could be injured by objects being thrown
around if you:
R brake sharply
R change direction suddenly
R are involved in an accident Only use the cup holders for containers of a
suitable size and which have lids. Otherwise,
the drinks could spill.
Cup holders should not be used for hot drinks.
Otherwise, you may scald yourself.
Cup holder in the rear seat armrest X
To open: fold down the rear seat armrest.
X Lift the cover of the rear seat armrest.
X Press release button :.
Cup holder ;folds out to the front.
X If necessary, tilt the cover of the rear seat
armrest back down again.
X To close: lift the cover of the rear seat arm-
rest.
X Fold cup holder ;back until it engages. Luggage net in the front-passenger
footwell
G
Risk of injury
Only place lightweight objects in the luggage
net. Do not use it to transport heavy, sharp-
edged or fragile objects. The luggage net can-
not secure the objects sufficiently in the event
of an accident. Loading and stowing
131Controls
X204_AKB; 1; 5, en-GB
wobuchh,V ersion: 2.11.4
2008-10-15T13:20:56+02:00 - Seite 131 ZDateiname: 6515_0671_02_buchblock.pdf; preflight
Page 135 of 261
Enlarging the luggage compartment
The left and right sides of the rear seat back-
rest can be folded down to increase the lug-
gage compartment capacity. G
Risk of injury
Do not carry heavy or hard objects inside the
vehicle or in the luggage compartment unless
they are secured.
Otherwise, you and other vehicle occupants
could be injured by objects being thrown
around the vehicle in the event of sharp brak-
ing, a sudden change in direction or an acci-
dent.
When using the luggage compartment
enlargement, you should always clip in the
safety net*, if at hand. G
Risk of poisoning
Always drive with the tailgate closed. Exhaust
fumes could otherwise enter the vehicle inte-
rior.
Folding the rear seat backrest forwards !
Before folding the rear seat backrest for-
wards, make sure that the head restraints
are pushed in (lowest detent). Otherwise,
the front seats, the armrests and the Rear-
Seat Entertainment System* could be dam-
aged.
X Fully insert the rear seat backrest head
restraints (Y page 64).
X If necessary, move the driver's or front-
passenger seat forward. X
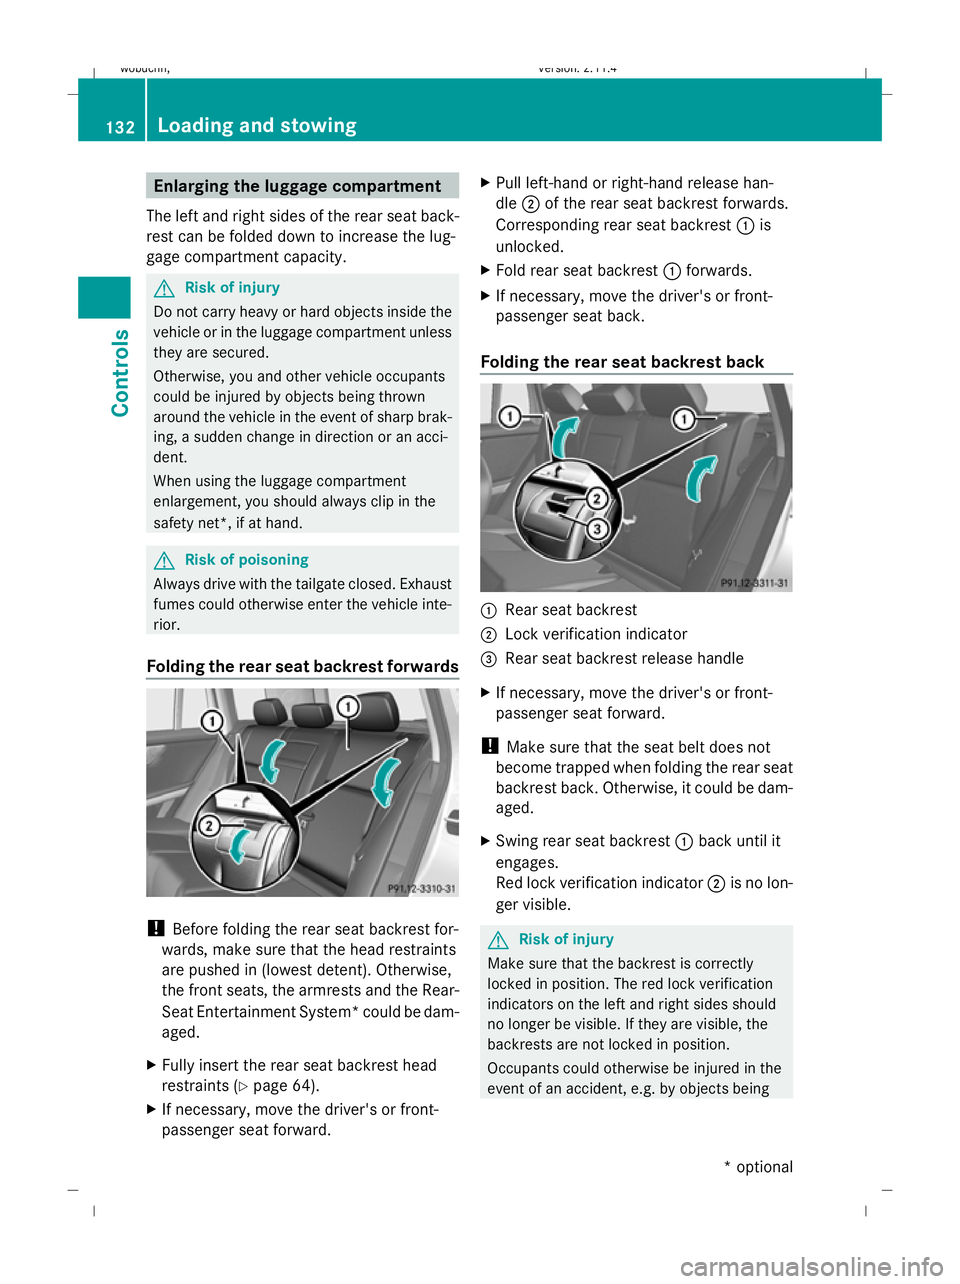
Pull left-hand or right-hand release han-
dle ;of the rear seat backrest forwards.
Corresponding rear seat backrest :is
unlocked.
X Fold rear seat backrest :forwards.
X If necessary, move the driver's or front-
passenger seat back.
Folding the rear seat backrest back :
Rear seat backrest
; Lock verification indicator
= Rear seat backrest release handle
X If necessary, move the driver's or front-
passenger seat forward.
! Make sure that the seat belt does not
become trapped when folding the rear seat
backrest back. Otherwise, it could be dam-
aged.
X Swing rear seat backrest :back until it
engages.
Red lock verification indicator ;is no lon-
ger visible. G
Risk of injury
Make sure that the backrest is correctly
locked in position. The red lock verification
indicators on the left and right sides should
no longer be visible. If they are visible, the
backrests are not locked in position.
Occupants could otherwise be injured in the
event of an accident, e.g. by objects being 132 Loading and stowingControls
* optional
X204_AKB; 1; 5, en-GB
wobuchh,
Version: 2.11.4 2008-10-15T13:20:56+02:00 - Seite 132Dateiname: 6515_0671_02_buchblock.pdf; preflight
Page 136 of 261
thrown forwards through the vehicle interior
from the luggage compartment.
X Adjust the head restraints if necessary
(Y page 64).
X If necessary, move the driver's or front-
passenger seat back. Securing a load
Lashing eyelets G
Risk of injury
Use only the intended lashing eyelets; on no
account should you use the child-seat anchor-
age points on the rear seat backrest.
Distribute the load on the lashing eyelets
evenly.
Otherwise, vehicle occupants could be
injured by objects being thrown around if you:
R brake sharply
R change direction suddenly
R are involved in an accident
Please observe the loading guidelines.
Observe the following points or guidelines
when securing loads:
R secure the load using the lashing eyelets.
R do not use elastic straps or nets to secure
a load, as these are only intended as an
anti-slip protection for light loads.
R do not route lashing materials across sharp
edges or corners.
R Pad sharp edges for protection.
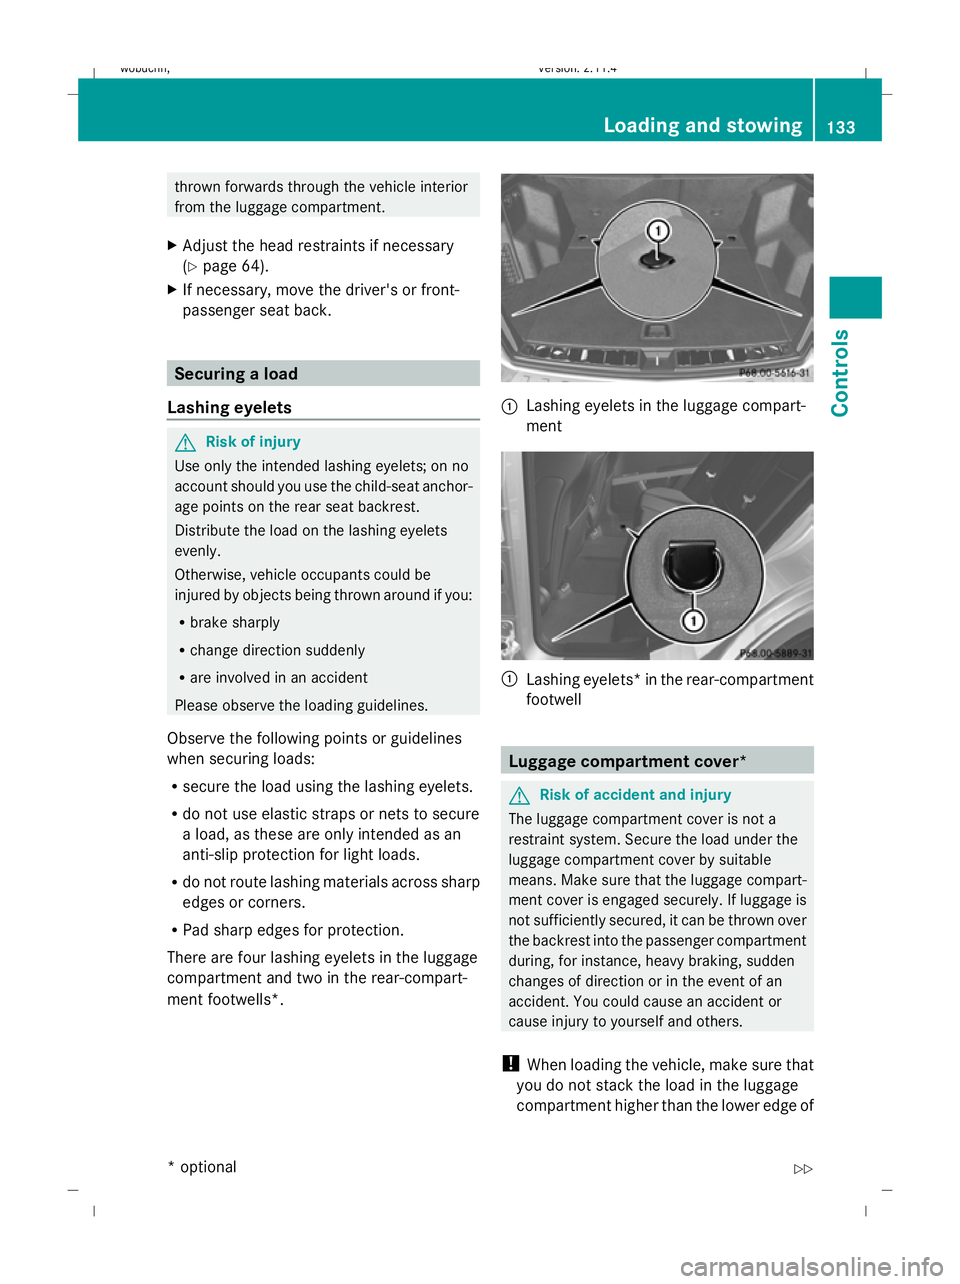
There are four lashing eyelets in the luggage
compartment and two in the rear-compart-
ment footwells*. :
Lashing eyelets in the luggage compart-
ment :
Lashing eyelets *in the rear-compartment
footwell Luggage compartment cover*
G
Risk of accident and injury
The luggage compartment cover is not a
restraint system. Secure the load under the
luggage compartment cover by suitable
means. Make sure that the luggage compart-
ment cover is engaged securely. If luggage is
not sufficiently secured, it can be thrown over
the backrest into the passenger compartment
during, for instance, heavy braking, sudden
changes of direction or in the event of an
accident. You could cause an accident or
cause injury to yourself and others.
! When loading the vehicle, make sure that
you do not stack the load in the luggage
compartment higher than the lower edge of Loading and stowing
133Controls
* optional
X204_AKB; 1; 5, en-GB
wobuchh
,V ersion: 2.11.4
2008-10-15T13:20:56+02:00 - Seite 133 ZDateiname: 6515_0671_02_buchblock.pdf; preflight
Page 138 of 261
lar
: and the lashing eyelets *in the foot-
well of the rear seat (Y page 133) are
required for tightening the net.
You can only use the safety net in position
1 if there are lashing eyelets *in the foot-
well of the rear seat.
R Position 2 behind the rear seat: the
retainers behind C-pillar ;and the lashing
eyelets in the luggage compartment are
required for tightening the net
(Y page 133).
Preparing the safety net The safety net is located in the loading tray in
the stowage well under the luggage compart-
ment floor (Y
page 136).
X Open both Velcro fasteners and remove the
safety net.
X Unroll and unfold the safety net.
The upper and lower guide rods must
engage audibly.
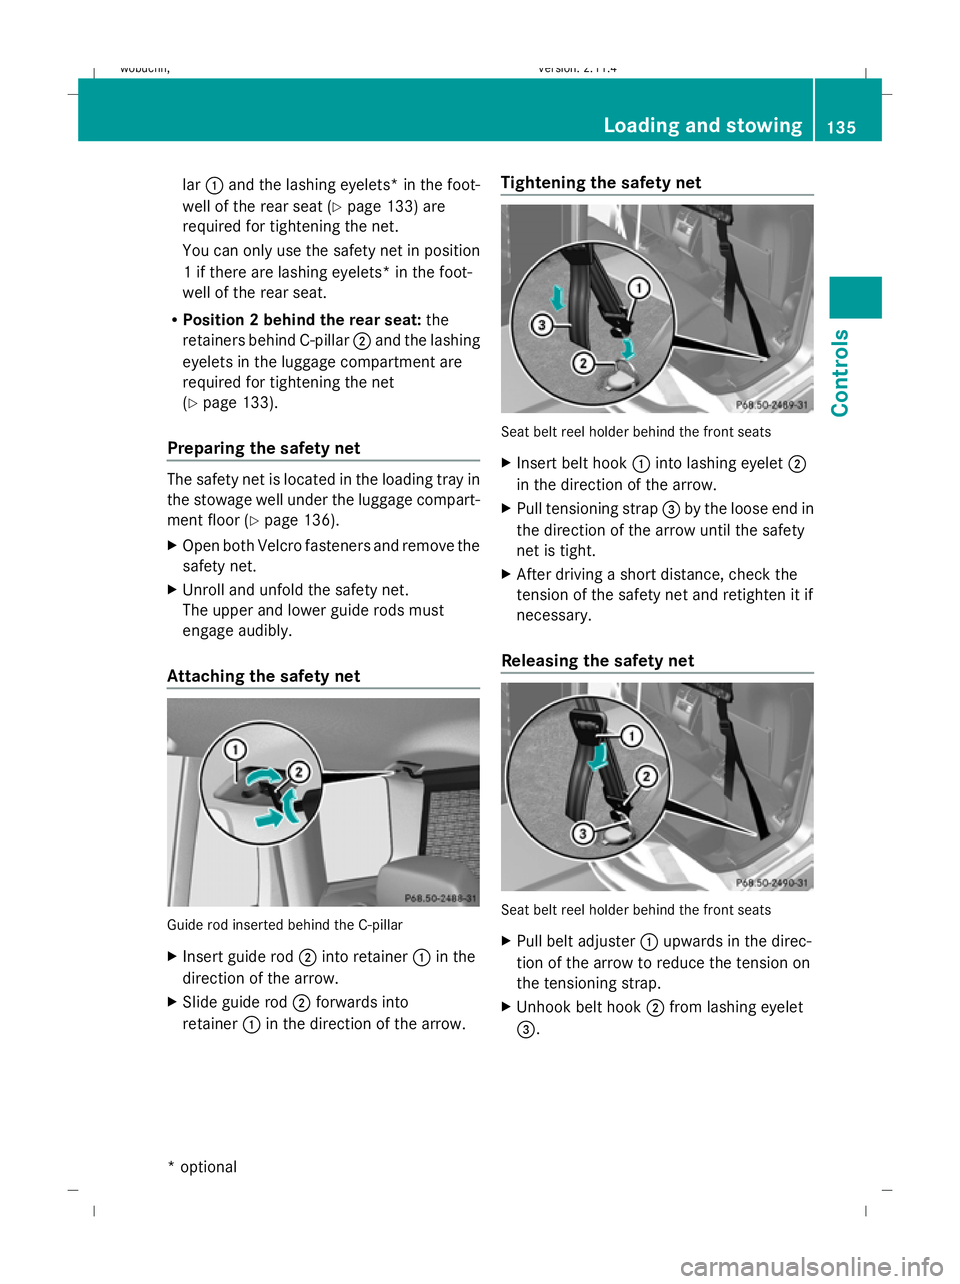
Attaching the safety net Guide rod inserted behind the C-pillar
X
Insert guide rod ;into retainer :in the
direction of the arrow.
X Slide guide rod ;forwards into
retainer :in the direction of the arrow. Tightening the safety net Seat belt reel holder behind the front seats
X
Insert belt hook :into lashing eyelet ;
in the direction of the arrow.
X Pull tensioning strap =by the loose end in
the direction of the arrow until the safety
net is tight.
X After driving a short distance, check the
tension of the safety net and retighten it if
necessary.
Releasing the safety net Seat belt reel holder behind the front seats
X
Pull belt adjuster :upwards in the direc-
tion of the arrow to reduce the tension on
the tensioning strap.
X Unhook belt hook ;from lashing eyelet
=. Loading and stowing
135Controls
* optional
X204_AKB; 1; 5, en-GB
wobuchh,
Version: 2.11.4 2008-10-15T13:20:56+02:00 - Seite 135 ZDateiname: 6515_0671_02_buchblock.pdf; preflight