2008 MERCEDES-BENZ GLK SUV clock
[x] Cancel search: clockPage 27 of 261
Instrument cluster
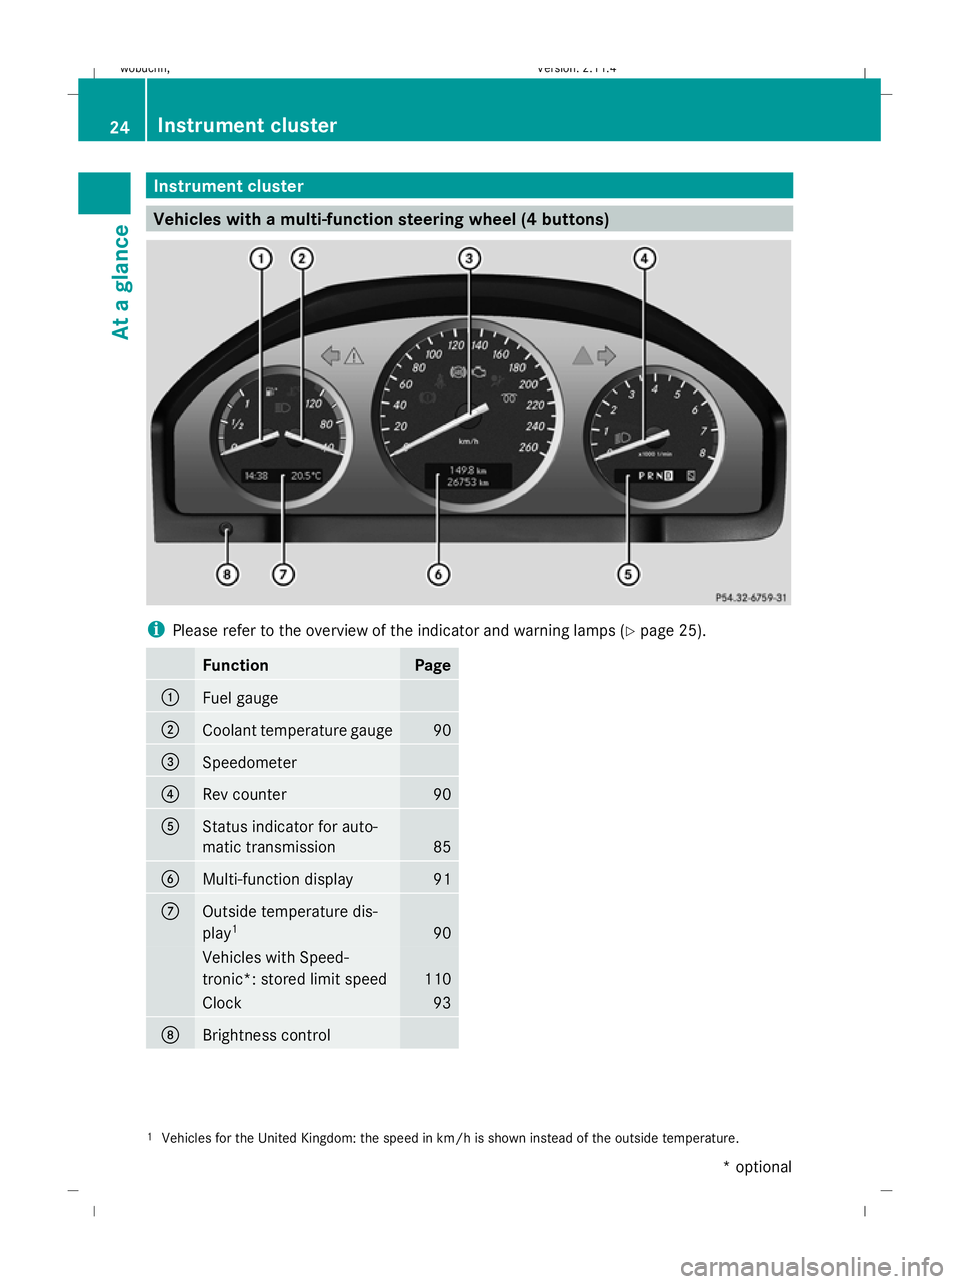
Vehicles with a multi-function steering wheel (4 buttons)i
Please refer to the overview of the indicator and warning lamps ( Ypage 25).
FunctionPage
:Fuel gauge
;Coolant temperature gauge90
=Speedometer
?Rev counter90
AStatus indicator for auto-
matic transmission
85
BMulti-function display91
COutside temperature dis-
play 1
90
Vehicles with Speed-
tronic*: stored limit speed
110
Clock93
DBrightness control
1
Vehicles for the United Kingdom: the speed in km/h is shown instead of the outside temperature.
24Instrument cluster
At a glance
* optional
X204_AKB; 1; 5, en-GB
wobuchh,
Version: 2.11.4 2008-10-15T13:20:56+02:00 - Seite 24Dateiname: 6515_0671_02_buchblock.pdf; preflight
Page 29 of 261
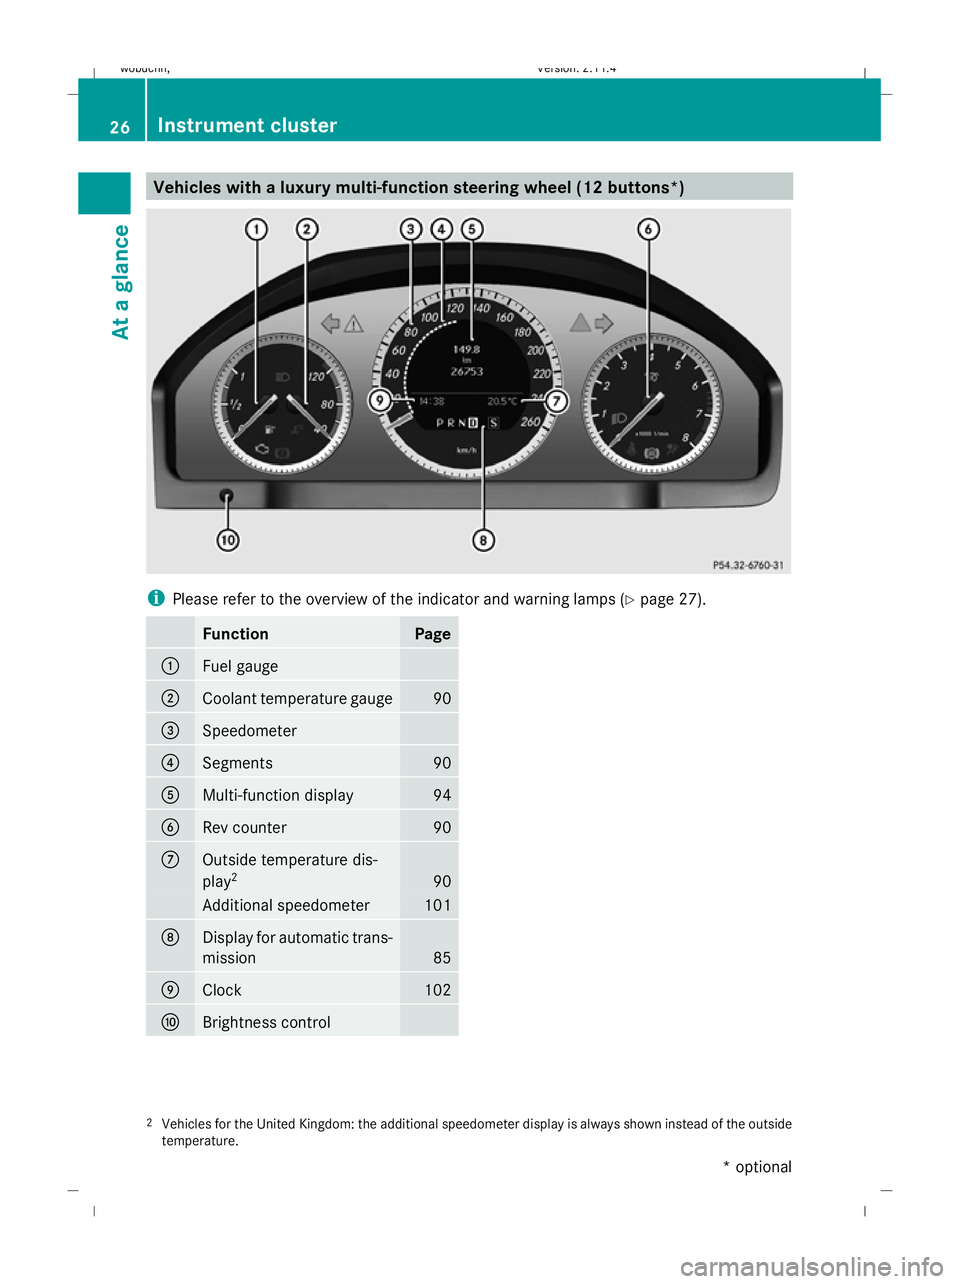
Vehicles with a luxury multi-function steering wheel (12 buttons
*)i
Please refer to the overview of the indicator and warning lamps (Y page 27).
FunctionPage
:Fuel gauge
;Coolant temperature gauge90
=Speedometer
?Segments90
AMulti-function display94
BRev counter90
COutside temperature dis-
play2
90
Additional speedometer101
DDisplay for automatic trans-
mission
85
EClock102
FBrightness control
2
Vehicles for the United Kingdom: the additional speedometer display is always shown instead of the outside
temperature.
26Instrument cluster
At a glance
* optional
X204_AKB; 1; 5, en-GB
wobuchh,
Version: 2.11.4 2008-10-15T13:20:56+02:00 - Seite 26Dateiname: 6515_0671_02_buchblock.pdf; preflight
Page 125 of 261
Controlling the air conditioning auto-
matically
In automatic mode, the set temperature is
maintained automatically at a constant level.
The system automatically regulates the tem-
perature of the dispensed air, the airflow and
the air distribution.
The automatic air conditioning will achieve
optimal operation if "cooling with air dehu-
midification" is also activated. If necessary,
cooling with air dehumidification can be deac-
tivated.
X Turn the key to position 2in the ignition
lock.
X Set the desired temperature.
X To activate: press theÃbutton.
The indicator lamp in the Ãbutton lights
up. Automatic air distribution and airflow
are activated.
X To switch off: press theÃbutton.
The indicator lamp in the Ãbutton goes
out. Automatic air distribution and airflow
are deactivated. Setting the temperature
2-zone Thermatic Different temperatures can be set for the
driver's and front-passenger sides.
X Turn the key to position 2in the ignition
lock.
X To increase/reduce: turn thumb-
wheels :and Dclockwise or anti-clock-
wise ( Ypage 118). Only change the tem-
perature setting in small increments. Start
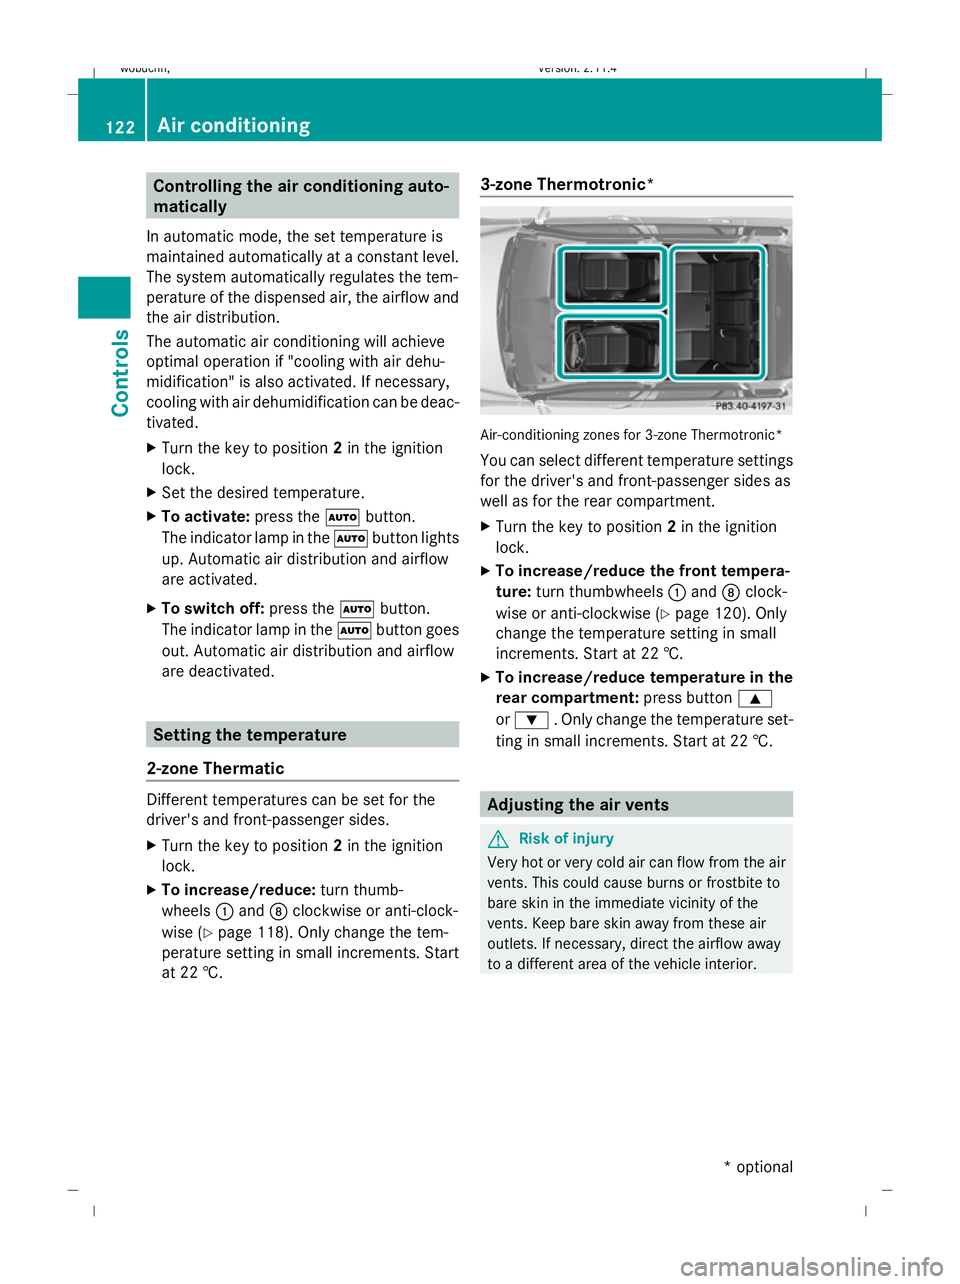
at 22 †. 3-zone Thermotronic* Air-conditioning zones for 3-zone Thermotronic*
You can select different temperature settings
for the driver's and front-passenger sides as
well as for the rear compartment.
X
Turn the key to position 2in the ignition
lock.
X To increase/reduce the front tempera-
ture: turn thumbwheels :and Dclock-
wise or anti-clockwise (Y page 120). Only
change the temperature setting in small
increments. Start at 22 †.
X To increase/reduce temperature in the
rear compartment: press button9
or : . Only change the temperature set-
ting in small increments. Start at 22 †. Adjusting the air vents
G
Risk of injury
Very hot or very cold air can flow from the air
vents. This could cause burns or frostbite to
bare skin in the immediate vicinity of the
vents. Keep bare skin away from these air
outlets. If necessary, direct the airflow away
to a different area of the vehicle interior. 122 Air conditioningControls
* optional
X204_AKB; 1; 5, en-GB
wobuchh,
Version: 2.11.4 2008-10-15T13:20:56+02:00 - Seite 122Dateiname: 6515_0671_02_buchblock.pdf; preflight
Page 126 of 261
In order to ensure the direct flow of fresh air
through the air vents into the vehicle interior,
please observe the following notes:
R
keep the air inlet between the windscreen
and the bonnet free of blockages, such as
ice, snow or leaves.
R never cover the vents or air inlet and outlet
grilles in the vehicle interior.
i For draught-free ventilation, adjust the
sliders of the air vents to the centre detent
position.
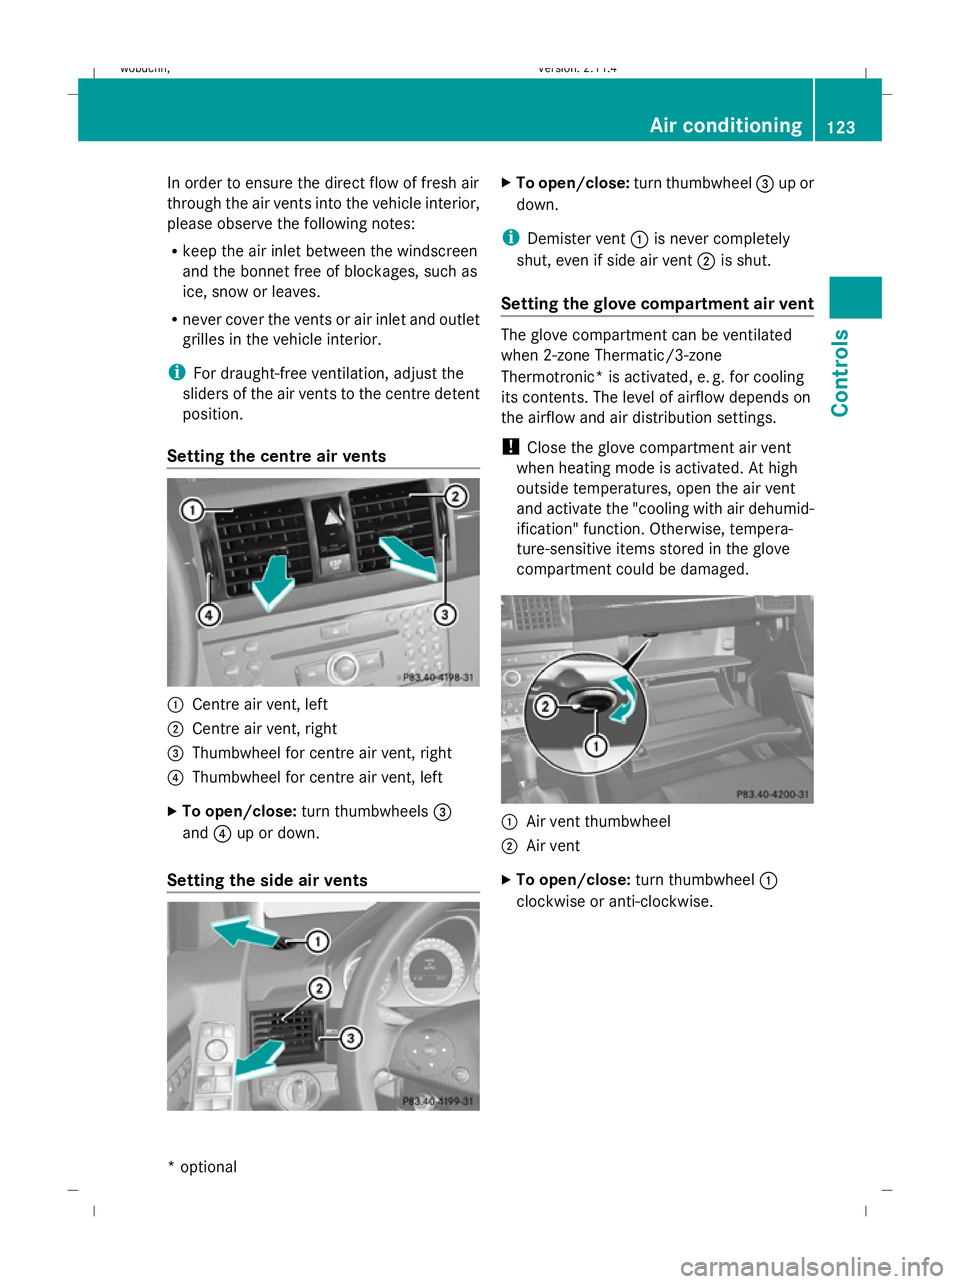
Setting the centre air vents :
Centre air vent, left
; Centre air vent, right
= Thumbwheel for centre air vent, right
? Thumbwheel for centre air vent, left
X To open/close: turn thumbwheels =
and ?up or down.
Setting the side air vents X
To open/close: turn thumbwheel =up or
down.
i Demister vent :is never completely
shut, even if side air vent ;is shut.
Setting the glove compartment air vent The glove compartment can be ventilated
when 2-zone Thermatic/3-zone
Thermotronic* is activated, e. g. for cooling
its contents. The level of airflow depends on
the airflow and air distribution settings.
!
Close the glove compartment air vent
when heating mode is activated. At high
outside temperatures, open the air vent
and activate the "cooling with air dehumid-
ification" function. Otherwise, tempera-
ture-sensitive items stored in the glove
compartment could be damaged. :
Air vent thumbwheel
; Air vent
X To open/close: turn thumbwheel :
clockwise or anti-clockwise. Air conditioning
123Controls
* optional
X204_AKB; 1; 5, en-GB
wobuchh,
Version: 2.11.4 2008-10-15T13:20:56+02:00 - Seite 123 ZDateiname: 6515_0671_02_buchblock.pdf; preflight
Page 128 of 261
R
air distribution to the windscreen and
front side windows
R air-recirculation mode off
X To switch off: press the¬button.
The indicator lamp in the ¬button goes
out. The previously selected settings come
into effect again. The cooling with air dehu-
midification function remains on. Air-recir-
culation mode remains deactivated.
or
X Press button Ã.
The indicator lamp in the ¬button goes
out. Airflow and air distribution are set to
automatic mode.
or
X Turn thumbwheels :orD clockwise or
anti-clockwise (Y page 118),(Ypage 120).
or
X Press the KorI button. Demisting the windows
Windows misted up on the inside X
Activate the "cooling function with air dehu-
midification" function.
X Activate the automatic mode.
X If the windows continue to mist up, activate
the "demisting" function.
Windows misted up on the outside X
Activate the windscreen wipers.
X Press the _button repeatedly until the
O orP symbol appears in the dis-
play.
i You should only select this setting until
the windscreen is clear again. Switching the rear window heating
on/off
G
Risk of accident
Clear all windows of ice or snow before setting
off. Otherwise, impaired visibility could
endanger you and others.
i The rear window heating has a high cur-
rent draw. You should therefore switch it
off as soon as the window is clear, as it only
switches off automatically after several
minutes.
i If the battery voltage is too low, the rear
window heating may switch off.
X Turn the key to position 2in the ignition
lock.
X Press the ¯button.
The indicator lamp in the ¯button lights
up or goes out. Activating/deactivating air-recircula-
tion mode
You can deactivate the flow of fresh air if
unpleasant odours are entering the vehicle
from outside. The air already inside the vehi-
cle will then be recirculated. G
Risk of accident
Only switch over to air-recirculation mode
briefly at low outside temperatures. Other-
wise, the windows could mist up, thus impair-
ing visibility and endangering yourself and
others. This may prevent you from observing
the traffic conditions, thereby causing an
accident.
X Turn the key to position 2in the ignition
lock.
X To activate: press the,button.
The indicator lamp in the ,button
comes on. Air conditioning
125Controls
X204_AKB; 1; 5, en-GB
wobuchh, Version: 2.11.4 2008-10-15T13:20:56+02:00 - Seite 125 ZDateiname: 6515_0671_02_buchblock.pdf; preflight
Page 133 of 261
are not designed to secure heavy items of
luggage.
You or other vehicle occupants could be
injured by objects being thrown around if you:
R brake sharply
R change direction suddenly
R are involved in an accident
Sharp-edged and fragile objects must not be
placed in the luggage net.
Do not place hard objects in the map pockets.
Objects must not protrude from the map
pockets.
Glove compartment X
To open: pull handle :and open glove
compartment lid ;.
X To close: fold glove compartment
cover ;up until it engages. X
To lock: insert the emergency key element
(Y page 213) into the lock and turn it 90°
clockwise to position 2.
X To unlock: insert the emergency key ele-
ment (Y page 213) into the lock and turn
it 90° anti-clockwise to position 1.
i Vehicles with audio equipment *or
COMAND APS*: the AUX jack is in the glove
compartment.
Stowage compartment/telephone
compartment under the armrest X
To open: press left-hand button ;or right-
hand button :.
The stowage compartment opens.
i A small and a large stowage compartment
are located under the armrest. The small
stowage compartment can be removed for
emptying. The telephone bracket* is loca-
ted in the large stowage compartment.
Stowage compartment under the driv-
er's and front-passenger seat (only
vehicles with electric seats*) G
Risk of injury
Only load the stowage compartment with the
maximum permissible load of 1.5 kg. Other-
wise, the transported load could, for example,
be thrown out of the stowage compartment if
you change direction suddenly or brake
sharply and could injure you or others. 130 Loading and stowingControls
* optional
X204_AKB; 1; 5, en-GB
wobuchh,
Version: 2.11.4 2008-10-15T13:20:56+02:00 - Seite 130Dateiname: 6515_0671_02_buchblock.pdf; preflight
Page 148 of 261

The arrow next to the filling pump indicates
the side of the vehicle.
:
To open the fuel filler flap
; To insert the fuel cap
= Tyre pressure table
? Fuel type
X To open: press the fuel filler flap in the
direction of arrow :.
The fuel filler flap opens slightly.
X Open the fuel filler flap.
X Turn the fuel filler cap anti-clockwise and
remove it.
X Insert the fuel filler cap into the holder
bracket on the inside of filler flap ;.
X Only fill the tank until the pump nozzle
switches off.
! Overfilling the fuel tank could damage the
fuel system.
X To close: replace the fuel filler cap and turn
it clockwise. The fuel filler cap audibly
engages.
X Close the fuel filler flap.
i Vehicles with a diesel engine: if the fuel
tank has been run completely dry, it will be
necessary to bleed the fuel system
(Y page 206). Petrol (EN 228)
! Refuel using only unleaded premium
grade petrol with a minimum octane num-
ber of 95 RON/85 MON conforming to
European standard EN 228.
Otherwise, you could impair engine output
or damage the engine.
i As a temporary measure, only when the
recommended fuel is not available, you
may also use regular unleaded petrol,
91 RON/82.5 MON. This may reduce
engine performance and increase fuel con-
sumption. Avoid driving at full throttle.
In some countries, the quality of the avail-
able petrol may not be adequate and could
cause coking around the inlet valve. In such
cases, and in consultation with a
Mercedes-Benz Service Centre, the petrol
may be mixed with the additive recommen-
ded by Mercedes-Benz (part no.
A000989254510). You must observe the
notes and mixing ratios specified on the
container.
Further information on "Fuel" (Y page 245) . Diesel (EN 590, DIN 51628)
G
Risk of fire
Do not use petrol to refuel vehicles with a die-
sel engine. Never mix diesel with petrol. This
would damage the fuel system and engine and
could result in a vehicle fire.
! Refuel using only diesel which conforms
to European standard EN 590 or German
standard DIN 51628.
Otherwise, you could impair engine output
or damage the engine.
! When refuelling vehicles with a diesel par-
ticulate filter in countries outside the EU,
only low-sulphur Euro diesel with less than
0.005 percent sulphur content by weight
(50 ppm) should be used. Refuelling
145Operation
X204_AKB; 1; 5, en-GB
wobuchh, Version: 2.11.4 2008-10-15T13:20:56+02:00 - Seite 145 ZDateiname: 6515_0671_02_buchblock.pdf; preflight
Page 151 of 261
i
If the bonnet can be raised slightly, it is
not properly engaged. Open it again and
close it with a little more force. Engine oil
Depending on driving style, the vehicle con-
sumes up to 0.8 l oil per 1,000 km. The oil
consumption may be higher than this when
the vehicle is new or if you frequently drive at
high engine speeds.
Further information on engine oil
(Y page 246).
Checking the engine oil level When doing so:
R
the vehicle should be parked on level
ground.
R the engine should be switched off for at
least five minutes if the engine is at normal
operating temperature.
R the engine should be switched off for at
least 30 minutes if the engine is not at
operating temperature (i.e. if you only start
the engine briefly). Example: vehicles with a petrol engine Example: vehicles with a diesel engine
X Pull oil dipstick :out of the oil dipstick
tube.
X Wipe off oil dipstick :.
X Insert oil dipstick :into the oil dipstick
tube to the stop, and take it out again.
The oil level is correct if the level is between
minimum mark =and maximum
mark ;.
X Top up the oil if necessary.
Topping up the engine oil H
Environmental note
When topping up the oil, take care not to spill
any. Oil must not be allowed to escape into
the soil or waterways. You would otherwise be
damaging the environment. Example: vehicles with a petrol/diesel engine
X
Turn cap :anti-clockwise and remove it.
X Top up with the amount of oil required . 148 Engine compartmentOperation
X204_AKB; 1; 5, en-GB
wobuchh,
Version: 2.11.4 2008-10-15T13:20:56+02:00 - Seite 148Dateiname: 6515_0671_02_buchblock.pdf; preflight