2008 MERCEDES-BENZ GLK SUV ECO mode
[x] Cancel search: ECO modePage 9 of 261
Central locking
Automatic door locking feature
(on-board computer, luxury multi-
function steering wheel). ................104
Key. .................................................. 58
Central locking/unlocking button ......59
Central unlocking Key. .................................................. 58
Centre console
Overview. .......................................... 30
Changing a wheel
see Flat tyre
Checklist (off-road driving)............... 159
Child-proof locks Rear doors. ....................................... 50
Children
In the vehicle. ................................... 41
Restraint systems. ............................ 41
Child seat
Automatic recognition ......................43
Automatic recognition (malfunc-
tion). ............................................... 200
Display message ............................. 182
ISOFIX............................................... 49
Recommendations. ...........................46
Suitable positions. ............................ 44
Cigarette lighter................................. 138
Cleaning the panorama sliding
sunroof................................................ 170
Cleaning the windscreen ..................169
Collapsible wheel Technical data. ............................... 253
COMAND display
Cleaning. ........................................ 170
Constant headlamp mode
see Daytime driving lights
Convenience closing ............................82
Convenience opening ........................... 82
Coolant Checking the level. .........................149
Display message (luxury multi-
function steering wheel) .................186
Display message (multi-function
steering wheel). ......................180, 186
Mixture ratio ................................... 247
Temperature gauge ...........................90
Warning lamp.................................. 202 Cornering lights
Display message ............................. 187
Cruise control..................................... 108
Display message ............................. 182
Cup holder.......................................... 131
Current fuel consumption On-board computer (multi-func-
tion steering wheel). ...................93, 96 D
Dashboard Cleaning. ........................................ 170
see Instrument cluster
Date
Setting (on-board computer,
luxury multi-function steering
wheel). ............................................ 102
Setting (on-board computer,
multi-function steering wheel) ..........93
Daytime driving lights.......................... 75
On-board computer (luxury multi-
function steering wheel) .................102
Delayed switch-off
Exterior lighting (luxury multi-
function steering wheel) .................103
Interior lighting (on-board com-
puter, luxury multi-function steer-
ing wheel). ...................................... 103
Diesel
Low outside temperatures. .............146
Diesel engine
Winter driving. ................................ 146
Digital speedometer............................ .96
Dipped-beam headlamps Display message ............................. 188
Symmetrical. .................................. 162
Display message................................ 176
Display messages Service interval display. ..................167
Symbol messages. ..........................182
Text messages. ............................... 177
Distance recorder
see Total distance recorder
see Trip meter 6 Index
X204_AKB; 1; 5, en-GB
wobuchh,
Version: 2.11.4 2008-10-15T13:20:56+02:00 - Seite 6Dateiname: 6515_0671_02_buchblock.pdf; preflight
Page 12 of 261
H
Headlamp cleaning system............... 149
Headlamps Cleaning. ........................................ 169
Cleaning system. .............................. 77
Misting up. ...................................... 210
Head restraint
Adjusting (front).......................... 63, 64
NECK-PRO. ....................................... 40
Removing (rear). ............................... 64
Resetting triggered head
restraints. ....................................... 215
Head restraints
Adjusting (rear). ................................ 64
Heating
see Air conditioning
High-pressure cleaners..................... 168
Hill start assist..................................... 84
Hook.................................................... 136I
Immobiliser........................................... 54
Indicator and warning lamp Automatic child seat recognition
(malfunction). ................................. 200
Brakes (red). ................................... 202
Coolant. .......................................... 202
Engine diagnostics ..........................203
PASSENGER AIRBAG OFF .........43, 200
Reserve fuel. ................................... 204
Seat belt. ........................................ 203
SRS........................................... 35, 202
Thermotronic (malfunction) ............199
Indicator and warning lamps............ 201
Indicator lamps see Warning and indicator lamps
Instrument cluster ............................... 90
On-board computer (luxury multi-
function steering wheel) .................101
Overview (luxury multi-function
steering wheel). ................................ 26
Overview (multi-function steering
wheel). .............................................. 24Intelligent Light System
......................77
Display message (luxury multi-
function steering wheel) .................192
On-board computer (luxury multi-
function steering wheel) .................103
Interior lighting
Automatic control system .................79
Emergency lighting. ..........................79
Manual control.................................. 79
On-board computer (luxury multi-
function steering wheel) .................103
Reading lamp .................................... 79
Interior motion sensor......................... 55
ISOFIX child seat securing system .....49 J
Jack...................................................... 175 Operation........................................ 227
Jump-starting ...................................... 234
Jump leads ...................................... 234 K
Key......................................................... 58 Changing the battery ......................216
Checking the battery ......................216
Display message (multi-function
steering wheel). .............................. 181
Loss. ............................................... 212
Malfunction..................................... 212
Modifying the programming. .............58
Key positions
Key. .................................................. 61
Kickdown........................................ 88, 89 L
Lamps see Warning and indicator lamps
Lashing eyelets.................................. 133
Licence plate lighting Display message ............................. 192
Lighting
see Lights
Lights
Active light function ..........................77
Automatic headlamp mode. ..............75
Cornering light function ....................78 Index
9 X204_AKB; 1; 5, en-GB
wobuchh,
Version: 2.11.4
2008-10-15T13:20:56+02:00 - Seite 9 Dateiname: 6515_0671_02_buchblock.pdf; preflight
Page 70 of 261
Easy-entry/exit feature*
The easy-entry/exit feature makes getting in
and out of your vehicle easier.
The steering wheel swings upwards when
you:
R remove the key from the ignition lock
R open the driver's door when the key in the
ignition lock is in position 0or 1.
When the key is inserted into the ignition lock
with the driver's door closed, the steering
wheel is automatically moved to the previ-
ously set position. G
Risk of injury
Make sure that nobody can become trapped
when you activate the easy-entry/exit fea-
ture.
If there is a risk of becoming trapped, stop the
adjustment procedure. To halt the procedure:
R press the steering-column adjustment
switch
R press one of the memory function position
buttons
The steering column stops moving immedi-
ately.
Never leave children unsupervised in the vehi-
cle. They could open the driver's door and
thereby unintentionally activate the easy-
entry feature and become trapped.
The most recent position of the steering
wheel is stored when you switch off the igni-
tion or when you store a memory position
(Y page 69).
You can activate and deactivate the easy-
entry/exit feature via the on-board computer
(Y page 104). Mirrors
Rear-view mirror
X Adjust the rear-view mirror by hand so you
have a good overview of the traffic condi-
tions.
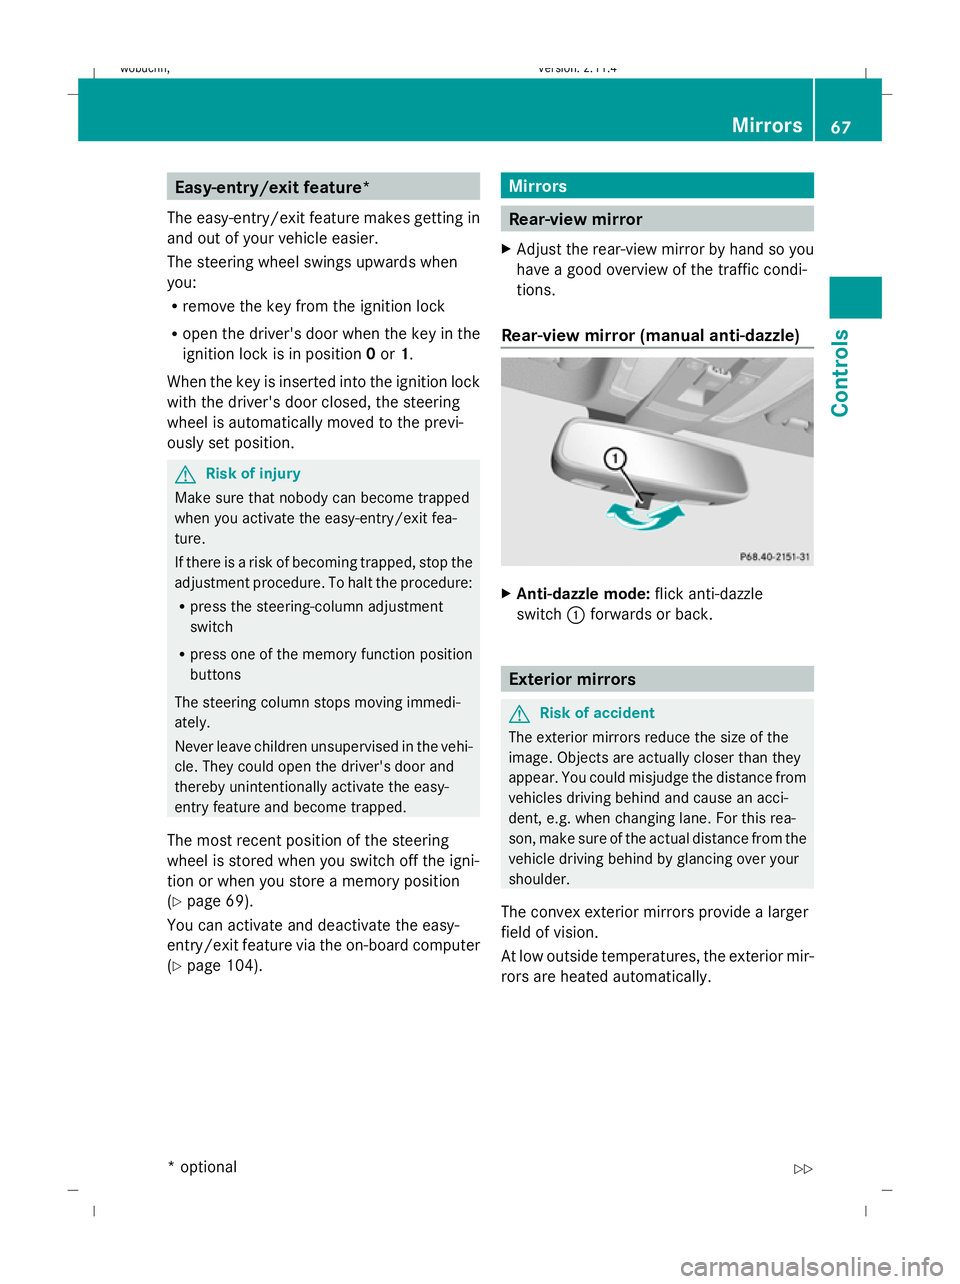
Rear-view mirror (manual anti-dazzle) X
Anti-dazzle mode: flick anti-dazzle
switch :forwards or back. Exterior mirrors
G
Risk of accident
The exterior mirrors reduce the size of the
image. Objects are actually closer than they
appear. You could misjudge the distance from
vehicles driving behind and cause an acci-
dent, e.g. when changing lane. For this rea-
son, make sure of the actual distance from the
vehicle driving behind by glancing over your
shoulder.
The convex exterior mirrors provide a larger
field of vision.
At low outside temperatures, the exterior mir-
rors are heated automatically. Mirrors
67Controls
* optional
X204_AKB; 1; 5, en-GB
wobuchh,
Version: 2.11.4 2008-10-15T13:20:56+02:00 - Seite 67 ZDateiname: 6515_0671_02_buchblock.pdf; preflight
Page 71 of 261
Adjusting the exterior mirrors
X
Make sure that the key is in position 1or
2 in the ignition lock.
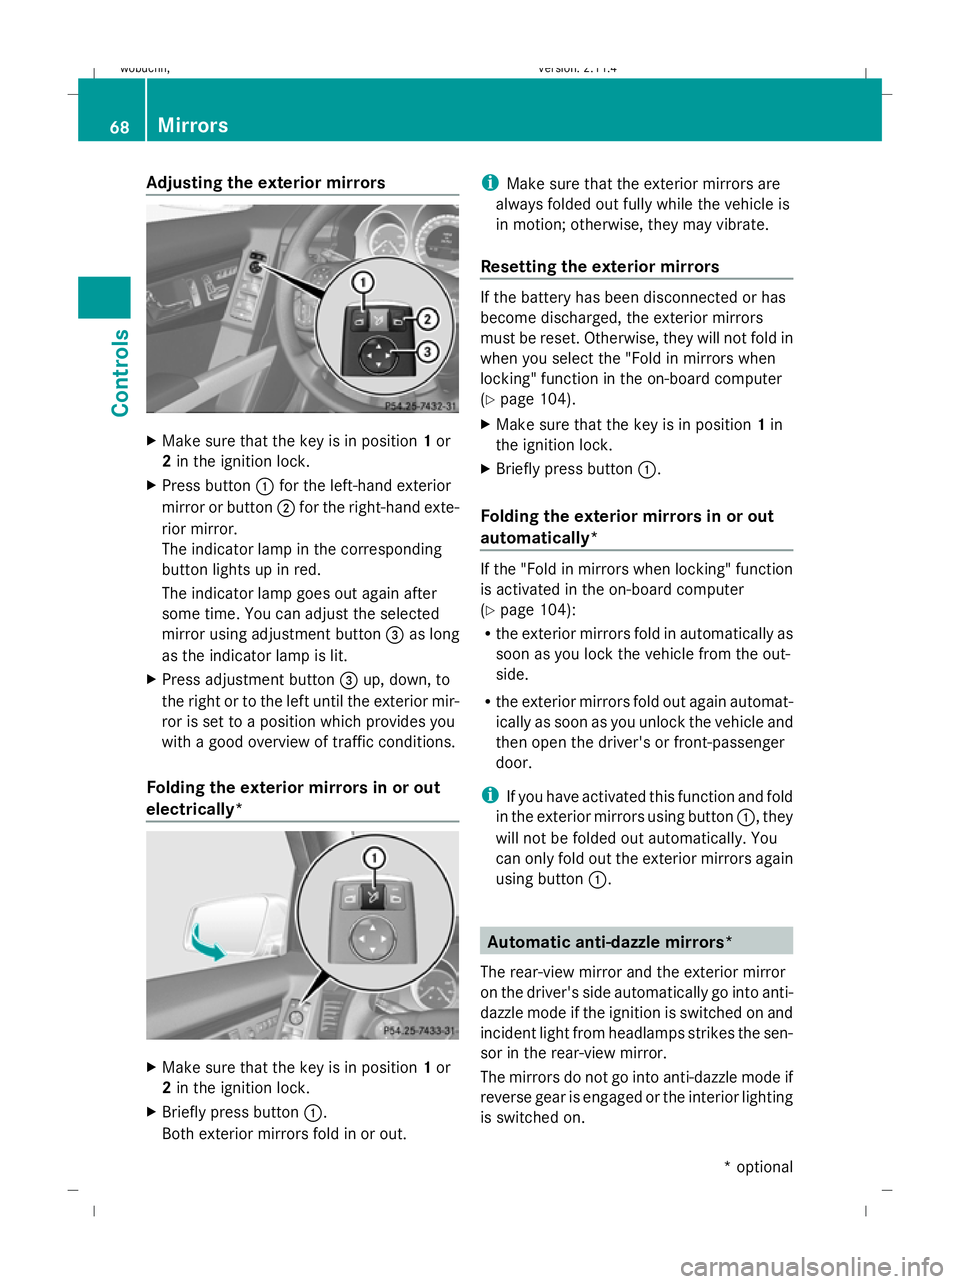
X Press button :for the left-hand exterior
mirror or button ;for the right-hand exte-
rior mirror.
The indicator lamp in the corresponding
button lights up in red.
The indicator lamp goes out again after
some time. You can adjust the selected
mirror using adjustment button =as long
as the indicator lamp is lit.
X Press adjustment button =up, down, to
the right or to the left until the exterior mir-
ror is set to a position which provides you
with a good overview of traffic conditions.
Folding the exterior mirrors in or out
electrically* X
Make sure that the key is in position 1or
2 in the ignition lock.
X Briefly press button :.
Both exterior mirrors fold in or out. i
Make sure that the exterior mirrors are
always folded out fully while the vehicle is
in motion; otherwise, they may vibrate.
Resetting the exterior mirrors If the battery has been disconnected or has
become discharged, the exterior mirrors
must be reset. Otherwise, they will not fold in
when you select the "Fold in mirrors when
locking" function in the on-board computer
(Y page 104).
X Make sure that the key is in position 1in
the ignition lock.
X Briefly press button :.
Folding the exterior mirrors in or out
automatically* If the "Fold in mirrors when locking" function
is activated in the on-board computer
(Y
page 104):
R the exterior mirrors fold in automatically as
soon as you lock the vehicle from the out-
side.
R the exterior mirrors fold out again automat-
ically as soon as you unlock the vehicle and
then open the driver's or front-passenger
door.
i If you have activated this function and fold
in the exterior mirrors using button :, they
will not be folded out automatically. You
can only fold out the exterior mirrors again
using button :. Automatic anti-dazzle mirrors*
The rear-view mirror and the exterior mirror
on the driver's side automatically go into anti-
dazzle mode if the ignition is switched on and
incident light from headlamps strikes the sen-
sor in the rear-view mirror.
The mirrors do not go into anti-dazzle mode if
reverse gear is engaged or the interior lighting
is switched on. 68 MirrorsCont
rols
* optional
X204_AKB; 1; 5, en-GB
wobuchh,
Version: 2.11.4 2008-10-15T13:20:56+02:00 - Seite 68Dateiname: 6515_0671_02_buchblock.pdf; preflight
Page 77 of 261
Make sure that:
R
you are as far away from the driver's front
airbag as possible.
R you are sitting in a normal upright posi-
tion.
R you can fasten the seat belt properly.
R you have moved the backrest to an
almost vertical position.
R you have set the seat angle so that your
thighs are gently supported.
R you can depress the pedals properly.
R you have adjusted the head restraint so
that the back of your head is supported
at eye level by the central area of the
head restraint.
X Check whether steering wheel :is adjus-
ted properly (Y page 66).
Make sure that:
R you can hold the steering wheel with your
arms slightly bent.
R you can move your legs freely.
R you can see all the displays in the instru-
ment cluster clearly.
X Check whether you have fastened seat
belt ;properly (Y page 70).
It should:
R fit snugly across your body.
R be routed across the middle of your
shoulder.
R be routed in your pelvic area across the
hip joints. Lights
Light switch
For safety reasons, Mercedes-Benz recom-
mends that you drive with the lights switched
on even during the daytime. In some coun-
tries, daytime operation of headlamps varies
due to legal and voluntary requirements. In these countries, daytime driving lights are
automatically switched on when the engine is
started.
i
If you drive in countries in which traffic
drives on the opposite side of the road to
the country where the vehicle is registered,
oncoming traffic may be dazzled by the
asymmetrical dipped-beam headlamps.
Have the headlamps changed to symmet-
rical dipped beam when driving in these
countries. You can obtain information
about this from any Mercedes-Benz Service
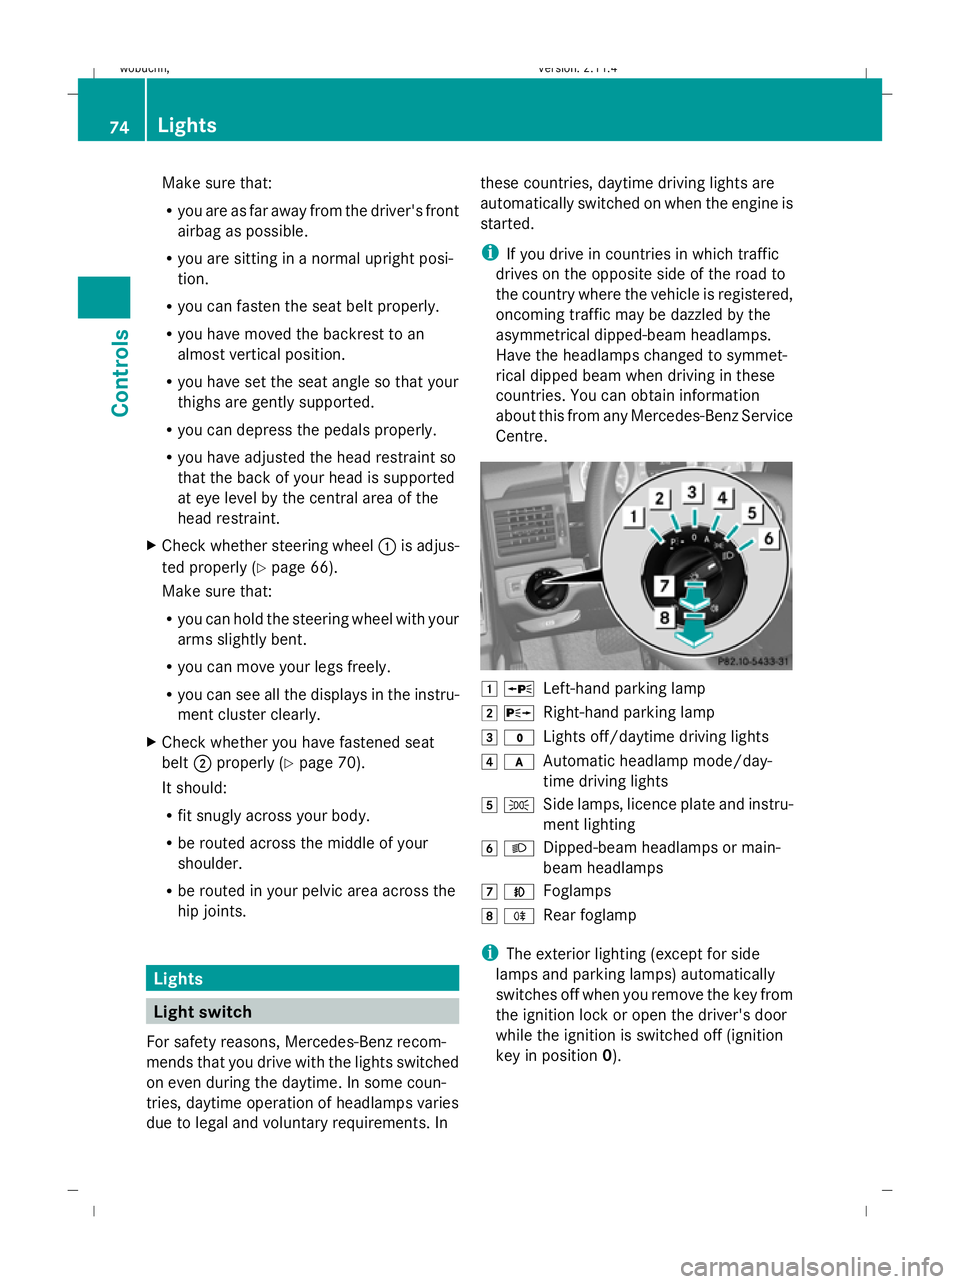
Centre. 1
W
Left-hand parking lamp
2 X
Right-hand parking lamp
3 $
Lights off/daytime driving lights
4 c
Automatic headlamp mode/day-
time driving lights
5 T
Side lamps, licence plate and instru-
ment lighting
6 L
Dipped-beam headlamps or main-
beam headlamps
7 N
Foglamps
8 R
Rear foglamp
i The exterior lighting (except for side
lamps and parking lamps) automatically
switches off when you remove the key from
the ignition lock or open the driver's door
while the ignition is switched off (ignition
key in position 0). 74 LightsControls
X204_AKB; 1; 5, en-GB
wobuchh,
Version: 2.11.4 2008-10-15T13:20:56+02:00 - Seite 74Dateiname: 6515_0671_02_buchblock.pdf; preflight
Page 80 of 261
Adjusting the headlamp range (halo-
gen headlamps)
The headlamp range control allows you to
adjust the cone of light from the headlamps
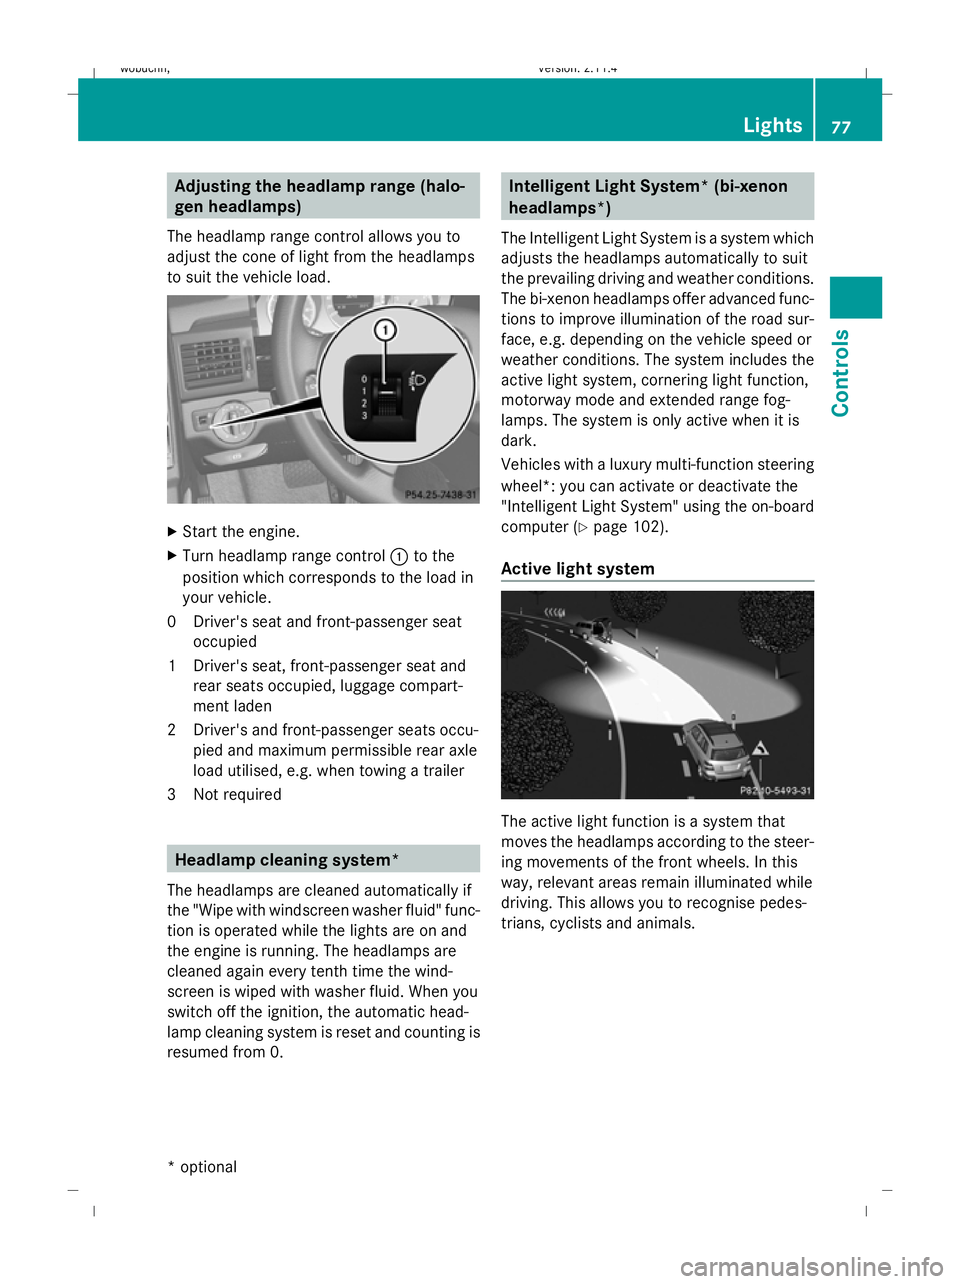
to suit the vehicle load. X
Start the engine.
X Turn headlamp range control :to the
position which corresponds to the load in
your vehicle.
0D river's seat and front-passenger seat
occupied
1D river's seat, front-passenger seat and
rear seats occupied, luggage compart-
ment laden
2D river's and front-passenger seats occu-
pied and maximum permissible rear axle
load utilised, e.g. when towing a trailer
3N ot required Headlamp cleaning system*
The headlamps are cleaned automatically if
the "Wipe with windscreen washer fluid" func-
tion is operated while the lights are on and
the engine is running. The headlamps are
cleaned again every tenth time the wind-
screen is wiped with washer fluid. When you
switch off the ignition, the automatic head-
lamp cleaning system is reset and counting is
resumed from 0. Intelligent Light System* (bi-xenon
headlamps*)
The Intelligent Light System is a system which
adjusts the headlamps automatically to suit
the prevailing driving and weather conditions.
The bi-xenon headlamps offer advanced func-
tions to improve illumination of the road sur-
face, e.g. depending on the vehicle speed or
weather conditions. The system includes the
active light system, cornering light function,
motorway mode and extended range fog-
lamps. The system is only active when it is
dark.
Vehicles with a luxury multi-function steering
wheel*: you can activate or deactivate the
"Intelligent Light System" using the on-board
computer (Y page 102).
Active light system The active light function is a system that
moves the headlamps according to the steer-
ing movements of the front wheels. In this
way, relevant areas remain illuminated while
driving. This allows you to recognise pedes-
trians, cyclists and animals. Lights
77Controls
* optional
X204_AKB; 1; 5, en-GB
wobuchh,
Version: 2.11.4 2008-10-15T13:20:56+02:00 - Seite 77 ZDateiname: 6515_0671_02_buchblock.pdf; preflight
Page 93 of 261
Instrument cluster
Points to remember
You will find an illustration of the instrument
cluster in the "At a glance" section.
Vehicles with a multi-function steering wheel
(4 buttons) (Y page 24)
Vehicles with a luxury multi-function steering
wheel* (12 buttons) (Y page 26)G
Risk of accident
No further messages can be displayed if the
instrument cluster and/or the multi-function
display fails.
This means that you will not see information
about the driving situation, such as the speed,
outside temperature, warning/indicator
lamps, display messages or system failures.
The vehicle's handling characteristics may be
affected. Adjust your driving style and speed
accordingly.
Immediately consult a qualified specialist
workshop which has the necessary specialist
knowledge and tools to carry out the work
required. Mercedes-Benz recommends that
you use a Mercedes-Benz Service Centre for
this purpose. In particular, work relevant to
safety or on safety-related systems must be
carried out at a qualified specialist workshop. Coolant temperature gauge
The coolant temperature gauge is in the
instrument cluster on the left-hand side.
Under normal operating conditions and with
the specified coolant level, the coolant tem-
perature may rise to 120 †. The coolant tem-
perature may rise to the top end of the scale
at high outside temperatures and on long
uphill stretches. Speedometer with segments (vehi-
cles with 12-button luxury multi-func-
tion steering wheel*)
The segments in the speedometer indicate
which speed range is available.
Cruise control* mode:
The segments light up from the stored speed
to the maximum speed.
Variable Speedtronic* mode:
The segments light up from the start of the
scale to the selected limit speed. Rev counter
The red band in the rev counter indicates the
engine's overrevving range. The fuel supply is
interrupted to protect the engine when the
red band is reached.
! Do not drive in the overrevving range.
Doing so will damage the engine. Outside temperature display
G
Risk of accident
When the temperature displayed is just above
freezing point, the road surface may be icy,
especially in wooded areas or on bridges. The
vehicle could skid if you fail to adapt your
driving style. Always adapt your driving style
and drive at a speed to suit the prevailing
weather conditions.
Changes in the outside temperature are dis-
played after a short delay. 90 Instrument clusterCont
rols
* optional
X204_AKB; 1; 5, en-GB
wobuchh,
Version: 2.11.4 2008-10-15T13:20:56+02:00 - Seite 90Dateiname: 6515_0671_02_buchblock.pdf; preflight
Page 106 of 261
X
Press the :or9 button to select the
Daytime driving lights: function.
You will see the selected setting: Onor
Off.
X Press the abutton to save the setting.
Activating/deactivating the Intelligent
Light System*
When you activate the Intell. Light Sys-
tem: function, you activate the following:
R motorway mode
R active light function
R cornering light function
R extended range foglamps
X Press the =or; button to select the
Settings menu.
X Press the :or9 button to select the
Light submenu.
X Press the abutton to confirm.
X Press the :or9 button to select the
Intell. Light System: function.
You will see the selected setting: Onor
Off.
X Press the abutton to save the setting.
Activating or deactivating the surround
lighting and exterior lighting delayed
switch-off
The Surround lighting: function allows
you to set whether the exterior lighting should
come on when it is dark:
R for 40 seconds after unlocking the vehicle
with the key.
The exterior lighting switches off when you
open the driver’s door.
R for 15 seconds after switching off the
engine and closing the doors.
If the engine is switched off and then none
of the doors are opened, or if an open door
is not closed, the exterior lighting goes out
after 60 seconds.
If you activate the Surround lighting:
function, the following light up: R
the side lamps
R the front foglamps
R the licence plate lighting
X Press the =or; button to select the
Settings menu.
X Press the :or9 button to select the
Light submenu.
X Press the abutton to confirm.
X Press the :or9 button to select the
Surround lighting: function.
You will see the selected setting: Onor
Off.
X Press the abutton to save the setting.
Deactivating the delayed switch-off tempora-
rily:
X Before leaving the vehicle, turn the key to
position 0in the ignition lock.
X Turn the key to position 2in the ignition
lock and back to position 0.
Delayed switch-off is deactivated.
Delayed switch-off is deactivated the next
time you start the engine.
Activating/deactivating the interior light-
ing delayed switch-off
When you activate the Interior lighting
delay sw. off: function and remove the
key from the ignition lock, the interior lighting
remains on for around 10 seconds if it is dark.
X Press the =or; button to select the
Settings menu.
X Press the :or9 button to select the
Light submenu.
X Press the abutton to confirm.
X Press the :or9 button to select the
Interior lighting delay sw. off:
function.
You will see the selected setting: Onor
Off.
X Press the abutton to save the setting. On-board computer (12-button multi-function steering wheel*)
103Controls
* optional
X204_AKB; 1; 5, en-GB
wobuchh,
Version: 2.11.4 2008-10-15T13:20:56+02:00 - Seite 103 ZDateiname: 6515_0671_02_buchblock.pdf; preflight