2008 MERCEDES-BENZ GLK SUV fuel cap
[x] Cancel search: fuel capPage 11 of 261

Engine oil
........................................... 246
Consumption ................................. 148
Display message ............................. 195
Filler neck. ...................................... 148
Topping up. ..................................... 148
ESP ®
(Electronic Stability Program)... 52
Activating/deactivating ....................53
Display message (luxury multi-
function steering wheel) .........179, 183
Display message (multi-function
steering wheel). ......................178, 179
Trailer stabilisatio n........................... 53
Warning lamp. .......................... 52, 201
ETS (Electronic Traction Support)...... .53
Exterior lighting Delayed switch-off (luxury multi-
function steering wheel). ................103
Exterior mirrors
Adjusting .......................................... 67
Anti-dazzle mode (automatic). ..........68
Folding in/out (automatically). .........68
Folding in/out (electrically). .............68
Folding in (on-board computer,
luxury multi-function steering
wheel). ............................................ 104
Malfunction..................................... 211
Parking position. ............................... 69
Resetting. ......................................... 68
Storing settings ................................ 69
Exterior view
Overview. .......................................... 22F
Fire extinguisher................................ 174
First-aid kit ......................................... 174
Flat tyre Equipment. ..................................... 222
Preparing the vehicle. .....................222
TIREFIT kit....................................... 222
Floormat............................................. .141
Foglamps Display message ............................. 193
Fording........................................ 157, 161
Frequencies Telephone. ...................................... 244
Front airbag .......................................... 38
Front-passenger airbag ........................ 38Fuel......................................................
245
Diesel. ............................................ 145
Loss. ............................................... 206
Petrol .............................................. 145
Fuel consumption................................. 95
Current (on-board computer,
multi-function steering wheel)
................................................... 93, 96
Notes..................................... .242, 246
Vehicle data. ................................... 249
see Trip computer(on-board computer)
Fuel filler flap
Emergency release. ........................215
Opening/closing ............................ 144
Fuel filter
Display message (luxury multi-
function steering wheel) .................187
Display message (multi-function
steering wheel). .............................. 180
Fuel level
Calling up the range (on-board
computer, luxury multi-function
steering wheel). ................................ 96
Calling up the range (on-board
computer, multi-function steering
wheel). .............................................. 93
Display. ....................................... 24, 26
Fuel line
Malfunction..................................... 206
Fuel tank
Defect ............................................. 206
Fuse allocation chart......................... 239
Fuse box Dashboard. ..................................... 239
Engine compartment ......................239
Luggage compartment. ...................240
Fuses................................................... 238 G
Genuine Mercedes-Benz parts.......... 242
Glove compartment ...........................130
Gradient-climbing capability (max-
imum).................................................. 1608 Index
X204_AKB; 1; 5, en-GB
wobuchh,
Version: 2.11.4 2008-10-15T13:20:56+02:00 - Seite 8Dateiname: 6515_0671_02_buchblock.pdf; preflight
Page 17 of 261
Standard display
On-board computer (luxury multi-
function steering wheel). ..................95
On-board computer (multi-func-
tion steering wheel). .........................92
Station
see Radio
Steering wheel
Adjusting .......................................... 66
Buttons (on-board computer,
luxury multi-function steering
wheel). .............................................. 93
Buttons (on-board computer,
multi-function steering wheel) ..........91
Storing settings ................................ 69
Steering wheel boss
Cleaning. ........................................ 170
Steering wheel gearshift paddles....... 88
Stowage compartment ......................129
Armrest (under) .............................. 130
Glove compartment. .......................130
Rear seat armrest. ..........................131
Stowage compartments
Under driver's seat/front-
passenger seat. .............................. 130
Submenu (luxury multi-function
steering wheel)
Convenience ................................... 104
Factory settings .............................. 104
Instrument cluster .......................... 101
Lights ............................................ .102
Standard display. .............................. 95
Time/date. ..................................... 102
Vehicle............................................ 104
Summer opening
see Convenience opening
Sun visor............................................. 137
Supplemental Restraint System see SRS
Surround lighting
On-board computer (luxury multi-
function steering wheel) .................103
Switching off the alarm
ATA. .................................................. 55 T
Tailgate Display message ............................. 183
Emergency unlocking...................... 214
Limiting the opening angle................ 61
Tail lamp
Display message ............................. 191
Tail lamps
changing. ........................................ 220
Display message ............................. 191
Tail pipes
Cleaning. ........................................ 171
Tank
see Fuel tank
Tank capacity ..................................... 245
Technical data GLK 280 4MATIC ............................ 249
GLK 320 CDI 4MATIC .....................250
GLK 350 4MATIC ............................ 249
Trailer loads .................................... 254
Tyres. .............................................. 252
Wheels. ........................................... 252
Telephone
see Mobile phone
Telephone compartment ...................130
Temperature Coolant. ............................................ 90
Outside temperature......................... 90
Thermatic
Malfunction indicator lamp. ............199
Thermotronic
Malfunction indicator lamp. ............199
Tightening torque............................... 231
Time Setting (on-board computer,
luxury multi-function steering
wheel). ............................................ 102
Setting (on-board computer,
multi-function steering wheel)
......................................................... 93
TIREFIT kit
Using. ............................................. 222
TopTether .............................................. 49
Total distance recorder................. 92, 95
Tow-away protection........................... 55
Towing................................................. 23814 Index
X204_AKB; 1; 5, en-GB
wobuchh,
Version: 2.11.4 2008-10-15T13:20:56+02:00 - Seite 14Dateiname: 6515_0671_02_buchblock.pdf; preflight
Page 147 of 261
Running-in notes
The first 1,500 km
G
Risk of accident
New brake pads/linings only have optimal
braking performance after several hundred
kilometres. Until then, compensate for this by
applying greater force to the brake pedal. This
also applies when brake pads/linings or
brake discs have been changed.
If you treat the engine with sufficient care
from the very start, you will be rewarded with
excellent performance for the remainder of
the engine's life.
R Therefore, you should drive at varying road
and engine speeds for the first 1,500 km.
R Avoid heavy loads, e.g. driving at full throt-
tle, during this time. Do not exceed 2
/ 3 of
the maximum permissible engine speed for
each gear.
R Change gear in good time.
R Do not shift down a gear manually in order
to brake.
R try to avoid depressing the accelerator
pedal beyond the pressure point (kick-
down).
R only use ranges 3,2or 1for slow driving,
e.g. in mountainous terrain.
After 1,500 km, you can continuously
increase the engine speed and bring the vehi-
cle up to full road speed.
i You should also observe these notes on
running in if the engine or the axle gear on
your vehicle has been replaced. Refuelling
Refuelling
G
Risk of explosion
Fuel is highly flammable. Fire, naked flames
and smoking are therefore prohibited when
handling fuels.
Switch off the engine before refuelling. G
Risk of injury
Avoid any contact with fuels.
You can damage your health if your skin
comes into direct contact with fuel or if you
inhale fuel vapours. G
Risk of fire
Do not use petrol to refuel vehicles with a die-
sel engine. Never mix diesel with petrol. This
causes damage to the fuel system and engine
and could result in the vehicle catching fire.
! Do not use petrol to refuel vehicles with a
diesel engine. Do not use diesel to refuel
vehicles with a petrol engine. Even a small
quantity of the wrong fuel will damage the
injection system. Damage resulting from
adding the wrong fuel is not covered by the
warranty.
! Do not start the engine if you accidentally
refuel with the wrong fuel. Otherwise, the
fuel could enter the fuel lines. This would
require draining of the fuel tank and fuel
lines. Notify a qualified specialist workshop
and have the fuel tank and fuel lines
drained completely.
When you open or close the vehicle with the
key, the fuel filler flap is automatically
unlocked or locked.
The position of the fuel filler cap is to the rear
on the right. The position of the fuel filler cap
is displayed in the instrument cluster 8.144 RefuellingOperation
X204_AKB; 1; 5, en-GB
wobuchh,
Version: 2.11.4 2008-10-15T13:20:56+02:00 - Seite 144Dateiname: 6515_0671_02_buchblock.pdf; preflight
Page 148 of 261

The arrow next to the filling pump indicates
the side of the vehicle.
:
To open the fuel filler flap
; To insert the fuel cap
= Tyre pressure table
? Fuel type
X To open: press the fuel filler flap in the
direction of arrow :.
The fuel filler flap opens slightly.
X Open the fuel filler flap.
X Turn the fuel filler cap anti-clockwise and
remove it.
X Insert the fuel filler cap into the holder
bracket on the inside of filler flap ;.
X Only fill the tank until the pump nozzle
switches off.
! Overfilling the fuel tank could damage the
fuel system.
X To close: replace the fuel filler cap and turn
it clockwise. The fuel filler cap audibly
engages.
X Close the fuel filler flap.
i Vehicles with a diesel engine: if the fuel
tank has been run completely dry, it will be
necessary to bleed the fuel system
(Y page 206). Petrol (EN 228)
! Refuel using only unleaded premium
grade petrol with a minimum octane num-
ber of 95 RON/85 MON conforming to
European standard EN 228.
Otherwise, you could impair engine output
or damage the engine.
i As a temporary measure, only when the
recommended fuel is not available, you
may also use regular unleaded petrol,
91 RON/82.5 MON. This may reduce
engine performance and increase fuel con-
sumption. Avoid driving at full throttle.
In some countries, the quality of the avail-
able petrol may not be adequate and could
cause coking around the inlet valve. In such
cases, and in consultation with a
Mercedes-Benz Service Centre, the petrol
may be mixed with the additive recommen-
ded by Mercedes-Benz (part no.
A000989254510). You must observe the
notes and mixing ratios specified on the
container.
Further information on "Fuel" (Y page 245) . Diesel (EN 590, DIN 51628)
G
Risk of fire
Do not use petrol to refuel vehicles with a die-
sel engine. Never mix diesel with petrol. This
would damage the fuel system and engine and
could result in a vehicle fire.
! Refuel using only diesel which conforms
to European standard EN 590 or German
standard DIN 51628.
Otherwise, you could impair engine output
or damage the engine.
! When refuelling vehicles with a diesel par-
ticulate filter in countries outside the EU,
only low-sulphur Euro diesel with less than
0.005 percent sulphur content by weight
(50 ppm) should be used. Refuelling
145Operation
X204_AKB; 1; 5, en-GB
wobuchh, Version: 2.11.4 2008-10-15T13:20:56+02:00 - Seite 145 ZDateiname: 6515_0671_02_buchblock.pdf; preflight
Page 153 of 261

on the left-hand side when viewed in the
direction of travel. i
Add windscreen washer concentrate to
the washer fluid all year round. G
Risk of fire
Windscreen washer fluid is highly flammable.
Fire, naked flames and smoking are prohibi-
ted when handling washer fluid concentrate.
! Only use windscreen washer fluid which
is suitable for plastic lamp lenses. Unsuit-
able windscreen washer fluid could dam-
age the plastic lamp lenses of the head-
lamps.
X Mix the windscreen washer fluid in a con-
tainer beforehand.
X At temperatures below freezing:
Fill the washer fluid reservoir with a mix of
water and windscreen washer concentrate
(e.g. MB SummerFit).
X At temperatures below freezing:
Fill the washer fluid reservoir with a mix of
water, antifreeze additive and windscreen
washer concentrate (e.g. MB WinterFit).
Adapt the mixing ratio to the outside tem-
peratures.
X To open: pull cap:upwards by the tab.
X Top up with the premixed washer fluid.
X To close: press cap :onto the filler neck
until it clicks into place. Tyres and wheels
Points to remember
! For safety reasons, Mercedes-Benz rec-
ommends that you only use tyres and
wheels which have been approved by
Mercedes-Benz specifically for your vehi-
cle. These tyres have been specially adap-
ted for use with the control systems, such
as ABS or ESP ®
, and are marked as follows:
R MO = Mercedes-Benz Original
If you use other tyres and wheels,
Mercedes-Benz cannot accept any respon-
sibility for damage that may result from
this. Further information about tyres,
wheels and approved combinations can be
obtained from any Mercedes-Benz Service
Centre.
If you use tyres other than those tested and
recommended for Mercedes-Benz vehi-
cles, characteristics such as handling, vehi-
cle noise emissions and fuel consumption
may be adversely affected. In addition, the
wheels may come into contact with the
body or axle components when heavily loa-
ded or when driving with snow chains. This
could result in damage to the tyres or the
vehicle.
! Retreaded tyres are neither tested nor
recommended by Mercedes-Benz, since
previous damage cannot always be detec-
ted on retreaded tyres. As a result,
Mercedes-Benz cannot guarantee vehicle
safety if retreaded tyres are fitted. Do not
fit used tyres if you have no information
about their previous usage. G
Risk of accident
Tyres, wheels or accessories which have not
been approved by Mercedes-Benz for your
vehicle or are not used as they should be, can
impair driving safety. As a result, you could
cause an accident. Before purchasing and
using them, enquire about their suitability, 150 Tyres and wheelsOperation
X204_AKB; 1; 5, en-GB
wobuchh,
Version: 2.11.4 2008-10-15T13:20:56+02:00 - Seite 150Dateiname: 6515_0671_02_buchblock.pdf; preflight
Page 155 of 261
Direction of rotation
Tyres with a specified direction of rotation
have additional benefits, e.g. if there is a risk
of aquaplaning. You will only gain these ben-
efits if the correct direction of rotation is
observed.
An arrow on the sidewall of the tyre indicates
its correct direction of rotation.
i An emergency spare wheel* may also be
fitted against the direction of rotation. Tyre tread
G
Risk of accident
Bear in mind that:
R tyre grip decreases rapidly on wet roads
when the tread depth is less than 3 mm.
Thus, you should replace tyres that have
insufficient tread.
R winter tyres should be replaced when the
tread depth is 4 mm or less as they will no
longer provide adequate grip.
R the tread on a tyre may not wear evenly.
Thus, you should regularly check the tread
depth and the condition of the tread across
the entire width of all tyres. If necessary,
turn the steering wheel so that you can see
the tyre tread more easily.
Otherwise, you could lose control of the vehi-
cle and cause an accident due to the reduced
grip of the tyres on the road. Tyre pressures
i You will find a table of tyre pressures for
various operating conditions on the inside
of your vehicle's fuel filler flap.
The valid value for the "Minispare" emer-
gency spare wheel* is stated on the spare
wheel and in the technical data section. G
Risk of accident
Tyre pressure that is either too high or too low
has a negative effect on the vehicle’s driving
safety, which could lead you to cause an acci-
dent. Therefore, you should regularly check
the pressure of all the tyres, particularly prior
to long trips, and correct the pressure as nec-
essary.
To test tyre pressure, use a suitable pressure
gauge. The outer appearance of a tyre does
not permit any reliable conclusion about the
tyre pressure. G
Risk of accident
Should the tyre pressure drop repeatedly:
R check the tyre for foreign bodies.
R check whether the wheel is losing air or the
valve is leaking.
R make sure that only a valve cap approved
by Mercedes-Benz has been fitted on the
tyre valve.
Tyre pressure that is too low has a negative
effect on the vehicle’s active safety, which
could lead to your causing an accident.
If possible, you should only correct tyre pres-
sures when the tyres are cold. Depending on
the ambient temperature, the speed you are
driving at and the load on the tyres, the tyre
temperature and thus the tyre pressure may
change by approximately 0.1 bar per 10 °C.
Take this into account when checking the
pressure of warm tyres and only correct it if
it is too low for the current operating condi-
tions.
Driving with tyre pressure that is too high or
too low can:
R shorten the service life of the tyres
R increase the likelihood of tyre damage
R have a negative effect on handling charac-
teristics (e.g. by causing aquaplaning) 152 Ty
res and wheelsOperation
* optional
X204_AKB; 1; 5, en-GB
wobuchh
,V ersion: 2.11.4
2008-10-15T13:20:56+02:00 - Seite 152 Dateiname: 6515_0671_02_buchblock.pdf; preflight
Page 162 of 261
R
Drive slowly and evenly, if necessary at a
walking pace.
R Ensure that the wheels are in contact with
the ground at all times.
R Drive with extreme care on unknown off-
road routes where visibility is poor. For
safety reasons, get out of the vehicle first
and survey the off-road route.
R Check the depth of water before fording
rivers and streams.
R Look out for obstacles such as rocks, holes,
tree stumps and furrows.
R Always keep the side windows and the pan-
orama sliding sunroof* closed during the
journey.
R Do not stray from marked routes or paths.
i Information about retrofitting special all-
terrain tyres is available from any
Mercedes-Benz Service Centre.
Checklist before driving off-road X
Engine oil level: check the engine oil and
top it up if necessary.
X Vehicle toolkit: check that the jack is
working and make sure you have the wheel-
brace, a robust tow cable and a folding
spade in the vehicle.
X Wheels and tyres: check the tyre tread
depth and tyre pressure.
X Check for damage and remove foreign
objects, e.g. small stones, from the
wheels/tyres.
X Replace any missing valve caps.
X Replace dented or damaged wheels.
Checklist after driving off-road Driving over rough terrain places greater
demands on your vehicle than driving on nor-
mal roads. After driving off-road, check the
vehicle. This allows you to detect damage
promptly and reduce the risk of an accident
to yourself and other road users. X
Deactivate DSR ( Ypage 105).
X Clean the headlamps and rear lights and
check for damage.
X Clean the front and rear licence plates.
X Clean the wheels/tyres with a water jet and
remove any foreign objects.
X Clean the wheels, wheel arches and the
vehicle underside with a water jet; check
for foreign objects and damage.
X Check whether twigs or other parts of
plants have become trapped. These
increase the risk of fire and can damage
fuel pipes, brake hoses or the rubber bel-
lows of the axle joints and propeller shafts.
X After the trip, examine without fail the
entire undercarriage, wheels, tyres, brakes,
bodywork structure, steering, chassis and
exhaust system for damage.
X After driving for extended periods across
sand, mud, gravel, water or in similarly dirty
conditions, have the brake discs, wheels,
brake pads /linings and axle joints checked
and cleaned.
X If you detect strong vibrations after off-road
travel, check for foreign objects in the
wheels and drive train and remove them if
necessary. Foreign objects can disturb the
balance and cause vibrations. Travelling uphill
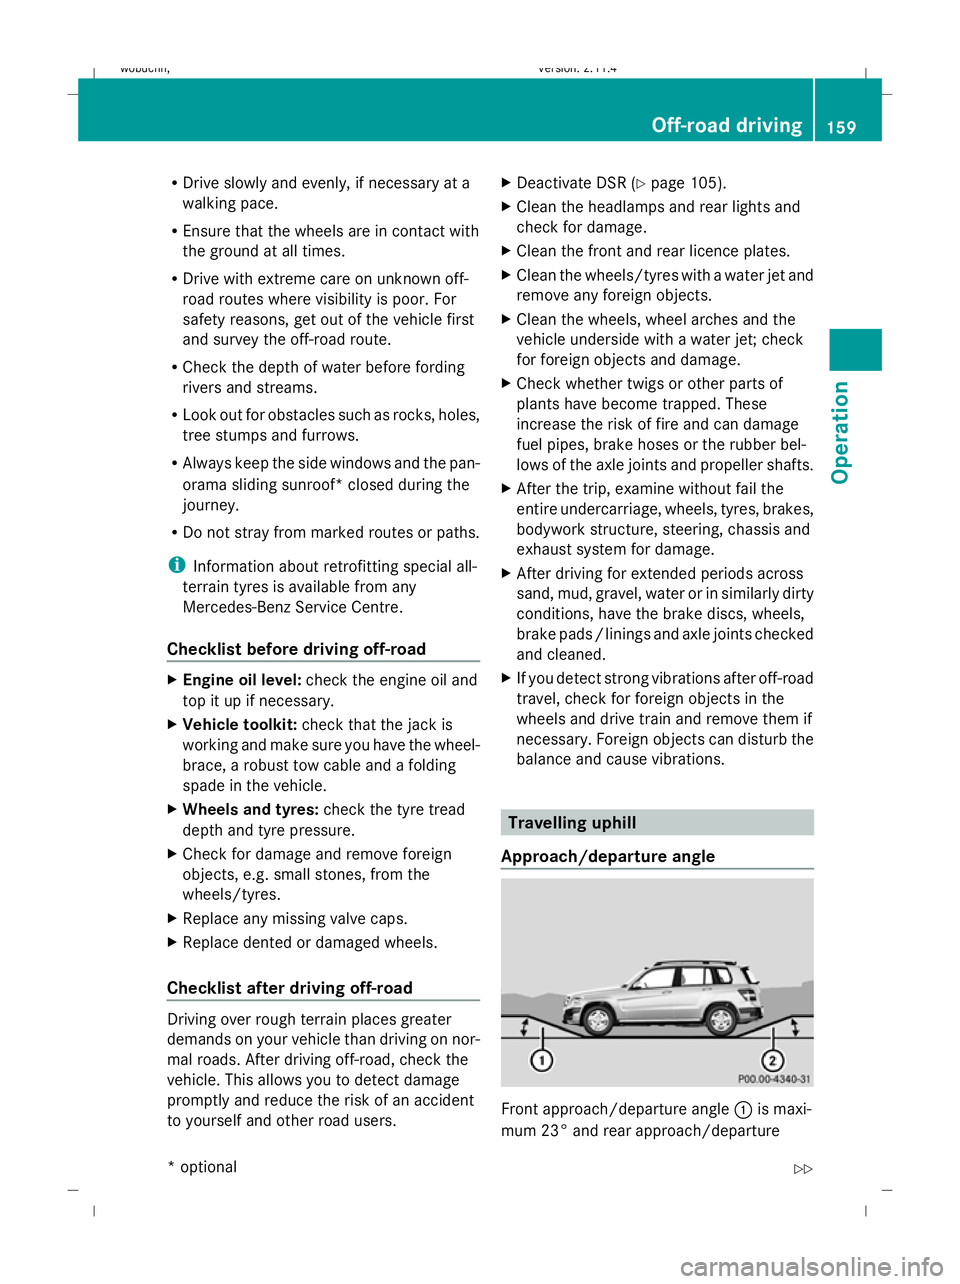
Approach/departure angle Front approach/departure angle
:is maxi-
mum 23° and rear approach/departure Off-road driving
159Operation
* optional
X204_AKB; 1; 5, en-GB
wobuchh,
Version: 2.11.4 2008-10-15T13:20:56+02:00 - Seite 159 ZDateiname: 6515_0671_02_buchblock.pdf; preflight
Page 168 of 261
G
Risk of accident
A maximum speed of 80 km/h should not be
exceeded, even in countries where higher
speeds are permitted for vehicle/trailer com-
binations. This lowers the risk of an accident.
When towing a trailer, your vehicle's handling
characteristics will be different in comparison
to when driving without a trailer.
The vehicle/trailer combination:
R is heavier
R is restricted in its acceleration and gradi-
ent-climbing capability
R has an increased braking distance
R is affected more by strong crosswinds
R demands more sensitive steering
R consumes more fuel
On long and steep downhill gradients, you
must select shift range 1,2or 3in good time.
i This also applies if you have activated
cruise control* or Speedtronic*.
This will use the braking effect of the engine,
so less braking will be required to maintain
the speed. This relieves the load on the brake
system and prevents the brakes from over-
heating and wearing too quickly. If you need
additional braking, depress the brake pedal
repeatedly rather than continuously. G
Risk of accident
Never depress the brake pedal continuously
while the vehicle is in motion, e.g. never cause
the brakes to rub by applying constant slight
pedal pressure. This causes the brake system
to overheat, increases the braking distance
and can lead to the brakes failing completely. Driving tips
R
Maintain a greater distance from the vehi-
cle in front than when driving without a
trailer.
R Avoid braking abruptly. If possible, brake
gently at first to allow the trailer to run on.
Then, increase the braking force rapidly.
R The values given for gradient-climbing
capabilities from a standstill refer to sea
level. When driving in mountainous areas,
note that the power output of the engine,
and consequently the vehicle's gradient-
climbing capability, decrease with increas-
ing altitude.
If the trailer swings from side to side:
X Do not accelerate.
X Do not counter-steer.
X Brake if necessary. G
Risk of accident
On no account should you attempt to draw the
vehicle/trailer combination out by increasing
speed. Removing the ball coupling
X Pull the protective cap off the lock in the
handwheel.
X Insert the key into the lock in the hand-
wheel.
X Turn the key clockwise.
The lock is unlocked.
X Hold the ball coupling. Pull the handwheel
away from the ball coupling and turn it
clockwise until it engages.
The green area on the ball coupling is
aligned with the red mark on the hand-
wheel.
X Pull out the ball coupling downwards.
X Clean the ball coupling if it is dirty.
X Open the stowage well under the luggage
compartment floor. Trailer towing*
165Operation
* optional
X204_AKB; 1; 5, en-GB
wobuchh,
Version: 2.11.4 2008-10-15T13:20:56+02:00 - Seite 165 ZDateiname: 6515_0671_02_buchblock.pdf; preflight