2008 MERCEDES-BENZ GLK SUV change key battery
[x] Cancel search: change key batteryPage 8 of 261
Selector lever positions.
...................85
Shift ranges. ..................................... 86
Trailer towing. ................................... 88
Axle load, permissible
Rear (trailer towing) ........................254 B
Bag hook............................................. 136
Ball coupling Fitting ............................................. 162
Removing....................................... .165
BAS (Brake Assist)............................... 52
Battery Changing (key).. .............................. 216
Charging. ........................................ 234
Checking (key). ............................... 216
Check lamp (key). ........................... 216
Disconnecting ................................. 233
Display message ............................. 184
Jump-starting. ................................. 234
Maintenance (vehicle)..................... 232
Reconnecting.................................. 234
Removing/fitting. ........................... 233
Vehicle battery. .............................. 232
Belt force limiters
Activation.......................................... 35
Belt height adjustment ........................72
Belt tensioners Activation.......................................... 35
Belt warning.......................................... 72
Bonnet
Bonnet catch .................................. 147
Display message ............................. 183
Opening/closing ............................ 146
Bonnet release lever
Release leve r.................................. 147
Boot
Automatic opening. ....................60, 61
Boot lid
Opening/closing. .............................. 59
Brake Assist
see BAS
Brake fluid .......................................... 248
Display message (luxury multi-
function steering wheel) .................185
Display message (multi-function
steering wheel). .............................. 180Brake lamps
Adaptive............................................ 52
Display message..................... 188, 191
Brakes
Parking brake................................... .84
Warning lamp..................................2 02
Brake system
Display message ............................. 185
Bulb
see Lamp
Bulbs
Brake lamp. .................................... 220
Display messages (multi-function
steering wheel). .............................. 194
Licence plate lamp.......................... 220
Overview. ........................................ 218
Rear foglamp. ................................. 220
Replacing. ....................................... 219
Reversing lamp. .............................. 220
Tail lamp ......................................... 220
Turn signal lamp. ....................219, 220 C
Care..................................................... 167
Automatic car wash. .......................168
Dashboard. ..................................... 170
Headlamps. .................................... 169
High-pressure cleaners. ..................168
Panorama sliding sunroo f............... 170
Parktronic. ...................................... 171
Plastic trim. .................................... 170
Rear window. .................................. 169
Reversing camera. ..........................172
Seat covers.................................... .170
Side windows ................................. 169
Steering wheel boss. ......................170
Tail pipes ........................................ 171
Trailer tow hitch. ............................. 172
Trim strips ...................................... 171
Windscreen. .................................... 169
Wiper blades.. ................................. 169
Wooden strips................................. 171
CD player/CD changer
Operating (on-board computer,
luxury multi-function steering
wheel). .............................................. 99 Index
5 X204_AKB; 1; 5, en-GB
wobuchh,
Version: 2.11.4
2008-10-15T13:20:56+02:00 - Seite 5 Dateiname: 6515_0671_02_buchblock.pdf; preflight
Page 61 of 261
Opening and closing
Key
The key centrally lock/unlocks:
R the doors
R the tailgate
R the fuel filler flap G
Risk of accident
If children are left unsupervised in the vehicle,
they could:
R open a door from the inside at any time,
even if it has been locked
R start the vehicle using a key which has been
left in the vehicle
R release the parking brake
They could, thereby, endanger themselves
and others. Never leave children unsuper-
vised in the vehicle. Always take the key with
you when leaving the vehicle, even if you are
only leaving it for a short time. :
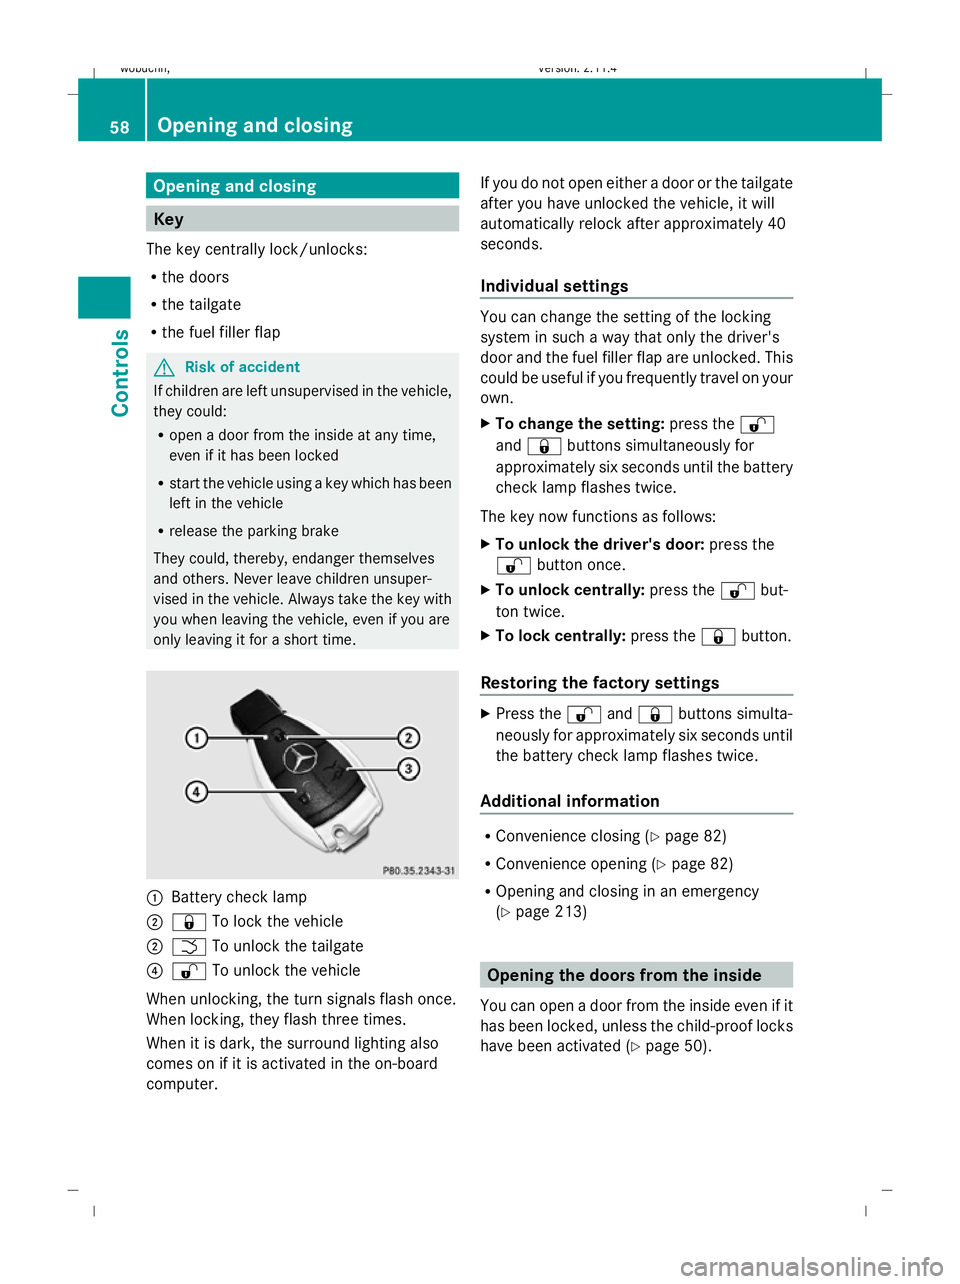
Battery check lamp
; & To lock the vehicle
; F To unlock the tailgate
? % To unlock the vehicle
When unlocking, the turn signals flash once.
When locking, they flash three times.
When it is dark, the surround lighting also
comes on if it is activated in the on-board
computer. If you do not open either a door or the tailgate
after you have unlocked the vehicle, it will
automatically relock after approximately 40
seconds.
Individual settings You can change the setting of the locking
system in such a way that only the driver's
door and the fuel filler flap are unlocked. This
could be useful if you frequently travel on your
own.
X To change the setting: press the%
and & buttons simultaneously for
approximately six seconds until the battery
check lamp flashes twice.
The key now functions as follows:
X To unlock the driver's door: press the
% button once.
X To unlock centrally: press the%but-
ton twice.
X To lock centrally: press the&button.
Restoring the factory settings X
Press the %and& buttons simulta-
neously for approximately six seconds until
the battery check lamp flashes twice.
Additional information R
Convenience closing (Y page 82)
R Convenience opening (Y page 82)
R Opening and closing in an emergency
(Y page 213) Opening the doors from the inside
You can open a door from the inside even if it
has been locked, unless the child-proof locks
have been activated (Y page 50).58 Opening and closingControls
X204_AKB; 1; 5, en-GB
wobuchh,
Version: 2.11.4 2008-10-15T13:20:56+02:00 - Seite 58Dateiname: 6515_0671_02_buchblock.pdf; preflight
Page 130 of 261
X
To deactivate: press theTbutton.
The indicator lamp in the Tbutton goes
out.
i The residual heat automatically switches
off after around 30 minutes or if:
R the ignition is switched on
R the battery voltage drops Sliding sunroof
General notes
G
Risk of injury
Make sure that nobody can become trapped
when closing the sliding sunroof. If there is a
risk of entrapment, release the switch and
push it briefly in any direction to stop the slid-
ing sunroof. G
Risk of injury
Children could injure themselves if they oper-
ate the sliding sunroof.
Never leave children unsupervised in the vehi-
cle. Always take the key with you when leaving
the vehicle, even if you are only leaving it for
a short time. G
Risk of injury
The glass in the panorama sunroof could
break in an accident. If you are not wearing a
seat belt, there is a risk that you could be
thrown through the opening in the event of the
vehicle overturning. Therefore, always wear a
seat belt to reduce the risk of injuries.
! Only open the panorama sliding sunroof
if it is free of snow and ice. Otherwise, mal-
functions may occur.
Do not allow anything to protrude from the
sliding sunroof. The seals could otherwise
be damaged.
i When the sliding sunroof is open, apart
from the normal airflow noises resonance
noises may also occur. They are caused by minor pressure fluctuations in the vehicle
interior. Change the position of the sliding
sunroof or open a side window slightly to
reduce or eliminate these noises.
i Related topics:
R convenience opening from the outside
(Y page 82) or from the inside
(Y page 126)
R convenience closing from the outside
(Y page 82) or from the inside
(Y page 126)
R automatic closing of the sliding sunroof
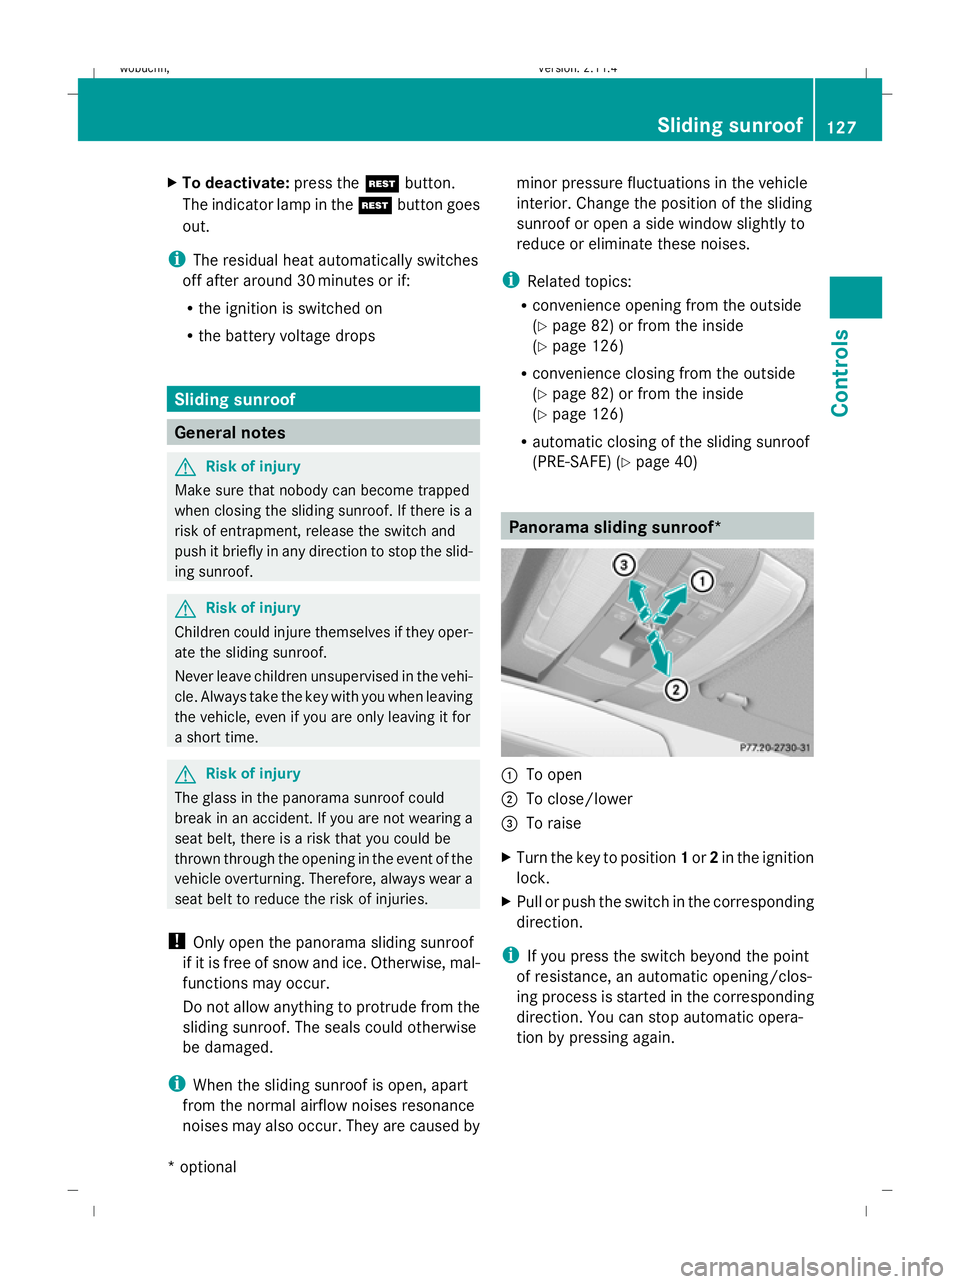
(PRE-SAFE) (Y page 40) Panorama sliding sunroof*
:
To open
; To close/lower
= To raise
X Turn the key to position 1or 2in the ignition
lock.
X Pull or push the switch in the corresponding
direction.
i If you press the switch beyond the point
of resistance, an automatic opening/clos-
ing process is started in the corresponding
direction. You can stop automatic opera-
tion by pressing again. Sliding sunroof
127Controls
* optional
X204_AKB; 1; 5, en-GB
wobuchh
,V ersion: 2.11.4
2008-10-15T13:20:56+02:00 - Seite 127 ZDateiname: 6515_0671_02_buchblock.pdf; preflight
Page 169 of 261
X
Remove the protective cap from the ball
coupling recess.
X Press the protective cap into the ball cou-
pling recess until it engages.
X Store the ball coupling with the key inser-
ted in the ball coupling recess.
X Fold the trailer power socket upwards. G
Risk of accident
Do not carry the ball coupling in the vehicle
interior if it is not secured.
Otherwise, you and others could be injured by
the ball coupling being thrown around if you:
R brake sharply
R change direction suddenly
R are involved in an accident Trailer power supply
When it leaves the factory, your vehicle's
trailer socket outlet is equipped with a per-
manent power supply and a power supply that
is switched on via the ignition lock.
The permanent power supply is supplied via
trailer socket pin 9.
The power supply that is switched on via the
ignition lock is supplied via trailer socket pin
10.
! You can connect consumers with a power
rating of up to 240 W to the permanent
power supply and up to 180 W to the power
supply that is switched on via the ignition
lock.
You must not charge a trailer battery using
the power supply.
The trailer's permanent power supply is
switched off in the event of low vehicle supply
voltage and after six hours at the latest.
The trailer's turn signal lamps are only guar-
anteed to function when bulbs are used.
You can obtain further information about
installing the trailer electrics from a qualified
specialist workshop, e.g. a Mercedes-Benz
Service Centre. X
To switch the connected power supply
on or off: turn the key in the ignition lock
to position 2or 0, respectively. Trailer with 7-pin connector
If your trailer has a 7-pin connector, you can
connect it to the 13-pin socket on the ball
coupling using an adapter or, if necessary, an
adapter cable. Both of these can be obtained
at a qualified specialist workshop, e.g. at a
Mercedes-Benz Service Centre.
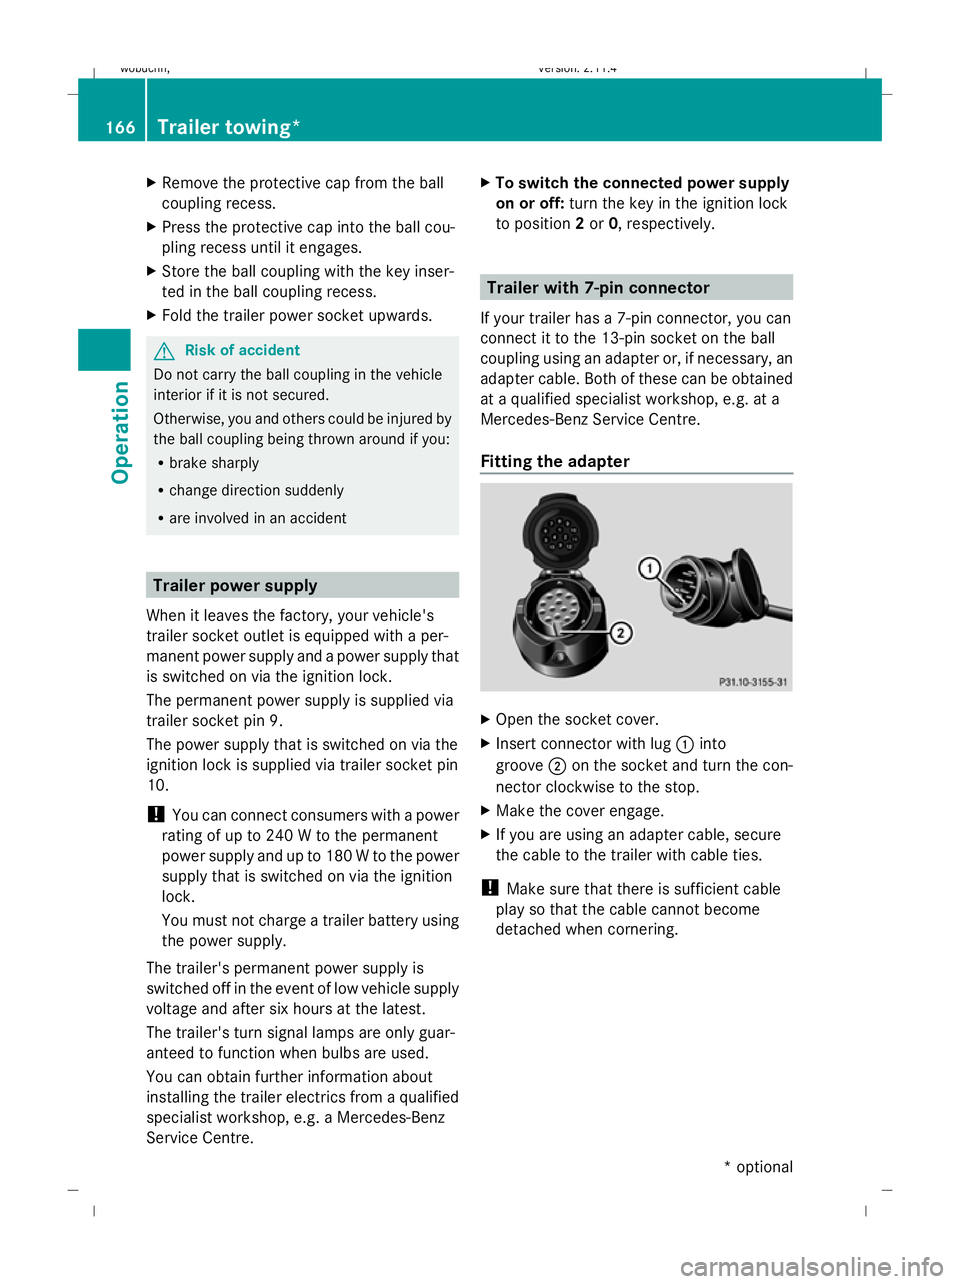
Fitting the adapter X
Open the socket cover.
X Insert connector with lug :into
groove ;on the socket and turn the con-
nector clockwise to the stop.
X Make the cover engage.
X If you are using an adapter cable, secure
the cable to the trailer with cable ties.
! Make sure that there is sufficient cable
play so that the cable cannot become
detached when cornering. 166
Traile
r towing*Operation
* optional
X204_AKB; 1; 5, en-GB
wobuchh
,V ersion: 2.11.4
2008-10-15T13:20:56+02:00 - Seite 166 Dateiname: 6515_0671_02_buchblock.pdf; preflight
Page 215 of 261
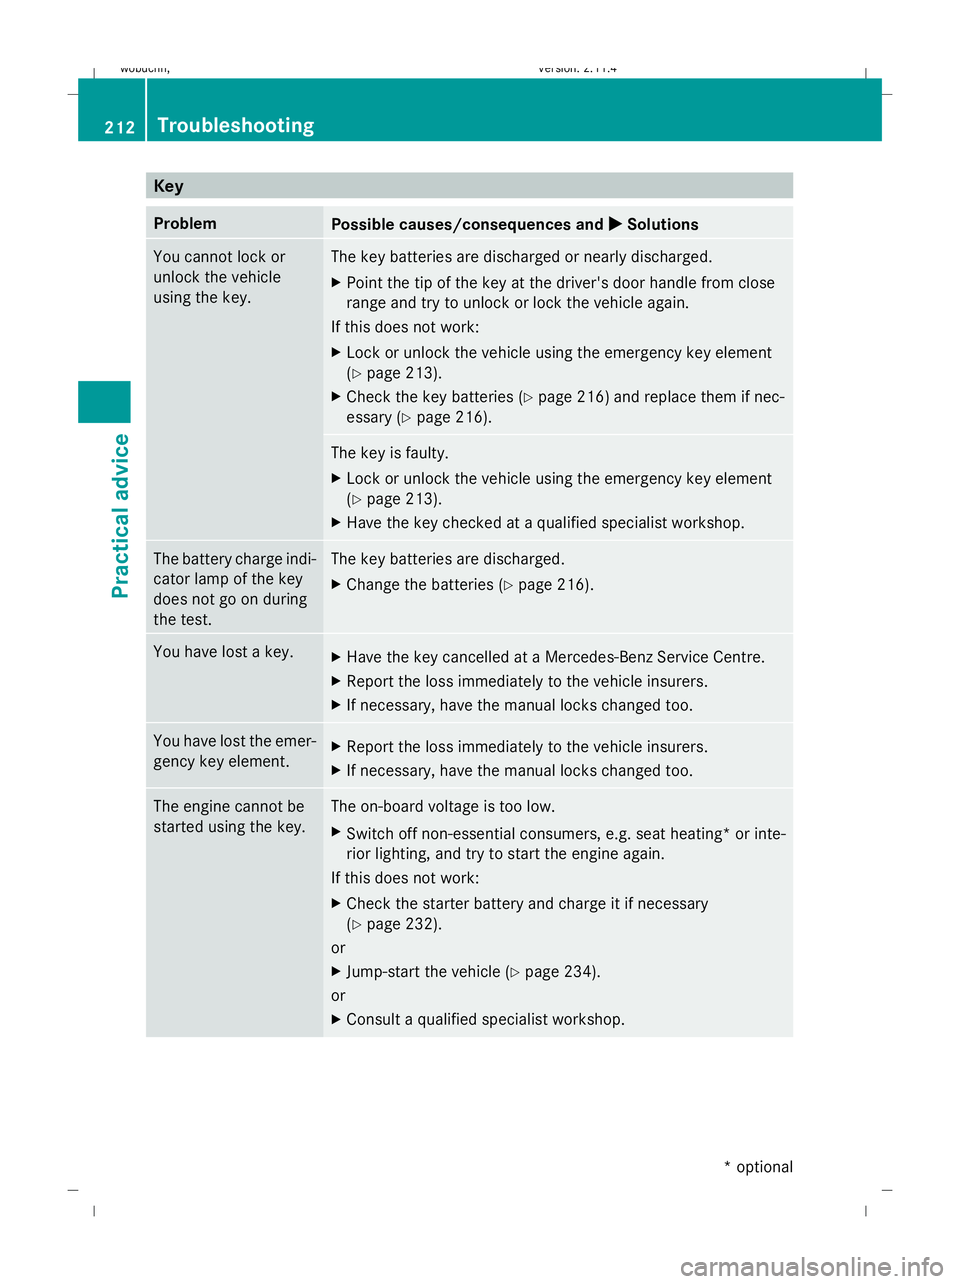
Key
Problem
Possible causes/consequences and
X XSolutions You cannot lock or
unlock the vehicle
using the key. The key batteries are discharged or nearly discharged.
X
Point the tip of the key at the driver's door handle from close
range and try to unlock or lock the vehicle again.
If this does not work:
X Lock or unlock the vehicle using the emergency key element
(Y page 213).
X Check the key batteries (Y page 216) and replace them if nec-
essary ( Ypage 216). The key is faulty.
X
Lock or unlock the vehicle using the emergency key element
(Y page 213).
X Have the key checked at a qualified specialist workshop. The battery charge indi-
cator lamp of the key
does not go on during
the test. The key batteries are discharged.
X
Change the batteries ( Ypage 216). You have lost a key.
X
Have the key cancelled at a Mercedes-Benz Service Centre.
X Report the loss immediately to the vehicle insurers.
X If necessary, have the manual locks changed too. You have lost the emer-
gency key element.
X
Report the loss immediately to the vehicle insurers.
X If necessary, have the manual locks changed too. The engine cannot be
started using the key. The on-board voltage is too low.
X
Switch off non-essential consumers, e.g. seat heating* or inte-
rior lighting, and try to start the engine again.
If this does not work:
X Check the starter battery and charge it if necessary
(Y page 232).
or
X Jump-start the vehicle (Y page 234).
or
X Consult a qualified specialist workshop. 212 TroubleshootingPractical advice
* optional
X204_AKB; 1; 5, en-GB
wobuchh,
Version: 2.11.4 2008-10-15T13:20:56+02:00 - Seite 212Dateiname: 6515_0671_02_buchblock.pdf; preflight
Page 220 of 261
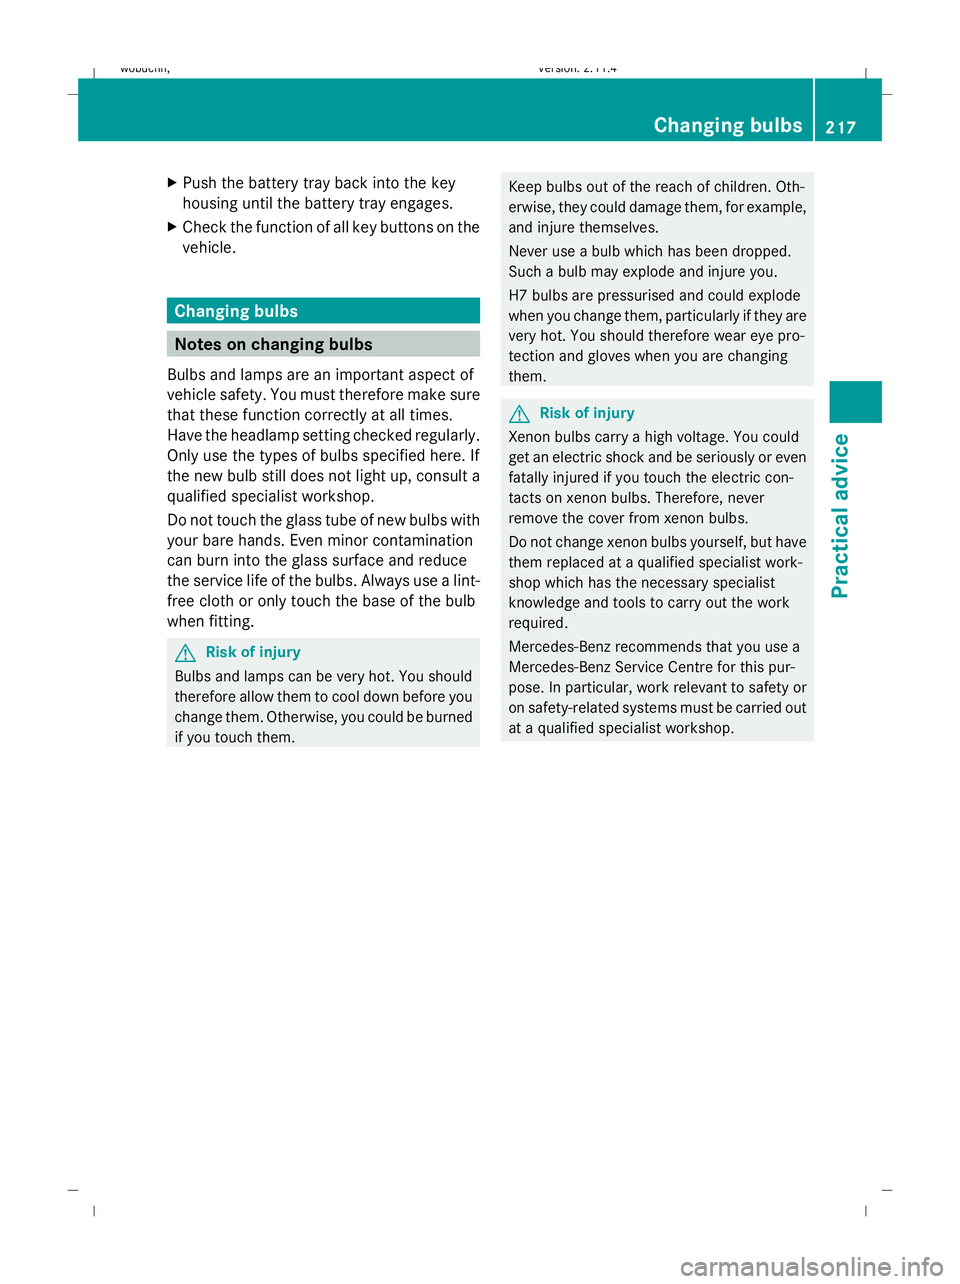
X
Push the battery tray back into the key
housing until the battery tray engages.
X Check the function of all key buttons on the
vehicle. Changing bulbs
Notes on changing bulbs
Bulbs and lamps are an important aspect of
vehicle safety. You must therefore make sure
that these function correctly at all times.
Have the headlamp setting checked regularly.
Only use the types of bulbs specified here. If
the new bulb still does not light up, consult a
qualified specialist workshop.
Do not touch the glass tube of new bulbs with
your bare hands. Even minor contamination
can burn into the glass surface and reduce
the service life of the bulbs. Always use a lint-
free cloth or only touch the base of the bulb
when fitting. G
Risk of injury
Bulbs and lamps can be very hot. You should
therefore allow them to cool down before you
change them. Otherwise, you could be burned
if you touch them. Keep bulbs out of the reach of children. Oth-
erwise, they could damage them, for example,
and injure themselves.
Never use a bulb which has been dropped.
Such a bulb may explode and injure you.
H7 bulbs are pressurised and could explode
when you change them, particularly if they are
very hot. You should therefore wear eye pro-
tection and gloves when you are changing
them. G
Risk of injury
Xenon bulbs carry a high voltage. You could
get an electric shock and be seriously or even
fatally injured if you touch the electric con-
tacts on xenon bulbs. Therefore, never
remove the cover from xenon bulbs.
Do not change xenon bulbs yourself, but have
them replaced at a qualified specialist work-
shop which has the necessary specialist
knowledge and tools to carry out the work
required.
Mercedes-Benz recommends that you use a
Mercedes-Benz Service Centre for this pur-
pose. In particular, work relevant to safety or
on safety-related systems must be carried out
at a qualified specialist workshop. Changing bulbs
217Practical advice
X204_AKB; 1; 5, en-GB
wobuchh, Version: 2.11.4 2008-10-15T13:20:56+02:00 - Seite 217 ZDateiname: 6515_0671_02_buchblock.pdf; preflight