2008 MERCEDES-BENZ GLK SUV height
[x] Cancel search: heightPage 8 of 261
Selector lever positions.
...................85
Shift ranges. ..................................... 86
Trailer towing. ................................... 88
Axle load, permissible
Rear (trailer towing) ........................254 B
Bag hook............................................. 136
Ball coupling Fitting ............................................. 162
Removing....................................... .165
BAS (Brake Assist)............................... 52
Battery Changing (key).. .............................. 216
Charging. ........................................ 234
Checking (key). ............................... 216
Check lamp (key). ........................... 216
Disconnecting ................................. 233
Display message ............................. 184
Jump-starting. ................................. 234
Maintenance (vehicle)..................... 232
Reconnecting.................................. 234
Removing/fitting. ........................... 233
Vehicle battery. .............................. 232
Belt force limiters
Activation.......................................... 35
Belt height adjustment ........................72
Belt tensioners Activation.......................................... 35
Belt warning.......................................... 72
Bonnet
Bonnet catch .................................. 147
Display message ............................. 183
Opening/closing ............................ 146
Bonnet release lever
Release leve r.................................. 147
Boot
Automatic opening. ....................60, 61
Boot lid
Opening/closing. .............................. 59
Brake Assist
see BAS
Brake fluid .......................................... 248
Display message (luxury multi-
function steering wheel) .................185
Display message (multi-function
steering wheel). .............................. 180Brake lamps
Adaptive............................................ 52
Display message..................... 188, 191
Brakes
Parking brake................................... .84
Warning lamp..................................2 02
Brake system
Display message ............................. 185
Bulb
see Lamp
Bulbs
Brake lamp. .................................... 220
Display messages (multi-function
steering wheel). .............................. 194
Licence plate lamp.......................... 220
Overview. ........................................ 218
Rear foglamp. ................................. 220
Replacing. ....................................... 219
Reversing lamp. .............................. 220
Tail lamp ......................................... 220
Turn signal lamp. ....................219, 220 C
Care..................................................... 167
Automatic car wash. .......................168
Dashboard. ..................................... 170
Headlamps. .................................... 169
High-pressure cleaners. ..................168
Panorama sliding sunroo f............... 170
Parktronic. ...................................... 171
Plastic trim. .................................... 170
Rear window. .................................. 169
Reversing camera. ..........................172
Seat covers.................................... .170
Side windows ................................. 169
Steering wheel boss. ......................170
Tail pipes ........................................ 171
Trailer tow hitch. ............................. 172
Trim strips ...................................... 171
Windscreen. .................................... 169
Wiper blades.. ................................. 169
Wooden strips................................. 171
CD player/CD changer
Operating (on-board computer,
luxury multi-function steering
wheel). .............................................. 99 Index
5 X204_AKB; 1; 5, en-GB
wobuchh,
Version: 2.11.4
2008-10-15T13:20:56+02:00 - Seite 5 Dateiname: 6515_0671_02_buchblock.pdf; preflight
Page 16 of 261
Reversing lamps
Display messag e............................. 194
Roller blind
see Roller sunblind
Roller sunblind
Panorama sliding sunroo f............... 128
Roof load (maximum) ......................... 249
Roof rack............................................. 137
Route see Route guidance
Route guidance
On-board computer (luxury multi-
function steering wheel) ...................97 S
Safety net............................................ 134
Seat Adjusting .................................... 62, 63
Correct driver's seat position. ..........73
Storing settings ................................ 69
Seat belt
Adjusting the height.......................... 72
Centre rear-compartment sea t......... 72
Display message .......................72, 183
Fastening. ......................................... 70
Warning lamp. .......................... 72, 203
Seat covers
Cleaning. ........................................ 170
Seat heating......................................... .65
Seat ventilation Malfunction indicator lamp. ............199
Securing a load................................... 133
Selector lever Positions. .......................................... 86
Service
On-board computer (luxury multi-
function steering wheel) .................101
Service indicator................................ 167
Service products................................ 245
Brake fluid. ..................................... 248
Coolant. .......................................... 247
Engine oil ........................................ 246
Fuel................................................. 245
Windscreen washer fluid. ................249Settings
Calling up a stored setting. ...............69
Factory (on-board computer,
luxury multi-function steering
wheel). ............................................ 104
On-board computer (luxury multi-
function steering wheel) .................101
Shift ranges
Automatic transmission ....................86
Indicator in the multi-function dis-
play .................................................. 85
Sidebag................................................. 39
Side window Fault. .............................................. 211
Side windows
Cleaning ......................................... 169
Opening/closing. .............................. 80
Ski rack............................................... 137
Sliding sunroof see Panorama sliding sunroof
Snow chains....................................... 155
Socket Cockpit. .......................................... 139
Luggage compartment. ...................140
Rear compartment. .........................139
Spare wheel
Technical data. ............................... 253
Speed limiter
Speedtronic. ................................... 110
Speedometer
Additional (on-board computer,
luxury multi-function steering
wheel). .............................................. 96
Segments.......................................... 90
Selecting display units (on-board
computer, luxury multi-function
steering wheel). .............................. 101
Speedtronic........................................ 110
Display message ............................. 182
Permanent. ..................................... 112
Variabl e.......................................... 111
SRS (Supplemental Restraint Sys-
tem)....................................................... 35
Display message ............................. 196
Warning lamp. .......................... 35, 202 Index
13 X204_AKB; 1; 5, en-GB
wobuchh,
Version: 2.11.4
2008-10-15T13:20:56+02:00 - Seite 13 Dateiname: 6515_0671_02_buchblock.pdf; preflight
Page 47 of 261
possible that the
4PASSENGER AIRBAG
OFF warning lamp will not light up briefly if you
turn the key in the ignition lock to position 2.
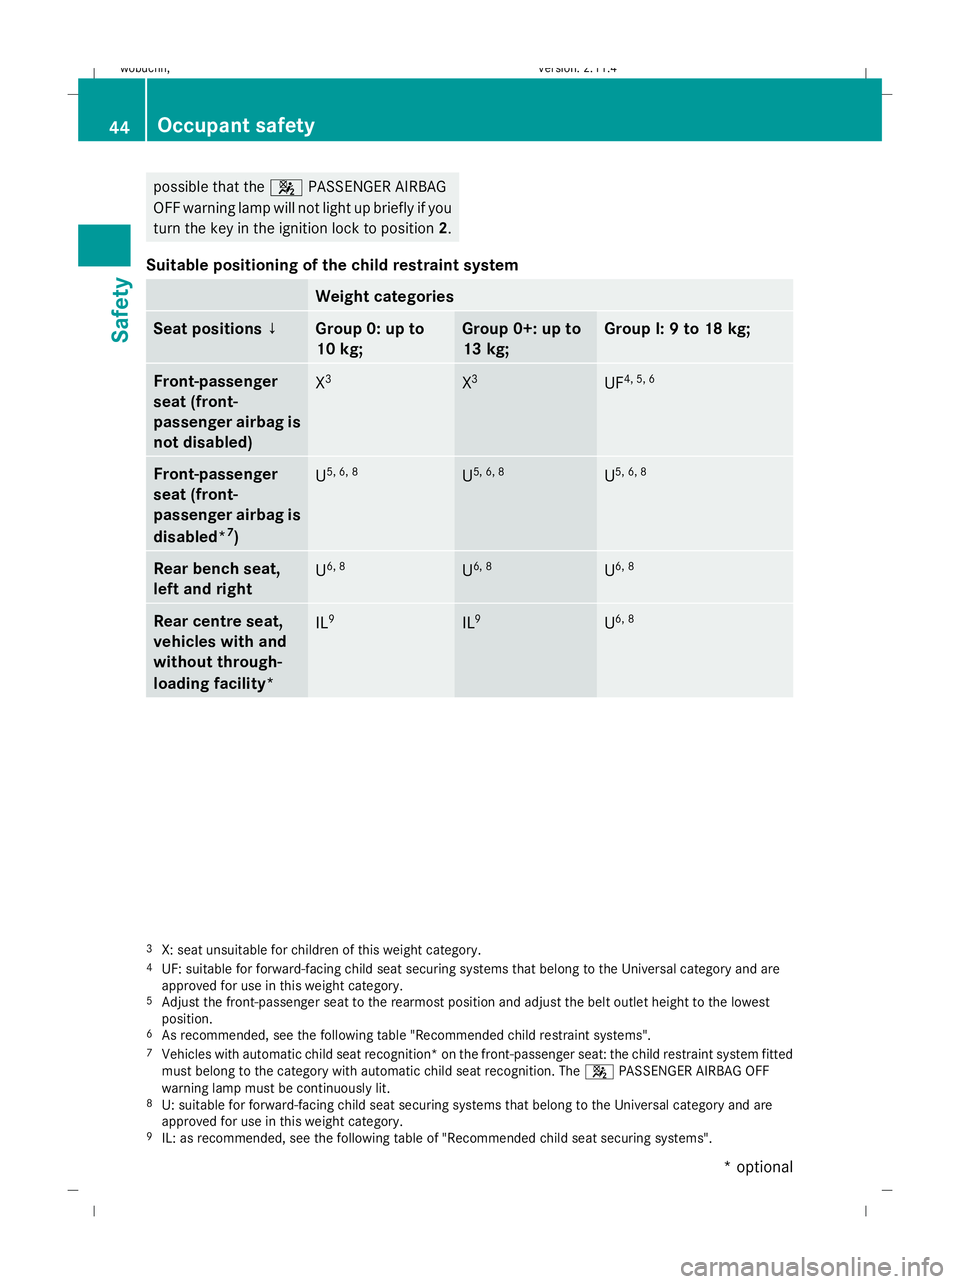
Suitable positioning of the child restraint system Weight categories
Seat positions ↓ Group 0: up to
10 kg; Group 0+: up to
13 kg; Group I: 9 to 18 kg;
Front-passenger
seat (front-
passenger airbag is
not disabled)
X
3 X
3 UF
4, 5, 6 Front-passenger
seat (front-
passenger airbag is
disabled*
7
) U
5, 6, 8 U
5, 6, 8 U
5, 6, 8 Rear bench seat,
left and right
U
6, 8 U
6, 8 U
6, 8 Rear centre seat,
vehicles with and
without through-
loading facility*
IL
9 IL
9 U
6, 8 3
X: seat unsuitable for children of this weight category.
4 UF: suitable for forward-facing child seat securing systems that belong to the Universal category and are
approved for use in this weight category.
5 Adjust the front-passenger seat to the rearmost position and adjust the belt outlet height to the lowest
position.
6 As recommended, see the following table "Recommended child restraint systems".
7 Vehicles with automatic child seat recognition* on the front-passenger seat: the child restraint system fitted
must belong to the category with automatic child seat recognition. The 4PASSENGER AIRBAG OFF
warning lamp must be continuously lit.
8 U: suitable for forward-facing child seat securing systems that belong to the Universal category and are
approved for use in this weight category.
9 IL: as recommended, see the following table of "Recommended child seat securing systems". 44 Occupant safetySafety
* optional
X204_AKB; 1; 5, en-GB
wobuchh,
Version: 2.11.4 2008-10-15T13:20:56+02:00 - Seite 44Dateiname: 6515_0671_02_buchblock.pdf; preflight
Page 48 of 261
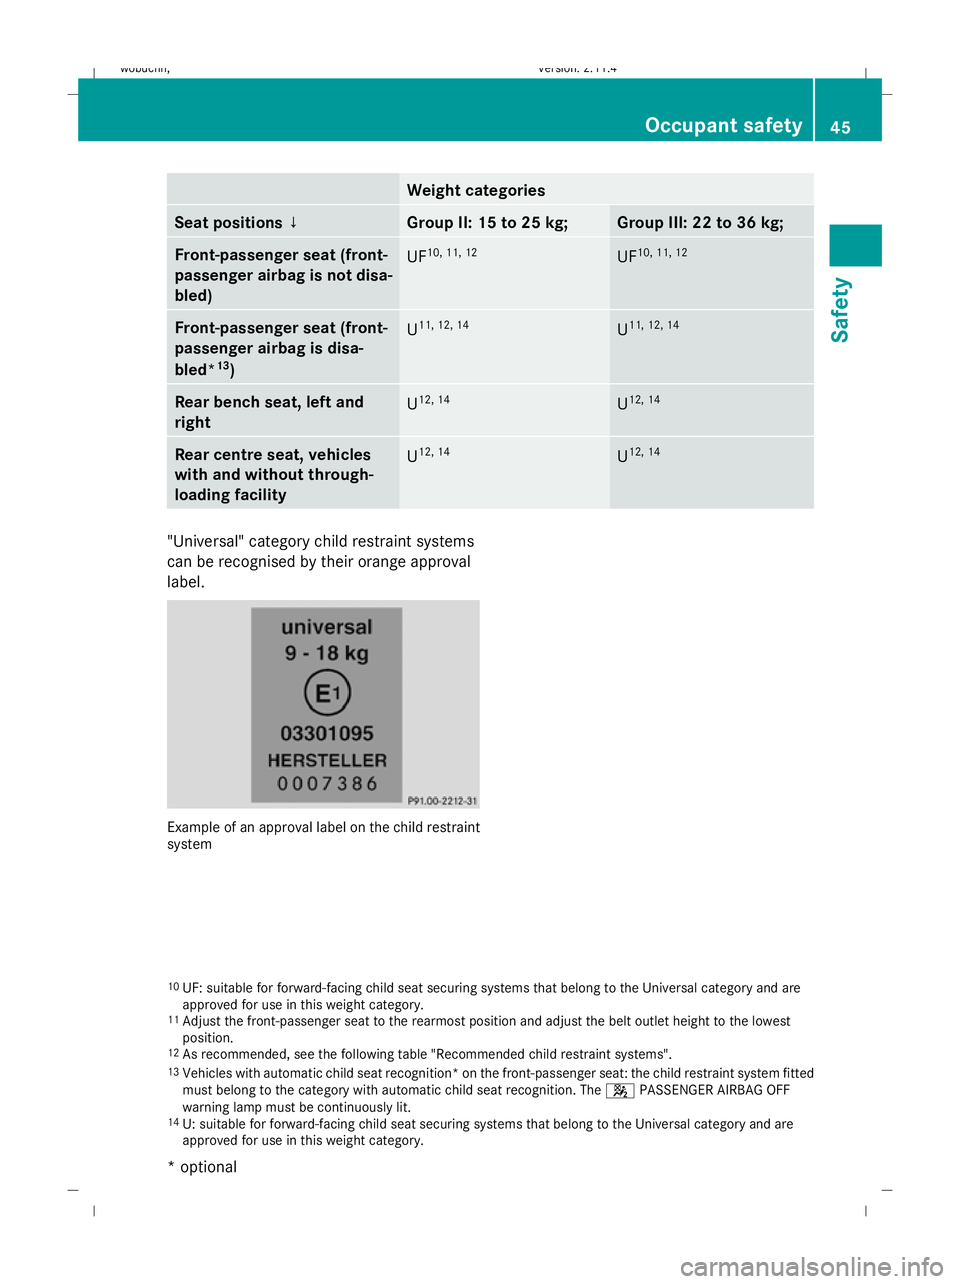
Weight categories
Seat positions ↓ Group II: 15 to 25 kg; Group III: 22 to 36 kg;
Front-passenger seat (front-
passenger airbag is not disa-
bled) UF
10, 11, 12 UF
10, 11, 12 Front-passenger seat (front-
passenger airbag is disa-
bled* 13
) U
11, 12, 14 U
11, 12, 14 Rear bench seat, left and
right U
12, 14 U
12, 14 Rear centre seat, vehicles
with and without through-
loading facility
U
12, 14 U
12, 14 "Universal" category child restraint systems
can be recognised by their orange approval
label. Example of an approval label on the child restraint
system
10 UF: suitable for forward-facing child seat securing systems that belong to the Universal category and are
approved for use in this weight category.
11 Adjust the front-passenger seat to the rearmost position and adjust the belt outlet height to the lowest
position.
12 As recommended, see the following table "Recommended child restraint systems".
13 Vehicles with automatic child seat recognition* on the front-passenger seat: the child restraint system fitted
must belong to the category with automatic child seat recognition. The 4PASSENGER AIRBAG OFF
warning lamp must be continuously lit.
14 U: suitable for forward-facing child seat securing systems that belong to the Universal category and are
approved for use in this weight category. Occupant safety
45Safety
* optional
X204_AKB; 1; 5, en-GB
wobuchh,
Version: 2.11.4 2008-10-15T13:20:56+02:00 - Seite 45 ZDateiname: 6515_0671_02_buchblock.pdf; preflight
Page 66 of 261
Backrest angle
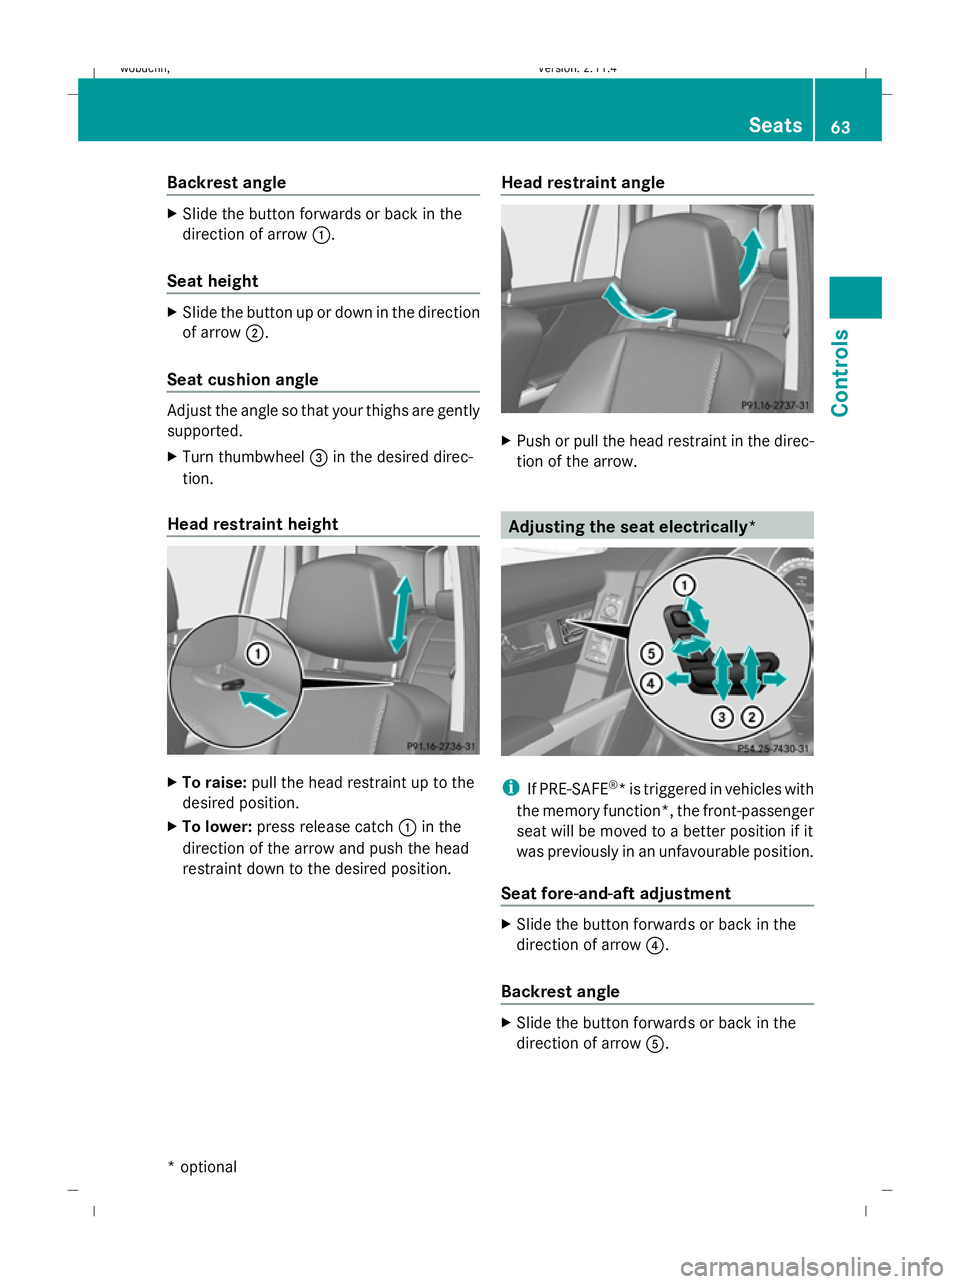
X
Slide the button forwards or back in the
direction of arrow :.
Seat height X
Slide the button up or down in the direction
of arrow ;.
Seat cushion angle Adjust the angle so that your thighs are gently
supported.
X Turn thumbwheel =in the desired direc-
tion.
Head restraint height X
To raise: pull the head restraint up to the
desired position.
X To lower: press release catch :in the
direction of the arrow and push the head
restraint down to the desired position. Head restraint angle X
Push or pull the head restraint in the direc-
tion of the arrow. Adjusting the seat electrically*
i
If PRE-SAFE ®
*i s triggered in vehicles with
the memory function*, the front-passenger
seat will be moved to a better position if it
was previously in an unfavourable position.
Seat fore-and-aft adjustment X
Slide the button forwards or back in the
direction of arrow ?.
Backrest angle X
Slide the button forwards or back in the
direction of arrow A. Seats
63Controls
* optional
X204_AKB; 1; 5, en-GB
wobuchh,
Version: 2.11.4 2008-10-15T13:20:56+02:00 - Seite 63 ZDateiname: 6515_0671_02_buchblock.pdf; preflight
Page 67 of 261
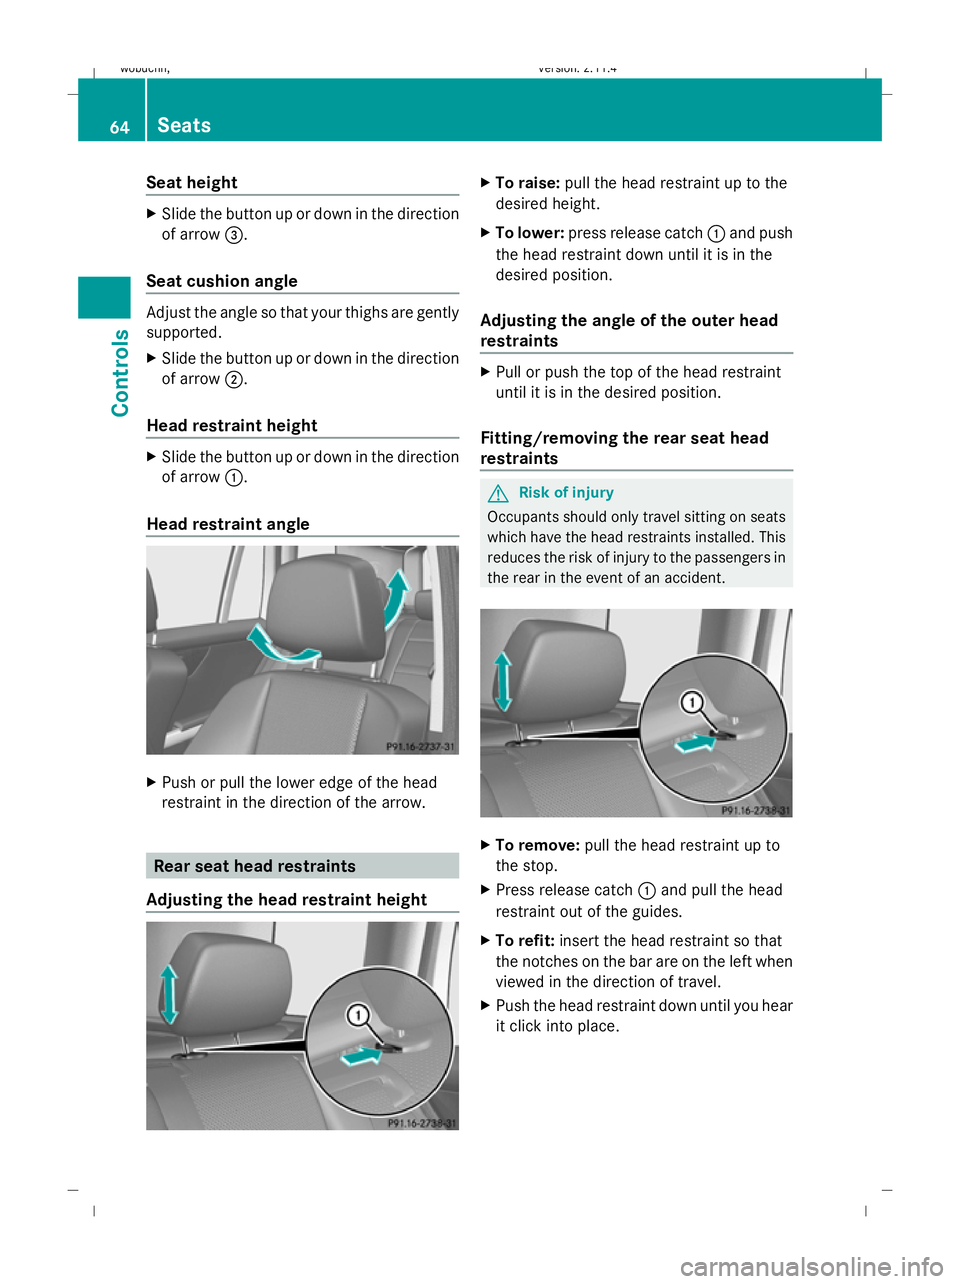
Seat height
X
Slide the button up or down in the direction
of arrow =.
Seat cushion angle Adjust the angle so that your thighs are gently
supported.
X Slide the button up or down in the direction
of arrow ;.
Head restraint height X
Slide the button up or down in the direction
of arrow :.
Head restraint angle X
Push or pull the lower edge of the head
restraint in the direction of the arrow. Rear seat head restraints
Adjusting the head restraint height X
To raise: pull the head restraint up to the
desired height.
X To lower: press release catch :and push
the head restraint down until it is in the
desired position.
Adjusting the angle of the outer head
restraints X
Pull or push the top of the head restraint
until it is in the desired position.
Fitting/removing the rear seat head
restraints G
Risk of injury
Occupants should only travel sitting on seats
which have the head restraints installed. This
reduces the risk of injury to the passengers in
the rear in the event of an accident. X
To remove: pull the head restraint up to
the stop.
X Press release catch :and pull the head
restraint out of the guides.
X To refit: insert the head restraint so that
the notches on the bar are on the left when
viewed in the direction of travel.
X Push the head restraint down until you hear
it click into place. 64 SeatsControls
X204_AKB; 1; 5, en-GB
wobuchh,
Version: 2.11.4 2008-10-15T13:20:56+02:00 - Seite 64Dateiname: 6515_0671_02_buchblock.pdf; preflight
Page 69 of 261
Steering wheel
Points to remember
Depending on the vehicle equipment, you can
adjust the steering wheel either manually or
electrically*. G
Risk of injury
The electrically adjustable steering wheel*
can be adjusted when the key is removed
from the ignition lock. Therefore, do not leave
children unsupervised in the vehicle as they
could become trapped as the steering wheel
is adjusted. G
Risk of accident
Only adjust the steering wheel when the vehi-
cle is stationary and do not pull away until the
steering wheel adjustment mechanism is
locked in position. Otherwise, you might drive
without the steering wheel adjustment mech-
anism being locked in position and be distrac-
ted from road and traffic conditions by an
unexpected movement of the steering wheel
and cause an accident.
However, the steerability of the vehicle is not
affected.
When you adjust the steering wheel, make
sure that:
R the steering wheel can be reached with
your arms slightly bent
R you can move your legs freely
R you can see all the displays in the instru-
ment cluster clearly Adjusting the steering wheel man-
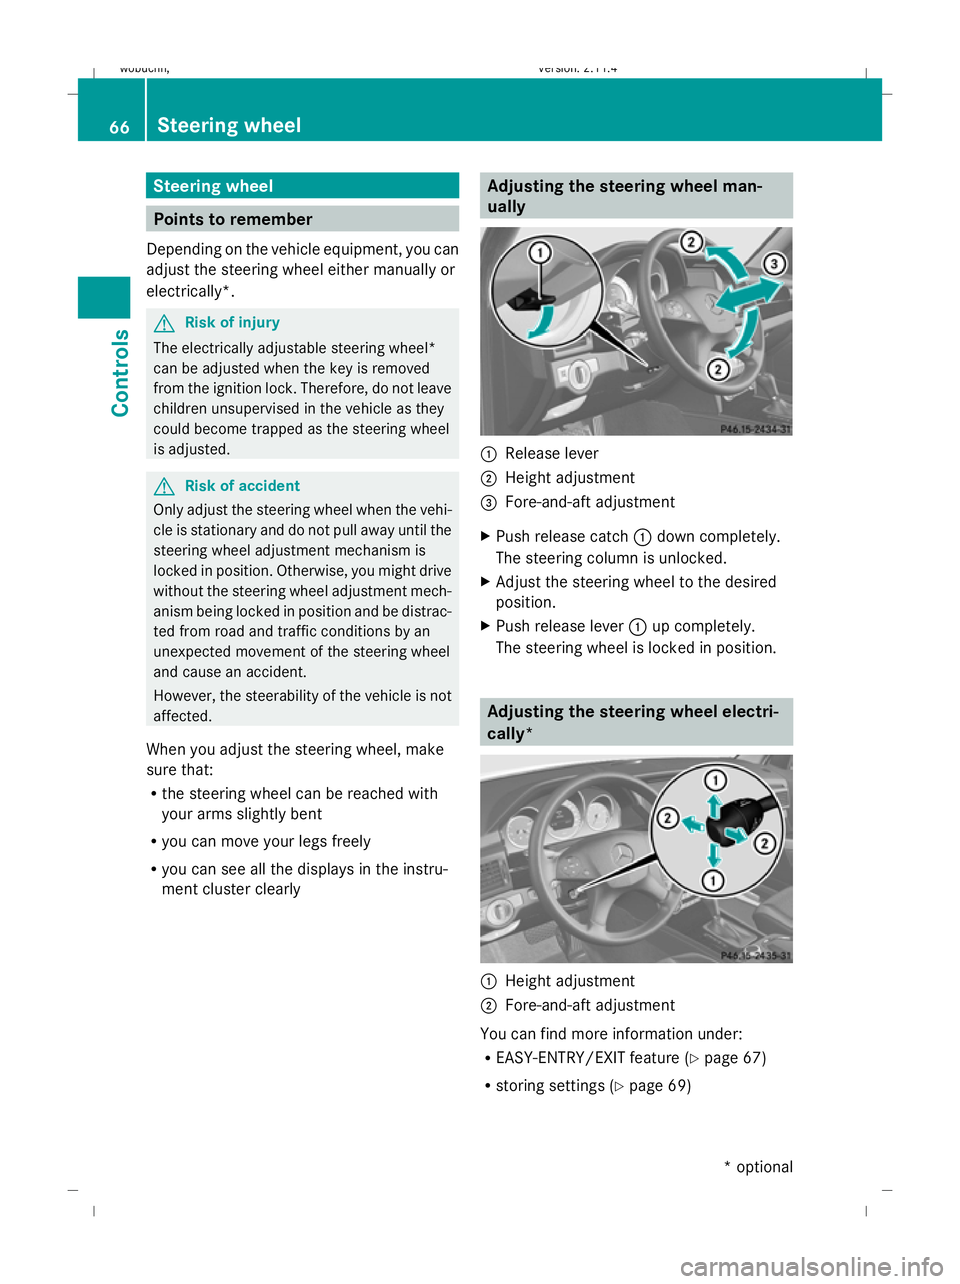
ually :
Release lever
; Height adjustment
= Fore-and-aft adjustment
X Push release catch :down completely.
The steering column is unlocked.
X Adjust the steering wheel to the desired
position.
X Push release lever :up completely.
The steering wheel is locked in position. Adjusting the steering wheel electri-
cally*
:
Height adjustment
; Fore-and-aft adjustment
You can find more information under:
R EASY-ENTRY/EXIT feature (Y page 67)
R storing settings (Y page 69)66 Steering wheelControls
* optional
X204_AKB; 1; 5, en-GB
wobuchh,
Version: 2.11.4 2008-10-15T13:20:56+02:00 - Seite 66Dateiname: 6515_0671_02_buchblock.pdf; preflight
Page 75 of 261
Fastening the belt
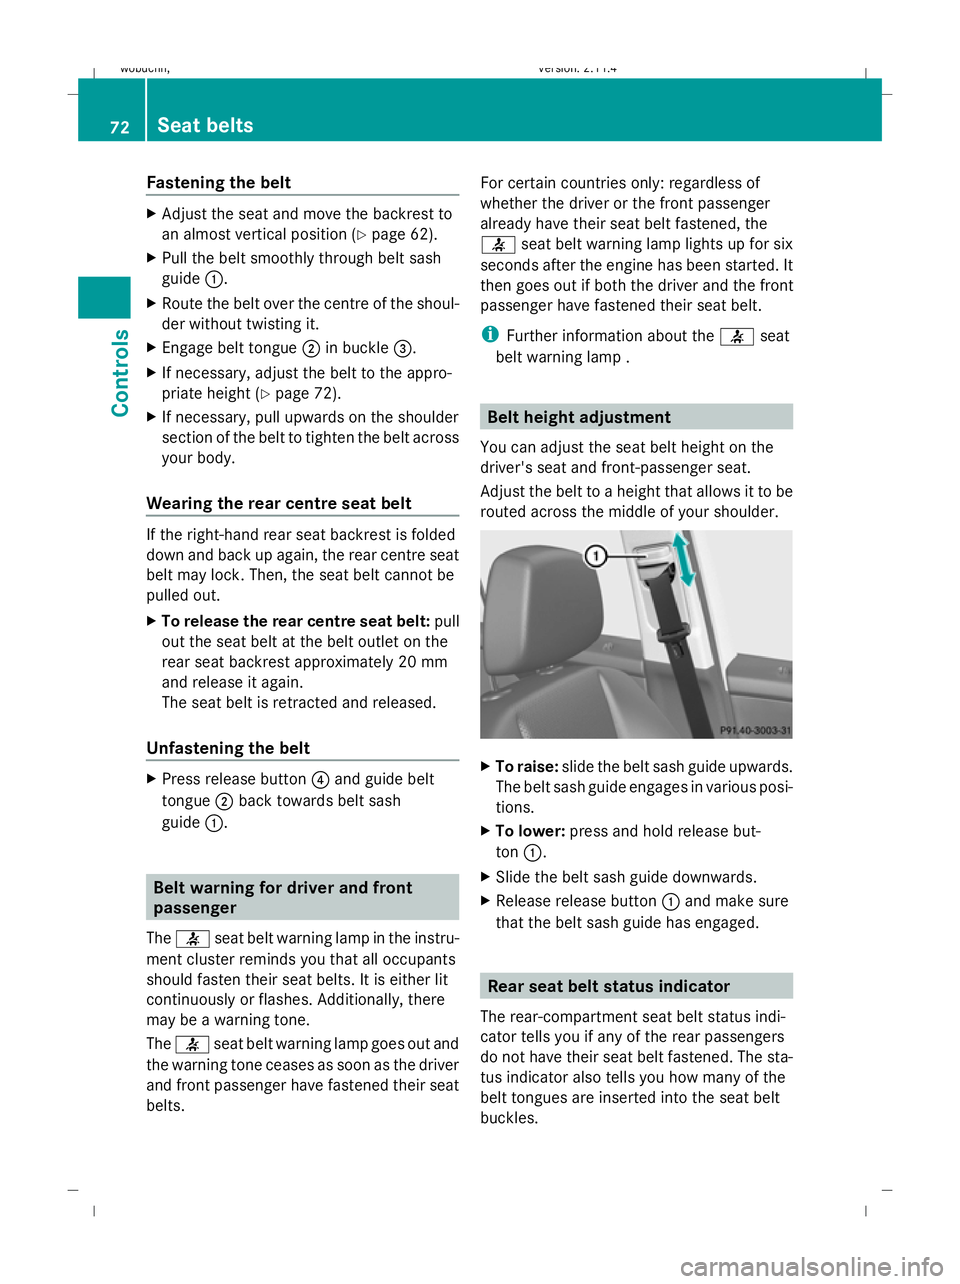
X
Adjust the seat and move the backrest to
an almost vertical position (Y page 62).
X Pull the belt smoothly through belt sash
guide :.
X Route the belt over the centre of the shoul-
der without twisting it.
X Engage belt tongue ;in buckle =.
X If necessary, adjust the belt to the appro-
priate height (Y page 72).
X If necessary, pull upwards on the shoulder
section of the belt to tighten the belt across
your body.
Wearing the rear centre seat belt If the right-hand rear seat backrest is folded
down and back up again, the rear centre seat
belt may lock. Then, the seat belt cannot be
pulled out.
X To release the rear centre seat belt: pull
out the seat belt at the belt outlet on the
rear seat backrest approximately 20 mm
and release it again.
The seat belt is retracted and released.
Unfastening the belt X
Press release button ?and guide belt
tongue ;back towards belt sash
guide :. Belt warning for driver and front
passenger
The 7 seat belt warning lamp in the instru-
ment cluster reminds you that all occupants
should fasten their seat belts. It is either lit
continuously or flashes. Additionally, there
may be a warning tone.
The 7 seat belt warning lamp goes out and
the warning tone ceases as soon as the driver
and front passenger have fastened their seat
belts. For certain countries only: regardless of
whether the driver or the front passenger
already have their seat belt fastened, the
7
seat belt warning lamp lights up for six
seconds after the engine has been started. It
then goes out if both the driver and the front
passenger have fastened their seat belt.
i Further information about the 7seat
belt warning lamp . Belt height adjustment
You can adjust the seat belt height on the
driver's seat and front-passenger seat.
Adjust the belt to a height that allows it to be
routed across the middle of your shoulder. X
To raise: slide the belt sash guide upwards.
The belt sash guide engages in various posi-
tions.
X To lower: press and hold release but-
ton :.
X Slide the belt sash guide downwards.
X Release release button :and make sure
that the belt sash guide has engaged. Rear seat belt status indicator
The rear-compartment seat belt status indi-
cator tells you if any of the rear passengers
do not have their seat belt fastened. The sta-
tus indicator also tells you how many of the
belt tongues are inserted into the seat belt
buckles. 72 Seat beltsCont
rols
X204_AKB; 1; 5, en-GB
wobuchh, Version: 2.11.4 2008-10-15T13:20:56+02:00 - Seite 72Dateiname: 6515_0671_02_buchblock.pdf; preflight