2008 MERCEDES-BENZ GLK SUV tire pressure
[x] Cancel search: tire pressurePage 155 of 261
Direction of rotation
Tyres with a specified direction of rotation
have additional benefits, e.g. if there is a risk
of aquaplaning. You will only gain these ben-
efits if the correct direction of rotation is
observed.
An arrow on the sidewall of the tyre indicates
its correct direction of rotation.
i An emergency spare wheel* may also be
fitted against the direction of rotation. Tyre tread
G
Risk of accident
Bear in mind that:
R tyre grip decreases rapidly on wet roads
when the tread depth is less than 3 mm.
Thus, you should replace tyres that have
insufficient tread.
R winter tyres should be replaced when the
tread depth is 4 mm or less as they will no
longer provide adequate grip.
R the tread on a tyre may not wear evenly.
Thus, you should regularly check the tread
depth and the condition of the tread across
the entire width of all tyres. If necessary,
turn the steering wheel so that you can see
the tyre tread more easily.
Otherwise, you could lose control of the vehi-
cle and cause an accident due to the reduced
grip of the tyres on the road. Tyre pressures
i You will find a table of tyre pressures for
various operating conditions on the inside
of your vehicle's fuel filler flap.
The valid value for the "Minispare" emer-
gency spare wheel* is stated on the spare
wheel and in the technical data section. G
Risk of accident
Tyre pressure that is either too high or too low
has a negative effect on the vehicle’s driving
safety, which could lead you to cause an acci-
dent. Therefore, you should regularly check
the pressure of all the tyres, particularly prior
to long trips, and correct the pressure as nec-
essary.
To test tyre pressure, use a suitable pressure
gauge. The outer appearance of a tyre does
not permit any reliable conclusion about the
tyre pressure. G
Risk of accident
Should the tyre pressure drop repeatedly:
R check the tyre for foreign bodies.
R check whether the wheel is losing air or the
valve is leaking.
R make sure that only a valve cap approved
by Mercedes-Benz has been fitted on the
tyre valve.
Tyre pressure that is too low has a negative
effect on the vehicle’s active safety, which
could lead to your causing an accident.
If possible, you should only correct tyre pres-
sures when the tyres are cold. Depending on
the ambient temperature, the speed you are
driving at and the load on the tyres, the tyre
temperature and thus the tyre pressure may
change by approximately 0.1 bar per 10 °C.
Take this into account when checking the
pressure of warm tyres and only correct it if
it is too low for the current operating condi-
tions.
Driving with tyre pressure that is too high or
too low can:
R shorten the service life of the tyres
R increase the likelihood of tyre damage
R have a negative effect on handling charac-
teristics (e.g. by causing aquaplaning) 152 Ty
res and wheelsOperation
* optional
X204_AKB; 1; 5, en-GB
wobuchh
,V ersion: 2.11.4
2008-10-15T13:20:56+02:00 - Seite 152 Dateiname: 6515_0671_02_buchblock.pdf; preflight
Page 162 of 261
R
Drive slowly and evenly, if necessary at a
walking pace.
R Ensure that the wheels are in contact with
the ground at all times.
R Drive with extreme care on unknown off-
road routes where visibility is poor. For
safety reasons, get out of the vehicle first
and survey the off-road route.
R Check the depth of water before fording
rivers and streams.
R Look out for obstacles such as rocks, holes,
tree stumps and furrows.
R Always keep the side windows and the pan-
orama sliding sunroof* closed during the
journey.
R Do not stray from marked routes or paths.
i Information about retrofitting special all-
terrain tyres is available from any
Mercedes-Benz Service Centre.
Checklist before driving off-road X
Engine oil level: check the engine oil and
top it up if necessary.
X Vehicle toolkit: check that the jack is
working and make sure you have the wheel-
brace, a robust tow cable and a folding
spade in the vehicle.
X Wheels and tyres: check the tyre tread
depth and tyre pressure.
X Check for damage and remove foreign
objects, e.g. small stones, from the
wheels/tyres.
X Replace any missing valve caps.
X Replace dented or damaged wheels.
Checklist after driving off-road Driving over rough terrain places greater
demands on your vehicle than driving on nor-
mal roads. After driving off-road, check the
vehicle. This allows you to detect damage
promptly and reduce the risk of an accident
to yourself and other road users. X
Deactivate DSR ( Ypage 105).
X Clean the headlamps and rear lights and
check for damage.
X Clean the front and rear licence plates.
X Clean the wheels/tyres with a water jet and
remove any foreign objects.
X Clean the wheels, wheel arches and the
vehicle underside with a water jet; check
for foreign objects and damage.
X Check whether twigs or other parts of
plants have become trapped. These
increase the risk of fire and can damage
fuel pipes, brake hoses or the rubber bel-
lows of the axle joints and propeller shafts.
X After the trip, examine without fail the
entire undercarriage, wheels, tyres, brakes,
bodywork structure, steering, chassis and
exhaust system for damage.
X After driving for extended periods across
sand, mud, gravel, water or in similarly dirty
conditions, have the brake discs, wheels,
brake pads /linings and axle joints checked
and cleaned.
X If you detect strong vibrations after off-road
travel, check for foreign objects in the
wheels and drive train and remove them if
necessary. Foreign objects can disturb the
balance and cause vibrations. Travelling uphill
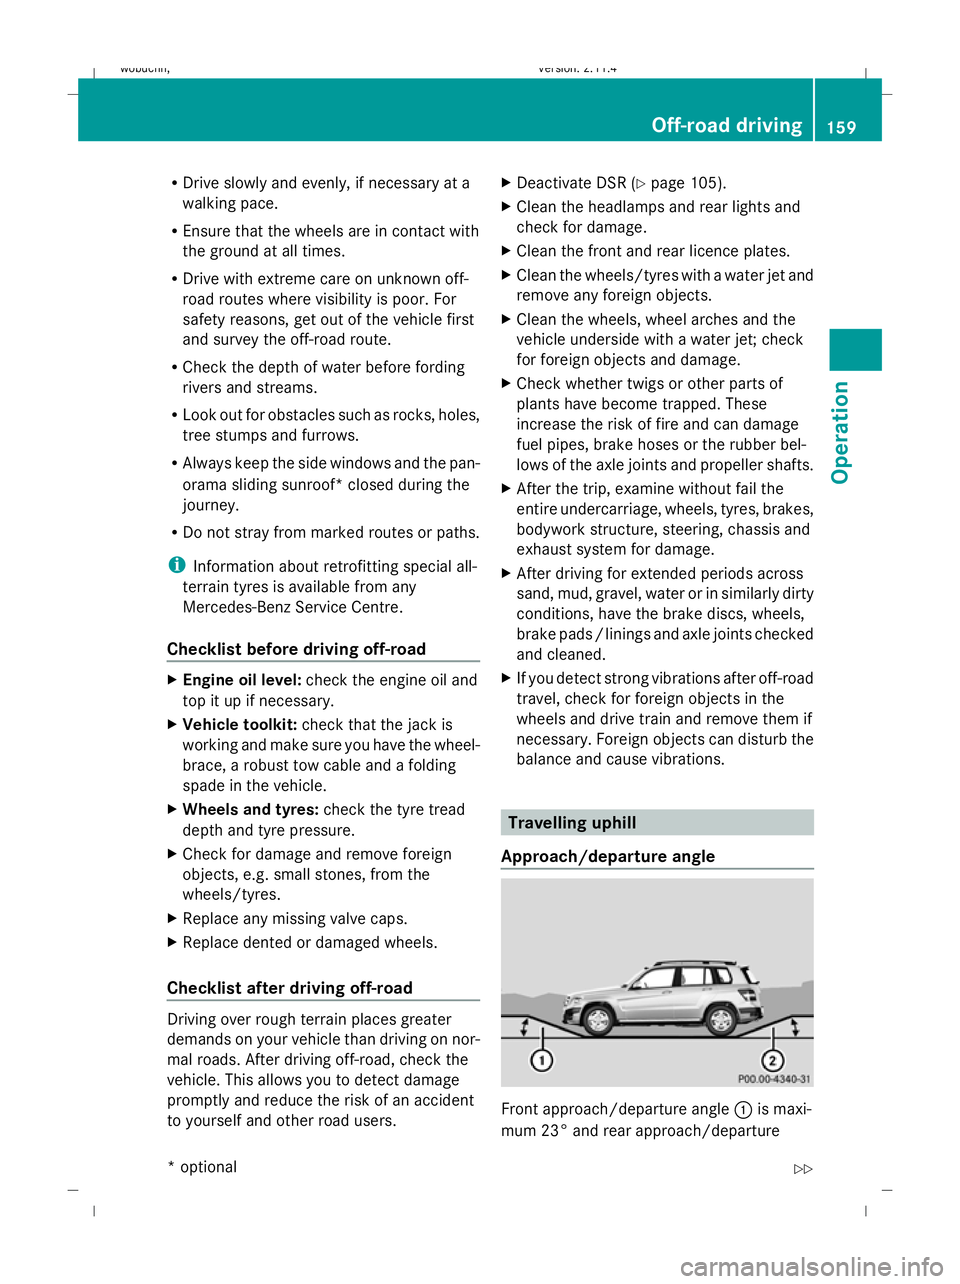
Approach/departure angle Front approach/departure angle
:is maxi-
mum 23° and rear approach/departure Off-road driving
159Operation
* optional
X204_AKB; 1; 5, en-GB
wobuchh,
Version: 2.11.4 2008-10-15T13:20:56+02:00 - Seite 159 ZDateiname: 6515_0671_02_buchblock.pdf; preflight
Page 174 of 261
does not become soaked. For leather
care, use leather care foam A 001 986
59 71 10. You can purchase this from any
Mercedes-Benz Service Centre.
R artificial leather covers with a cloth mois-
tened with a solution containing 1%
detergent (e. g. washing-up liquid).
R fabric covers with a microfibre cloth
moistened with a solution containing 1%
detergent (e. g. washing-up liquid). When
cleaning, take care not to rub too vigo-
rously and always wipe entire seat sec-
tions to avoid leaving visible lines. Leave
the seat to dry afterwards. Cleaning
results depend on the type of dirt and
how long it has been there.
i Note that leather covers are a natural
product and, as such, are subject to a nat-
ural ageing process and may react differ-
ently (e.g. increased wrinkling) to certain
environmental influences (such as high
humidity, intense heat).
Note that regular care is essential to ensure
that the quality (both appearance and com-
fort) of the covers is retained over time.
Cleaning the wooden trim*and trim
strips X
Moisten a clean lint-free cloth with water.
X Clean the wooden trim.
X If particularly dirty, use a mild detergent.
! Do not use cleaning agents containing
solvents because these can damage the
wooden trim.
Cleaning the exhaust tail pipes Impurities combined with the effects of road
grit and corrosive environmental factors may
cause flash rust to form on the surface.
Regular care of the exhaust tail pipes will
ensure that their original shine is restored. !
Do not clean the exhaust tail pipes with
alkaline-based cleaning agents such as
wheel cleaner.
Use the chrome-cleaning agent recommen-
ded by Mercedes-Benz for cleaning. Infor-
mation about chrome-cleaning agents can
be obtained from any Mercedes-Benz
Service Centre.
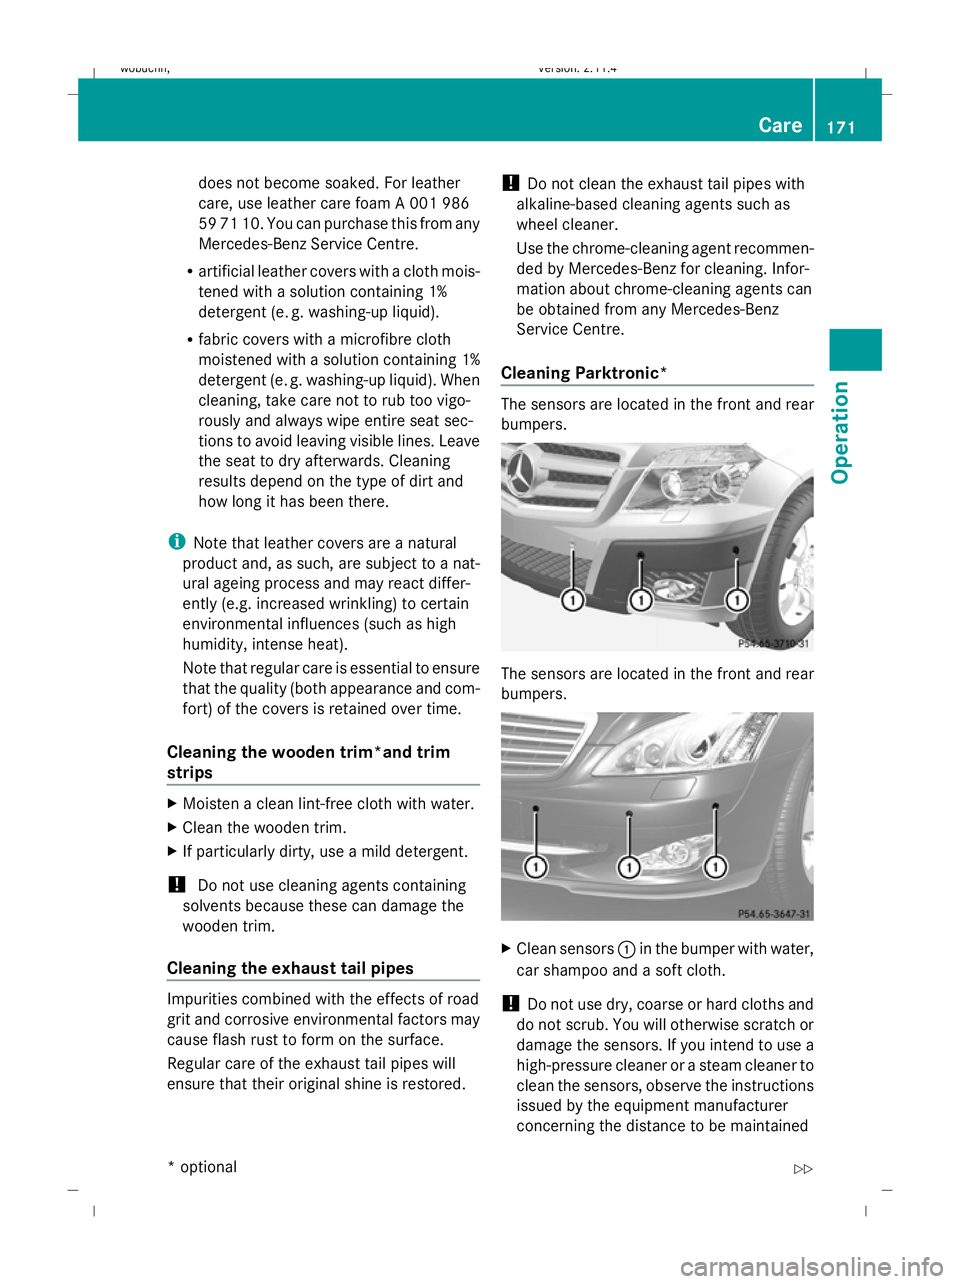
Cleaning Parktronic* The sensors are located in the front and rear
bumpers.
The sensors are located in the front and rear
bumpers.
X
Clean sensors :in the bumper with water,
car shampoo and a soft cloth.
! Do not use dry, coarse or hard cloths and
do not scrub. You will otherwise scratch or
damage the sensors. If you intend to use a
high-pressure cleaner or a steam cleaner to
clean the sensors, observe the instructions
issued by the equipment manufacturer
concerning the distance to be maintained Care
171Operation
* optional
X204_AKB; 1; 5, en-GB
wobuchh,
Version: 2.11.4 2008-10-15T13:20:56+02:00 - Seite 171 ZDateiname: 6515_0671_02_buchblock.pdf; preflight
Page 225 of 261
X
Hold wiper arm :and press wiper
blade ;in the direction of the arrow until
it releases.
X Remove wiper blade ;.
Fitting X
Place the new wiper blade ;onto wiper
arm :.
X Hold wiper arm :and press wiper
blade ;in the opposite direction to the
arrow until it engages.
X Make sure that wiper blade ;is seated
correctly.
X Position wiper blade ;parallel to wiper
arm :.
X Fold wiper arm :back onto the rear win-
dow. Flat tyre
Flat tyre equipment variants
Your vehicle may be equipped with:
R a TIREFIT kit (Y page 175)
R a collapsible emergency spare
wheel* (Y page 175) Preparing the vehicle
X Stop your vehicle as far away from traffic
as possible on solid, non-slippery, level
ground.
X Switch on the hazard warning lamps.
X Firmly depress the parking brake.
X Move the selector lever to P.
X All occupants must get out of the vehicle.
Make sure that they are not endangered as
they do so.
X Make sure that no one is near the danger
area whilst a wheel is being changed. Any-
one who is not directly assisting in the
wheel change should, for example, stand
behind the barrier. X
Switch off the engine.
X Remove the key from the ignition lock.
X Get out of the vehicle.
X Close the driver's door.
X Place the warning triangle (Y page 174) at
a suitable distance. Observe legal require-
ments. Using the TIREFIT kit
You can use the TIREFIT kit to seal small
punctures, particularly those in the tyre tread.
You can use TIREFIT at outside temperatures
down to -20 †. G
Risk of accident
In the following situations, your safety is at
particular risk and tyre sealant is unable to
provide breakdown assistance:
R if there are cuts or punctures in the tyre
greater than 4 mm
R if the wheel rim is damaged
R if you have driven at very low tyre pressures
or on a flat tyre
Do not drive any further. Consult a qualified
specialist workshop which has the necessary
specialist knowledge and tools to carry out
the work required.
Mercedes-Benz recommends that you use a
Mercedes-Benz Service Centre for this pur-
pose. In particular, work relevant to safety or
on safety-related systems must be carried out
at a qualified specialist workshop.
X Do not remove any foreign objects which
have penetrated the tyre, e.g. screws or
nails.
X Remove TIREFIT, the accompanying "max.
80 km/h" sticker and the electric air pump
from the stowage well underneath the lug-
gage compartment floor (Y page 175).222 Flat tyrePractical advice
* optional
X204_AKB; 1; 5, en-GB
wobuchh,
Version: 2.11.4 2008-10-15T13:20:56+02:00 - Seite 222Dateiname: 6515_0671_02_buchblock.pdf; preflight
Page 226 of 261
X
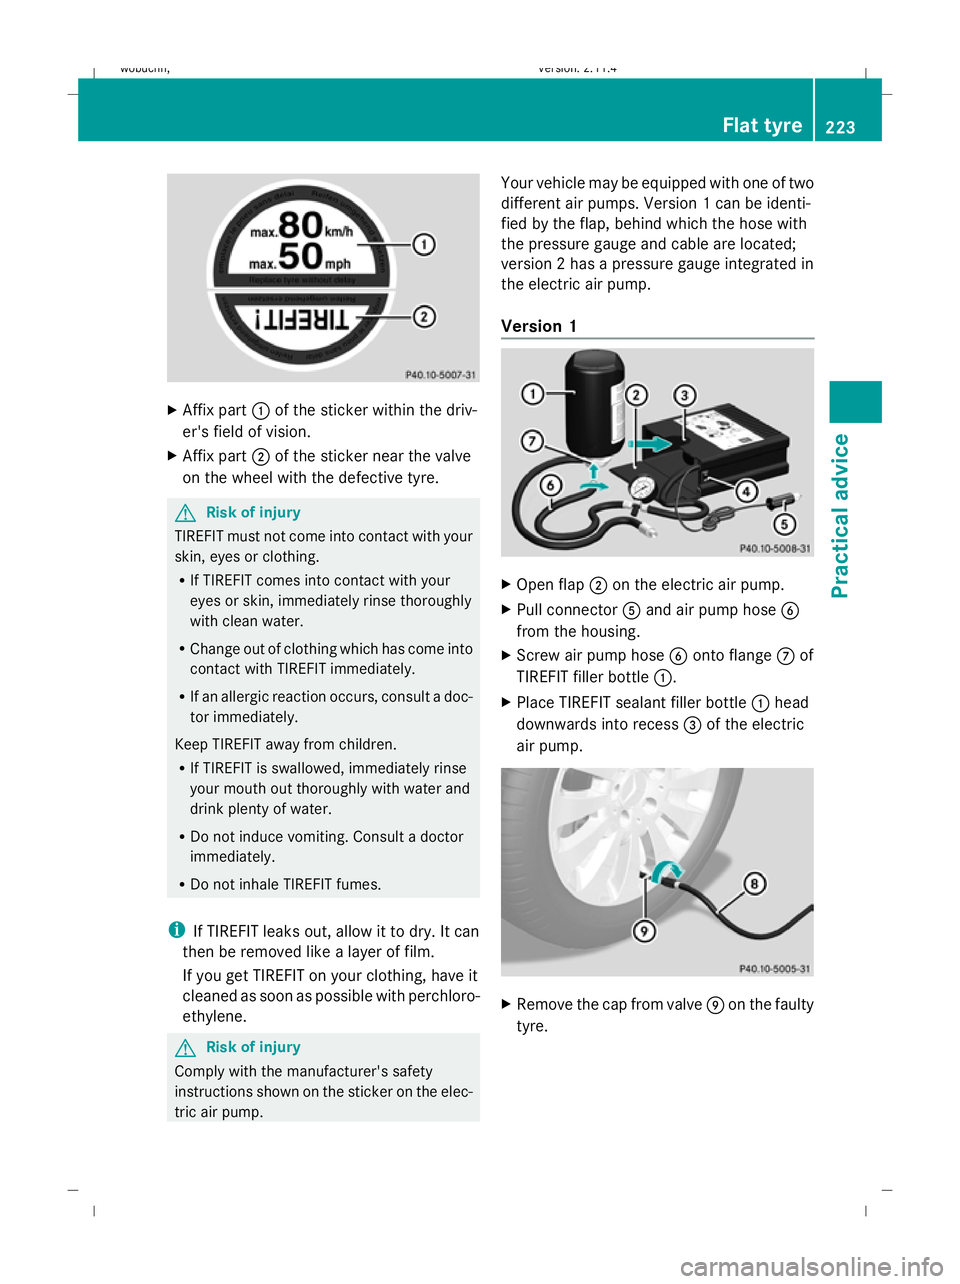
Affix part :of the sticker within the driv-
er's field of vision.
X Affix part ;of the sticker near the valve
on the wheel with the defective tyre. G
Risk of injury
TIREFIT must not come into contact with your
skin, eyes or clothing.
R If TIREFIT comes into contact with your
eyes or skin, immediately rinse thoroughly
with clean water.
R Change out of clothing which has come into
contact with TIREFIT immediately.
R If an allergic reaction occurs, consult a doc-
tor immediately.
Keep TIREFIT away from children.
R If TIREFIT is swallowed, immediately rinse
your mouth out thoroughly with water and
drink plenty of water.
R Do not induce vomiting. Consult a doctor
immediately.
R Do not inhale TIREFIT fumes.
i If TIREFIT leaks out, allow it to dry. It can
then be removed like a layer of film.
If you get TIREFIT on your clothing, have it
cleaned as soon as possible with perchloro-
ethylene. G
Risk of injury
Comply with the manufacturer's safety
instructions shown on the sticker on the elec-
tric air pump. Your vehicle may be equipped with one of two
different air pumps. Version 1 can be identi-
fied by the flap, behind which the hose with
the pressure gauge and cable are located;
version 2 has a pressure gauge integrated in
the electric air pump.
Version 1 X
Open flap ;on the electric air pump.
X Pull connector Aand air pump hose B
from the housing.
X Screw air pump hose Bonto flange Cof
TIREFIT filler bottle :.
X Place TIREFIT sealant filler bottle :head
downwards into recess =of the electric
air pump. X
Remove the cap from valve Eon the faulty
tyre. Flat tyre
223Practical advice
X204_AKB; 1; 5, en-GB
wobuchh,V ersion: 2.11.4
2008-10-15T13:20:56+02:00 - Seite 223 ZDateiname: 6515_0671_02_buchblock.pdf; preflight
Page 227 of 261
X
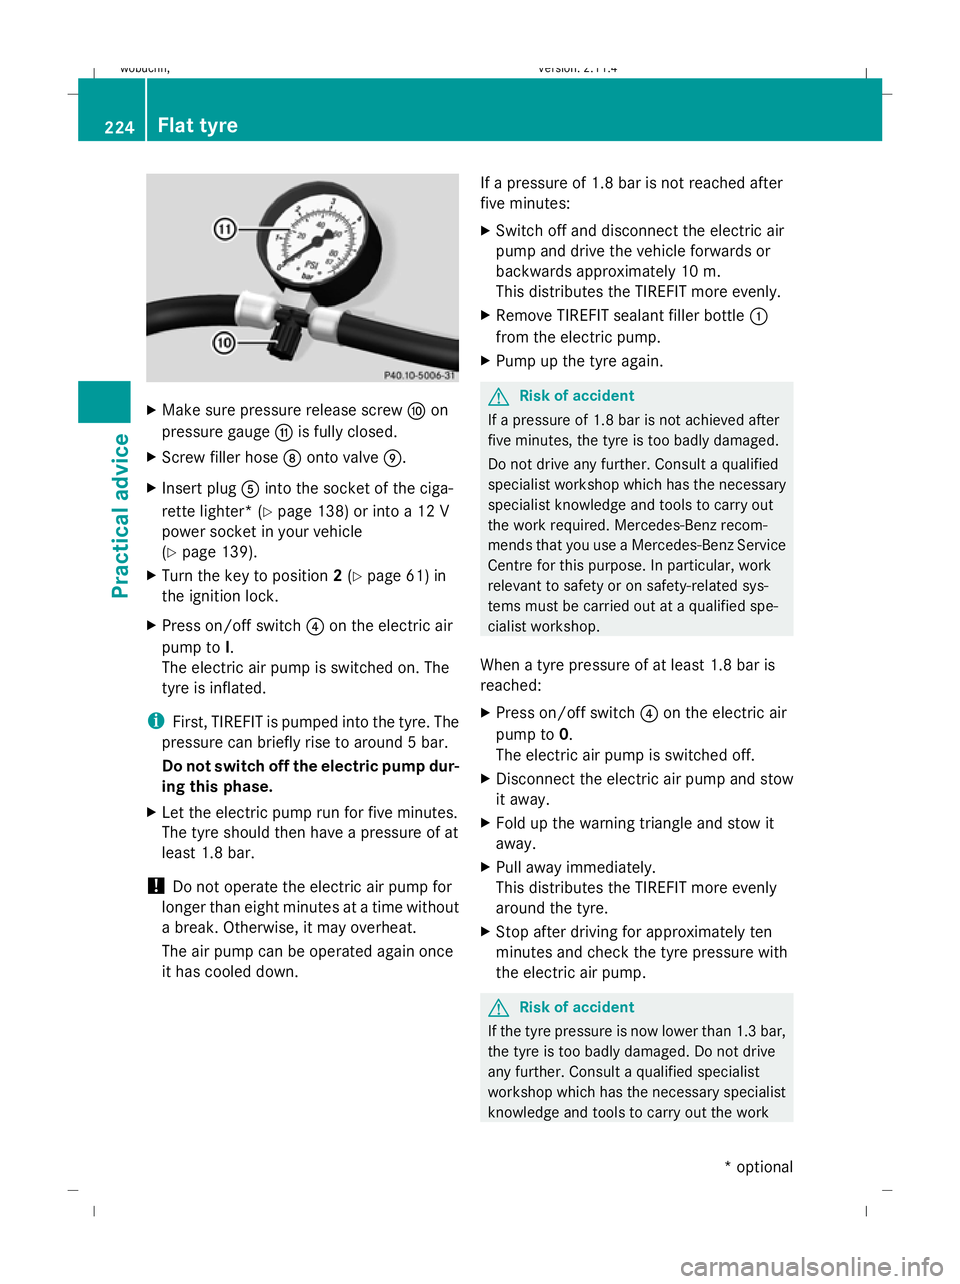
Make sure pressure release screw Fon
pressure gauge Gis fully closed.
X Screw filler hose Donto valve E.
X Insert plug Ainto the socket of the ciga-
rette lighter* (Y page 138) or into a 12 V
power socket in your vehicle
(Y page 139).
X Turn the key to position 2(Y page 61) in
the ignition lock.
X Press on/off switch ?on the electric air
pump to I.
The electric air pump is switched on. The
tyre is inflated.
i First, TIREFIT is pumped into the tyre. The
pressure can briefly rise to around 5 bar.
Do not switch off the electric pump dur-
ing this phase.
X Let the electric pump run for five minutes.
The tyre should then have a pressure of at
least 1.8 bar.
! Do not operate the electric air pump for
longer than eight minutes at a time without
a break. Otherwise, it may overheat.
The air pump can be operated again once
it has cooled down. If a pressure of 1.8 bar is not reached after
five minutes:
X
Switch off and disconnect the electric air
pump and drive the vehicle forwards or
backwards approximately 10 m.
This distributes the TIREFIT more evenly.
X Remove TIREFIT sealant filler bottle :
from the electric pump.
X Pump up the tyre again. G
Risk of accident
If a pressure of 1.8 bar is not achieved after
five minutes, the tyre is too badly damaged.
Do not drive any further. Consult a qualified
specialist workshop which has the necessary
specialist knowledge and tools to carry out
the work required. Mercedes-Benz recom-
mends that you use a Mercedes-Benz Service
Centre for this purpose. In particular, work
relevant to safety or on safety-related sys-
tems must be carried out at a qualified spe-
cialist workshop.
When a tyre pressure of at least 1.8 bar is
reached:
X Press on/off switch ?on the electric air
pump to 0.
The electric air pump is switched off.
X Disconnect the electric air pump and stow
it away.
X Fold up the warning triangle and stow it
away.
X Pull away immediately.
This distributes the TIREFIT more evenly
around the tyre.
X Stop after driving for approximately ten
minutes and check the tyre pressure with
the electric air pump. G
Risk of accident
If the tyre pressure is now lower than 1.3 bar,
the tyre is too badly damaged. Do not drive
any further. Consult a qualified specialist
workshop which has the necessary specialist
knowledge and tools to carry out the work 224 Flat tyrePractical advice
* optional
X204_AKB; 1; 5, en-GB
wobuchh,
Version: 2.11.4 2008-10-15T13:20:56+02:00 - Seite 224Dateiname: 6515_0671_02_buchblock.pdf; preflight
Page 228 of 261
required. Mercedes-Benz recommends that
you use a Mercedes-Benz Service Centre for
this purpose. In particular, work relevant to
safety or on safety-related systems must be
carried out at a qualified specialist workshop.
X If the tyre pressure is still at least 1.3 bar,
correct it (see fuel filler flap for values).
To increase the tyre pressure: switch on
the electric air pump.
To reduce the tyre pressure: open pres-
sure release screw Fon pressure
gauge G.
X Drive to the nearest workshop and have the
tyre changed there.
X Have the TIREFIT kit replaced as soon as
possible at a qualified specialist workshop,
e.g. at a Mercedes-Benz Service Centre. G
Risk of accident
Do not exceed the maximum speed of
80 km/h.
The "max. 80 km/h" label must be affixed in
the driver's field of vision.
The vehicle's handling characteristics may be
affected. H
Environmental note
Have the used TIREFIT kit disposed of profes-
sionally, e.g. at a Mercedes-Benz Service
Centre.
X Have the TIREFIT kit replaced every four
years at a qualified specialist workshop,
e.g. a Mercedes-Benz Service Centre. Version 2 X
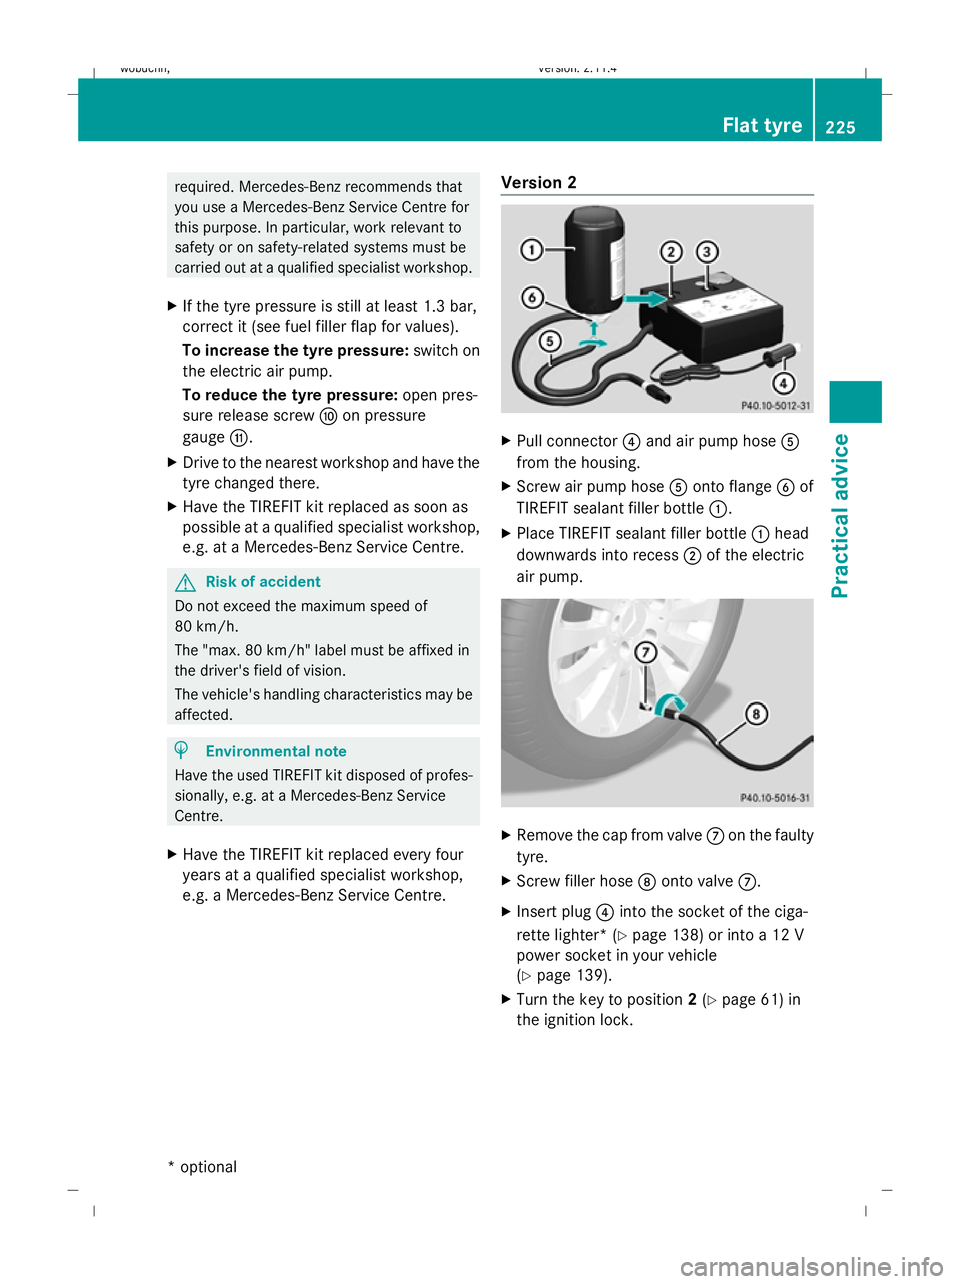
Pull connector ?and air pump hose A
from the housing.
X Screw air pump hose Aonto flange Bof
TIREFIT sealant filler bottle :.
X Place TIREFIT sealant filler bottle :head
downwards into recess ;of the electric
air pump. X
Remove the cap from valve Con the faulty
tyre.
X Screw filler hose Donto valve C.
X Insert plug ?into the socket of the ciga-
rette lighter* (Y page 138) or into a 12 V
power socket in your vehicle
(Y page 139).
X Turn the key to position 2(Y page 61) in
the ignition lock. Flat tyre
225Practical advice
* optional
X204_AKB; 1; 5, en-GB
wobuchh,
Version: 2.11.4 2008-10-15T13:20:56+02:00 - Seite 225 ZDateiname: 6515_0671_02_buchblock.pdf; preflight
Page 229 of 261
X
Press on/off switch =on the electric air
pump to I.
The electric air pump is switched on. The
tyre is inflated.
i First, TIREFIT is pumped into the tyre. The
pressure can briefly rise to around 5 bar.
Do not switch off the electric pump dur-
ing this phase.
X Let the electric pump run for five minutes.
The tyre should then have a pressure of at
least 1.8 bar.
! Do not operate the electric air pump for
longer than eight minutes at a time without
a break. Otherwise, it may overheat.
The air pump can be operated again once
it has cooled down.
If a pressure of 1.8 bar is not reached after
five minutes:
X Switch off and disconnect the electric air
pump and drive the vehicle forwards or
backwards approximately 10 m.
This distributes the TIREFIT more evenly.
X Remove TIREFIT sealant filler bottle :
from the electric pump.
X Pump up the tyre again. G
Risk of accident
If a pressure of 1.8 bar is not achieved after
five minutes, the tyre is too badly damaged.
Do not drive any further. Consult a qualified
specialist workshop which has the necessary
specialist knowledge and tools to carry out
the work required. Mercedes-Benz recom-
mends that you use a Mercedes-Benz Service
Centre for this purpose. In particular, work
relevant to safety or on safety-related sys-
tems must be carried out at a qualified spe-
cialist workshop. When a tyre pressure of at least 1.8 bar is
reached:
X
Press on/off switch =on the electric air
pump to 0.
The electric air pump is switched off.
X Disconnect the electric air pump and stow
it away.
X Fold up the warning triangle and stow it
away.
X Pull away immediately.
This distributes the TIREFIT more evenly
around the tyre.
X Stop after driving for approximately ten
minutes and check the tyre pressure with
the electric air pump. G
Risk of accident
If the tyre pressure is now lower than 1.3 bar,
the tyre is too badly damaged. Do not drive
any further. Consult a qualified specialist
workshop which has the necessary specialist
knowledge and tools to carry out the work
required. Mercedes-Benz recommends that
you use a Mercedes-Benz Service Centre for
this purpose. In particular, work relevant to
safety or on safety-related systems must be
carried out at a qualified specialist workshop. X
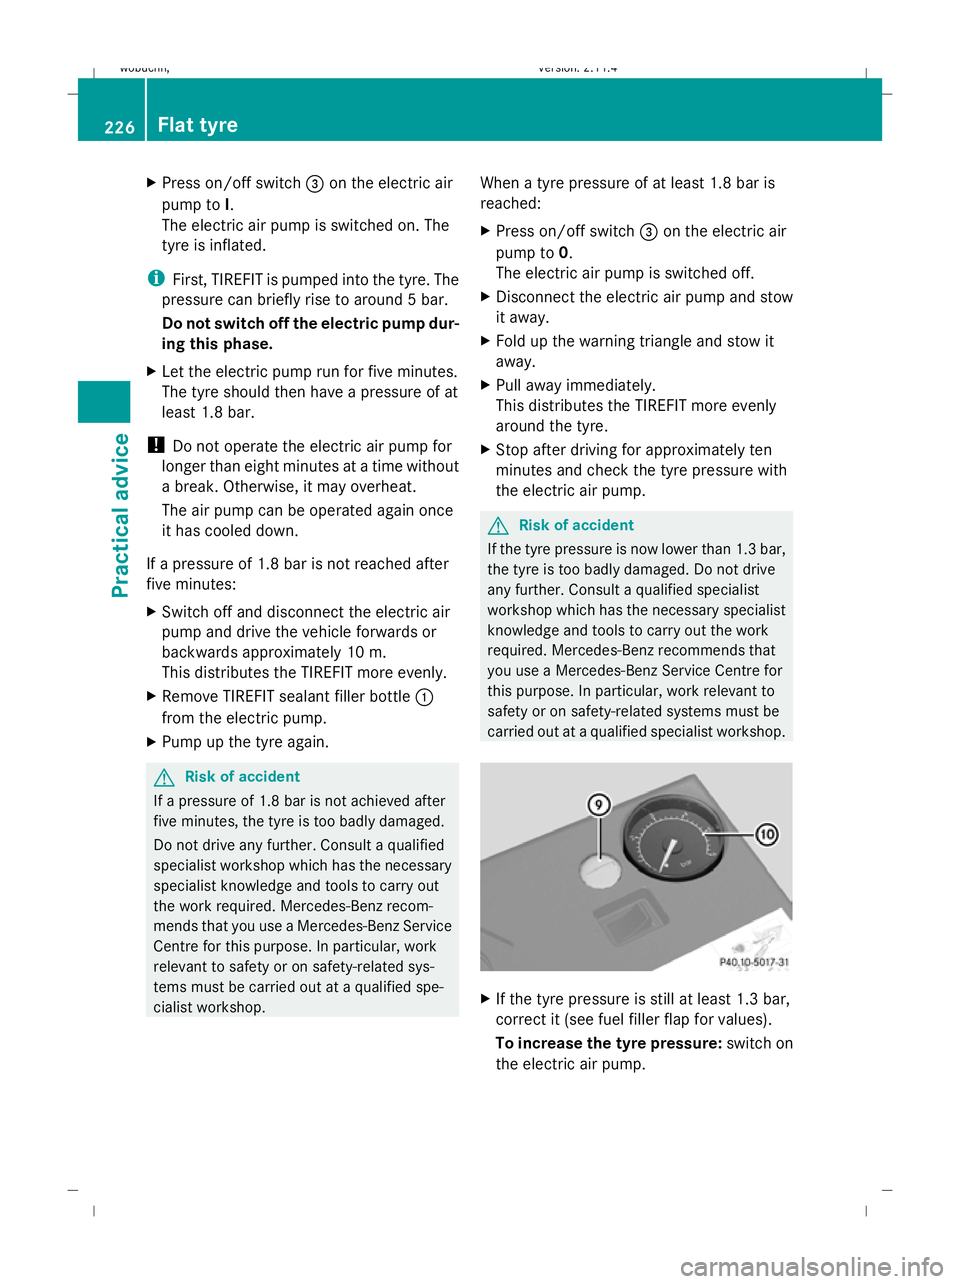
If the tyre pressure is still at least 1.3 bar,
correct it (see fuel filler flap for values).
To increase the tyre pressure: switch on
the electric air pump. 226 Flat tyrePractical advice
X204_AKB; 1; 5, en-GB
wobuchh,
Version: 2.11.4 2008-10-15T13:20:56+02:00 - Seite 226Dateiname: 6515_0671_02_buchblock.pdf; preflight