2008 MERCEDES-BENZ GLK SUV charging
[x] Cancel search: chargingPage 8 of 261
Selector lever positions.
...................85
Shift ranges. ..................................... 86
Trailer towing. ................................... 88
Axle load, permissible
Rear (trailer towing) ........................254 B
Bag hook............................................. 136
Ball coupling Fitting ............................................. 162
Removing....................................... .165
BAS (Brake Assist)............................... 52
Battery Changing (key).. .............................. 216
Charging. ........................................ 234
Checking (key). ............................... 216
Check lamp (key). ........................... 216
Disconnecting ................................. 233
Display message ............................. 184
Jump-starting. ................................. 234
Maintenance (vehicle)..................... 232
Reconnecting.................................. 234
Removing/fitting. ........................... 233
Vehicle battery. .............................. 232
Belt force limiters
Activation.......................................... 35
Belt height adjustment ........................72
Belt tensioners Activation.......................................... 35
Belt warning.......................................... 72
Bonnet
Bonnet catch .................................. 147
Display message ............................. 183
Opening/closing ............................ 146
Bonnet release lever
Release leve r.................................. 147
Boot
Automatic opening. ....................60, 61
Boot lid
Opening/closing. .............................. 59
Brake Assist
see BAS
Brake fluid .......................................... 248
Display message (luxury multi-
function steering wheel) .................185
Display message (multi-function
steering wheel). .............................. 180Brake lamps
Adaptive............................................ 52
Display message..................... 188, 191
Brakes
Parking brake................................... .84
Warning lamp..................................2 02
Brake system
Display message ............................. 185
Bulb
see Lamp
Bulbs
Brake lamp. .................................... 220
Display messages (multi-function
steering wheel). .............................. 194
Licence plate lamp.......................... 220
Overview. ........................................ 218
Rear foglamp. ................................. 220
Replacing. ....................................... 219
Reversing lamp. .............................. 220
Tail lamp ......................................... 220
Turn signal lamp. ....................219, 220 C
Care..................................................... 167
Automatic car wash. .......................168
Dashboard. ..................................... 170
Headlamps. .................................... 169
High-pressure cleaners. ..................168
Panorama sliding sunroo f............... 170
Parktronic. ...................................... 171
Plastic trim. .................................... 170
Rear window. .................................. 169
Reversing camera. ..........................172
Seat covers.................................... .170
Side windows ................................. 169
Steering wheel boss. ......................170
Tail pipes ........................................ 171
Trailer tow hitch. ............................. 172
Trim strips ...................................... 171
Windscreen. .................................... 169
Wiper blades.. ................................. 169
Wooden strips................................. 171
CD player/CD changer
Operating (on-board computer,
luxury multi-function steering
wheel). .............................................. 99 Index
5 X204_AKB; 1; 5, en-GB
wobuchh,
Version: 2.11.4
2008-10-15T13:20:56+02:00 - Seite 5 Dateiname: 6515_0671_02_buchblock.pdf; preflight
Page 78 of 261
!
Switch off the side lamps and parking
lamp when you leave the vehicle. This pre-
vents the battery from discharging.
Dipped-beam headlamps X
Turn the ignition key to position 2in the
ignition lock or start the engine.
X To switch on: turn the light switch to
L.
The side lamp indicator lamp next to the
light switch and the Lindicator lamp in
the instrument cluster light up.
Daytime driving lights On vehicles with a luxury multi-function steer-
ing wheel*, you can activate or deactivate the
daytime driving light function using the on-
board computer (Y page 102).
X To switch on: turn the light switch to
$ orc.
Engine start: the dipped-beam headlamps
are switched on.
Automatic headlamp mode G
Risk of accident
If the light switch is set to the cposition,
the light will not come on automatically in
foggy conditions. This could endanger you
and others. Therefore, turn the light switch to
L in the dark or in fog.
The automatic headlamp feature is only an
aid. The driver is responsible for the vehicle's
lighting at all times. G
Risk of accident
When it is dark or foggy, turn the light switch
from c toL in good time. Otherwise,
the headlamps could switch off temporarily
and you could cause an accident.
X To switch on: turn the light switch to
c.
Key in position 1in the ignition lock: the
side lamp is switched on or off automati- cally depending on the brightness of the
ambient light.
Engine start: depending on the ambient
light conditions, the side lamp and the
dipped-beam headlamps are switched on
or off automatically.
When the dipped-beam headlamps are
switched on, the indicator lamp next to the
light switch and the Lindicator lamp in
the instrument cluster light up.
Foglamps G
Risk of accident
If you suspect that driving conditions will be
foggy, turn the light switch to Lbefore you
start your journey. Otherwise, your vehicle
may not be visible and you could endanger
yourself and others.
X Turn the key to position 2in the ignition
lock.
X To switch on: turn the light switch to
L orT. If the light switch is set to
c, you cannot switch on the foglamp.
X Pull the light switch out to the first detent.
The N green indicator lamp next to the
light switch lights up.
X To switch off: press the light switch in as
far as it will go.
The N green indicator lamp next to the
light switch goes out.
Rear foglamp X
Turn the key to position 2in the ignition
lock.
X To switch on: turn the light switch to
L orT. When the light switch is set
to c you cannot switch on the rear fog-
lamp. Lights
75Controls
* optional
X204_AKB; 1; 5, en-GB
wobuchh,
Version: 2.11.4 2008-10-15T13:20:56+02:00 - Seite 75 ZDateiname: 6515_0671_02_buchblock.pdf; preflight
Page 182 of 261
Display messages
Possible causes/consequences and
X
X Solutions EBV, ABS,
ESP inop-
erative
G
Risk of accident
EBV (electronic brake force distribution), ABS, ESP ®
, BAS,
PRE-SAFE ®
*, hill start assist and ESP ®
trailer stabilisation are
unavailable due to a malfunction. In addition, the dwarn-
ing lamp in the instrument cluster lights up and a warning tone
sounds.
The brake system continues to function normally, but without
the functions listed above.
X Drive on carefully.
X Visit a qualified specialist workshop immediately. ESP inop-
erative ESP inop-
erative
see Own-
er's Man-
ual
G
Risk of accident
ESP ®
, BAS, PRE-SAFE ®
*, hill start assist and ESP ®
trailer sta-
bilisation are unavailable due to a malfunction. The d
warning lamp also lights up in the instrument cluster.
The brake system continues to function normally, but without
the functions listed above.
X Drive on carefully.
X Visit a qualified specialist workshop. ESP inop-
erative ESP cur-
rently
unavail.
See Own-
er's Man-
ual
G
Risk of accident
ESP ®
, BAS, PRE-SAFE ®
*, hill start assist and ESP ®
trailer sta-
bilisation are temporarily unavailable. The self diagnosis func-
tion might not be complete, for example. The dwarning
lamp also lights up in the instrument cluster. The brake sys-
tem continues to function normally, but without the functions
listed above.
X On a suitable stretch of road, carefully manoeuvre the vehi-
cle slightly to the left and right at a speed above 20 km/h
until the display message disappears. G
Risk of accident
ESP ®
, BAS, PRE-SAFE ®
*, hill start assist and ESP ®
trailer sta-
bilisation are unavailable due to undervoltage. The battery
might not be charging, for example. The dwarning lamp
also lights up in the instrument cluster. The brake system
continues to function normally, but without the functions lis-
ted above.
X Drive on carefully.
X Visit a qualified specialist workshop. Display
messages
179Practical advice
* optional
X204_AKB; 1; 5, en-GB
wobuchh
,V ersion: 2.11.4
2008-10-15T13:20:56+02:00 - Seite 179 ZDateiname: 6515_0671_02_buchblock.pdf; preflight
Page 236 of 261
from the battery. Otherwise, you may
destroy electronic components, such as
the alternator.
i Mercedes-Benz recommends that you
have all work involving the battery, e.g.
removal, charging and replacement, car-
ried out at a qualified specialist workshop,
e.g. a Mercedes-Benz Service Centre.
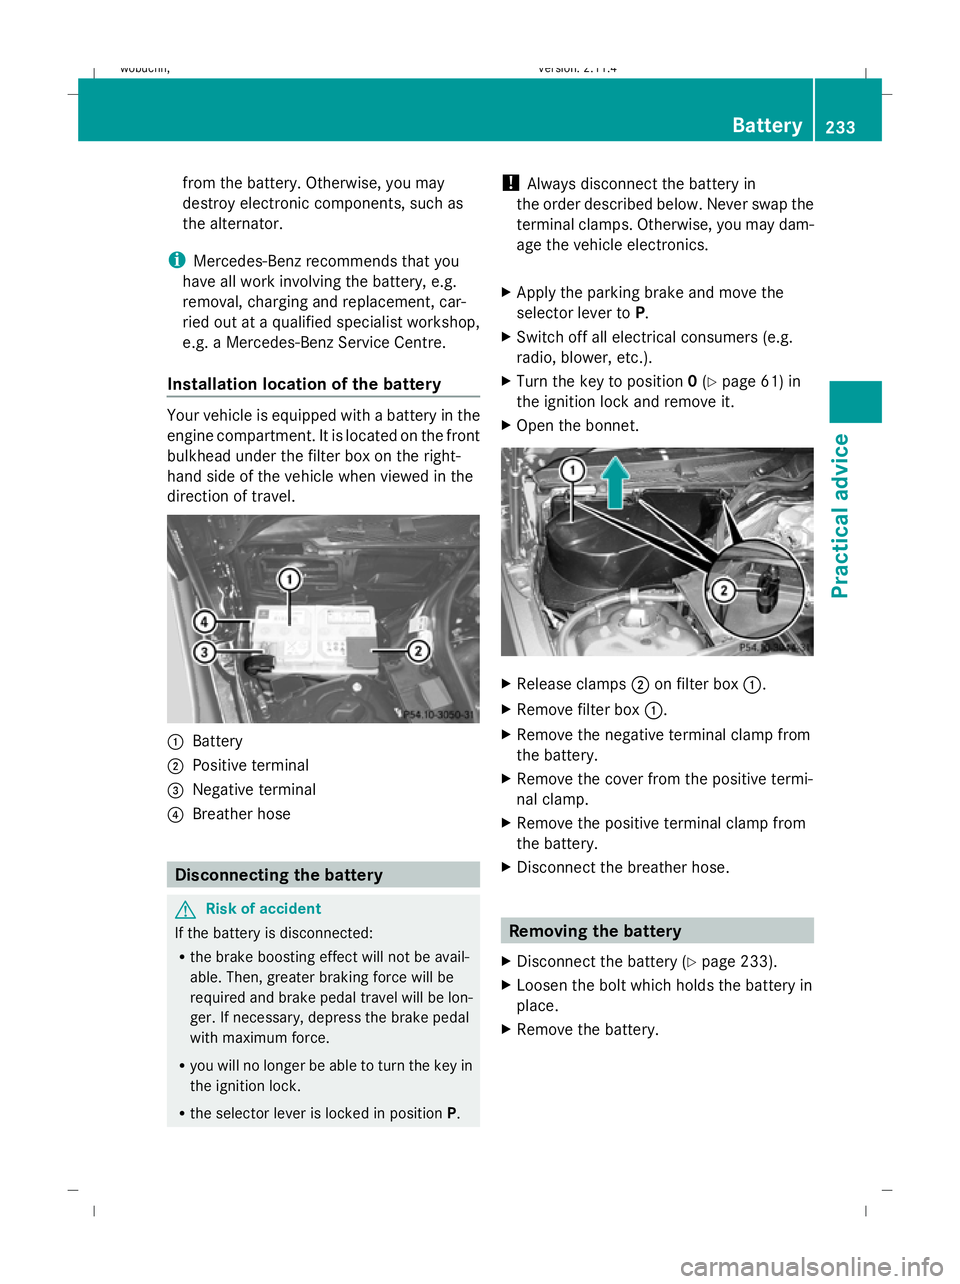
Installation location of the battery Your vehicle is equipped with a battery in the
engine compartment. It is located on the front
bulkhead under the filter box on the right-
hand side of the vehicle when viewed in the
direction of travel.
:
Battery
; Positive terminal
= Negative terminal
? Breather hose Disconnecting the battery
G
Risk of accident
If the battery is disconnected:
R the brake boosting effect will not be avail-
able. Then, greater braking force will be
required and brake pedal travel will be lon-
ger. If necessary, depress the brake pedal
with maximum force.
R you will no longer be able to turn the key in
the ignition lock.
R the selector lever is locked in position P.!
Always disconnect the battery in
the order described below. Never swap the
terminal clamps. Otherwise, you may dam-
age the vehicle electronics.
X Apply the parking brake and move the
selector lever to P.
X Switch off all electrical consumers (e.g.
radio, blower, etc.).
X Turn the key to position 0(Y page 61) in
the ignition lock and remove it.
X Open the bonnet. X
Release clamps ;on filter box :.
X Remove filter box :.
X Remove the negative terminal clamp from
the battery.
X Remove the cover from the positive termi-
nal clamp.
X Remove the positive terminal clamp from
the battery.
X Disconnect the breather hose. Removing the battery
X Disconnect the battery ( Ypage 233).
X Loosen the bolt which holds the battery in
place.
X Remove the battery. Battery
233Practical advice
X204_AKB; 1; 5, en-GB
wobuchh, Version: 2.11.4 2008-10-15T13:20:56+02:00 - Seite 233 ZDateiname: 6515_0671_02_buchblock.pdf; preflight
Page 237 of 261
Charging and fitting the battery
G
Risk of injury
Only charge the battery in a well-ventilated
area. As the battery is being charged, gases
can escape and generate minor explosions.
This may injure you and other persons or
cause damage to the paintwork or acid cor-
rosion on the vehicle.
You can obtain information about battery
chargers which allow the battery to be
charged when still installed from a qualified
specialist workshop, e.g. a Mercedes-Benz
Service Centre. G
Risk of injury
There is a risk of acid burns during the charg-
ing process due to the gases which escape
from the battery. Do not lean over the battery
during the charging process. G
Risk of injury
Battery acid is caustic. Avoid contact with the
skin, eyes or clothing.
! Only charge the installed battery with a
battery charger which has been tested and
approved by Mercedes-Benz. These battery
chargers allow the battery to be charged
while it is still installed. However, the bat-
tery must always be disconnected first.
! Only use battery chargers with a maxi-
mum charging voltage of 14.8 V.
X Charge the battery. Observe the notes in
the operating instructions for your battery
charger.
X Refit the charged battery.
To do this, follow the steps described in
"Removing the battery" (Y page 233) in
reverse order. Reconnecting the battery
! Always reconnect the battery in the
sequence described below. Never swap the
terminal clamps. You may otherwise dam-
age the vehicle electronics.
X Switch off all electrical consumers (e.g.
radio, blower, etc.).
X Connect the positive terminal clamp and
secure the cover.
X Connect the negative terminal clamp.
X Connect the breather hose. Make sure that
a cell cap is fitted on the side of the battery.
X Close the bonnet.
i If the battery power supply has been inter-
rupted (e.g. if it has been reconnected), you
must carry out the following tasks:
R set the time (Y page 102).
R reset the panorama sliding sun-
roof* (Y page 127)
R reset the function for folding the exterior
mirrors in/out automatically* by folding
the mirrors out once (Y page 68). Jump-starting
If your vehicle's battery is discharged, the
engine can be jump-started from another
vehicle or from an external battery using jump
leads.
Observe the following points:
R jump-starting may only be performed when
the engine and catalytic converter are cold.
R do not start the engine if the battery is fro-
zen. Let the battery thaw first.
R jump-starting may only be performed from
batteries with a nominal voltage of 12 V.
R only use jump leads which have a sufficient
cross-section and insulated terminal
clamps. 234 Jump-startingPractical advice
* optional
X204_AKB; 1; 5, en-GB
wobuchh,
Version: 2.11.4 2008-10-15T13:20:56+02:00 - Seite 234Dateiname: 6515_0671_02_buchblock.pdf; preflight