2008 MERCEDES-BENZ GLK SUV clock setting
[x] Cancel search: clock settingPage 125 of 261

Controlling the air conditioning auto-
matically
In automatic mode, the set temperature is
maintained automatically at a constant level.
The system automatically regulates the tem-
perature of the dispensed air, the airflow and
the air distribution.
The automatic air conditioning will achieve
optimal operation if "cooling with air dehu-
midification" is also activated. If necessary,
cooling with air dehumidification can be deac-
tivated.
X Turn the key to position 2in the ignition
lock.
X Set the desired temperature.
X To activate: press theÃbutton.
The indicator lamp in the Ãbutton lights
up. Automatic air distribution and airflow
are activated.
X To switch off: press theÃbutton.
The indicator lamp in the Ãbutton goes
out. Automatic air distribution and airflow
are deactivated. Setting the temperature
2-zone Thermatic Different temperatures can be set for the
driver's and front-passenger sides.
X Turn the key to position 2in the ignition
lock.
X To increase/reduce: turn thumb-
wheels :and Dclockwise or anti-clock-
wise ( Ypage 118). Only change the tem-
perature setting in small increments. Start
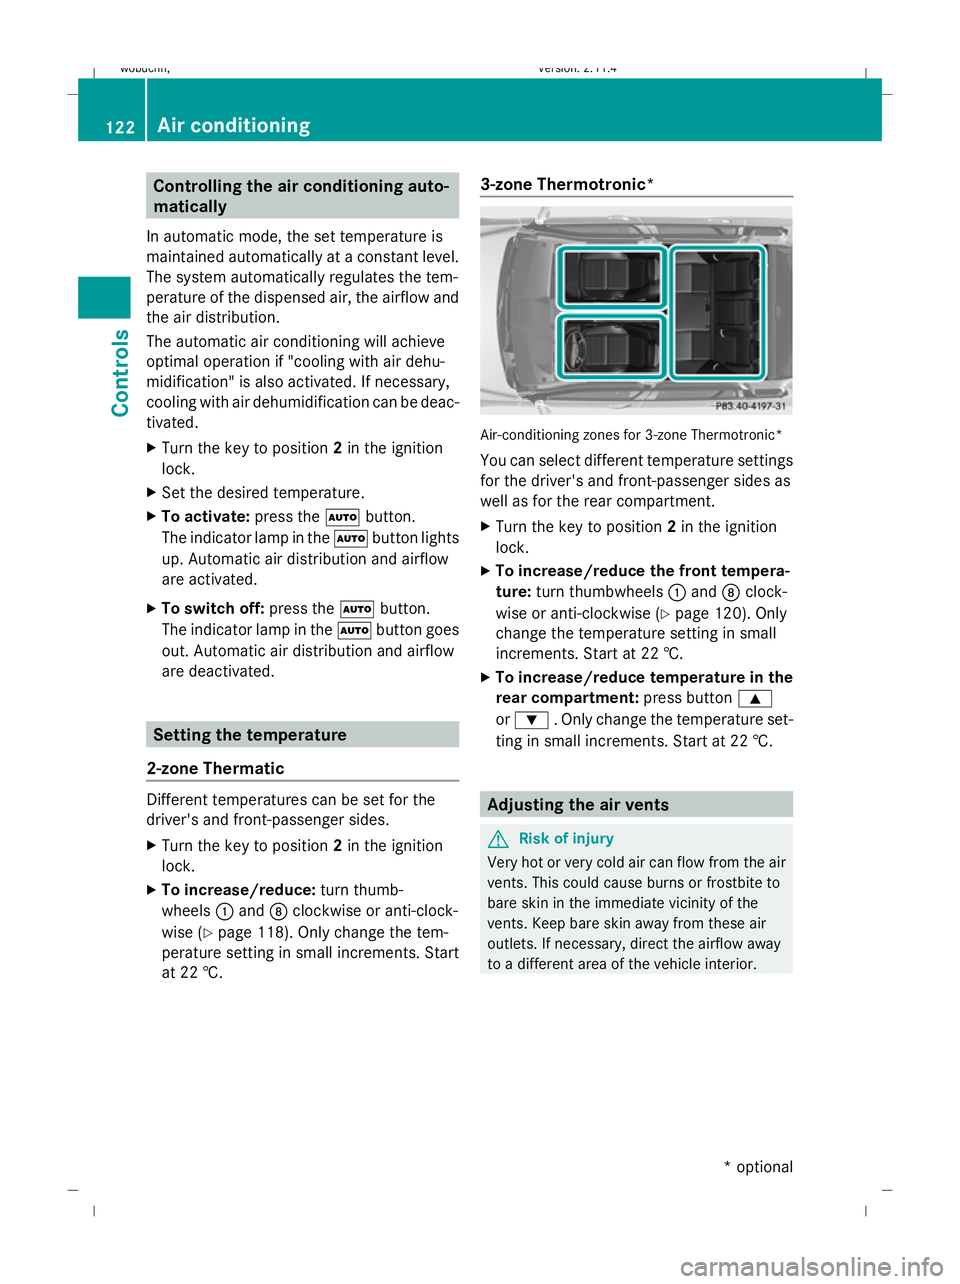
at 22 †. 3-zone Thermotronic* Air-conditioning zones for 3-zone Thermotronic*
You can select different temperature settings
for the driver's and front-passenger sides as
well as for the rear compartment.
X
Turn the key to position 2in the ignition
lock.
X To increase/reduce the front tempera-
ture: turn thumbwheels :and Dclock-
wise or anti-clockwise (Y page 120). Only
change the temperature setting in small
increments. Start at 22 †.
X To increase/reduce temperature in the
rear compartment: press button9
or : . Only change the temperature set-
ting in small increments. Start at 22 †. Adjusting the air vents
G
Risk of injury
Very hot or very cold air can flow from the air
vents. This could cause burns or frostbite to
bare skin in the immediate vicinity of the
vents. Keep bare skin away from these air
outlets. If necessary, direct the airflow away
to a different area of the vehicle interior. 122 Air conditioningControls
* optional
X204_AKB; 1; 5, en-GB
wobuchh,
Version: 2.11.4 2008-10-15T13:20:56+02:00 - Seite 122Dateiname: 6515_0671_02_buchblock.pdf; preflight
Page 126 of 261

In order to ensure the direct flow of fresh air
through the air vents into the vehicle interior,
please observe the following notes:
R
keep the air inlet between the windscreen
and the bonnet free of blockages, such as
ice, snow or leaves.
R never cover the vents or air inlet and outlet
grilles in the vehicle interior.
i For draught-free ventilation, adjust the
sliders of the air vents to the centre detent
position.
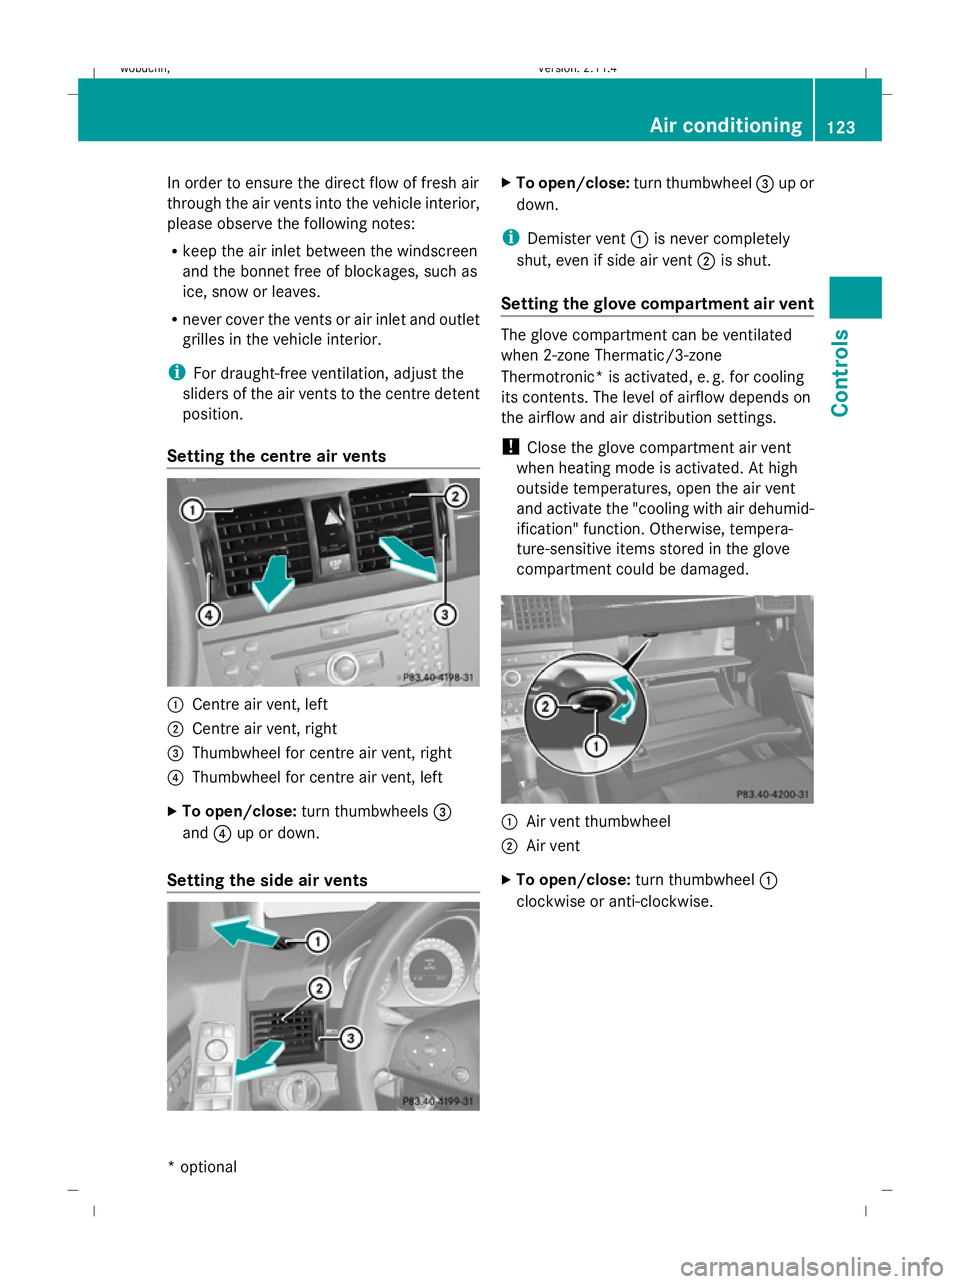
Setting the centre air vents :
Centre air vent, left
; Centre air vent, right
= Thumbwheel for centre air vent, right
? Thumbwheel for centre air vent, left
X To open/close: turn thumbwheels =
and ?up or down.
Setting the side air vents X
To open/close: turn thumbwheel =up or
down.
i Demister vent :is never completely
shut, even if side air vent ;is shut.
Setting the glove compartment air vent The glove compartment can be ventilated
when 2-zone Thermatic/3-zone
Thermotronic* is activated, e. g. for cooling
its contents. The level of airflow depends on
the airflow and air distribution settings.
!
Close the glove compartment air vent
when heating mode is activated. At high
outside temperatures, open the air vent
and activate the "cooling with air dehumid-
ification" function. Otherwise, tempera-
ture-sensitive items stored in the glove
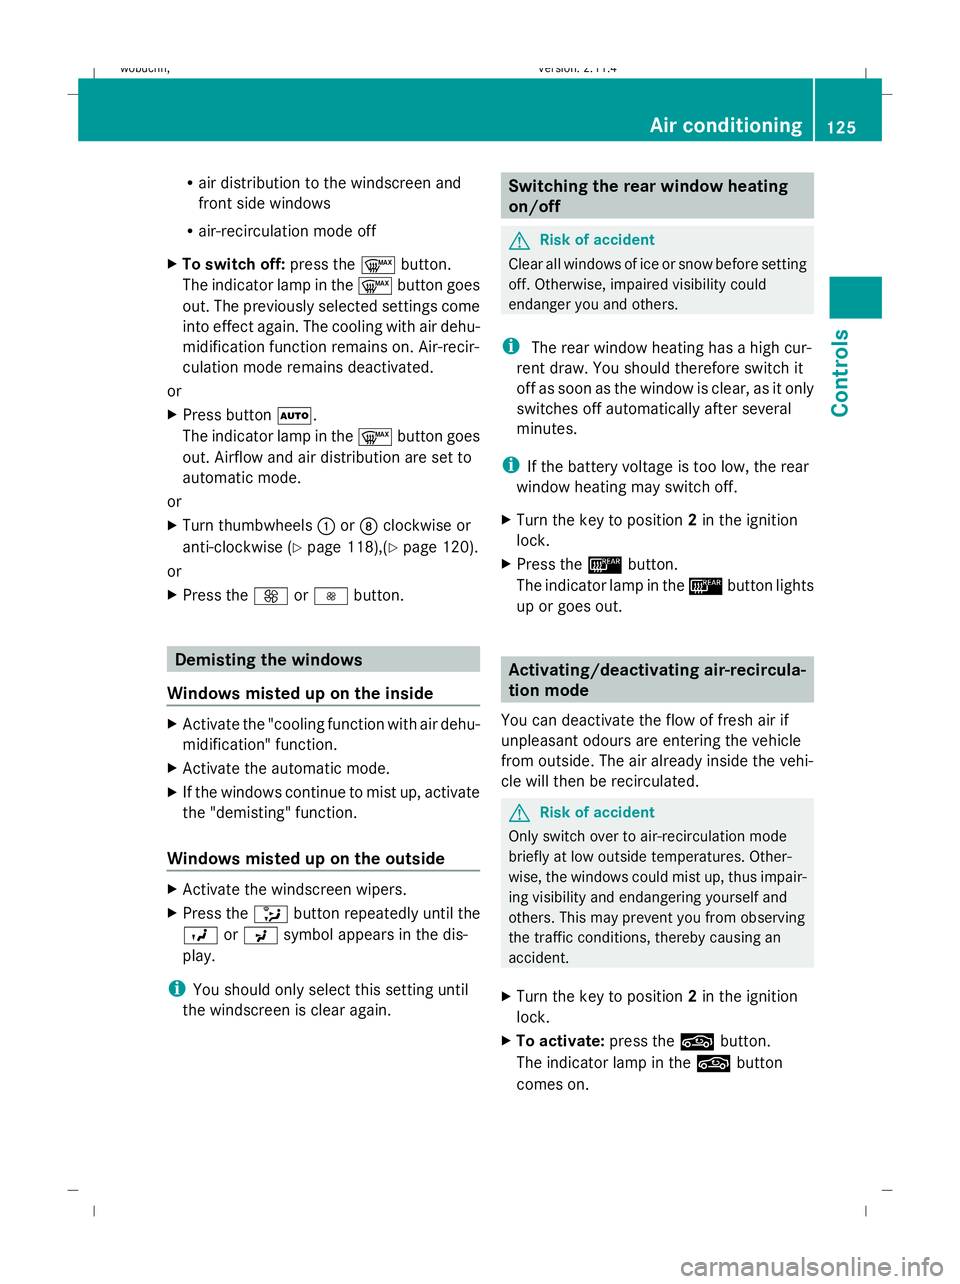
compartment could be damaged. :
Air vent thumbwheel
; Air vent
X To open/close: turn thumbwheel :
clockwise or anti-clockwise. Air conditioning
123Controls
* optional
X204_AKB; 1; 5, en-GB
wobuchh,
Version: 2.11.4 2008-10-15T13:20:56+02:00 - Seite 123 ZDateiname: 6515_0671_02_buchblock.pdf; preflight
Page 128 of 261

R
air distribution to the windscreen and
front side windows
R air-recirculation mode off
X To switch off: press the¬button.
The indicator lamp in the ¬button goes
out. The previously selected settings come
into effect again. The cooling with air dehu-
midification function remains on. Air-recir-
culation mode remains deactivated.
or
X Press button Ã.
The indicator lamp in the ¬button goes
out. Airflow and air distribution are set to
automatic mode.
or
X Turn thumbwheels :orD clockwise or
anti-clockwise (Y page 118),(Ypage 120).
or
X Press the KorI button. Demisting the windows
Windows misted up on the inside X
Activate the "cooling function with air dehu-
midification" function.
X Activate the automatic mode.
X If the windows continue to mist up, activate
the "demisting" function.
Windows misted up on the outside X
Activate the windscreen wipers.
X Press the _button repeatedly until the
O orP symbol appears in the dis-
play.
i You should only select this setting until
the windscreen is clear again. Switching the rear window heating
on/off
G
Risk of accident
Clear all windows of ice or snow before setting
off. Otherwise, impaired visibility could
endanger you and others.
i The rear window heating has a high cur-
rent draw. You should therefore switch it
off as soon as the window is clear, as it only
switches off automatically after several
minutes.
i If the battery voltage is too low, the rear
window heating may switch off.
X Turn the key to position 2in the ignition
lock.
X Press the ¯button.
The indicator lamp in the ¯button lights
up or goes out. Activating/deactivating air-recircula-
tion mode
You can deactivate the flow of fresh air if
unpleasant odours are entering the vehicle
from outside. The air already inside the vehi-
cle will then be recirculated. G
Risk of accident
Only switch over to air-recirculation mode
briefly at low outside temperatures. Other-
wise, the windows could mist up, thus impair-
ing visibility and endangering yourself and
others. This may prevent you from observing
the traffic conditions, thereby causing an
accident.
X Turn the key to position 2in the ignition
lock.
X To activate: press the,button.
The indicator lamp in the ,button
comes on. Air conditioning
125Controls
X204_AKB; 1; 5, en-GB
wobuchh, Version: 2.11.4 2008-10-15T13:20:56+02:00 - Seite 125 ZDateiname: 6515_0671_02_buchblock.pdf; preflight
Page 218 of 261

X
Insert emergency key element ;into
opening in trim :.
X Turn emergency key element ;90° clock-
wise.
X Push emergency key element ;in the
direction of arrow and open the tailgate. Emergency fuel filler flap release
G
Risk of injury
The edges on the inside of the vehicle body
can be sharp. You could injure yourself when
using the fuel filler flap emergency release.
Avoid contact with the edges on the inside of
the vehicle body.
The emergency release is located in the lug-
gage compartment behind the side trim on
the right-hand side, when viewed in the direc-
tion of travel.
X Open the tailgate.
X Open the right-hand side trim panel
(Y page 219). X
Pull emergency release :.
The fuel filler flap is unlocked.
X Open the fuel filler flap. Releasing the parking lock manually
In the event of an electrical fault, it is possible
to release the selector lever lock manually to
move it out of position P, e.g. if you wish to
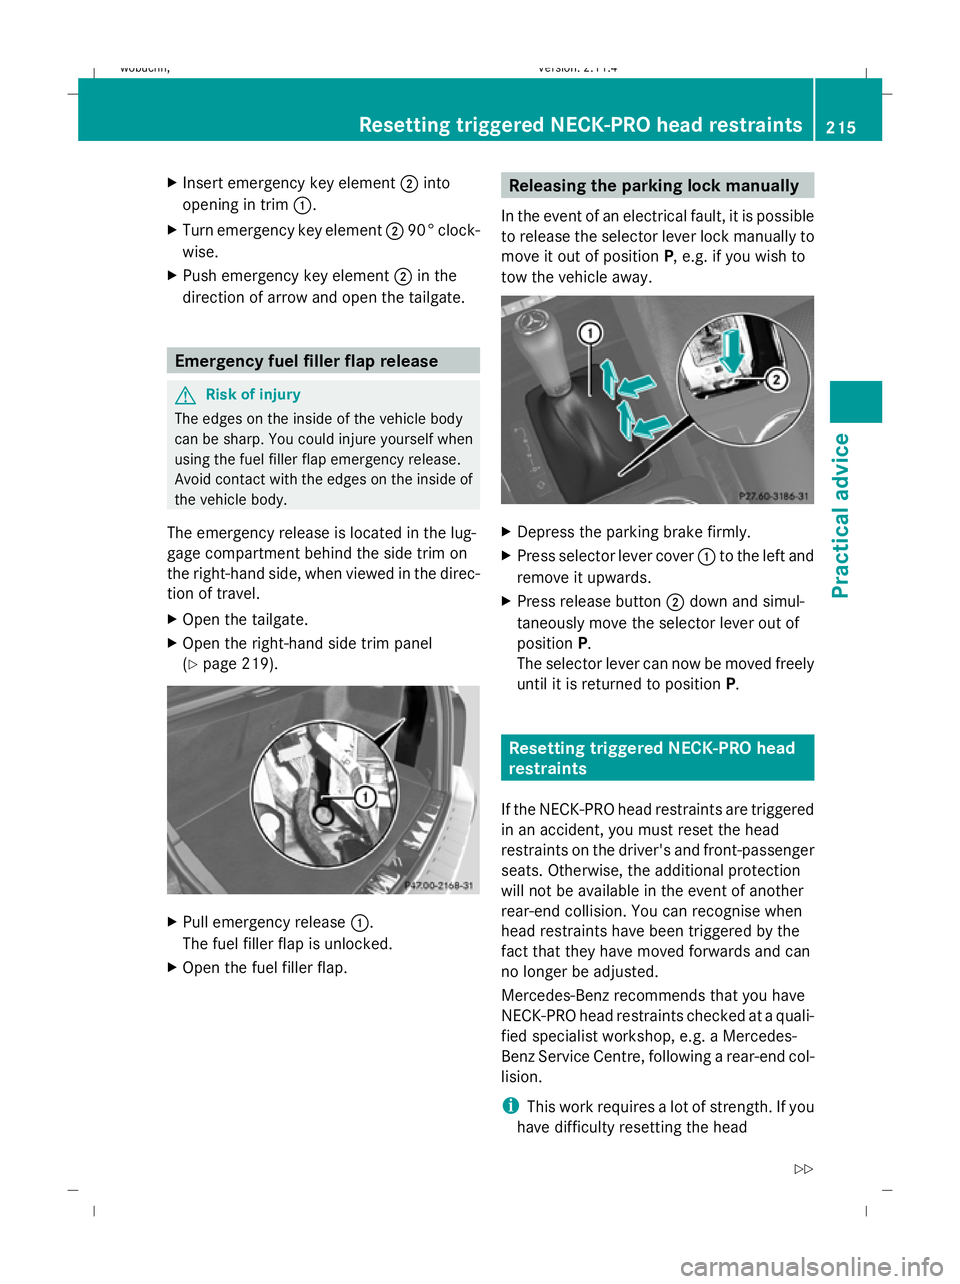
tow the vehicle away. X
Depress the parking brake firmly.
X Press selector lever cover :to the left and
remove it upwards.
X Press release button ;down and simul-
taneously move the selector lever out of
position P.
The selector lever can now be moved freely
until it is returned to position P. Resetting triggered NECK-PRO head
restraints
If the NECK-PRO head restraints are triggered
in an accident, you must reset the head
restraints on the driver's and front-passenger
seats. Otherwise, the additional protection
will not be available in the event of another
rear-end collision. You can recognise when
head restraints have been triggered by the
fact that they have moved forwards and can
no longer be adjusted.
Mercedes-Benz recommends that you have
NECK-PRO head restraints checked at a quali-
fied specialist workshop, e.g. a Mercedes-
Benz Service Centre, following a rear-end col-
lision.
i This work requires a lot of strength. If you
have difficulty resetting the head Resetting triggered NECK-PRO head restraints
215Practical advice
X204_AKB; 1; 5, en-GB
wobuchh,Version: 2.11.4 2008-10-15T13:20:56+02:00 - Seite 215 ZDateiname: 6515_0671_02_buchblock.pdf; preflight