2008 MERCEDES-BENZ GLK SUV check oil
[x] Cancel search: check oilPage 14 of 261
MP3
Operating (on-board computer,
luxury multi-function steering
wheel). .............................................. 99
Multi-function display
Luxury multi-function steering
wheel. ............................................... 94
Multi-function steering wheel. ..........91
Multi-function steering wheel............. 91
Overview. .......................................... 28
Multi-function steering wheel (12-
button)
see Luxury multi-function steering wheel N
Navigation On-board computer (luxury multi-
function steering wheel) ...................97
NECK-PRO head restraints ..................40
Resetting after being triggered. ......215
Notes on running in a new vehicle ...144 O
Odometer Total distance recorder. ..............92, 95
Trip meter. .................................. 92, 95
Off-road
4MATIC ........................................... 105
DSR. ............................................... 105
Off-road ABS. .................................... 51
Off-road drive program. ..................107
Off-road ABS ......................................... 51
Off-road drive program (vehicles
with off-road engineering package) .107
Off-road driving Checklist......................................... 159
Information. .................................... 158
Off-road ESP ®
........................................ 54
Off-road terrain Off-road ESP. .................................... 54
Oil
Consumption. ................................. 148
Topping up. ..................................... 148
On-board computer (luxury multi-
function steering wheel) ......................93
Audio menu ...................................... 98Convenience submenu.
..................104
Display messages ........................... 176
Factory settings submenu ..............104
Instrument cluster submenu ...........101
Lights submenu. ............................. 102
Navigation menu. .............................. 97
Overview. .......................................... 95
Service menu .................................. 101
Settings menu ................................ 101
Standard display submenu................ 95
Telephone menu. .............................. 99
Time/date submenu. ......................102
Trip computer menu. ........................95
Vehicle submenu. ........................... 104
On-board computer (multi-func-
tion steering wheel)............................. 91
Display messages ........................... 176
Overview. .......................................... 92
Range. .............................................. 93
Standard display. .............................. 92
Time/date. ....................................... 93
Trip computer. .................................. 92
On-board computer menu (luxury
multi-function steering wheel).......... 101
One-touch gearshifting........................ 86
Operating system see On-board computer (luxury
multi-function steering wheel)
see On-board computer (multi-
function steering wheel)
Outside temperature display .............90
Override feature Rear side windows ............................ 50 P
Paint code........................................... 244
Panorama sliding sunroof................. 127
Rain closing feature. .......................128
Resetting. ....................................... 129
Parking .................................................. 84
Parking aid Exterior mirror on the front-
passenger side.................................. 69
Parktronic. ...................................... 113
Reversing camera. ..........................115
Parking brake ....................................... 84
Display message ............................. 185 Index
11 X204_AKB; 1; 5, en-GB
wobuchh,
Version: 2.11.4
2008-10-15T13:20:56+02:00 - Seite 11 Dateiname: 6515_0671_02_buchblock.pdf; preflight
Page 150 of 261

Vehicles with a petrol engine:
The electronic ignition system uses high volt-
age. For this reason, you must never touch
components of the ignition system (ignition
coil, ignition cable, spark plug connector or
test socket) when:
R the engine is running.
R the engine is being started.
R the ignition is switched on and the engine
is being cranked by hand.
You could otherwise suffer an electric shock
and be seriously or even fatally injured.
Vehicles with a diesel engine:
The electronic injection control uses high volt-
age. Therefore, never touch fuel injection sys-
tem components when:
R the engine is running.
R the engine is being started.
R the ignition is switched on.
You could otherwise suffer an electric shock
and be seriously or even fatally injured.
X Make sure that the windscreen wipers are
switched off. G
Risk of injury
The windscreen wipers and wiper linkage
could be set in motion.
When the bonnet is open, you or others could
be injured by the wiper rods.
Make sure that the windscreen wipers are
switched off and that the key has been pulled
out of the ignition lock before opening the
bonnet. The bonnet release lever is located in the
driver's footwell. X
Pull bonnet release lever :.
The bonnet is released.
! Make sure that the windscreen wipers
are not folded away from the windscreen.
Otherwise, you could damage the wind-
screen wipers or the bonnet.
The handle for opening the bonnet is located
above the radiator grille. X
Reach into the gap, pull bonnet catch han-
dle ;up and lift the bonnet.
Closing G
Risk of injury
Make sure that nobody can become trapped
as you close the bonnet.
X Lower the bonnet and let it fall from a
height of approximately 20 cm.
X Check that the bonnet has engaged prop-
erly. Engine compartment
147Operation
X204_AKB; 1; 5, en-GB
wobuchh, Version: 2.11.4 2008-10-15T13:20:56+02:00 - Seite 147 ZDateiname: 6515_0671_02_buchblock.pdf; preflight
Page 151 of 261
i
If the bonnet can be raised slightly, it is
not properly engaged. Open it again and
close it with a little more force. Engine oil
Depending on driving style, the vehicle con-
sumes up to 0.8 l oil per 1,000 km. The oil
consumption may be higher than this when
the vehicle is new or if you frequently drive at
high engine speeds.
Further information on engine oil
(Y page 246).
Checking the engine oil level When doing so:
R
the vehicle should be parked on level
ground.
R the engine should be switched off for at
least five minutes if the engine is at normal
operating temperature.
R the engine should be switched off for at
least 30 minutes if the engine is not at
operating temperature (i.e. if you only start
the engine briefly). Example: vehicles with a petrol engine Example: vehicles with a diesel engine
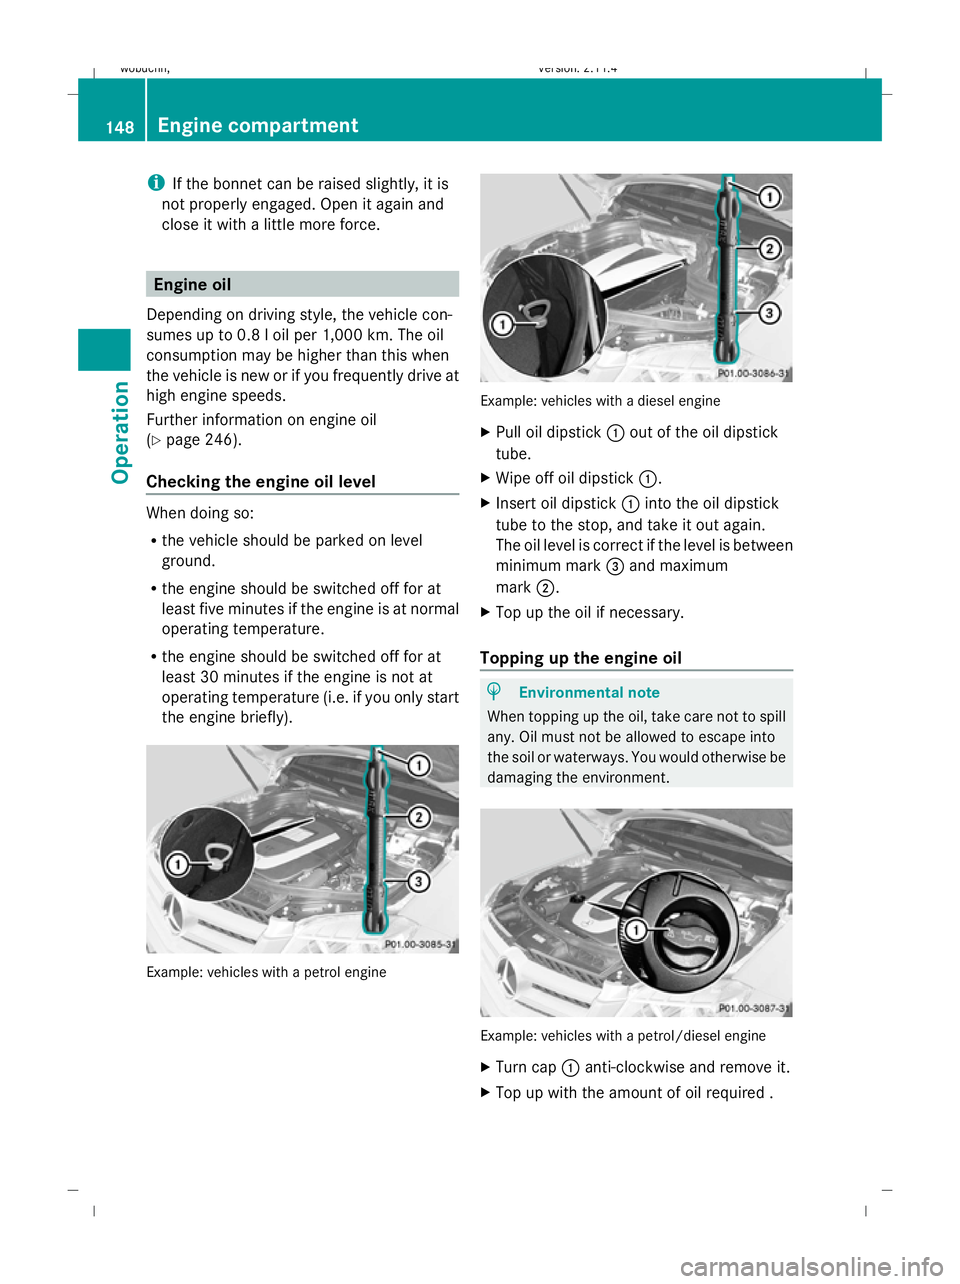
X Pull oil dipstick :out of the oil dipstick
tube.
X Wipe off oil dipstick :.
X Insert oil dipstick :into the oil dipstick
tube to the stop, and take it out again.
The oil level is correct if the level is between
minimum mark =and maximum
mark ;.
X Top up the oil if necessary.
Topping up the engine oil H
Environmental note
When topping up the oil, take care not to spill
any. Oil must not be allowed to escape into
the soil or waterways. You would otherwise be
damaging the environment. Example: vehicles with a petrol/diesel engine
X
Turn cap :anti-clockwise and remove it.
X Top up with the amount of oil required . 148 Engine compartmentOperation
X204_AKB; 1; 5, en-GB
wobuchh,
Version: 2.11.4 2008-10-15T13:20:56+02:00 - Seite 148Dateiname: 6515_0671_02_buchblock.pdf; preflight
Page 152 of 261
i
The difference in quantity between the
minimum mark and maximum mark is
approximately 2 litres.
! Do not add too much oil. If too much oil
is added and the oil level is above the max-
imum mark on the dipstick, the engine or
catalytic converter could be damaged.
Have excess oil siphoned off.
X Replace cap :on the filler neck and
tighten clockwise.
Ensure that the cap locks into place
securely.
For further information on engine oil, see
(Y page 246). Coolant
Only check the coolant level when the vehicle
is on a level surface and the engine has cooled
down.
X Turn the key to position 2(Y page 61) in
the ignition lock.
X Check the coolant temperature gauge in
the multi-function display. G
Risk of injury
The cooling system is pressurised. Therefore,
only unscrew the cap once the engine has
cooled down. The coolant temperature gauge
must display less than 70 †. Otherwise, you
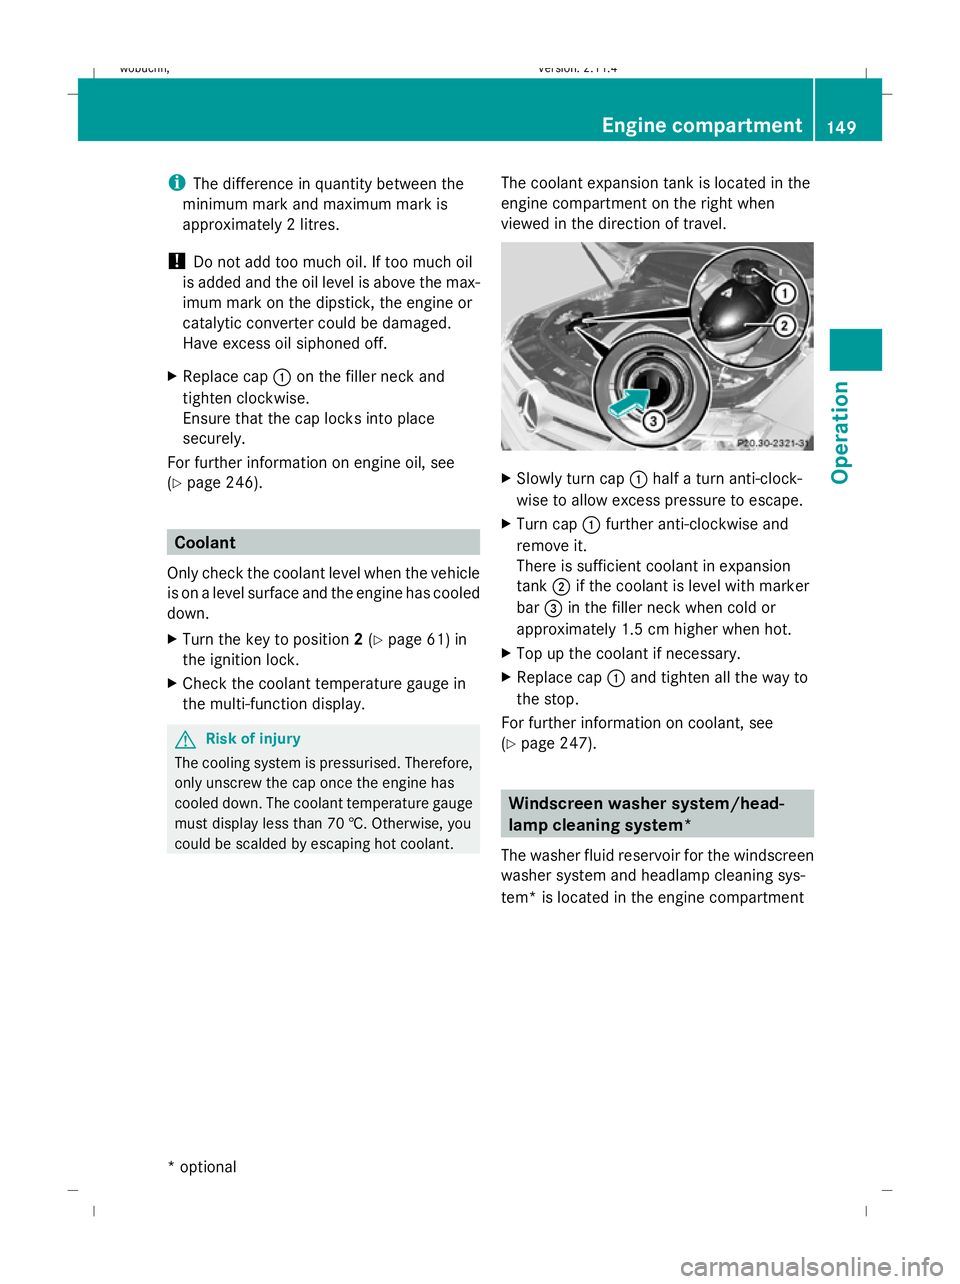
could be scalded by escaping hot coolant. The coolant expansion tank is located in the
engine compartment on the right when
viewed in the direction of travel. X
Slowly turn cap :half a turn anti-clock-
wise to allow excess pressure to escape.
X Turn cap :further anti-clockwise and
remove it.
There is sufficient coolant in expansion
tank ;if the coolant is level with marker
bar =in the filler neck when cold or
approximately 1.5 cm higher when hot.
X Top up the coolant if necessary.
X Replace cap :and tighten all the way to
the stop.
For further information on coolant, see
(Y page 247). Windscreen washer system/head-
lamp cleaning system*
The washer fluid reservoir for the windscreen
washer system and headlamp cleaning sys-
tem* is located in the engine compartment Engine compartment
149Operation
* optional
X204_AKB; 1; 5, en-GB
wobuchh,
Version: 2.11.4
2008-10-15T13:20:56+02:00 - Seite 149 ZDateiname: 6515_0671_02_buchblock.pdf; preflight
Page 154 of 261

legal stipulations and factory recommenda-
tions at a Mercedes-Benz Service Centre.
Modification work on the brake system and
wheels is not permitted, nor is the use of
spacer plates or brake dust shields. This inva-
lidates the General Operating Permit for the
vehicle.
Notes on selecting, fitting and replacing
tyres R
Only fit tyres and wheels of the same type
and make.
R Only fit tyres of the correct size onto the
wheels.
R After fitting new tyres, run them in at mod-
erate speeds for the first 100 km as they
only reach their full performance after this
distance.
R Fit new tyres on the front wheels first if
tyres of the same size are required on the
front and rear wheels.
R Replace the tyres after six years at the lat-
est, regardless of wear. This also applies to
the spare wheel*.
R Do not drive with tyres which have too little
tread depth, as this significantly reduces
the traction on wet roads (aquaplaning).
! Store tyres that are not being used in a
cool, dry and preferably dark place. Protect
the tyres against oil, grease, petrol and die-
sel.
Notes on regularly inspecting wheels
and tyres R
Regularly check the wheels and tyres of
your vehicle for damage (e.g. cuts, punctu-
res, tears, bulges on tyres and deformation,
cracks or severe corrosion on wheels), at
least every 14 days, as well as after driving
off-road or on rough roads. Damaged
wheels could cause a loss of tyre pressure.
R Regularly check the tyre tread depth and
the condition of the tread across the whole width of the tyre (Y
page 152). If neces-
sary, turn the front wheels to full lock in
order to inspect the inner side of the tyre
surface.
R All wheels must have a valve cap to protect
the valve against dirt and moisture. Do not
fit anything onto the valve (such as tyre
pressure monitoring systems) other than
the standard valve cap or other valve caps
approved by Mercedes-Benz for your vehi-
cle.
R You should regularly check the pressure of
all the tyres, particularly prior to long trips,
and correct the pressure as necessary
(Y page 152).
Notes on driving R
While driving, pay attention to vibrations,
noises and unusual handling characteris-
tics, e.g. pulling to one side. This may indi-
cate that the wheels or tyres are damaged.
If you suspect that a tyre is defective,
reduce your speed and stop the vehicle as
soon as possible to check the wheels and
tyres for damage. Hidden tyre damage
could also be causing the unusual handling
characteristics. If you find no signs of dam-
age, have the wheels and tyres examined
at a specialist workshop, for example at a
Mercedes-Benz Service Centre.
R When parking your vehicle, make sure that
the tyres do not get deformed by the kerb
or other obstacles. If it is necessary to drive
over kerbs, speed humps or similar eleva-
tions, try to do so slowly and at an obtuse
angle. Otherwise, the tyres, particularly the
sidewalls, could get damaged. Tyres and wheels
151Operation
* optional
X204_AKB; 1; 5, en-GB
wobuchh,
Version: 2.11.4 2008-10-15T13:20:56+02:00 - Seite 151 ZDateiname: 6515_0671_02_buchblock.pdf; preflight
Page 162 of 261
R
Drive slowly and evenly, if necessary at a
walking pace.
R Ensure that the wheels are in contact with
the ground at all times.
R Drive with extreme care on unknown off-
road routes where visibility is poor. For
safety reasons, get out of the vehicle first
and survey the off-road route.
R Check the depth of water before fording
rivers and streams.
R Look out for obstacles such as rocks, holes,
tree stumps and furrows.
R Always keep the side windows and the pan-
orama sliding sunroof* closed during the
journey.
R Do not stray from marked routes or paths.
i Information about retrofitting special all-
terrain tyres is available from any
Mercedes-Benz Service Centre.
Checklist before driving off-road X
Engine oil level: check the engine oil and
top it up if necessary.
X Vehicle toolkit: check that the jack is
working and make sure you have the wheel-
brace, a robust tow cable and a folding
spade in the vehicle.
X Wheels and tyres: check the tyre tread
depth and tyre pressure.
X Check for damage and remove foreign
objects, e.g. small stones, from the
wheels/tyres.
X Replace any missing valve caps.
X Replace dented or damaged wheels.
Checklist after driving off-road Driving over rough terrain places greater
demands on your vehicle than driving on nor-
mal roads. After driving off-road, check the
vehicle. This allows you to detect damage
promptly and reduce the risk of an accident
to yourself and other road users. X
Deactivate DSR ( Ypage 105).
X Clean the headlamps and rear lights and
check for damage.
X Clean the front and rear licence plates.
X Clean the wheels/tyres with a water jet and
remove any foreign objects.
X Clean the wheels, wheel arches and the
vehicle underside with a water jet; check
for foreign objects and damage.
X Check whether twigs or other parts of
plants have become trapped. These
increase the risk of fire and can damage
fuel pipes, brake hoses or the rubber bel-
lows of the axle joints and propeller shafts.
X After the trip, examine without fail the
entire undercarriage, wheels, tyres, brakes,
bodywork structure, steering, chassis and
exhaust system for damage.
X After driving for extended periods across
sand, mud, gravel, water or in similarly dirty
conditions, have the brake discs, wheels,
brake pads /linings and axle joints checked
and cleaned.
X If you detect strong vibrations after off-road
travel, check for foreign objects in the
wheels and drive train and remove them if
necessary. Foreign objects can disturb the
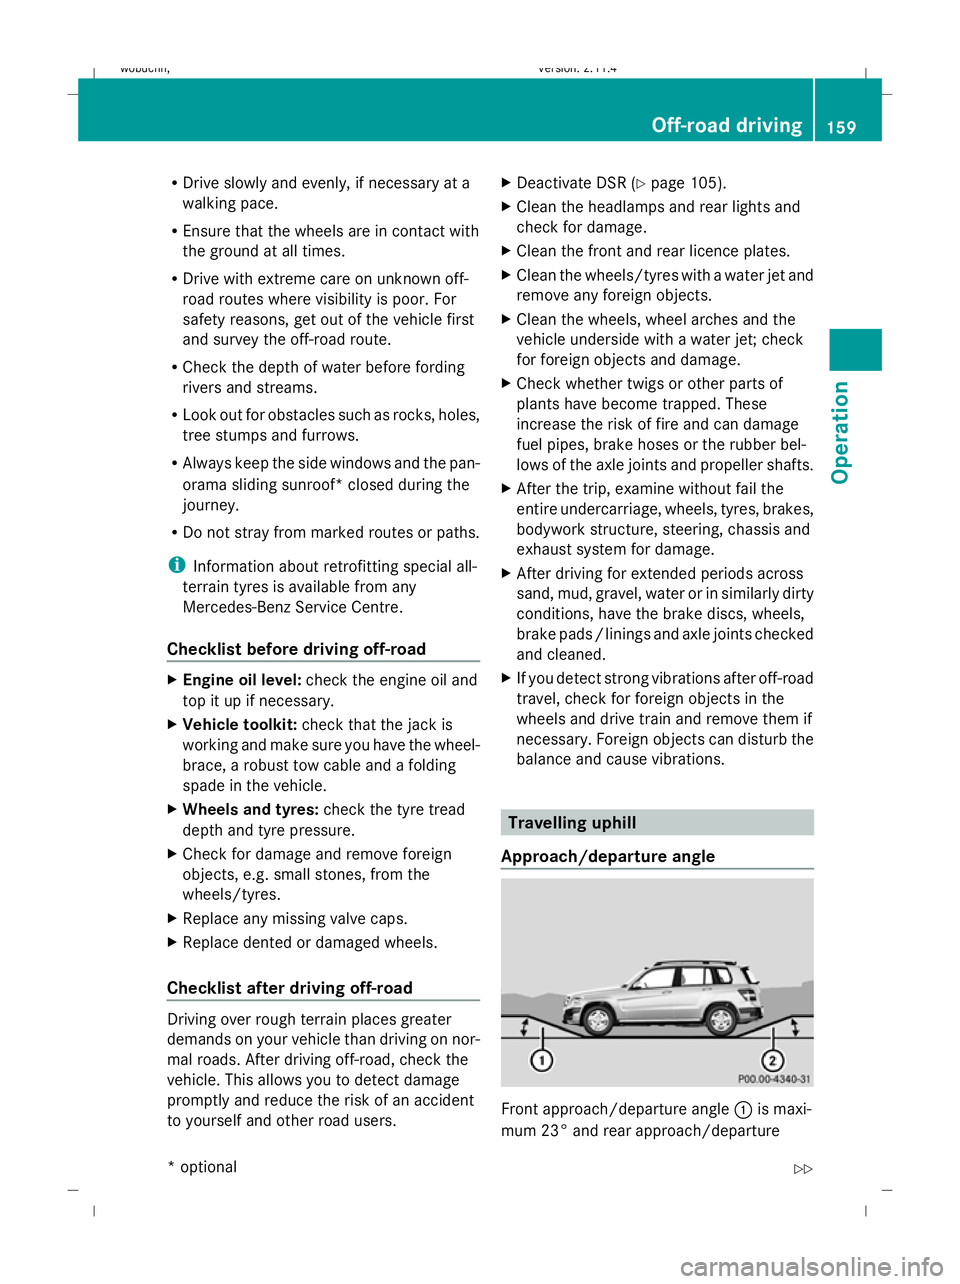
balance and cause vibrations. Travelling uphill
Approach/departure angle Front approach/departure angle
:is maxi-
mum 23° and rear approach/departure Off-road driving
159Operation
* optional
X204_AKB; 1; 5, en-GB
wobuchh,
Version: 2.11.4 2008-10-15T13:20:56+02:00 - Seite 159 ZDateiname: 6515_0671_02_buchblock.pdf; preflight
Page 175 of 261
between the nozzle of the high-pressure
cleaner and the vehicle.
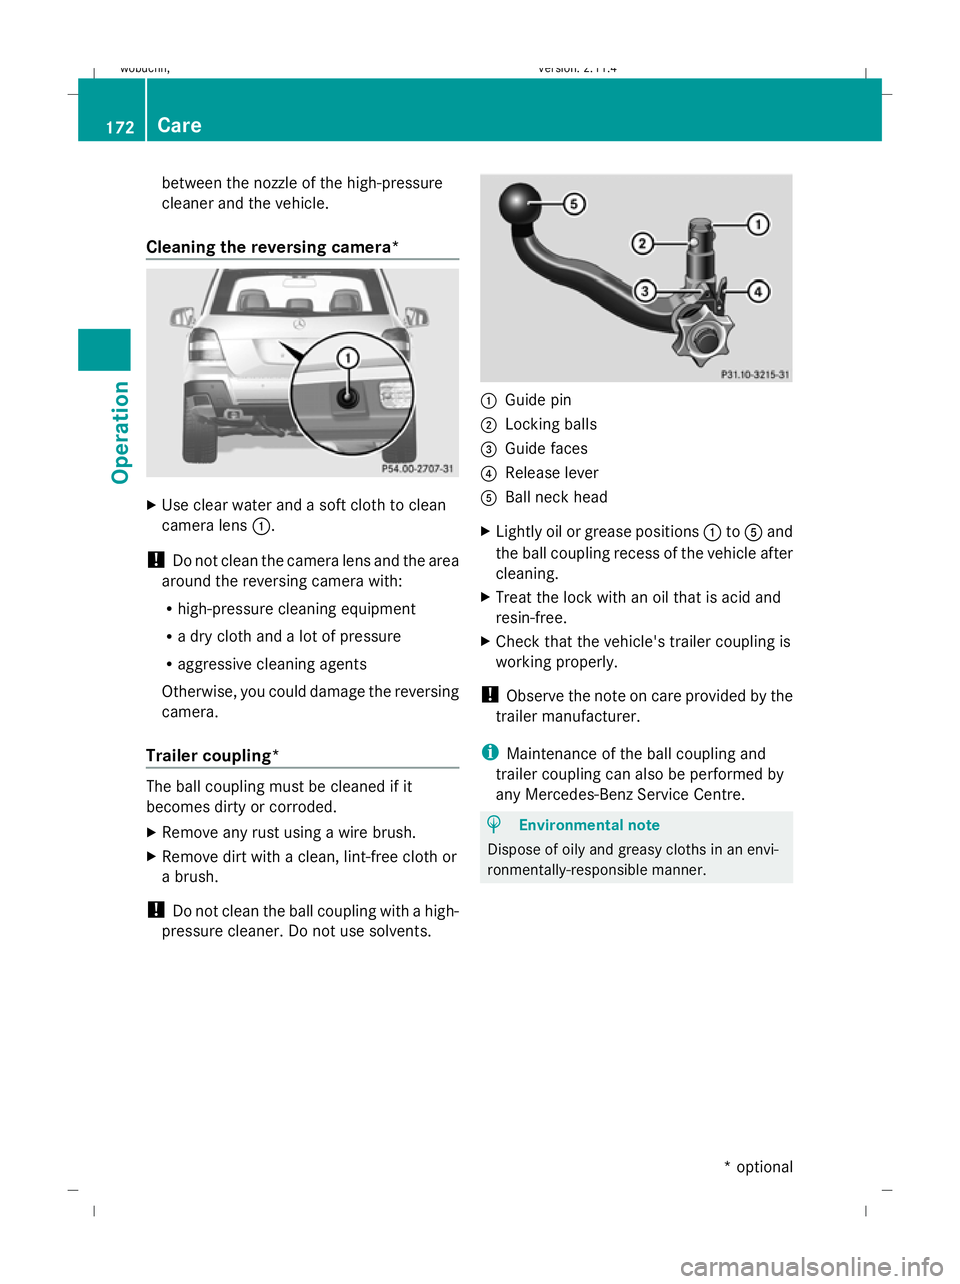
Cleaning the reversing camera* X
Use clear water and a soft cloth to clean
camera lens :.
! Do not clean the camera lens and the area
around the reversing camera with:
R high-pressure cleaning equipment
R a dry cloth and a lot of pressure
R aggressive cleaning agents
Otherwise, you could damage the reversing
camera.
Trailer coupling* The ball coupling must be cleaned if it
becomes dirty or corroded.
X Remove any rust using a wire brush.
X Remove dirt with a clean, lint-free cloth or
a brush.
! Do not clean the ball coupling with a high-
pressure cleaner. Do not use solvents. :
Guide pin
; Locking balls
= Guide faces
? Release lever
A Ball neck head
X Lightly oil or grease positions :toA and
the ball coupling recess of the vehicle after
cleaning.
X Treat the lock with an oil that is acid and
resin-free.
X Check that the vehicle's trailer coupling is
working properly.
! Observe the note on care provided by the
trailer manufacturer.
i Maintenance of the ball coupling and
trailer coupling can also be performed by
any Mercedes-Benz Service Centre. H
Environmental note
Dispose of oily and greasy cloths in an envi-
ronmentally-responsible manner. 172 CareOperation
* optional
X204_AKB; 1; 5, en-GB
wobuchh,
Version: 2.11.4 2008-10-15T13:20:56+02:00 - Seite 172Dateiname: 6515_0671_02_buchblock.pdf; preflight
Page 198 of 261
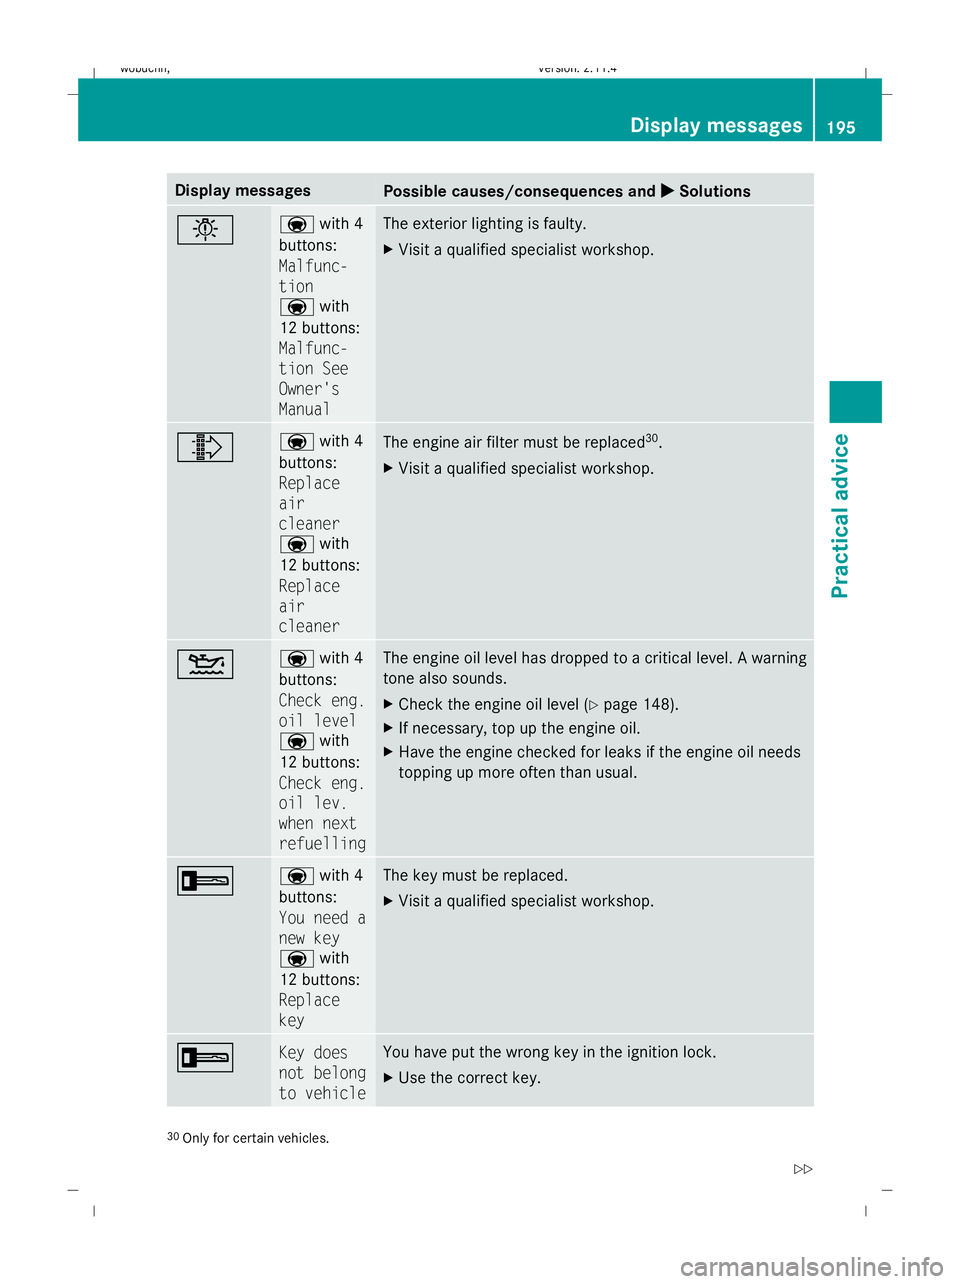
Display messages
Possible causes/consequences and
X
X Solutions b a
with 4
buttons:
Malfunc-
tion
a with
12 buttons:
Malfunc-
tion See
Owner's
Manual The exterior lighting is faulty.
X
Visit a qualified specialist workshop. ¸ a
with 4
buttons:
Replace
air
cleaner
a with
12 buttons:
Replace
air
cleaner The engine air filter must be replaced
30
.
X Visit a qualified specialist workshop. 4 a
with 4
buttons:
Check eng.
oil level
a with
12 buttons:
Check eng.
oil lev.
when next
refuelling The engine oil level has dropped to a critical level. A warning
tone also sounds.
X
Check the engine oil level ( Ypage 148).
X If necessary, top up the engine oil.
X Have the engine checked for leaks if the engine oil needs
topping up more often than usual. + a
with 4
buttons:
You need a
new key
a with
12 buttons:
Replace
key The key must be replaced.
X
Visit a qualified specialist workshop. + Key does
not belong
to vehicle You have put the wrong key in the ignition lock.
X
Use the correct key. 30
Only for certain vehicles. Display
messages
195Practical advice
X204_AKB; 1; 5, en-GB
wobuchh,V ersion: 2.11.4
2008-10-15T13:20:56+02:00 - Seite 195 ZDateiname: 6515_0671_02_buchblock.pdf; preflight